


Displaying a radar to indicate the relative locations of objects
A radar displays the locations of other objects relative to the player, usually based on a circular display, where the center represents the player and each graphical blip indicates how far away and what relative direction objects are to the player. Sophisticated radar displays will display different categories of objects with different colored or shaped blip icons:

Figure 2.42: Example of a radar
In the preceding screenshot, we can see two red square blips, indicating the relative position of the two red cube GameObjects tagged Cube near the player, and a yellow circle blip indicating the relative position of the yellow sphere GameObject tagged Sphere. The green circle radar background image gives the impression of an aircraft control tower radar or something similar.
Getting ready
For this recipe, we have prepared the radar images and terrain textures that you need in folders named Images and Textures in 02_14.
How to do it...
To create a radar to show the relative positions of the objects, follow these steps:
- Create a new Unity 3D project.
- Import the provided
ImagesandTexturesfolders into the project. - Create a terrain by choosing Create | 3D Object | Terrain.
- Change the size of Terrain to
20 x 20by setting the Terrain Width and Terrain Length properties for the Terrain component in the Inspector. Also, set its position to(-10, 0, -10)so that its center is at (0, 0, 0):
Figure 2.43: Terrain settings for this recipe
Note. We change the size of a Terrain through its Terrain Width and Terrain Length properties in its Terrain component. The Scale property of a Terrain’s Transform component does not affect its size.
- Let’s give this whole terrain a sandy look. Select the Paint Terrain tool (second from left – mountains and paintbrush icon) for the Terrain component in the Inspector. Then choose the Paint Texture option in the drop-down menu. Create a new Terrain Layer by clicking the Edit Terrain Layers… button. Finally, you must select the
SandAlbedotexture from the importedTexturesfolder – find this easily by typingsandin the search bar. You should now see a new Terrain Layer named NewLayer, and the whole terrain should have been textured with theSandAlbedotexture.
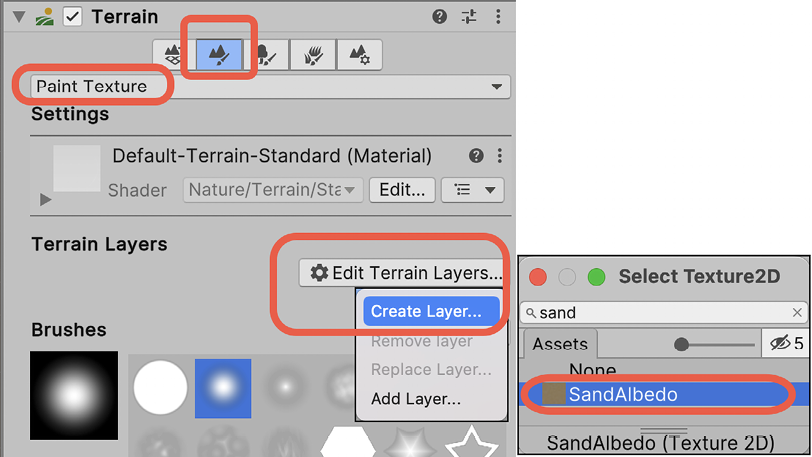
Figure 2.44: Settings for painting the terrain
- Create a 3D Cube GameObject at Position
(2, 0.5, 2). Create a Cube tag and tag this GameObject with this new tag. Texture this GameObject with the red image called icon32_square_red by dragging the icon32_square_red image from the Project window over this GameObject in the Hierarchy window. - Duplicate the
cubeGameObject and move it to Position(6, 0.5, 2). - Create a 3D Sphere GameObject at Position
(0, 0.5, 4). Create a tag called Sphere and tag this GameObject with this new tag. Texture this GameObject with the yellow image called icon32_square_yellow. - In the Hierarchy window, add a UI RawImage GameObject to the scene named RawImage-radar.
- Ensure that the
RawImage-radarGameObject is selected in the Hierarchy window. From theImagesfolder in the Project window, drag theradarBackgroundimage into the Raw Image (Script) public property’s Texture. - In Rect Transform, position
RawImage-radarat the top left using the Anchor Presets item. Then, set both Width and Height to200pixels. - Create a new Tag named
Blip. - Create a new UI RawImage named
blip-cube. Assign it theredSquareBlackBordertexture image file from the Project window. Tag this GameObject asBlip. - Create a new UI RawImage named blip-sphere. Assign it the
yellowCircleBlackBordertexture image file from the Project window. Tag this GameObject asBlip. - In the Project window, create a folder named
Prefabs. - Drag the blip-sphere and blip-cube GameObjects into the Project folder
Prefabs. You should now see two new prefab asset files in this folder with the same names as the GameObjects. - Delete the blip-sphere and blip-cube GameObjects from the Hierarchy. We don’t need these in the scene initially, and the prefabs have stored all the properties of these GameObjects, to be instantiated at runtime by our scripts.
- Create a C# script class called
Radarcontaining the following code and add an instance as a scripted component to theRawImage-radarGameObject:using UnityEngine; using UnityEngine.UI; public class Radar : MonoBehaviour { public float insideRadarDistance = 20; public float blipSizePercentage = 5; public GameObject rawImageBlipCube; public GameObject rawImageBlipSphere; private RawImage rawImageRadarBackground; private Transform playerTransform; private float radarWidth; private float radarHeight; private float blipHeight; private float blipWidth; void Start() { rawImageRadarBackground = GetComponent<RawImage>(); playerTransform = GameObject.FindGameObjectWithTag("Player").transform; radarWidth = rawImageRadarBackground.rectTransform.rect.width; radarHeight = rawImageRadarBackground.rectTransform.rect.height; blipHeight = radarHeight * blipSizePercentage / 100; blipWidth = radarWidth * blipSizePercentage / 100; } void Update() { RemoveAllBlips(); FindAndDisplayBlipsForTag("Cube", rawImageBlipCube); FindAndDisplayBlipsForTag("Sphere", rawImageBlipSphere); } private void FindAndDisplayBlipsForTag(string tag, GameObject prefabBlip) { Vector3 playerPos = playerTransform.position; GameObject[] targets = GameObject.FindGameObjectsWithTag(tag); foreach (GameObject target in targets) { Vector3 targetPos = target.transform.position; float distanceToTarget = Vector3.Distance(targetPos, playerPos); if ((distanceToTarget <= insideRadarDistance)) CalculateBlipPositionAndDrawBlip (playerPos, targetPos, prefabBlip); } } private void CalculateBlipPositionAndDrawBlip (Vector3 playerPos, Vector3 targetPos, GameObject prefabBlip) { Vector3 normalisedTargetPosition = NormalizedPosition(playerPos, targetPos); Vector2 blipPosition = CalculateBlipPosition(normalisedTargetPosition); DrawBlip(blipPosition, prefabBlip); } private void RemoveAllBlips() { GameObject[] blips = GameObject.FindGameObjectsWithTag("Blip"); foreach (GameObject blip in blips) Destroy(blip); } private Vector3 NormalizedPosition(Vector3 playerPos, Vector3 targetPos) { float normalisedyTargetX = (targetPos.x - playerPos.x) / insideRadarDistance; float normalisedyTargetZ = (targetPos.z - playerPos.z) / insideRadarDistance; return new Vector3(normalisedyTargetX, 0, normalisedyTargetZ); } private Vector2 CalculateBlipPosition(Vector3 targetPos) { float angleToTarget = Mathf.Atan2(targetPos.x, targetPos.z) * Mathf.Rad2Deg; float anglePlayer = playerTransform.eulerAngles.y; float angleRadarDegrees = angleToTarget - anglePlayer - 90; float normalizedDistanceToTarget = targetPos.magnitude; float angleRadians = angleRadarDegrees * Mathf.Deg2Rad; float blipX = normalizedDistanceToTarget * Mathf.Cos(angleRadians); float blipY = normalizedDistanceToTarget * Mathf.Sin(angleRadians); blipX *= radarWidth / 2; blipY *= radarHeight / 2; blipX += radarWidth / 2; blipY += radarHeight / 2; return new Vector2(blipX, blipY); } private void DrawBlip(Vector2 pos, GameObject blipPrefab) { GameObject blipGO = (GameObject)Instantiate(blipPrefab); blipGO.transform.SetParent(transform.parent); RectTransform rt = blipGO.GetComponent<RectTransform>(); rt.SetInsetAndSizeFromParentEdge(RectTransform.Edge.Left, pos.x, blipWidth); rt.SetInsetAndSizeFromParentEdge(RectTransform.Edge.Top, pos.y, blipHeight); } } - Ensure that the
RawImage-radarGameObject is selected in the Hierarchy. We now need to populate public variables Raw Image Blip Cube and Raw Image Blip Sphere the for theRadarscripted component in the Inspector. - Drag the blip-sphere from the
Prefabfolder in the Project panel into the Raw Image Blip Cube public variable in the Inspector. Then drag the blip-sphere Prefab asset file from thePrefabfolder into the Raw Image Blip Sphere public variable. By doing this, you are setting these public script variables to reference these prefabs, allowing theRadarscripted component to control the display of GameObjects created from these Prefabs at runtime.
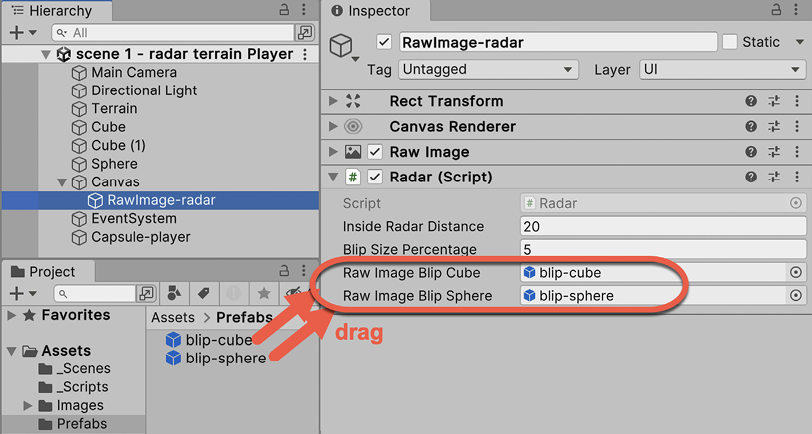
Figure 2.45: Calculation for the blip method
- In the Inspector, set the Main Camera Transform properties to have Position
(0, 5, -10), and Rotation(10, 0, 0). This will allow you to see the cubes and sphere GameObjects easily when playing the game. - Save and Run your game. We just see an empty radar image at the top left of the screen! The
Radarscript will draw blips on the radar relative to the position of the GameObject taggedPlayer. - Stop the game and create a new 3D capsule named
Capsule-player, positioned at(0, 1, 0), and tag thisPlayer. - Save and Run your game. Now we can see a yellow circle blip, and two red square blips on the radar, showing the relative position of the yellow sphere and two red cubes to the capsule tagged
Player!
How it works...
A radar background is displayed on the screen. The center of this circular image represents the position of the player’s character. In this recipe, you created two prefabs – one for red square images to represent each red cube found within the radar distance, and one for yellow circles to represent yellow sphere GameObjects.
The Radar C# script class has been added to the radar UI Image GameObject. This class defines four public variables:
insideRadarDistance: This value defines the maximum distance in the scene that an object may be from the player so that it can still be included on the radar (objects further than this distance will not be displayed on the radar).blipSizePercentage: This public variable allows the developer to decide how large each blip will be, as a proportion of the radar’s image.rawImageBlipCubeandrawImageBlipSphere: These are references to the prefab UI RawImages that are to be used to visually indicate the relative distance and position of cubes and spheres on the radar.
Since there is a lot happening in the code for this recipe, each method will be described in its own section.
The Start() method
The Start() method caches a reference to the RawImage of the radar background image. Then, it caches a reference to the Transform component of the player’s character (tagged as Player). This allows the scripted object to know about the position of the player’s character in each frame. Next, the width and height of the radar image are cached, so that the relative positions for blips can be calculated based on the size of this background radar image. Finally, the size of each blip (blipWidth and blipHeight) is calculated using the blipSizePercentage public variable.
The Update() method
The Update() method calls the RemoveAllBlips() method, which removes any old UI RawImage GameObjects of cubes and spheres that might currently be displayed. If we didn’t remove old blips before creating new ones, then you’d see “tails” behind each blip as new ones are created in different positions – which could actually be an interesting effect.
Next, the FindAndDisplayBlipsForTag(...) method is called twice. First, for the objects tagged Cube to be represented on the radar with the rawImageBlipCube prefab, and then again for objects tagged Sphere to be represented on the radar with the rawImageBlipSphere prefab. As you might expect, most of the hard work of the radar is to be performed by the FindAndDisplayBlipsForTag(...) method.
This code is a simple approach to creating a radar. It is very inefficient to make repeated calls to FindGameObjectWithTag("Blip") for every frame from the Update() method. In a real game, it would be much better to cache all created blips in something such as a List or ArrayList, and then simply loop through that list each time.
The FindAndDisplayBlipsForTag(...) method
This method inputs two parameters: the string tag for the objects to be searched for, and a reference to the RawImage prefab to be displayed on the radar for any such tagged objects within the range.
First, the current position of the player’s character is retrieved from the cached player Transform variable. Next, an array is constructed, referring to all GameObjects in the scene that have the provided tag. This array of GameObjects is looped through, and for each GameObject, the following actions are performed:
- The position of the target
GameObjectis retrieved. - The distance from this target’s position to the player’s position is calculated.
- If this distance is within the range (less than or equal to
insideRadarDistance), then theCalculateBlipPositionAndDrawBlip(...)method is called.
The CalculateBlipPositionAndDrawBlip (...) method
This method inputs three parameters: the position of the player, the position of the target, and a reference to the prefab of the blip to be drawn.
Three steps are now required to get the blip for this object to appear on the radar:
- The normalized position of the target is calculated by calling
NormalizedPosition(...). - The position of the blip on the radar is calculated from this normalized position by calling
CalculateBlipPosition(...). - The RawImage blip is displayed by calling
DrawBlip(...)and passing the blip’s position and the reference to the RawImage prefab that is to be created there.
The NormalizedPosition(...) method
The NormalizedPosition(...) method inputs the player’s character position and the target GameObject's position. It has the goal of outputting the relative position of the target to the player, returning a Vector3 object (actually, a C# struct – but we can think of it as a simple object) with a triplet of X, Y, and Z values. Note that since the radar is only 2D, we ignore the Y-value of the target GameObjects, so the Y-value of the Vector3 object that’s returned by this method will always be 0. So, for example, if a target was at exactly the same location as the player, the X, Y, and Z of the returned Vector3 object would be (0, 0, 0).
Since we know that the target GameObject is no further from the player’s character than insideRadarDistance, we can calculate a value in the -1 ... 0 ... +1 range for the X and Z axes by finding the distance on each axis from the target to the player and then dividing it by insideRadarDistance. An X-value of -1 means that the target is fully to the left of the player (at a distance that is equal to insideRadarDistance), while +1 means it is fully to the right. A value of 0 means that the target has the same X position as the player’s character. Likewise, for -1 ... 0 ... +1 values in the Z-axis (this axis represents how far, in front or behind us, an object is located, which will be mapped to the vertical axis in our radar).
Finally, this method constructs and returns a new Vector3 object with the calculated X and Z normalized values and a Y-value of zero.
The normalized position
The normalized value is one that has been simplified in some way so that its context has been abstracted away. In this recipe, what we are interested in is where an object is relative to the player. So, our normal form is to get a value of the X and Z position of a target in the -1 to +1 range for each axis. Since we are only considering the GameObjects within our insideRadarDistance value, we can map these normalized target positions directly onto the location of the radar image in our UI.
The CalculateBlipPosition(...) method
First, we calculate angleToTarget, which is the angle from (0, 0, 0) to our normalized target position.
Next, we calculate anglePlayer, which is the angle the player’s character is facing. This recipe makes use of the yaw angle of the rotation, which is the rotation about the Y-axis – that is, the direction that a character controller is facing. This can be found in the Y component of a GameObject’s eulerAngles component of its transform. You can imagine looking from above and down at the character controller and seeing what direction they are facing – this is what we are trying to display graphically with the radar.
Our desired radar angle (the angleRadarDegrees variable) is calculated by subtracting the player’s direction angle from the angle between the target and the player, since a radar displays the relative angle from the direction that the player is facing to the target object. In mathematics, an angle of zero indicates a direction of east. To correct this, we need to also subtract 90 degrees from the angle.
The angle is then converted into radians since this is required for these Unity trigonometry methods. We then multiply the Sin() and Cos() results by our normalized distances to calculate the X and Y values, respectively (see the following diagram):
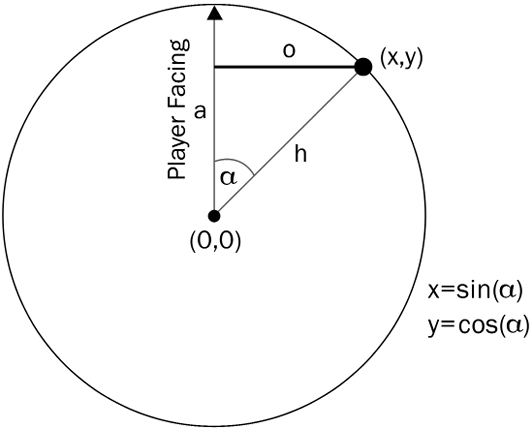
Figure 2.46: Calculation for the blip method
In the preceding diagram, alpha is the angle between the player and the target object, “a” is the adjacent side, “h” is the hypotenuse, and “o” is the side opposite the angle.
Our final position values need to be expressed as pixel lengths, relative to the center of the radar. So, we multiply our blipX and blipY values by half the width and the height of the radar; note that we only multiply with half the width since these values are relative to the center of the radar. We then add half the width and the height of the radar image to the blipX/Y values so that these values are now positioned relative to the center.
Finally, a new Vector2 object is created and returned, passing back these final calculated X and Y pixel values for the position of our blip icon.
The DrawBlip() method
The DrawBlip() method takes the input parameters of the position of the blip (as a Vector2 X, Y pair) and the reference to the RawImage prefab to be created at that location on the radar.
A new GameObject is created (instantiated) from the prefab and is parented to the radar GameObject (of which the scripted object is also a component). A reference is retrieved from the Rect Transform component of the new RawImage GameObject that has been created for the blip. Calls to the Unity RectTransform method, SetInsetAndSizeFromParentEdge(...), result in the blip GameObject being positioned at the provided horizontal and vertical locations over the radar image, regardless of where in the Game window the background radar image has been located.
There’s more...
This radar script scans 360 degrees all around the player and only considers straight-line distances on the X-Z plane. So, the distances in this radar are not affected by any height difference between the player and target GameObjects. The script can be adapted to ignore targets whose height is more than some threshold different from the player’s height.
Also, as presented, this recipe’s radar sees through everything, even if there are obstacles between the player and the target. This recipe can be extended to not show obscured targets by using raycasting techniques.
And, of course, you can replace the 3D capsule with a user-controlled animated character, such as those covered in Chapter 9, Animated Characters.