


Integrating UIKit into SwiftUI: the best of both worlds
SwiftUI was announced at WWDC 2019 and is only available on devices running iOS 13 and above. Many improvements and new APIs have been added to SwiftUI since its introduction, to the point that, at the time of this writing, we can create an app in SwiftUI without using any UIKit components.
However, if you’re dealing with legacy code written in UIKit, and have the need to integrate the code in your SwiftUI app, Apple provides a way to do this. UIViews and UIViewControllers can be seamlessly placed inside SwiftUI views and vice versa.
In this recipe, we’ll look at how to integrate UIKit APIs in SwiftUI. We will create a project that wraps instances of UIActivityIndicatorView to display an indicator in SwiftUI.
Getting ready
Open Xcode and create a SwiftUI project named UIKitToSwiftUI.
How to do it…
We can display UIKit views in SwiftUI by using the UIViewRepresentable protocol. Follow these steps to implement the UIActivityIndicatorView in SwiftUI:
- Within the Xcode menu, click File | New | File and select Swift File. Name the view
ActivityIndicator. - Replace the
import Foundationstatement withimport SwiftUI:import SwiftUI - Modify the code in
ActivityIndicatorto use theUIViewRepresentableprotocol:struct ActivityIndicator: UIViewRepresentable { var animating: Bool func makeUIView(context: Context) -> UIActivityIndicatorView { return UIActivityIndicatorView() } func updateUIView(_ activityIndicator: UIActivityIndicatorView, context: Context) { if animating { activityIndicator.startAnimating() } else { activityIndicator.stopAnimating() } } } - Let’s open the
ContentView.swiftfile and replace the struct with the following code to make use of theActivityIndicatorinstance that we just created. Let’s also add aTogglecontrol to turn the indicator on or off:struct ContentView: View { @State private var animate = true var body: some View { VStack{ ActivityIndicator(animating: animate) HStack{ Toggle(isOn: $animate){ Text("Toggle Activity") } }.padding() } } } - The resulting
ContentViewpreview should look like this:
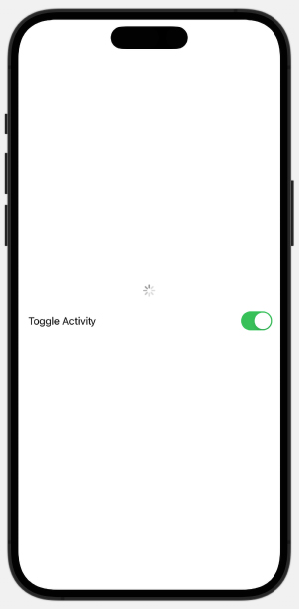
Figure 1.18: UIKit UIActivityIndicatorView inside our SwiftUI view
How it works…
UIKit views can be implemented in SwiftUI by using the UIViewRepresentable protocol to wrap the UIKit views. In this recipe, we make use of a UIActivityIndicatorView by first wrapping it with a UIViewRepresentable.
In our ActivityIndicator.swift file, we implement a struct that conforms to the UIViewRepresentable protocol. This requires us to implement both the makeUIView and updateUIView functions. The makeUIView function creates and prepares the view, while the updateUIView function updates the UIView when the animation changes.
Important Note
You can implement the preceding features in iOS 14+ apps by using SwiftUI’s ProgressView. The purpose of the recipe was to show how to integrate a UIKit view with SwiftUI.
See also
Check out the Exploring more views and controls recipe at the end of this chapter for more information on ProgressView.
Apple’s tutorial on how to integrate UIKit and SwiftUI:
https://developer.apple.com/tutorials/swiftui/interfacing-with-uikit