


Adding SwiftUI to a legacy UIKit app
In this recipe, we will learn how to navigate from a UIKit view to a SwiftUI view while passing a secret text to our SwiftUI view. This recipe assumes prior knowledge of UIKit and it is most useful to developers who want to integrate SwiftUI into a legacy UIKit app. If this is not your case, feel free to skip to the next recipe.
We’ll be making use of a UIKit storyboard, a visual representation of the UI in UIKit. The Main.storyboard file is to UIKit what the ContentView.swift file is to SwiftUI. They are both the default home views that are created when you start a new project.
We start off this project with a simple UIKit project that contains a button.
Getting ready
Get the following ready before starting out with this recipe:
- Clone or download the code for this book from GitHub: https://github.com/PacktPublishing/SwiftUI-Cookbook-3rd-Edition/tree/main/Chapter01-Using-the-basic-SwiftUI-Views-and-Controls/10-Adding-SwiftUI-to-UIKit.
- Open the
StartingPointfolder and double-click onAddSwiftUIToUIKit.xcodeproj to open the project in Xcode.
How to do it…
We will add a NavigationController to the UIKit ViewController that allows the app to switch from the UIKit to the SwiftUI view when the button is clicked:
- Open the
Main.storyboardfile in Xcode by clicking on it. TheMain.storyboardlooks like this:
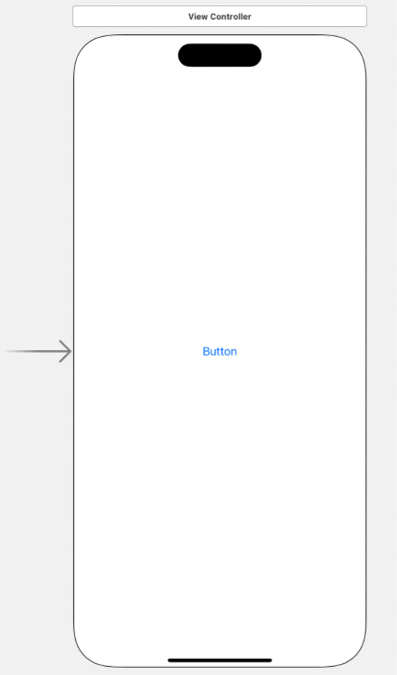
Figure 1.19: UIKit View Controller
- Click anywhere in the
ViewControllerto select it. - In the Xcode menu, click Editor | Embed in | Navigation Controller.
- Add a new
ViewControllerto the project:- Click the + button at the top right of the Xcode window.
- In the new window, select the
Objectslibrary, typehostingin the search bar, select Hosting View Controller, and drag it out to the storyboard:
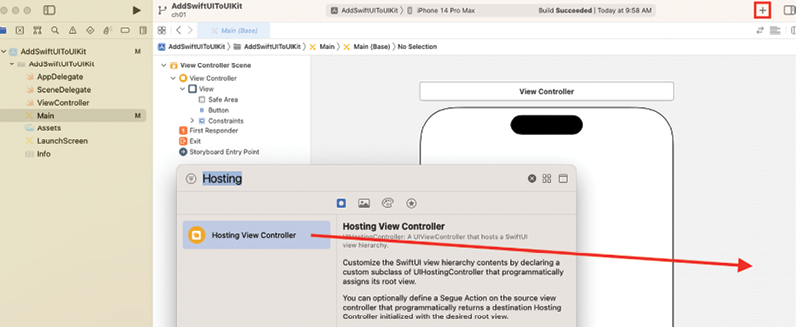
Figure 1.20: Creating a UIKit Hosting View Controller
- Hold down the Ctrl key, and then click and drag from the
ViewControllerbutton to the new Hosting View Controller that we added. - In the pop-up menu, for the Action Segue option, select Show.
- Click the Adjust Editor Options button:

Figure 1.21: Adjust Editor Options button
- Click Assistant. This splits the view into two panes, as shown here:
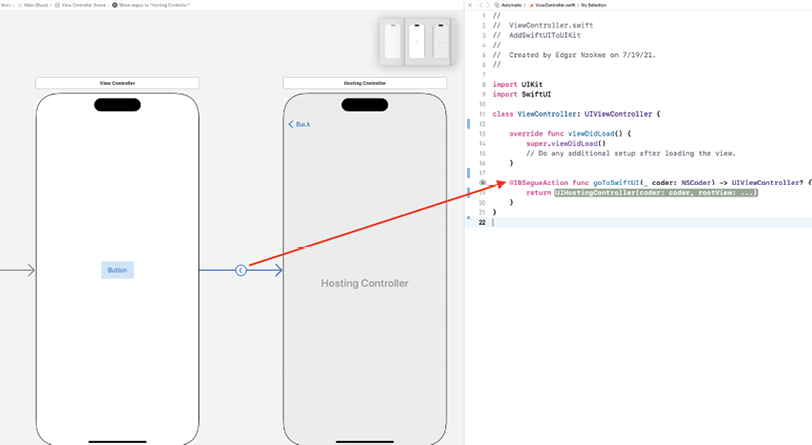
Figure 1.22: Xcode with the Assistant editor open
- To create a segue action, hold the Ctrl key, then click and drag from the segue button (item in the middle of the blue arrow in Figure 1.22) to the space after the
viewDidLoadfunction in theViewController.swiftfile. - In the pop-up menu, enter the name
goToSwiftUIand click Connect. The following code will be added to theViewController.swiftfile:@IBSegueAction func goToSwiftUI(_ coder: NSCoder) -> UIViewController? { return <#UIHostingController(coder: coder, rootView: ...)#> } - Add a statement to import SwiftUI at the top of the
ViewControllerpage, belowimport UIKit:import SwiftUI - Within the
goToSwiftUIfunction, create a text that will be passed to our SwiftUI view. Also, create arootViewvariable that specifies the SwiftUI view that you would like to reach. Finally, return theUIHostingController, which is a specialViewControllerused to display the SwiftUI view. The resulting code should look like this:@IBSegueAction func goToSwiftUI(_ coder: NSCoder) -> UIViewController? { let greetings = "Hello From UIKit" let rootView = Greetings(textFromUIKit: greetings) return UIHostingController(coder: coder, rootView: rootView) } - At this point, the code will not compile because we have not yet implemented a Greetings view. Let’s resolve that now.
- Create a SwiftUI view to display a message:
- Click File | New | File and select SwiftUI View.
- Name the view
Greetings.swift.
- Add a
Viewcomponent that displays some text passed to it:struct Greetings: View { var textFromUIKit: String var body: some View { Text(textFromUIKit) } } #Preview { Greetings(textFromUIKit: "Hello, World!") }
Run the project in the simulator, click on the UIKit button, and watch the SwiftUI page get displayed.
How it works…
To host SwiftUI views in an existing app, you need to wrap the SwiftUI hierarchy in a ViewController or InterfaceController.
We start by performing core UIKit concepts, such as adding a Navigation View Controller to the storyboard and adding a Hosting View Controller as a placeholder for our SwiftUI view.
Lastly, we create an IBSegueAction to present our SwiftUI view upon clicking the UIKit button.


