


Dealing with text
The most basic building block of any application is text, which we use to provide or request information from a user. Some text requires special treatment, such as password fields, which must be masked for privacy reasons.
In this recipe, we will implement different types of SwiftUI Text views. A Text view is used to display one or more lines of read-only text on the screen. A TextField view is used to display multiline editable text, and a SecureField view is used to request private information that should be masked, such as passwords.
Getting ready
Create a new SwiftUI project named FormattedText.
How to do it…
We’ll implement multiple types of text-related views and modifiers. Each step in this section applies minor changes to the view, so note the UI changes that occur after each step. Let’s get started:
- Replace the initial
ContentViewbody variable with our ownVStack. The ContentView should look like the following code:struct ContentView: View { var body: some View { VStack{ Text("Hello World") } } } - Add the
.fontWeight(.medium)modifier to the text and observe the text weight change in the canvas preview:Text("Hello World") .fontWeight(.medium) - Add two state variables to the
ContentView.swiftfile:passwordandsomeText. Place the values below theContentViewstruct declaration. These variables will hold the content of the user’s password andTextfieldinputs:struct ContentView: View { @State private var password = "1234" @State private var someText = "initial text" var body: some View { ... } - Now, we will start adding more views to the
VStack. Each view should be added immediately after the previous one. AddSecureFieldand a Text view to theVStack. The Text view displays the value entered inSecureField:SecureField("Enter a password", text: $password) .padding() Text("password entered: \(password)") .italic() - Add
TextFieldand a Text view to display the value entered inTextField:TextField("Enter some text", text: $someText) .padding() Text(someText) .font(.largeTitle) .underline() - Now, let’s add some other Text views with modifiers to the list:
Text("Changing text color and make it bold")
         .foregroundStyle(.blue)
         .bold()
Text("Use kerning to change space between characters in the text")
          .kerning(7)
      Text("Changing baseline offset")
          .baselineOffset(100)
      Text("Strikethrough")
           .strikethrough()
      Text("This is a multiline text implemented in
           SwiftUI. The trailing modifier was added
           to the text. This text also implements
           multiple modifiers")
            .background(.yellow)
            .multilineTextAlignment(.trailing)
            .lineSpacing(10)
Now is the moment to test the app. We can choose to run the app in a simulator or click the Play button in the canvas preview, which allows for interactivity. Play with the app and enter some text in the SecureField and TextField. Text entered in the SecureField will be masked, while text in the TextField will be shown.
The resulting preview should look like this:
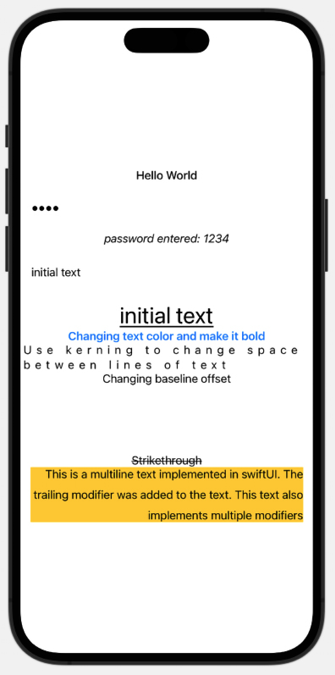
Figure 1.4: FormattedText preview
How it works…
Text views have several modifiers for font, spacing, and other formatting requirements. When in doubt, position the cursor on the line of code that includes the Text view, and press the Esc key to reveal a list of all available modifiers. This is shown in the following example:
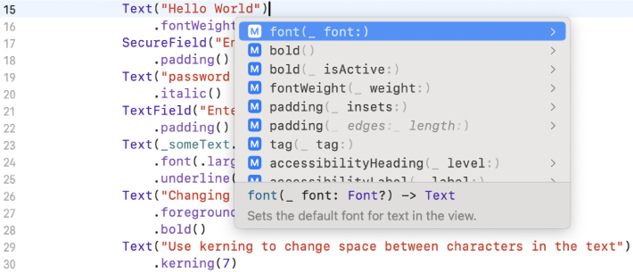
Figure 1.5: Using Xcode autocomplete to view formatting options
Unlike regular Text views, TextField and SecureField require state variables to store the value entered by the user. State variables are declared using the @State keyword. SwiftUI manages the storage of properties declared by using @State and refreshes the body each time the value of the state variable changes.
Values entered by the user are stored using the process of binding. In this recipe, we have state variables bound to the SecureField and TextField input parameters. The $ symbol is used to bind a state variable to the field. Using the $ symbol ensures that the state variable’s value is changed to correspond to the value entered by the user, as shown in the following example:
TextField("Enter some text", text: $someText)
Binding also notifies other views of state changes and causes the views to be redrawn on state change.
The wrapped value of bound state variables, which is the underlying value referenced by the state variable, is accessed without having to use the $ symbol. This is a convenience shortcut provided by Swift, as shown in the following code snippet:
Text(someText)
See also
Apple documentation regarding SwiftUI Text view: https://developer.apple.com/documentation/swiftui/text.