


Using images
Apps need to be appealing to users and need to engage them to interact with the app. To that purpose, a well-crafted and beautiful user interface with simple and intuitive interactions is very desirable.
Images play an important part in an app’s user interface as they add color and simplicity and they convey messages in a graphical way. It is fundamental to master how to use images in your apps.
In this recipe, we will learn how to add an image to a view, use an already existing UIImage, put an image in a frame, and use modifiers to present beautiful images. The images in this section were obtained from https://unsplash.com/, so special thanks to jf-brou, Kieran White, and Camilo Fierro.
Getting ready
Let’s start by creating a new SwiftUI project called UsingImages.
How to do it…
Let’s add some images to our SwiftUI project and introduce the modifiers used to style them. The steps are given here:
- Replace the content of the body variable with an empty
VStack.var body: some View { VStack { } } - Download the project images from the GitHub link at https://github.com/PacktPublishing/SwiftUI-Cookbook-3rd-Edition/tree/main/Resources/Chapter01/recipe3/.
- Drag and drop the downloaded images for this recipe into the project’s
Assets.xcassets(orAssets) folder, as shown in the following screenshot:
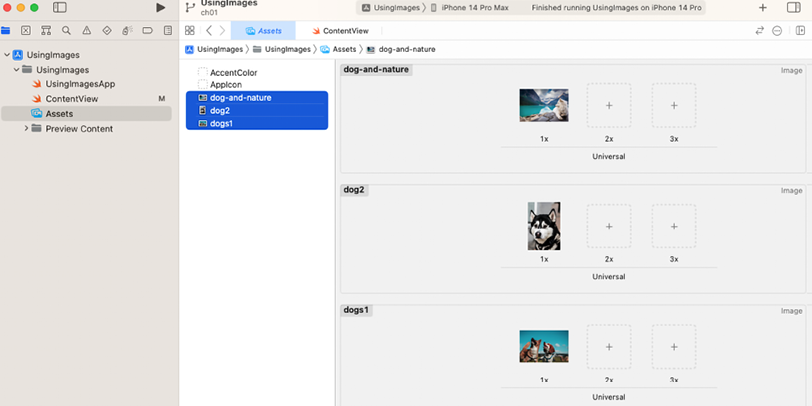
Figure 1.6: Assets.xcassets folder in Xcode
- Add an
Imageview toVStack:Image("dogs1") - Observe the result in the canvas preview.
- In iOS 17, the
ImageResourceandColorResourcestructs were introduced, backward compatible to iOS 11 for UIKit and iOS 13 for SwiftUI. Xcode 15 automatically generates instances ofImageResourceandColorResourcefor images and colors in asset catalogs. For example, the three images in our asset catalog, shown in Figure 1.6, generate the following code:// MARK: - Image Symbols - @available(iOS 11.0, macOS 10.7, tvOS 11.0, *) extension ImageResource { /// The "dog-and-nature" asset catalog image resource. static let dogAndNature = ImageResource(name: "dog-and-nature", bundle: resourceBundle) /// The "dog2" asset catalog image resource. static let dog2 = ImageResource(name: "dog2", bundle: resourceBundle) /// The "dogs1" asset catalog image resource. static let dogs1 = ImageResource(name: "dogs1", bundle: resourceBundle) } #if canImport(SwiftUI) @available(iOS 13.0, macOS 10.15, tvOS 13.0, watchOS 6.0, *) extension SwiftUI.Image { /// Initialize an 'Image' with an image resource. init(_ resource: ImageResource) { self.init(resource.name, bundle: resource.bundle) } } #endif - This is auto-generated code, compiled along with our own code. Thanks to the new initializer for
Image, which takes anImageResourceinstead ofImage("dogs1"), we can writeImage(.dogs1). The advantage of this approach is the compile-time checking of the correct image name, which eliminates runtime errors from typos. - Add a
.resizable()modifier to the image and allow SwiftUI to adjust the image such that it fits the screen space available:Image(.dogs1) .resizable() - The
.resizable()modifier causes the full image to fit on the screen, but the proportions are distorted. That can be fixed by adding the.aspectRatio(contentMode: .fit)modifier:Image(.dogs1) .resizable() .aspectRatio(contentMode: .fit) - Add the dog-and-nature image to
VStack:Image(.dogAndNature) .resizable() .aspectRatio(contentMode: .fit) .frame(width:300, height:200) .clipShape(Circle()) .overlay(Circle().stroke(.blue, lineWidth: 6)) .shadow(radius: 10) - We can also use a
UIImageinstance to initialize anImageview. This is useful if theUIImagewas generated with legacy code or programmatically. In our example, we use theUIImageconvenience initializer, which takes anImageResourceinstance. For example, to create aUIImagefrom thedogs2image in our asset catalog, we would use:UIImage(resource: .dogs2). - Use the
UIImageand display it within theVStack. The resulting code should look like this:struct ContentView: View { var body: some View { VStack{ Image("dogs1") .resizable() .aspectRatio(contentMode: .fit) Image("dog-and-nature") .resizable() .aspectRatio(contentMode: .fit) .frame(width:300, height:200) .clipShape(Circle()) .overlay(Circle().stroke(Color.blue, lineWidth: 6)) .shadow(radius: 10) Image(uiImage: UIImage(resource: .dog2)) .resizable() .aspectRatio(contentMode: .fit) .frame(width: 200, height: 200) } } } - The completed application should then look like this:

Figure 1.7: UsingImages preview
How it works…
Adding the Image view to SwiftUI displays the image in its original proportions. The image might be too small or too big for the device’s display. For example, without any modifiers, the dog-and-nature image fills up the full iPhone 14 Pro Max screen:
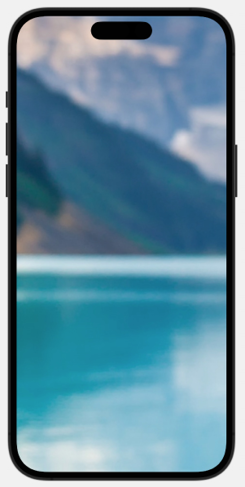
Figure 1.8: The dog-and-nature image without the resizable modifier
To allow an image to shrink or enlarge to fit the device screen size, add the .resizable() modifier to the image. Adding the .resizable() modifier causes the image to fit within its view, but it may be distorted due to changes in proportion:
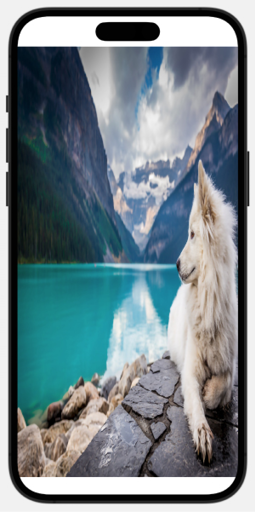
Figure 1.9: Image with resizable modifier
To address the issue, add the .aspectRatio(contentMode: .fit) modifier to the image:
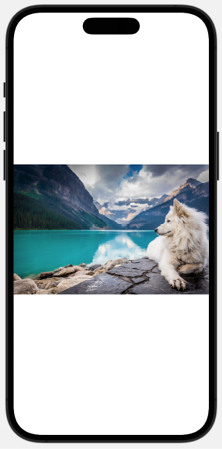
Figure 1.10: Image with AspectRatio set
To specify the width and height of an image, add the .frame(width, height) modifier to the view and set the width and height: .frame(width: 200, height: 200).
Images can be clipped to specific shapes. The .clipShape(Circle()) modifier changes the image shape to a circle:
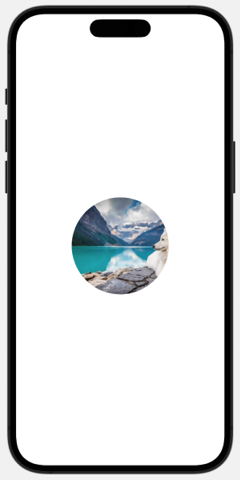
Figure 1.11: Image with the clipShape(Circle()) modifier
The .overlay(Circle().stroke(Color.blue, lineWidth: 6)) and .shadow(radius: 10) modifiers were used to draw a blue line around the image circle and add a shadow to the circle:
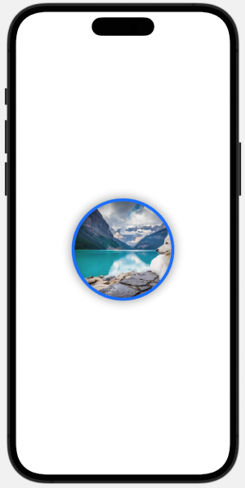
Figure 1.12: Stroke and shadow applied to image
Important Note
The order in which the modifiers are added matters. Adding the .frame() modifier before the .resizable() or .aspectRatio() modifiers may lead to different results.
Note that if you set the project deployment target to iOS 14, the ImageResource struct works without issues since Apple made the struct available for older versions of iOS. This allows us to use the new APIs in older versions of iOS in case your app needs to support them.
See also
Apple documentation regarding SwiftUI Image: https://developer.apple.com/documentation/swiftui/image.