The recipes in this section will take you through how to get a fully functional Kubernetes cluster with a fully customizable master and worker nodes that you can use for the recipes in the following chapters or in production.
In this section, we will cover both Amazon EC2 and Amazon EKS recipes so that we can run Kubernetes on Amazon Web Services (AWS).
Getting ready
All the operations mentioned here require an AWS account and an AWS user with a policy that has permission to use the related services. If you don't have one, go to https://aws.amazon.com/account/ and create one.
AWS provides two main options when it comes to running Kubernetes on it. You can consider using the Amazon Elastic Compute Cloud (Amazon EC2) if you'd like to manage your deployment completely and have specific powerful instance requirements. Otherwise, it's highly recommended to consider using managed services such as Amazon Elastic Container Service for Kubernetes (Amazon EKS).
How to do it…
Depending on whether you want to use AWS EC2 service or EKS, you can follow the following recipes to get your cluster up and running using either kops or eksctl tools:
- Installing the command-line tools to configure AWS services
- Installing kops to provision a Kubernetes cluster
- Provisioning a Kubernetes cluster on Amazon EC2
- Provisioning a managed Kubernetes cluster on Amazon EKS
Installing the command-line tools to configure AWS services
In this recipe, we will get the AWS Command-Line Interface (CLI) awscli and the Amazon EKS CLI eksctl to access and configure AWS services.
Let's perform the following steps:
-
Install awscli on your workstation:
$ sudo apt-get update && sudo apt-get install awscli
-
Configure the AWS CLI so that it uses your access key ID and secret access key:
$ aws configure
-
Download and install the Amazon EKS command-line interface, eksctl:
$ curl --silent --location "https://github.com/weaveworks/eksctl/releases/download/latest_release/eksctl_$(uname -s)_amd64.tar.gz" | tar xz -C /tmp
$ sudo mv /tmp/eksctl /usr/local/bin
-
Verify its version and make sure eksctl is installed:
$ eksctl version
To be able to perform the following recipes, the eksctl version should be 0.13.0 or later.
Installing kops to provision a Kubernetes cluster
In this recipe, we will get the Kubernetes Operations tool, kops, and Kubernetes command-line tool, kubectl, installed in order to provision and manage Kubernetes clusters.
Let's perform the following steps:
- Download and install the Kubernetes Operations tool, kops:
$ curl -LO https://github.com/kubernetes/kops/releases/download/$(curl -s https://api.github.com/repos/kubernetes/kops/releases/latest | grep tag_name | cut -d '"' -f 4)/kops-linux-amd64
$ chmod +x kops-linux-amd64 && sudo mv kops-linux-amd64 /usr/local/bin/kops
- Run the following command to make sure kops is installed and confirm that the version is 1.15.0 or later:
$ kops version
- Download and install the Kubernetes command-line tool, kubectl:
$ curl -LO https://storage.googleapis.com/kubernetes-release/release/$(curl -s https://storage.googleapis.com/kubernetes-release/release/stable.txt)/bin/linux/amd64/kubectl
$ chmod +x ./kubectl && sudo mv ./kubectl /usr/local/bin/kubectl
- Verify its version and make sure kubectl is installed:
$ kubectl version --short
To be able to perform the following recipes, the kubectl version should be v1.15 or later.
Provisioning a Kubernetes cluster on Amazon EC2
This recipe will take you through how to get a fully functional Kubernetes cluster with fully customizable master and worker nodes that you can use for the recipes in the following chapters or in production.
Let's perform the following steps:
- Create a domain for your cluster.
It is a cloud management best practice to have subdomains and to divide your clusters with logical and valid DNS names for kops to successfully discovery them.
As an example, I will use the k8s.containerized.me subdomain as our hosted zone. Also, if your domain is registered with a registrar other than Amazon Route 53, you must update the name servers with your registrar and add Route 53 NS records for the hosted zone to your registrar's DNS records:
$ aws route53 create-hosted-zone --name k8s.containerized.me \
--caller-reference k8s-devops-cookbook \
--hosted-zone-config Comment="Hosted Zone for my K8s Cluster"
- Create an S3 bucket to store the Kubernetes configuration and the state of the cluster. In our example, we will use s3.k8s.containerized.me as our bucket name:
$ aws s3api create-bucket --bucket s3.k8s.containerized.me \
--region us-east-1
- Confirm your S3 bucket by listing the available bucket:
$ aws s3 ls
2019-07-21 22:02:58 s3.k8s.containerized.me
- Enable bucket versioning:
$ aws s3api put-bucket-versioning --bucket s3.k8s.containerized.me \
--versioning-configuration Status=Enabled
- Set environmental parameters for kops so that you can use the locations by default:
$ export KOPS_CLUSTER_NAME=useast1.k8s.containerized.me
$ export KOPS_STATE_STORE=s3://s3.k8s.containerized.me
- Create an SSH key if you haven't done so already:
$ ssh-keygen -t rsa
- Create the cluster configuration with the list of zones where you want your master nodes to run:
$ kops create cluster --node-count=6 --node-size=t3.large \
 --zones=us-east-1a,us-east-1b,us-east-1c \
 --master-size=t3.large \
 --master-zones=us-east-1a,us-east-1b,us-east-1c
- Create the cluster:
$ kops update cluster --name ${KOPS_CLUSTER_NAME} --yes
- Wait a couple of minutes for the nodes to launch and validate:
$ kops validate cluster
- Now, you can use kubectl to manage your cluster:
$ kubectl cluster-info
By default, kops creates and exports the Kubernetes configuration under ~/.kube/config. Therefore, no additional steps are required to connect your clusters using kubectl.
Provisioning a managed Kubernetes cluster on Amazon EKS
Perform the following steps to get your managed Kubernetes-as-a-service cluster up and running on Amazon EKS using eksctl:
- Create a cluster using the default settings:
$ eksctl create cluster
...
[√] EKS cluster "great-outfit-123" in "us-west-2" region is ready
By default, eksctl deploys a cluster with workers on two m5.large instances using the AWS EKS AMI in the us-west-2 region. eksctl creates and exports the Kubernetes configuration under ~/.kube/config. Therefore, no additional steps are required to connect your clusters using kubectl.
- Confirm the cluster information and workers:
$ kubectl cluster-info && kubectl get nodes
Kubernetes master is running at https://gr7.us-west-2.eks.amazonaws.com
CoreDNS is running at https://gr7.us-west-2.eks.amazonaws.com/api/v1/namespaces/kube-system/services/kube-dns:dns/proxy
NAME                                  STATUS ROLES  AGE   VERSION
ip-1-2-3-4.us-west-2.compute.internal Ready  <none> 5m42s v1.13.8-eks-cd3eb0
ip-1-2-3-4.us-west-2.compute.internal Ready  <none> 5m40s v1.13.8-eks-cd3eb0
Now, you have a two-node Amazon EKS cluster up and running.
How it works...
The first recipe on Amazon EC2 showed you how to provision multiple copies of master nodes that can survive a master node failure as well as single AZ outages. Although it is similar to what you get with the second recipe on Amazon EKS with Multi-AZ support, clusters on EC2 give you higher flexibility. When you run Amazon EKS instead, it runs a single-tenant Kubernetes control plane for each cluster, and the control plane consists of at least two API server nodes and three etcd nodes that run across three AZs within a region.
Let's take a look at the cluster options we used in step 7 with the kops create cluster command:
- --node-count=3 sets the number of nodes to create. In our example, this is 6. This configuration will deploy two nodes per zone defined with--zones=us-east-1a,us-east-1b,us-east-1c, with a total of three master nodes and six worker nodes.
- --node-size and --master-size set the instance size for the worker and master nodes. In our example, t2.medium is used for worker nodes and t2.large is used for master nodes. For larger clusters, t2.large is recommended for a worker.
- --zones and --master-zones set the zones that the cluster will run in. In our example, we have used three zones called us-east-1a, us-east-1b, and us-east-1c.
For additional zone information, check the AWS Global Infrastructure link in the See also section.
AWS clusters cannot span across multiple regions and all the zones that have been defined for the master and worker nodes should be within the same region.
When deploying multi-master clusters, an odd number of master instances should be created. Also, remember that Kubernetes relies on etcd, a distributed key/value store. etcd quorum requires more than 51% of the nodes to be available at any time. Therefore, with three master nodes, our control plane can only survive a single master node or AZ outages. If you need to handle more than that, you need to consider increasing the number of master instances.
There's more…
It is also useful to have knowledge of the following information:
- Using the AWS Shell
- Using a gossip-based cluster
- Using different regions for an S3 bucket
- Editing cluster configuration
- Deleting your cluster
- Provisioning an EKS cluster using the Amazon EKS dashboard
- Deploying Kubernetes Dashboard
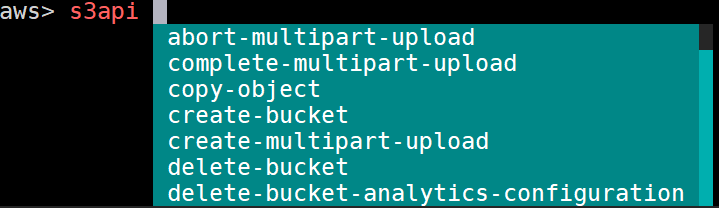
Using the AWS Shell
Another useful tool worth mentioning here is aws-shell. It is an integrated shell that works with the AWS CLI. It uses the AWS CLI configuration and improves productivity with an autocomplete feature.
Install aws-shell using the following command and run it:
$ sudo apt-get install aws-shell && aws-shell
You will see the following output:
You can use AWS commands with aws-shell with less typing. Press the F10 key to exit the shell.
Using a gossip-based cluster
In this recipe, we created a domain (either purchased from Amazon or another registrar) and a hosted zone, because kops uses DNS for discovery. Although it needs to be a valid DNS name, starting with kops 1.6.2, DNS configuration became optional. Instead of an actual domain or subdomain, a gossip-based cluster can be easily created. By using a registered domain name, we make our clusters easier to share and accessible by others for production use.
If, for any reason, you prefer a gossip-based cluster, you can skip hosted zone creation and use a cluster name that ends with k8s.local :
$ export KOPS_CLUSTER_NAME=devopscookbook.k8s.local
$ export KOPS_STATE_STORE=s3://devops-cookbook-state-store
Setting the environmental parameters for kops is optional but highly recommended since it shortens your CLI commands.
Using different regions for an S3 bucket
In order for kops to store cluster configuration, a dedicated S3 bucket is required.
An example for the eu-west-1 region would look as follows:
$ aws s3api create-bucket --bucket s3.k8s.containerized.me \
--region eu-west-1 --create-bucket-configuration \
LocationConstraint=eu-west-1
This S3 bucket will become the source of truth for our Kubernetes cluster configuration. For simplicity, it is recommended to use the us-east-1 region; otherwise, an appropriate LocationConstraint needs be specified in order to create the bucket in the desired region.
Editing the cluster configuration
The kops create cluster command, which we used to create the cluster configuration, doesn't actually create the cluster itself and launch the EC2 instances; instead, it creates the configuration file in our S3 bucket.
After creating the configuration file, you can make changes to the configuration using the kops edit cluster command.
You can separately edit your node instance groups using the following command:
$ kops edit ig nodes
$ kops edit ig master-us-east-1a
The config file is called from the S3 bucket's state store location. If you prefer a different editor you can, for example, set $KUBE_EDITOR=nano to change it.
Deleting your cluster
To delete your cluster, use the following command:
$ kops delete cluster --name ${KOPS_CLUSTER_NAME} --yes
This process may take a few minutes and, when finished, you will get a confirmation.
Provisioning an EKS cluster using the Amazon EKS Management Console
In the Provisioning a managed Kubernetes cluster on Amazon EKS recipe, we used eksctl to deploy a cluster. As an alternative, you can also use the AWS Management Console web user interface to deploy an EKS cluster.
Perform the following steps to get your cluster up and running on Amazon EKS:
- Open your browser and go to the Amazon EKS console at https://console.aws.amazon.com/eks/home#/clusters.
- Enter a cluster name and click on the Next Step button.
- On the Create Cluster page, select Kubernetes Version, Role name, at least two or more availability zones from the subnets list, and Security groups.
- Click on Create.
- Cluster creation with EKS takes around 20 minutes. Refresh the page in 15-20 minutes and check its status.
- Use the following command to update your kubectl configuration:
$ aws eks --region us-east-1 update-kubeconfig \
--name K8s-DevOps-Cookbook
- Now, use kubectl to manage your cluster:
$ kubectl get nodes
Now that your cluster has been configured, you can configure kubectl to manage it.
Deploying Kubernetes Dashboard
Last but not least, to deploy the Kubernetes Dashboard application on an AWS cluster, you need to follow these steps:
- At the time I wrote this recipe, Kubernetes Dashboard v.2.0.0 was still in beta. Since v.1.x version will be obsolete soon, I highly recommend that you install the latest version, that is, v.2.0.0. The new version brings a lot of functionality and support for Kubernetes v.1.16 and later versions. Before you deploy Dashboard, make sure to remove the previous version if you have a previous version. Check the latest release by following the link in the following information box and deploy it using the latest release, similar to doing the following:
$ kubectl delete ns kubernetes-dashboard
# Use the latest version link from https://github.com/kubernetes/dashboard/releases
$ kubectl apply -f https://raw.githubusercontent.com/kubernetes/dashboard/v2.0.0-beta5/aio/deploy/recommended.yaml
As the Kubernetes version gets upgraded, the dashboard application also gets frequently updated. To use the latest version, find the latest link to the YAML manifest on the release page at https://github.com/kubernetes/dashboard/releases. If you experience compatibility issues with the latest version of Dashboard, you can always deploy the previous stable version by using the following command:
$ kubectl apply -f
https://raw.githubusercontent.com/kubernetes/dashboard/v1.10.1/src/depl
oy/recommended/kubernetes-dashboard.yaml
- By default, the kubernetes-dashboard service is exposed using the ClusterIP type. If you want to access it from outside, edit the service using the following command and replace the ClusterIP type with LoadBalancer; otherwise, use port forwarding to access it:
$ kubectl edit svc kubernetes-dashboard -n kubernetes-dashboard
- Get the external IP of your dashboard from the kubernetes-dashboard service:
$ kubectl get svc kubernetes-dashboard -n kubernetes-dashboard
NAME                 TYPE          CLUSTER-IP    EXTERNAL-IP PORT(S) AGE
kubernetes-dashboard LoadBalancer 100.66.234.228 myaddress.us-east-1.elb.amazonaws.com 443:30221/TCP 5m46s
- Open the external IP link in your browser. In our example, it is https://myaddress.us-east-1.elb.amazonaws.com.
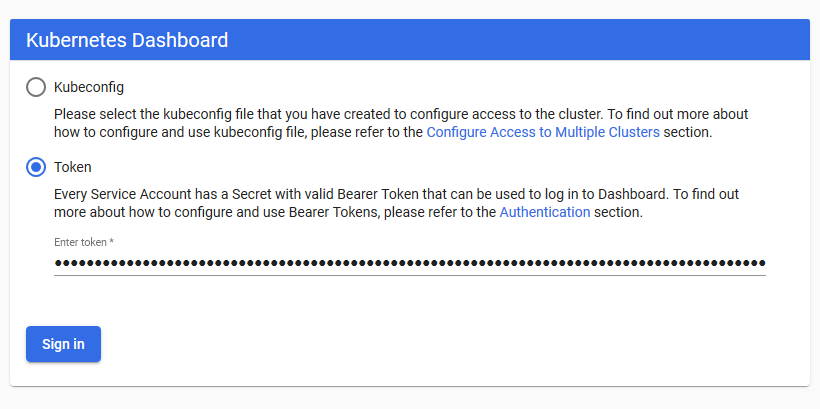
- We will use the token option to access Kubernetes Dashboard. Now, let's find the token in our cluster using the following command. In this example, the command returns kubernetes-dashboard-token-bc2w5 as the token name:
$ kubectl get secrets -A | grep dashboard-token
kubernetes-dashboard kubernetes-dashboard-token-bc2w5 kubernetes.io/service-account-token 3 17m
- Replace the secret name with yours from the output of the previous command. Get the token details from the description of the Secret:
$ kubectl describe secrets kubernetes-dashboard-token-bc2w5 -nkubernetes-dashboard
- Copy the token section from the output of the preceding command and paste it into Kubernetes Dashboard to sign in to Dashboard:
Now, you have access to Kubernetes Dashboard to manage your cluster.
See also
- Other recommended tools for getting highly available clusters on AWS: