Reader small image

You're reading from  JIRA 7 Essentials - Fourth Edition

Product typeBook
Published inNov 2016
Reading LevelBeginner
PublisherPackt
ISBN-139781786462510
Edition4th Edition
Languages
Tools
Right arrow
Author (1)
Patrick Li
Patrick Li
author image
Patrick Li

Patrick Li is the cofounder of AppFusions and works as a senior engineer there, specializing in integration solutions with many enterprise applications and platforms, including IBM Connections, Jive, Google Apps, and more. He has worked in the Atlassian ecosystem for over 10 years, developing products and solutions for the Atlassian platform and providing expert consulting services. He has authored many books and video courses covering Jira. He has extensive experience in designing and deploying Atlassian solutions from the ground up and customizing existing deployments for clients across verticals such as healthcare, software engineering, financial services, and government agencies.
Read more about Patrick Li

Right arrow

Chapter 9. Securing JIRA

In the previous chapters, you learned how to store data in JIRA by creating issues. As you can see, as an information system, JIRA, is all about data. It should come as no surprise to you that security plays a big role in JIRA, not only to ensure that the right people will get access to our data, but also to maintain data integrity by preventing accidental changes.

By the end of this chapter, you will have learned the following:

  • User directories and how to connect JIRA to LDAP

  • General access control in JIRA

  • Managing fine-grained permission settings

  • How to troubleshoot permission problems

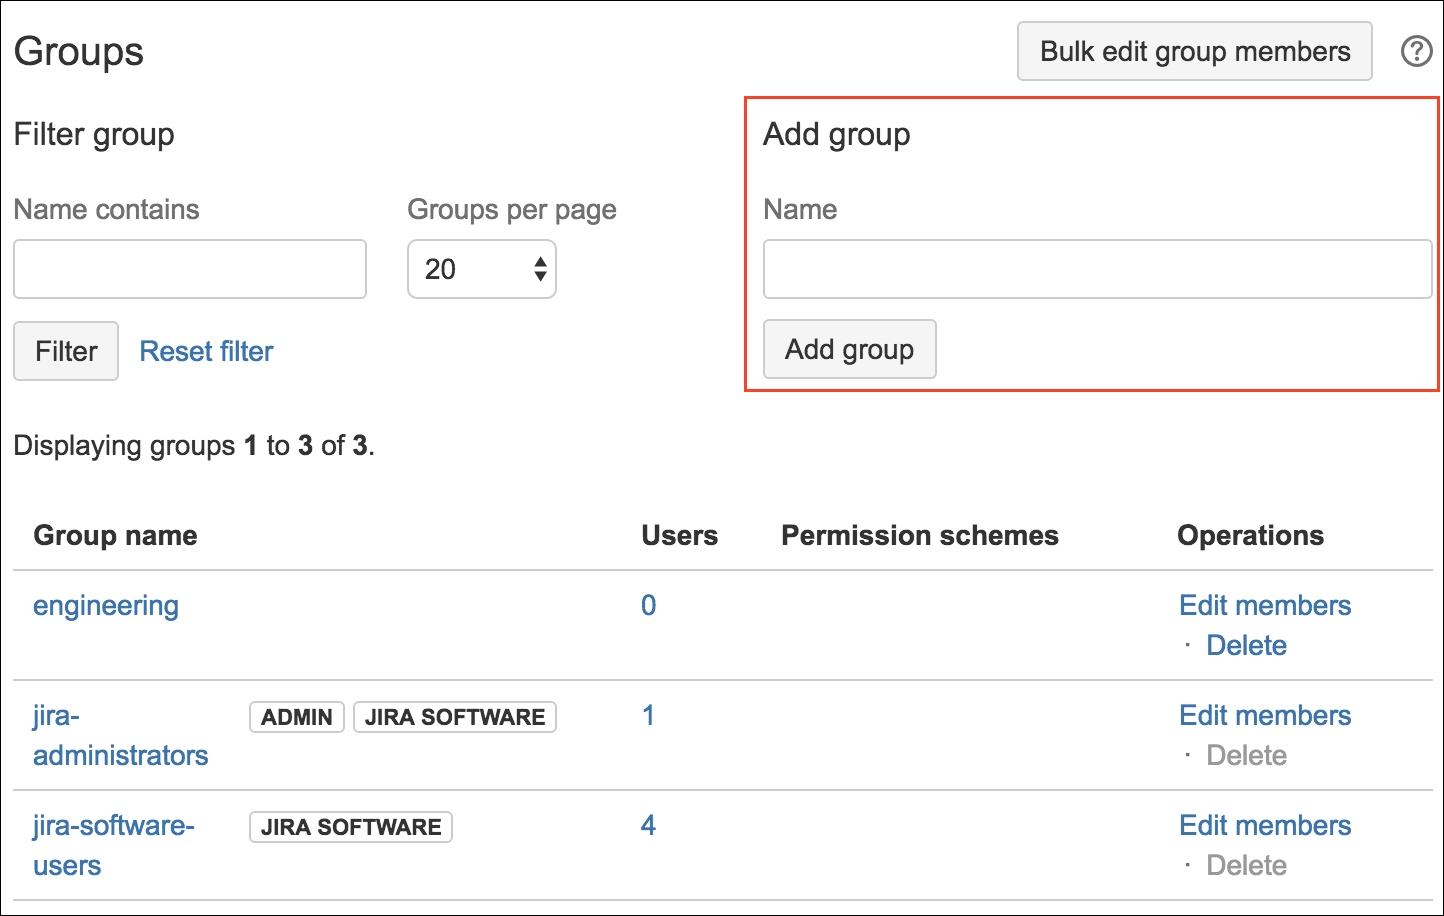
Before we delve into the deep end of how JIRA handles security, let's first take a look at how JIRA maintains user and group memberships.

User directories


User directories are what JIRA uses to store information about users and groups. A user directory is backed by a user repository system, such as LDAP, a database, or a remote user management system, such as Atlassian Crowd.

You can have multiple user directories in JIRA. This allows you to connect your JIRA instance to multiple user repositories. For example, you can have an LDAP directory for your internal users and a database directory (a JIRA internal directory) for external users. An example is given in the following screenshot, where we have two user directories configured. The first user directory is the built-in JIRA Internal directory running on the JIRA database. The second user directory is connected to the Microsoft Active Directory (Read Only) in the read-only mode. The last user directory is connected to the crowd, a user identity management software from Atlassian:

As a JIRA administrator, you can manage user directories by performing these two steps:

  1. Browse...

Users


In JIRA, each user needs to have an account for them to access JIRA, unless JIRA is configured to allow anonymous access (by selecting the Anyone group in the Browse Project permission scheme; refer to the Permission schemes section in this chapter for details). Each user is identified by their username. In JIRA 7, usernames can be changed after the account is created.

User browser


The user browser is where you will be able to see a list of all the users in JIRA, including their usernames, e-mail addresses, last login attempt, and which user directory they belong to. User browser also provides you with search capabilities. You will be able to search for users that fit in the criteria such as username, full name, e-mail address, and group association. Perform the following steps to access the user browser:

  1. Browse to the JIRA administration console.

  2. Select the User management tab and then the Users option. This will bring up the User Browser page.

By default, the results will be paginated to show 20 users per page, but you can change this setting to show up to 100 users per page. When dealing with large deployments having hundreds of users, these options will become very useful to quickly find the users you need to manage.

Other than providing the ability for you to effectively search for users, the user browser also serves as the portal for you to add new users...

Groups


Groups are a common way of managing users in any information system. A group represents a collection of users, usually based on their positions and responsibilities within the organization. In JIRA, groups provide an effective way to apply configuration settings to users, such as permissions and notifications.

Groups are global in JIRA, which is something that should not be confused with project roles (which we will discuss later). This means if you belong to the jira-administrators group, then you will always be in that group regardless of which project you are accessing. You will see in later sections how this is different from project roles and their significance.

Group browser

Similar to user browser, the group browser allows you to search, add, and configure groups within JIRA:

  1. Browse to the JIRA administration console.

  2. Select the User management tab and then the Groups option. This will bring up the Group Browser page:

JIRA comes with a few default groups. These groups are created...

Project roles


As you have seen, groups are collections of users and are applied globally in JIRA to all projects. JIRA also offers another way of grouping users, which is applied on the project level only.

Project role browser

Similar to users and groups, project roles are maintained by the JIRA administrator through the Project Role Browser page. There is a slight difference, however, because since project roles are specific to projects, JIRA administrators only define what roles are available in JIRA and their default members. Each project's administrators (discussed in later sections) can further define each role's membership for their own projects, overriding the default assignment. We will first look at what JIRA administrators can control through the Project Role Browser page and then look at how project administrators can fine-tune the membership assignment later.

Perform the following steps to access the Project Role Browser page:

  1. Browse to the JIRA administration console.

  2. Select the...

JIRA permissions hierarchy


JIRA manages its permissions in a hierarchical manner. Each level is more fine-grained than the one above it. For a user to gain access to a resource, for example, to view an issue, they need to satisfy all four levels of permission (if they are all set on the issue in question):

  • Application access: This defines the groups that will have access to the various applications in JIRA, for example, JIRA Software

  • JIRA global permission: This permission controls the access rights functions such as overall administration

  • Project-level permission: This permission controls the project-level permissions

  • Issue-level security: This permission controls the view access on a per-issue level

We will now look at each of the permission levels and how you can configure them to suit your requirements, starting from the most coarse-grained permission level—global permissions.

Application access


Application access is a new concept introduced in JIRA 7. Since you now can have multiple applications in JIRA, for example, JIRA Software and JIRA Service Desk, and each application can have its own license, you as the administrator need to have a way to specify the users who will have access to each application. Prior to JIRA 7, this was controlled via the global permission JIRA Users, which is not removed. To manage application access:

  1. Browse to the JIRA administration console.

  2. Select the Applications tab and then the Application access option.

  3. Select the group to grant access to the application. If you check the Default option of the group, new users will be added to the group when created:

Global permissions


Global permissions, as the name suggests, is the highest permission level in JIRA. These are coarse-grained permissions applied globally across JIRA, controlling broad security levels such as the ability to access JIRA and administer configurations.

Since they are not fine-grained security, global permissions are applied to groups rather than users. The following table lists all the permissions and what they control in JIRA:

Project permissions


As you have seen, global permissions are rather coarse in what they control and are applied globally. Since they can only be applied to groups, they are rather inflexible when it comes to deciding whom to grant the permissions to.

To provide a more flexible way of managing and designing permissions, JIRA allows you to manage permissions at the project level, which allows each project to have its own distinctive permission settings. Furthermore, permissions can be assigned to one of the following:

  • Reporter: This is the user who submitted the issue

  • Group: These are all users that belong to the specified group

  • Single user: This is any user in JIRA

  • Project lead: This is the lead of the project

  • Current assignee: This is the user currently assigned to the issue

  • User custom field value: This user is specified in a custom field of the type User Custom Field

  • Project role: These are all users that belong to the specified role

  • Group custom field value: These are users within the...

Permission schemes


Permission schemes, like other schemes such as notification schemes, are collections of associations between permissions and users or a collection of users. Each permission scheme is a reusable, self-contained entity that can be applied to one or more projects.

Like most schemes, permission schemes are applied at the project level. This allows you to apply fine-grained permissions for each project. Just like project roles, JIRA administrators oversee the creation and configuration of permission schemes, and it is up to each project's administrator to choose and decide which permission scheme to use. This way, administrators are encouraged to design their permissions that can be reused based on the common needs of an organization. With meaningful scheme names and descriptions, project administrators will be able to choose the scheme that will fit their needs the best instead of requesting a new set of permissions to be set up for each project.

We will first look at how JIRA...

Issue security


We have seen how JIRA administrators can restrict general access to JIRA with global permissions, and what project administrators can do to place fine-grained permissions on individual projects through permission schemes. JIRA allows you to take things to yet another level to allow ordinary users to set the security level on the issues they are working with, with issue security.

Issue security allows users to set view permissions (not edit) on issues by selecting one of the preconfigured issue security levels. This is a very powerful feature as it allows the delegation of security control to the end users and empowers them (to a limited degree) to decide who can view their issues.

On a high level, issue security works in a similar way to permission schemes. The JIRA administrator will start by creating and configuring a set of issue security schemes with security levels set. Project administrators can then apply one of these schemes to their projects, which allow the users ...

Issue security scheme


As explained earlier, the starting point of using issue security is the issue security scheme. It is the responsibility of the JIRA administrator to create and design the security levels so they can be reused as much as possible:

  1. Browse to the JIRA administration console.

  2. Select the Issues tab and then the Issue security schemes option to bring up the Issue Security Schemes page:

Adding an issue security scheme

JIRA does not come with any predefined issue security schemes, so you will have to create your own from scratch. Perform the following steps to create a new issue security scheme:

  1. Browse to the Issue Security Schemes page.

  2. Click on the Add Issue Security Scheme button.

  3. Enter a name and description for the new scheme.

  4. Click on the Add button to create the new issue security scheme.

Since the issue security scheme does not define a set of security levels like the permission scheme, you will need to create your own set of security levels right after you create your scheme...

Troubleshooting permissions


Just like notifications, it can be very frustrating to troubleshoot permission settings. To help with this, JIRA also provides a Permission Helper to assist administrators with pinpointing settings that prevent users from accessing certain features.

The Permission Helper works similarly to the Notification Helper:

  1. Browse to the JIRA administration console.

  2. Select the System tab and then the Permission helper option at the bottom.

  3. Specify the user that is having access problems in the User field.

  4. Specify the issue to test with.

  5. Select the permission the user does not have (for example, Edit issue).

  6. Click on Submit.

As shown in the preceding screenshot, the user, Patrick Li, cannot edit issue DEMO-3 because he is not in the Internal Only issue security level, which is required as per the Default Permission Scheme used.

Workflow security


The security features we have looked at thus far are not applied to workflows. When securing your JIRA, you will also need to consider who will be allowed to perform certain workflow transitions. For example, only users in the managers' group will be able to execute the Authorize transition on issues. For you to enforce security on workflows, you will have to set it on each transition you have by adding workflow conditions. Refer to Chapter 7Workflow and Business Process, which discusses workflows and conditions in more detail.

The HR project


In the previous chapters, you configured your JIRA to capture data with customized screens and fields, and processed the captured data through workflows. What you need to do now is secure the data you have gathered to make sure that only the authorized users can access and manipulate issues.

Since your HR project is used by the internal team, what you really need to do is put enough permission around your issues to ensure that the data they hold does not get modified by other users, by mistake. This allows us to mitigate human errors by handling access accordingly.

To achieve this, you need to have the following requirements:

  • You should be able to tell who belongs to the HR team

  • Restrict issue assign operations to only the user that has submitted the ticket and members of the HR team

  • Do not allow issues to be moved to other projects

  • Limit the assignee of tickets to the reporter and members of the HR team

Of course, there are a lot of other permissions we can apply here; the preceding...

Summary


In this chapter, we first looked at how we can integrate JIRA with user repositories such as LDAP through user directories. We then looked at JIRA's user management options with groups and project roles. Though both are very similar, groups are global, while project roles are specific to each project. We also covered how JIRA hierarchically manages permissions. We discussed each permission level in detail and how to manage them.

In the next chapter, we will take a different approach and start looking at another powerful use of JIRA—getting your data out through reporting.

lock icon
The rest of the chapter is locked
You have been reading a chapter from
JIRA 7 Essentials - Fourth Edition
Published in: Nov 2016Publisher: PacktISBN-13: 9781786462510
Register for a free Packt account to unlock a world of extra content!
A free Packt account unlocks extra newsletters, articles, discounted offers, and much more. Start advancing your knowledge today.
undefined
Unlock this book and the full library FREE for 7 days
Get unlimited access to 7000+ expert-authored eBooks and videos courses covering every tech area you can think of
Renews at $15.99/month. Cancel anytime

Author (1)

author image
Patrick Li

Patrick Li is the cofounder of AppFusions and works as a senior engineer there, specializing in integration solutions with many enterprise applications and platforms, including IBM Connections, Jive, Google Apps, and more. He has worked in the Atlassian ecosystem for over 10 years, developing products and solutions for the Atlassian platform and providing expert consulting services. He has authored many books and video courses covering Jira. He has extensive experience in designing and deploying Atlassian solutions from the ground up and customizing existing deployments for clients across verticals such as healthcare, software engineering, financial services, and government agencies.
Read more about Patrick Li

Global permission level

Description

JIRA System Administrators

This gives the permission to perform all JIRA administration functions. This is akin to the root mode in other systems.

JIRA Administrators

This gives the permission to perform most JIRA administration functions that are not related to system-wide changes. (For example, to configure the SMTP server and to export/restore JIRA data.)

Browse Users

This gives the permission to view the list of JIRA users and groups. This permission is required if the user needs to use the User Picker...