

Whenever you have to solve a problem in the real world, you use elements and interact with them. For example, when you are thirsty, you take a glass, you fill it up with water, soda, or your favorite juice, and then you drink. Similarly, you can easily recognize elements, known as objects, from real-world actions and then translate them into object-oriented code. In this chapter, we will start learning the principles of object-oriented programming to use them in the Swift programming language to develop apps and applications.
In this book, you will learn to take advantage of all the object-oriented features included in the Swift programming language version 2.2. Most of the examples are compatible with previous Swift versions, such as 1.0, 1.1, 1.2, 2.0, and 2.1, but it is convenient to use Swift 2.0 or later because it has added error-handling features and many performance and stability improvements as compared to its predecessors.
We will use Xcode as our IDE (Integrated Development Environment). All the examples work with Xcode version 7 or higher. The latest versions of the IDE include Swift 2.2 as one of the supported programming languages to build iOS apps, watchOS apps, and Mac OS X applications. It is important to note that Xcode only runs on Mac OS X, and all the instructions provided in this chapter consider that we are running this operating system on a Mac computer. However, after Apple launched Swift 2.2, it made the language open source and added a port to Linux. Thus, we can apply everything we learn about object-oriented programming with Swift when targeting other platforms to which the language is ported.
Tip
In case you want to work with the Swift open source release, you can download the latest development snapshot in the Downloads section at http://swift.org. You can run all the code examples included in the book in the Swift Read Evaluate Print Loop command-line environment instead of working with Xcode Playground. The Swift Read Evaluate Print Loop command-line environment is also known as Swift REPL.
In order to install Xcode, you just need to launch Mac App Store, enter Xcode in the search box, click on the Xcode application icon shown in the results, and make sure that it is the application developed by Apple and not an Xcode helper application. The following screenshot shows the details of the Xcode application in Mac App Store:

Then, click on GET and wait until Mac App Store downloads Xcode. Note that it is necessary to download a few GBs, and therefore, it may take some time to finish the download process. Once the download is finished, click on INSTALL APP and follow the necessary steps to complete the application's installation process. Finally, you will be able to launch the Xcode application as you would execute any other application in your Mac OS X operating system.
Apple usually launches Xcode beta versions before releasing the final stable versions. It is highly recommended to avoid working with beta versions to test the examples included in the book because beta versions are unstable, and some examples might crash or generate unexpected outputs. Mac App Store only offers the latest stable version of Xcode, and therefore, there is no risk of installing a beta version by mistake when following the previously explained steps.
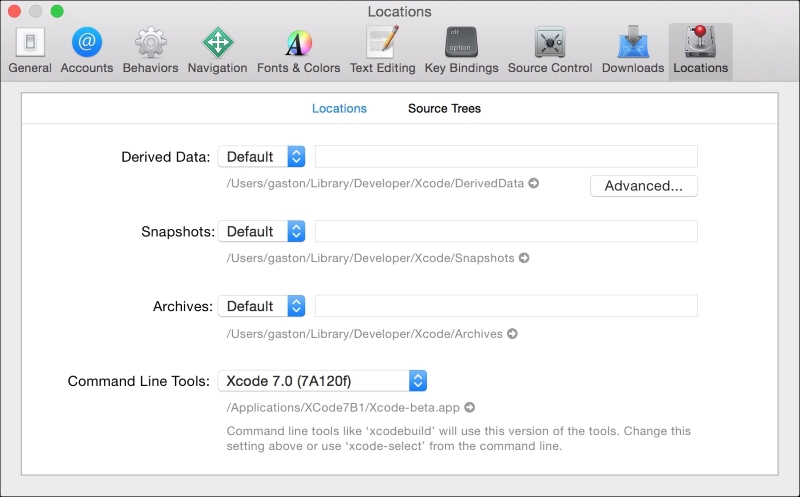
In case we have any Xcode beta version installed on the same computer in which we will run the book samples, we have to make sure that the configuration for the stable Xcode version uses the appropriate command-line tools. We won't work with the command-line tools, but we will take advantage of Playground, and this feature uses the command-line tools under the hood.
Launch Xcode and navigate to Xcode | Preferences… and click on Locations. Make sure that the Command Line Tools drop-down menu displays the stable Xcode version that you installed as the selected option. The following screenshot shows Xcode 7.2 (7C68) as the selected version for Command Line Tools:
Tip
We don't need an iOS Developer Program membership to run the examples included in this book. However, in case we want to distribute the apps or applications coded in Swift to any App Store or activate certain capabilities in Xcode, we will require an active membership.
We don't need any previous experience with the Swift programming language to work with the examples in the book and learn how to model and create object-oriented code with Swift. If we have some experience with Objective-C, Java, C#, Python, Ruby, or JavaScript, we will be able to easily learn Swift's syntax and understand the examples. Swift borrows many features from these and other modern programming languages, and therefore, any knowledge of these languages will be extremely useful.
Now, let's forget about Xcode and Swift for a while. Imagine that we have to develop a new universal iOS app that targets the iPad, iPhone, and iPod touch devices. We will have different UIs (User Interfaces) and UXs (User eXperiences) because these devices have diverse screen sizes and resolutions. However, no matter the device in which the app runs, it will have the same goal.
Imagine that Vanessa is a very popular YouTuber, painter, and craftswoman who usually uploads videos on a YouTube channel. She has more than a million followers, and one of her latest videos had a huge impact on social networking sites. In this video, she sketched basic shapes and then painted them with acrylic paint to build patterns. She worked with very attractive colors, and many famous Hollywood actresses uploaded pictures on Instagram sharing their creations with the technique demonstrated by Vanessa and with the revolutionary special colors developed by a specific acrylic paint manufacturer.
Obviously, the acrylic paint manufacturer wants to take full advantage of this situation, so he specifies the requirements for an app. The app must provide a set of predefined 2D shapes that the user can drag and drop in a document to build a pattern so that he/she can change both the 2D position and size. It is important to note that the shapes cannot intersect, and users cannot change the line widths because they are the basic requirements of the technique introduced by Vanessa. A user can select the desired line and fill colors for each shape. At any time, the user can tap a button, and the app must display a list of the acrylic paint tubes, bottles, or jars that the user must buy to paint the drawn pattern. Finally, the user can easily place an online order to request the suggested acrylic paint tubes, bottles, or jars. The app also generates a tutorial to explain to the user how to generate each of the final colors for the lines and fills by thinning the appropriate amount of acrylic paint with water, based on the colors that the user has specified.
The following image shows an example of a pattern. Note that it is extremely simple to describe the objects that compose the pattern: four 2D shapes—specifically, two rectangles and two circles. If we measure the shapes, we would easily realize that they aren't two squares and two ellipses; they are two rectangles and two circles.

We can easily recognize objects; we understand that the pattern is composed of many 2D geometric shapes. Now, let's focus on the core requirement for the app, which is calculating the required amounts of acrylic paint. We have to take into account the following data for each shape included in the pattern in order to calculate the amount of acrylic paint:
The perimeter
The area
The line color
The fill color
The app allows users to use a specific color for the line that draws the borders of each shape. Thus, we have to calculate the perimeter in order to use it as one of the values that will allow us to estimate the amount of acrylic paint that the user must buy to paint each shape's border. Then, we have to calculate the area to use it as one of the values that will allow us to estimate the amount of acrylic paint that the user must buy to fill each shape's area.
We have to start working on the backend code that calculates areas and perimeters. The app will follow Vanessa's guidelines to create the patterns, and it will only support the following six shapes:
Squares
Equilateral triangles
Rectangles
Circles
Ellipses
Regular hexagons
We can start writing Swift code—specifically, six functions that calculate the areas of the previously enumerated shapes and another six to calculate their perimeters. Note that we are talking about functions, and we stopped thinking about objects; therefore, we will face some problems with this path, which we will solve with an object-oriented approach from scratch.
For example, if we start thinking about functions to solve the problem, one possible solution is to code the following 12 functions to do the job:
calculateSquareAreacalculateEquilateralTriangleAreacalculateRectangleAreacalculateCircleAreacalculateEllipseAreacalculateRegularHexagonAreacalculateSquarePerimetercalculateEquilateralTrianglePerimetercalculateRectanglePerimetercalculateCirclePerimetercalculateEllipsePerimetercalculateRegularHexagonPerimeter
Each of the previously enumerated functions has to receive the necessary parameters of each shape and return either its calculated area or perimeter.
Now, let's forget about functions for a bit. Let's recognize the real-world objects from the application's requirements that we were assigned. We have to calculate the areas and perimeters of six elements, which are six nouns in the requirements that represent real-life objects—specifically 2D shapes. Our list of real-world objects is exactly the same that Vanessa's specification uses to determine the shapes allowed to be used to create patterns. Take a look at the list:
Squares
Equilateral triangles
Rectangles
Circles
Ellipses
Regular hexagons
After recognizing the real-life objects, we can start designing our application by following an object-oriented paradigm. Instead of creating a set of functions that perform the required tasks, we can create software objects that represent the state and behavior of a square, equilateral triangle, rectangle, circle, ellipse, and regular hexagon. This way, the different objects mimic the real-world 2D shapes. We can work with the objects to specify the different attributes required to calculate the area and perimeter. Then, we can extend these objects to include the additional data required to calculate other required values, such as the quantity of acrylic paint required to paint the borders.
Now, let's move to the real world and think about each of the previously enumerated six shapes. Imagine that we have to draw each of the shapes on paper and calculate their areas and perimeters. After we draw each shape, which values will we use to calculate their areas and perimeters? Which formulas will we use?
Tip
We started working on an object-oriented design before we started coding, and therefore, we will work as if we didn't know many concepts of geometry. For example, we can easily generalize the formulas that we use to calculate the perimeters and areas of regular polygons. However, we will analyze the requirements in most cases; we still aren't experts on the subject, and we need to dive deeper into the subject before we can group classes and generalize their behavior.
The following figure shows a drawn square and the formulas that we will use to calculate the perimeter and area. We just need the length of side value, usually identified as a.

The following figure shows a drawn equilateral triangle and the formulas that we will use to calculate the perimeter and area. This type of triangle has equal sides, and the three internal angles are equal to 60 degrees. We just need the length of side value, usually identified as a.

The following figure shows a drawn rectangle and the formulas that we will use to calculate the perimeter and area. We need the width and height values.

The following figure shows a drawn circle and the formulas that we will use to calculate the perimeter and area. We just need the radius value, usually identified as r.

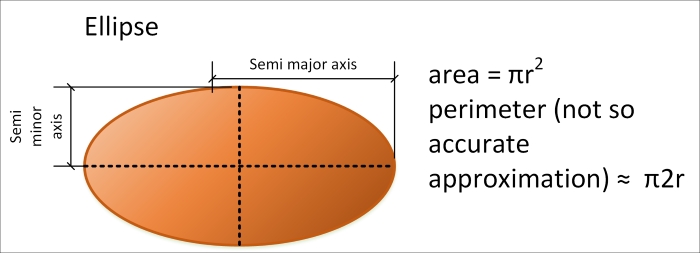
The following figure shows a drawn ellipse and the formulas that we will use to calculate the perimeter and area. We need the semimajor axis (usually labelled as a) and semiminor axis (usually labelled as b) values.
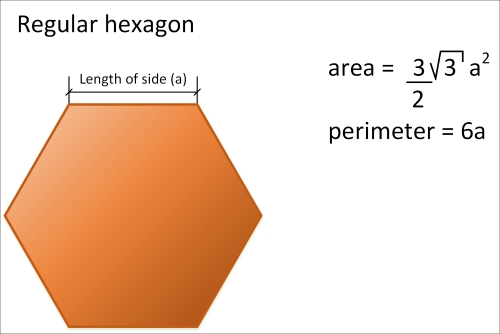
The following figure shows a drawn regular hexagon and the formulas that we will use to calculate the perimeter and area. We just need the length of the side value, usually labelled as a.
The following table summarizes the data required for each shape:
|
Shape |
Required data |
|---|---|
|
Square |
The length of a side |
|
Equilateral triangle |
The length of a side |
|
Rectangle |
The width and height |
|
Circle |
The radius |
|
Ellipse |
The semimajor and semiminor axes |
|
Regular hexagon |
The length of a side |
Each object that represents a specific shape encapsulates the required data that we identified. For example, an object that represents an ellipse will encapsulate the ellipse's semimajor and semiminor axes.
Imagine that you want to draw and calculate the areas of six different ellipses. You will end up with six ellipses drawn, their different semimajor axis and semiminor axis values, and their calculated areas. It would be great to have a blueprint to simplify the process of drawing each ellipse with their different semimajor axis and semiminor axis values.
In object-oriented programming, a class is a template definition or blueprint from which objects are created. Classes are models that define the state and behavior of an object. After declaring a class that defines the state and behavior of an ellipse, we can use it to generate objects that represent the state and behavior of each real-world ellipse.
Tip
Objects are also known as instances. For example, we can say each circle object is an instance of the Circle class.
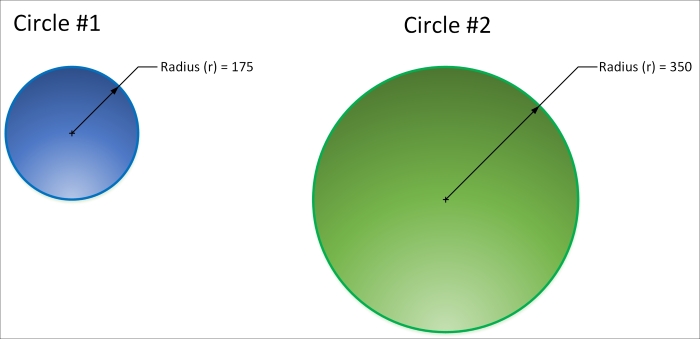
The following picture shows two circle instances drawn with their radius values specified: Circle #1 and Circle #2. We can use a Circle class as a blueprint to generate the two different Circle instances. Note that Circle #1 has a radius value of 175, and Circle #2 has a radius value of 350. Each instance has a different radius value.
The following image shows three ellipse instances drawn with their semimajor axis and semiminor axis values specified: Ellipse #1, Ellipse #2, and Ellipse #3. In this case, we can use an Ellipse class as a blueprint to generate the three different ellipse instances. It is very important to understand the difference between a class and the objects or instances generated through its usage. The object-oriented programming features supported in Swift allow us to discover which blueprint we used to generate a specific object. We will use these features in many examples in the upcoming chapters. Thus, we can know that each object is an instance of the Ellipse class. Each ellipse has its own specific values for the semimajor and semiminor axes.

We recognized six completely different real-world objects from the application's requirements, and therefore, we can generate the following six classes to create the necessary objects:
SquareEquilateralTriangleRectangleCircleEllipseRegularHexagon
Note the usage of Pascal case for class names; this means that the first letter of each word that composes the name is capitalized, while the other letters are in lowercase. This is a coding convention in Swift. For example, we use the RegularHexagon name for the class that will generate regular hexagons.
We know the information required for each of the shapes to achieve our goals. Now, we have to design the classes to include the necessary properties that provide the required data to each instance. We have to make sure that each class has the necessary variables that encapsulate all the data required by the objects to perform all the tasks based on our application domain.
Let's start with the RegularHexagon class. It is necessary to know the length of a side for each instance of this class—that is, for each regular hexagon object. Thus, we need an encapsulated variable that allows each instance of the RegularHexagon class to specify the value for the length of a side.
Tip
The variables defined in a class to encapsulate the data for each instance of the class in Swift are known as properties. Each instance has its own independent value for the properties defined in the class. The properties allow us to define the characteristics for an instance of the class. In other programming languages, these variables defined in a class are known as either attributes or fields.
The RegularHexagon class defines a floating point property named lengthOfSide, whose initial value is equal to 0 for any new instance of the class. After we create an instance of the RegularHexagon class, it is possible to change the value of the lengthOfSide attribute.
Note the usage of Camel case, which is using a lowercase first letter, for class property names. The first letter is lowercase, and then, the first letter for each word that composes the name is capitalized, while the other letters are in lowercase. It is a coding convention in Swift for both variables and properties. For example, we use the name lengthOfSide for the property that stores the value of the length of side.
Imagine that we create two instances of the RegularHexagon class. One of the instances is named regularHexagon1 and the other regularHexagon2. The instance names allow us to access the encapsulated data for each object, and therefore, we can use them to change the values of the exposed properties.
Swift uses a dot (.) to allow us to access the properties of instances. So, regularHexagon1.lengthOfSide provides access to the length of side for the RegularHexagon instance named regularHexagon1, and regularHexagon2.lengthOfSide does the same for the RegularHexagon instance named regularHexagon2.
Tip
Note that the naming convention makes it easy for us to differentiate an instance name—that is, a variable from a class name. Whenever we see the first letter in uppercase or capitalized, it means that we are talking about a class.
We can assign 20 to regularHexagon1.lengthOfSide and 50 to regularHexagon2.lengthOfSide. This way, each RegularHexagon instance will have a different value for the lengthOfSide attribute.
Now, let's move to the Ellipse class. We can define two floating point attributes for this class: semiMajorAxis and semiMinorAxis. Their initial values will also be 0. Then, we can create three instances of the Ellipse class named ellipse1, ellipse2, and ellipse3.
We can assign the values summarized in the following table to the three instances of the Ellipse class:
|
Instance name |
|
|
|---|---|---|
|
|
|
|
|
|
|
|
|
|
|
|
This way, ellipse1.semiMinorAxis will be equal to 210, while ellipse3.semiMinorAxis will be equal to 180. The ellipse1 instance represents an ellipse with semiMinorAxis of 210 and semiMajorAxis of 400.
The following table summarizes the floating point properties defined for each of the six classes that we need for our application:
|
Class name |
Properties list |
|---|---|
|
|
|
|
|
|
|
|
|
|
|
|
|
|
|
|
|
|
Tip
The properties are members of their respective classes. However, properties aren't the only members that classes can have.
Note that three of these classes have the same property: lengthOfSide—specifically, the following three classes: Square, EquilateralTriangle, and RegularHexagon. We will dive deep into what these three classes have in common later and take advantage of object-oriented features to reuse code and simplify our application's maintenance. However, we are just starting our journey, and we will make improvements as we learn additional object-oriented features included in Swift.
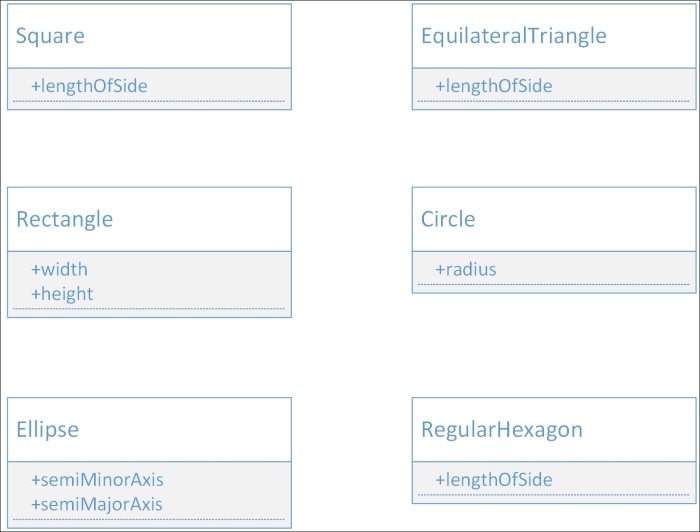
The following image shows a UML (Unified Modeling Language) class diagram with the six classes and their properties. This diagram is very easy to understand. The class name appears on the top of the rectangle that identifies each class. A rectangle below the same shape that holds the class name displays all the property names exposed by the class with a plus sign (+) as a prefix. This prefix indicates that what follows it is an attribute name in UML and a property name in Swift.
So far, we designed six classes and identified the necessary properties for each of them. Now, it is time to add the necessary pieces of code that work with the previously defined properties to perform all the tasks. We have to make sure that each class has the necessary encapsulated functions that process the property values specified in the objects to perform all the tasks.
Let's forget a bit about similarities between the different classes. We will work with them individually as if we didn't have the necessary knowledge of geometric formulas. We will start with the Square class. We need pieces of code that allow each instance of this class to use the value of the lengthOfSide property to calculate the area and perimeter.
Tip
The functions defined in a class to encapsulate the behavior of each instance of the class are known as methods. Each instance can access the set of methods exposed by the class. The code specified in a method can work with the properties specified in the class. When we execute a method, it will use the properties of the specific instance. Whenever we define methods, we must make sure that we define them in a logical place—that is, in the place where the required data is kept.
When a method doesn't require parameters, we can say that it is a parameterless method. In this case, all the methods we will initially define for the classes will be parameterless methods that just work with the values of the previously defined properties and use the formulas shown in the figures. Thus, we will be able to call them without arguments. We will start creating methods, but we will be able to explore additional options based on specific Swift features later.
The Square class defines the following two parameterless methods. We will declare the code for both methods within the definition of the Square class so that they can access the lengthofSide property value, as follows:
calculateArea: This method returns a floating point value with the calculated area for the square. It returns the square of thelengthOfSideattribute value (lengthOfSide2 or lengthOfSide ^ 2).calculatePerimeter: This method returns a floating point value with the calculated perimeter for the square. It returns thelengthOfSideattribute value multiplied by 4 (4 * lengthOfSide).
Note the usage of Camel case—that is, using a lowercase first letter—for method names. The first letter is in lowercase, and then, the first letter for each word that composes the name is capitalized, while the other letters are in lowercase. As it happened with property names, it is a coding convention in Swift for methods.
Swift uses a dot (.) to allow us to execute the methods of the instances. Imagine that we have two instances of the Square class: square1 with the lengthOfSide property equal to 20 and square2 with the lengthOfSide property equal to 40. If we call square1.calculateArea, it will return the result 202, which is 400. If we call square2.calculateArea, it will return the result 402, which is 1600. Each instance has a diverse value for the lengthOfSide attribute, and therefore, the results of executing the calcualteArea method are different.
If we call square1.calculatePerimeter, it will return the result of 4 * 20, which is 80. On the other hand, if we call square2.calculatePerimeter, it will return the result of 4 * 40, which is 160.
Now, let's move to the EquilateralTriangle class. We need exactly two methods with the same names specified for the Square class: calculateArea and calculatePerimeter. In addition, the methods return the same type and don't need parameters, so we can declare both of them as parameterless methods, as we did in the Square class. However, these methods have to calculate the results in a different way; that is, they have to use the appropriate formulas for an equilateral triangle. The other classes also need the same two methods. However, each of them will use the appropriate formulas for the related shape.
We have a specific problem with the calculatePerimeter method that the Ellipse class generates. Perimeters are complex to calculate for ellipses, so there are many formulas that provide approximations. An exact formula requires an infinite series of calculations. We can use an initial formula that isn't very accurate, which we will have to improve later. The initial formula will allow us to return a floating point value with the calculated approximation of the perimeter for the ellipse.
The following figure shows an updated version of the UML diagram with the six classes, their attributes, and their methods:

So far, our object-oriented solution includes six classes with their properties and methods. However, if we take another look at these six classes, we will notice that all of them have the same two methods: calculateArea and calculatePerimeter. The code for the methods in each class is different because each shape uses a special formula to calculate either the area or perimeter. However, the declarations, contracts, or protocols for the methods are the same. Both methods have the same name, are always parameterless, and return a floating point value. Thus, all of them return the same type.
When we talked about the six classes, we said we were talking about six different geometrical shapes or simply shapes. Thus, we can generalize the required behavior or protocol for the six shapes. The six shapes must define the calculateArea and calculatePerimeter methods with the previously explained declarations. We can create a protocol to make sure that the six classes provide the required behavior.
The protocol is a special class named Shape, and it generalizes the requirements for the geometrical shapes in our application. In this case, we will work with a special class, but in the future, we will use protocols for the same goal. The Shape class declares two parameterless methods that return a floating point value: calculateArea and calculatePerimeter. Then, we will declare the six classes as subclasses of the Shape class, which will inherit these definitions, and provide the specific code for each of these methods.
The subclasses of Shape (Square, EquilateralTriangle, Rectangle, Circle, Ellipse, and RegularHexagon) implement the methods because they provide code while maintaining the same method declarations specified in the Shape superclass. Abstraction and hierarchy are two major pillars of object-oriented programming.
Object-oriented programming allows us to discover whether an object is an instance of a specific superclass. After we chang the organization of the six classes and they become subclasses of Shape, any instance of Square, EquilateralTriangle, Rectangle, Circle, Ellipse, or RegularHexagon is also a Shape class. In fact, it isn't difficult to explain the abstraction because we speak the truth about the object-oriented model when we say that it represents the real world. It makes sense to say that a regular hexagon is indeed a shape, and therefore, an instance of RegularHexagon is a Shape class. An instance of RegularHexagon is both a Shape (the superclass of RegularHexagon) and a RegularHexagon (the class that we used to create the object) class.
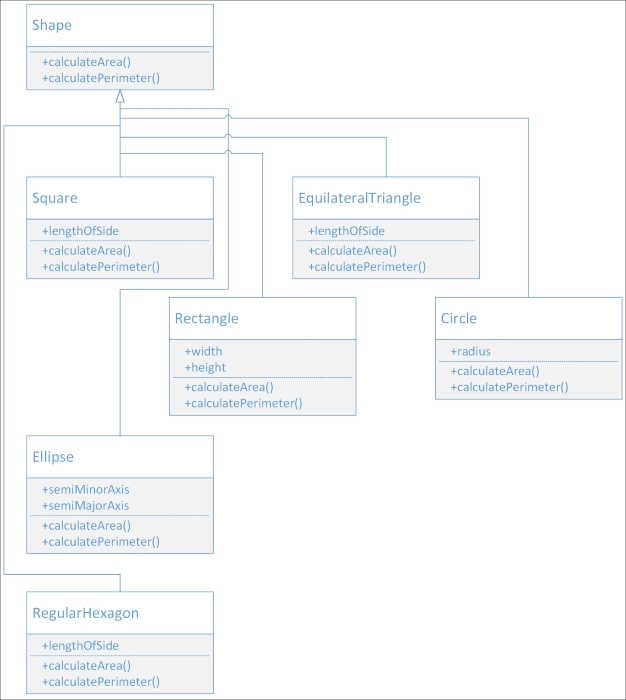
The following figure shows an updated version of the UML diagram with the superclass or base class (Shape), its six subclasses, and their attributes and methods. Note that the diagram uses a line that ends in an arrow that connects each subclass to its superclass. You can read the line that ends in an arrow as the following: the class where the line begins "is a subclass of" the class that has the line ending with an arrow. For example, Square is a subclass of Shape, and EquilateralTriangle is a subclass of Shape.
Now, it is time to have a meeting with a domain expert—that is, someone that has an excellent knowledge of geometry. We can use the UML diagram to explain the object-oriented design for the solution. After we explain the different classes that we will use to abstract behavior, the domain expert explains to us that many of the shapes have something in common and that we can generalize behavior even further. The following three shapes are regular polygons:
An equilateral triangle (the
EquilateralTriangleclass)A square (the
Squareclass)A regular hexagon (the
RegularHexagonclass)
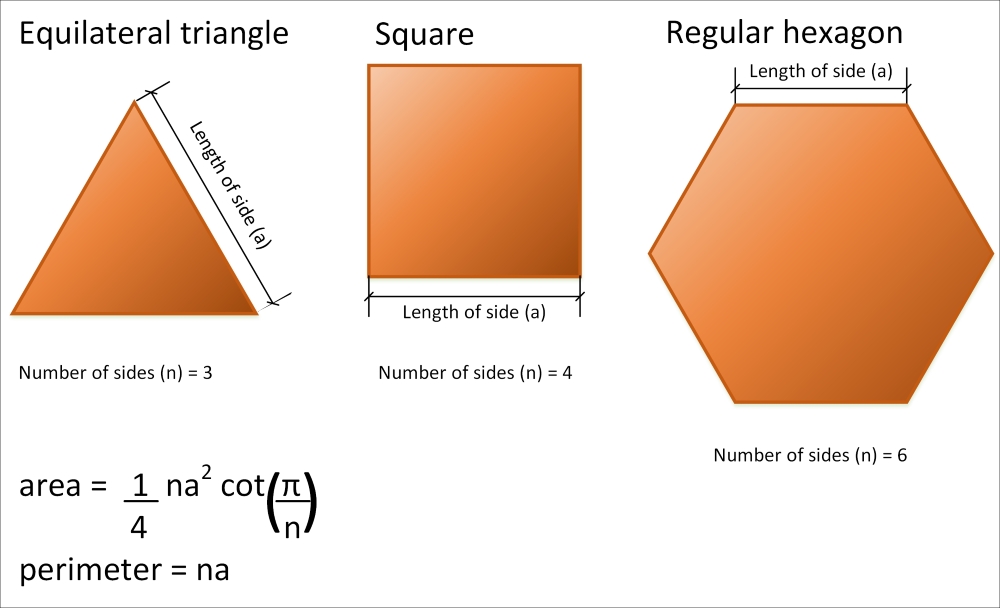
Regular polygons are polygons that are both equiangular and equilateral. All the sides that compose a regular polygon have the same length and are placed around a common center. This way, all the angles between any two sides are equal. An equilateral triangle is a regular polygon with three sides, the square has four sides, and the regular hexagon has six sides. The following picture shows the three regular polygons and the generalized formulas that we can use to calculate their areas and perimeters. The generalized formula to calculate the area requires us to calculate a cotangent, which is abbreviated as cot:
As the three shapes use the same formula with just a different value for the number of sides (n) parameter, we can generalize the required protocol for the three regular polygons. The protocol is a special class named RegularPolygon that defines a new numberOfSides property that specifies the number of sides with an integer value. The RegularPolygon class is a subclass of the previously defined Shape class. It makes sense because a regular polygon is indeed a shape. The three classes that represent regular polygons become subclasses of RegularPolygon. However, both the calculateArea and calculatePerimeter methods are coded in the RegularPolygon class using the generalized formulas. The subclasses just specify the right value for the inherited numberOfSides property, as follows:
EquilateralTriangle: 3Square: 4RegularHexagon: 6
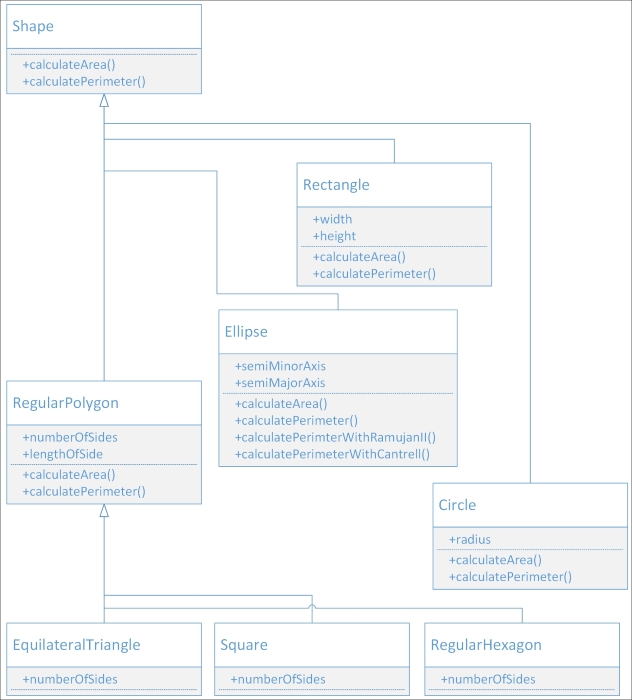
The RegularPolygon class also defines the lengthOfSide property that was previously defined in the three classes that represent regular polygons. Now, the three classes become subclasses or RegularPolygon and inherit the lengthOfSide property. The following figure shows an updated version of the UML diagram with the new RegularPolygon class and the changes in the three classes that represent regular polygons. The three classes that represent regular polygons do not declare either the calculateArea or calculatePerimeter methods because these classes inherit them from the RegularPolygon superclass and don't need to make changes to these methods that apply a general formula.

Our domain expert also explains to us a specific issue with ellipses. There are many formulas that provide approximations of the perimeter value for this shape. Thus, it makes sense to add additional methods that calculate the perimeter using other formulas. He suggests us to make it possible to calculate the perimeters with the following formulas:
The second version of the formula developed by Srinivasa Aiyangar Ramanujan
The formula proposed by David W. Cantrell
We will define the following two additional parameterless methods to the Ellipse class. The new methods will return a floating point value and solve the specific problem of the ellipse shape:
CalculatePerimeterWithRamanujanIICalculatePerimeterWithCantrell
This way, the Ellipse class will implement the methods specified in the Shape superclass and also add two specific methods that aren't included in any of the other subclasses of Shape. The following figure shows an updated version of the UML diagram with the new methods for the Ellipse class:
Now, let's forget a bit about geometry, shapes, polygons, perimeters, and areas. We will interact with API objects in the Xcode Playground. You still need to learn many things before we can start creating object-oriented code. However, we will write some code in the Playground to interact with an existing API before we move forward with our journey into the object-oriented programming world.
Object-oriented programming is extremely useful when you have to interact with API objects. When Apple launched iOS 8, it introduced a Health app that provided iPhone users access to a dashboard of health and fitness data. The HealthKit framework introduced in the iOS SDK 8 allows app developers to request permissions from the users themselves to read and write specific types of health and fitness data. The framework makes it possible to ask for, create, and save health and fitness data that the users will see summarized in the Health app.
When we store and query health and fitness data, we have to use the framework to work with the units in which the values are expressed, their conversions, and localizations. For example, let's imagine an app that stores body temperature data without considering units and their conversions. A value of 39 degrees Celsius (which is equivalent to 102.2 degrees Fahrenheit) in an adult would mean that his/her body temperature is higher than normal (that is, he/she may have a fever). However, a value of 39 degrees Fahrenheit (equivalent to 3.88 degrees Celsius) would mean that his/her body is close to its freezing point. If our app just stores values without considering the related units and user preferences, we can have huge mistakes. If the app just saves 39 degrees and thinks that the user will always display Celsius, it will still display 39 degrees to a user whose settings use Fahrenheit as the default temperature unit. Thus, the app will provide wrong information to the user.
The data in HealthKit is always represented by a double value with an associated simple or complex unit. The units are classified into types, and it is possible to check the compatibility between units before performing conversions. We can work with HealthKit quantities and units in the Swift interactive Playground and understand how simple it is to work with an object-oriented framework. It is important to note that the Playground doesn't allow us to interact with the HealthKit data store. However, we will just play with quantities and units with a few object-oriented snippets.
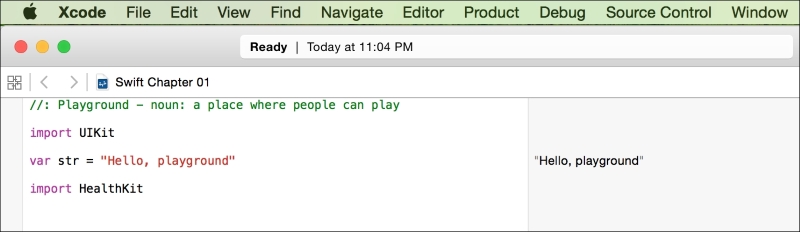
Start Xcode, navigate to File | New | Playground…, enter a name for the Playground, select iOS as the desired platform, click on Next, select the desired location for the Playground file, and click on Create. Xcode will display a Playground window with a line that imports UIKit and creates a string variable. You just need to add the following line to be able to work with quantities and units from the HealthKit framework, as shown in the subsequent screenshot:
import HealthKit
All HealthKit types start with the HK prefix. HKUnit represents a particular unit that can be either simple or complex. Simple units for Temperature are degrees Celsius and degrees Fahrenheit. A complex unit for Mass/Volume is ounces per liter (oz/L). HKUnit supports many standard SI units (Système Internationale d'Unités in French, International System of Units in English) and nonSI units.
Add the following two lines to the Swift Playground and check the results on the right-hand side of the window; you will notice that they generate instances of HKTemperatureUnit. Thus, you created two objects that represent temperature units, as follows:
let degCUnit = HKUnit.degreeCelsiusUnit()
let degFUnit = HKUnit.degreeFahrenheitUnit()
However, there are other ways to create objects that represent temperature units. It is also possible to use the HKUnit initializer, which returns the appropriate unit instance from its string representation. For example, the following lines also generate instances of HKTemperatureUnit for degrees in Celsius and Fahrenheit:
let degCUnitFromStr = HKUnit(fromString: "degC")
let degFUnitFromStr = HKUnit(fromString: "degF")
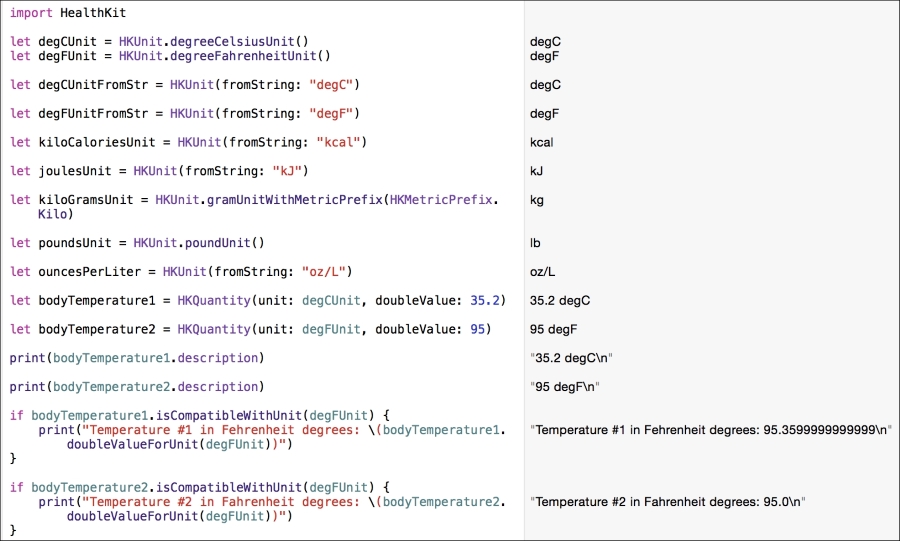
The following lines generate two instances of HKEnergyUnit—one for kilocalories and the other for kilojoules:
let kiloCaloriesUnit = HKUnit(fromString: "kcal")
let joulesUnit = HKUnit(fromString: "kJ")
The next two lines generate two instances of HKMassUnit—one for kilograms and the other for pounds:
let kiloGramsUnit = HKUnit.gramUnitWithMetricPrefix(HKMetricPrefix.Kilo)
let poundsUnit = HKUnit.poundUnit()
The next line generates an instance of _HKCompoundUnit because the string specifies a complex unit for Mass/Volume: ounces per liter (oz/L). The subsequent screenshot shows the results displayed in the Playground:
let ouncesPerLiter = HKUnit(fromString: "oz/L")

HKQuantity encapsulates a quantity value (Double) and the unit of measurement (HKUnit). This class doesn't provide all the operations you might expect to work with quantities and their units of measure, but it allows you to perform some useful compatibility checks and conversions.
The following lines create two HKQuantity instances with temperature units named bodyTemperature1 and bodyTemperature2. The former uses degrees Celsius (degCUnit) and the latter degrees Fahrenheit (degFUnit). Then, the code calls the isCompatibleWithUnit method to make sure that each HKQuantity instance can be converted to degrees Fahrenheit (degFUnit). If isCompatibleWithUnit returns true, it means that you can convert to HKUnit, which is specified as an argument. We always have to call this method before calling the doubleValueForUnit method. This way, we will avoid errors when the units aren't compatible.
The doubleValueForUnit method returns the quantity value converted to the unit specified as an argument. In this case, the two calls make sure that the value is expressed in degrees Fahrenheit no matter the temperature unit specified in each HKQuantity instance. The screenshot that follows the given code shows the results displayed in the Playground:
let bodyTemperature1 = HKQuantity(unit: degCUnit, doubleValue: 35.2)
let bodyTemperature2 = HKQuantity(unit: degFUnit, doubleValue: 95)
print(bodyTemperature1.description)
print(bodyTemperature2.description)

if bodyTemperature1.isCompatibleWithUnit(degFUnit) {
    print("Temperature #1 in Fahrenheit degrees:
\(bodyTemperature1.doubleValueForUnit(degFUnit))")
}

if bodyTemperature2.isCompatibleWithUnit(degFUnit) {
    print("Temperature #2 in Fahrenheit degrees: \(bodyTemperature2.doubleValueForUnit(degFUnit))")
}
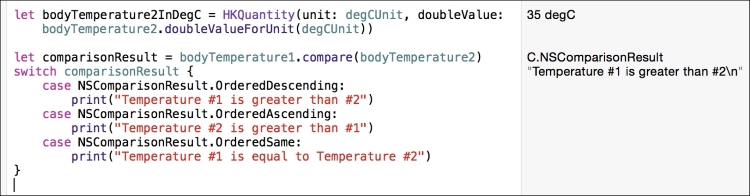
The following line shows an example of the code that creates a new HKQuantity instance with a quantity and temperature unit converted from degrees Fahrenheit to degrees Celsius. There is no convert method that acts as a shortcut, so we have to call doubleValueForUnit and use it in the HKQuantity initializer, as follows:
let bodyTemperature2InDegC = HKQuantity(unit: degCUnit, doubleValue: bodyTemperature2.doubleValueForUnit(degCUnit))
The compare method returns an NSComparisonResult value that indicates whether the receiver is greater than, equal to, or less than the compatible HKQuantity value specified as an argument. For example, the following lines compare bodyTemperature1 with bodyTemperature2 and print the results of the comparison. Note that it isn't necessary to convert both the HKQuantity instances to the same unit; they just need to be compatible, and the compare method will be able to perform the comparison by making the necessary conversions under the hood. In this case, one of the temperatures is in degrees Celsius, and the other is in degrees Fahrenheit. The screenshot that follows the given code shows the results displayed in the Playground:
let comparisonResult = bodyTemperature1.compare(bodyTemperature2)
switch comparisonResult {
    case NSComparisonResult.OrderedDescending:
        print("Temperature #1 is greater than #2")
    case NSComparisonResult.OrderedAscending:
        print("Temperature #2 is greater than #1")
    case NSComparisonResult.OrderedSame:
        print("Temperature #1 is equal to Temperature #2")
}
Now that you understand what an object is, it is time to recognize objects in different applications.
Exercise 1: Work with an iOS app and recognize its objects. Work with an app that has both an iPhone and iPad version. Execute the app in both versions and recognize the different objects that the developers might have used to code the app. Create an UML diagram with the classes that you would use to create the app. Think about the methods and properties that you would require for each class. If the app is extremely complex, just focus on a specific feature.
Exercise 2: Work with a Mac OS X application and recognize its objects. Execute the app and work with a specific feature. Recognize the objects that interact to enable you to work with the feature. Write down the objects you recognized and their required behaviors.
Objects are also known as:
Classes.
Subclasses.
Instances.
The code specified in a method within a class:
Cannot access the properties specified in the class.
Can access the properties specified in the class.
Cannot interact with other members of the class.
A subclass:
Inherits all members from its superclass.
Inherits only methods from its superclass.
Inherits only properties from its superclass.
The variables defined in a class to encapsulate data for each instance of the class in Swift are known as:
Subclasses.
Properties.
Methods.
The functions defined in a class to encapsulate behavior for each instance of the class are known as:
Subclasses.
Properties.
Methods.
In this chapter, you learned how to recognize real-world elements and translate them into the different components of the object-oriented paradigm supported in Swift: classes, protocols, properties, methods, and instances. You understood that the classes represent blueprints or templates to generate the objects, also known as instances.
We designed a few classes with properties and methods that represent blueprints for real-life objects. Then, we improved the initial design by taking advantage of the power of abstraction and specialized different classes. We generated many versions of the initial UML diagram as we added superclasses and subclasses. Finally, we wrote some code in the Swift Playground to understand how we can interact with API objects.
Now that you have learned some of the basics of the object-oriented paradigm, we are ready to start creating classes and instances in Swift, which is the topic of the next chapter.
You have been reading a chapter from
Object???Oriented Programming with Swift 2Published in: Jan 2016Publisher: ISBN-13: 9781785885693
Register for a free Packt account to unlock a world of extra content!
A free Packt account unlocks extra newsletters, articles, discounted offers, and much more. Start advancing your knowledge today.
undefined
Unlock this book and the full library FREE for 7 days
Get unlimited access to 7000+ expert-authored eBooks and videos courses covering every tech area you can think of
Renews at €14.99/month. Cancel anytime