


 Download code from GitHub
Chapter 2: Creating a Collection Game
In this chapter, we will complete the collection game that we started in the previous chapter. As a reminder, in this game, the player wanders an environment in first-person, searching for and collecting coins before a global timer expires. So far, the project features a complete environment, a first-person controller, and a simple coin object. The coin has been shaped, and a Material has been applied, so it looks the part, but cannot yet be collected (something we will rectify shortly).
This chapter completes the project by making the coin object collectable and adding a timer system to determine whether the total game time has expired. In essence, this chapter is about defining a system of logic and rules governing the game, including the win and lose conditions. To achieve this, we'll need to code in C#.
In this chapter, we'll customize the Material (specifying how an object should be rendered) for the coin object to make it look more realistic. Once our coins look the part, we'll write scripts in C# for coin collection, counting, and spawning. As part of this process, we'll create custom Tags (which we'll use to identify the coin objects in the scene), and convert the coins to prefabs (which will enable us to spawn them during gameplay). We'll also write a timer to add a sense of urgency to the game.
Overall, this chapter will demonstrate the following topics:
- Creating Materials
- Coding with C#
- Working with prefabs
- Unity Tags
- Using particle systems
- Building and compiling games to be run as standalone
Technical requirements
This book is about Unity and developing games in that engine. The basics of programming as a subject is, however, beyond the scope of this book. So, I'll assume that you already have a working knowledge of coding generally but have not coded in Unity before.
You can download the example code files for this book from GitHub at https://github.com/PacktPublishing/Unity-2020-By-Example.
Once downloaded, the project so far can be found in the book's companion files in the Chapter04/Start folder you can find the completed CollectionGame project in the Chapter02/End folder.
Working with Materials
The previous chapter closed by creating a coin object from a non-uniformly scaled cylinder primitive, as shown in Figure 2.1:
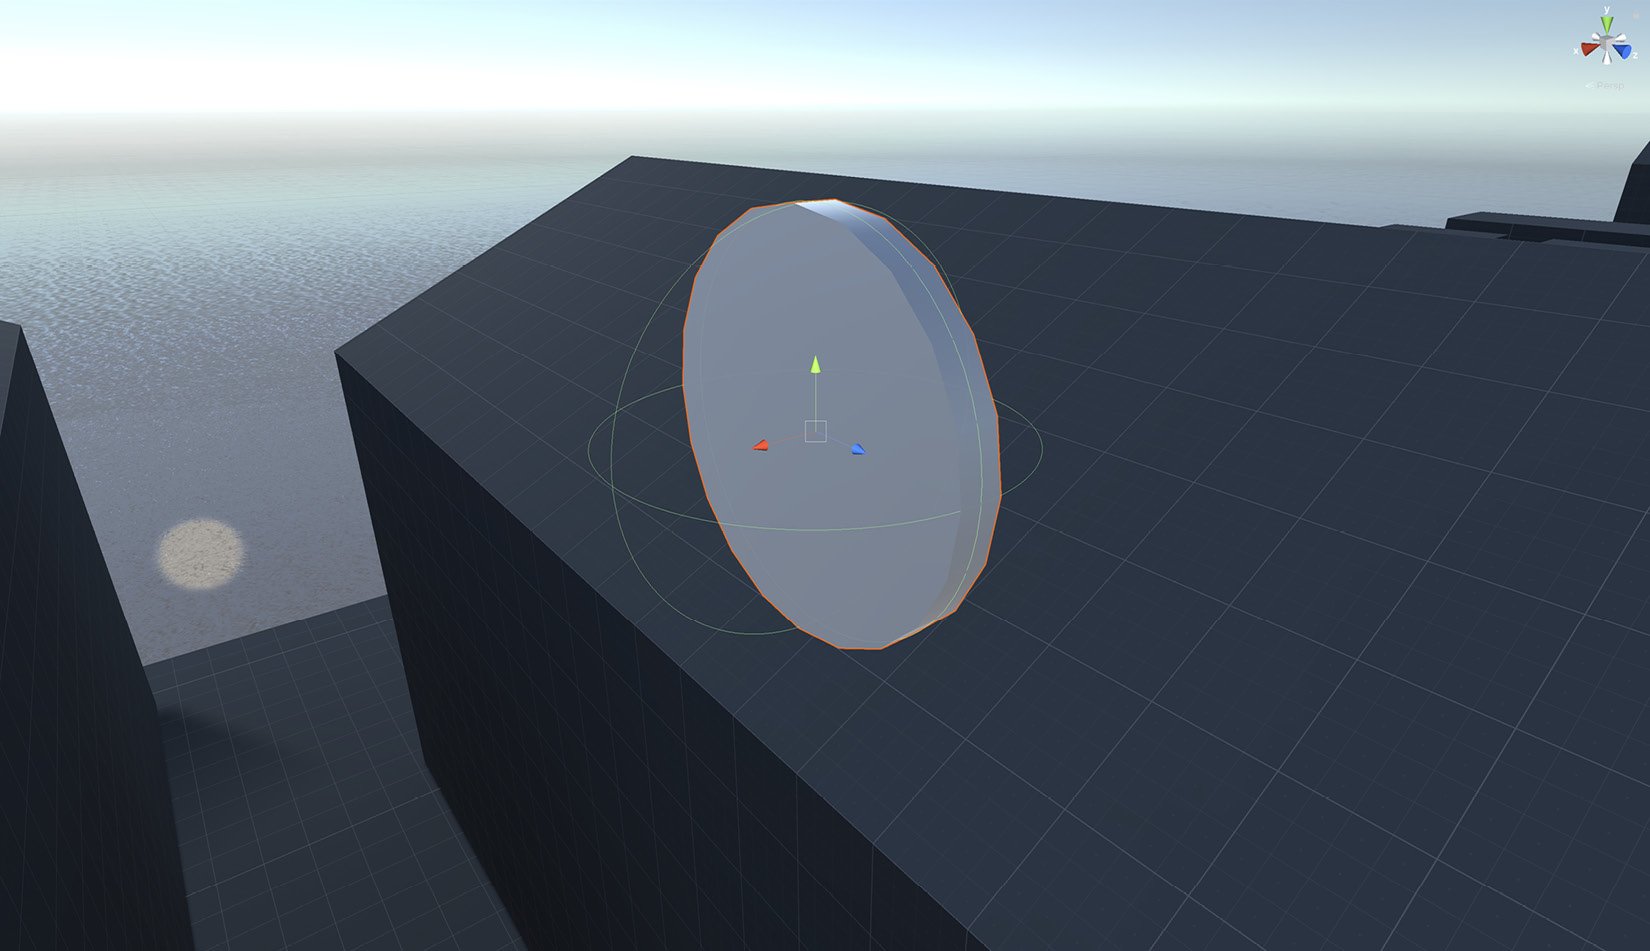
Figure 2.1 – The coin object so far
The coin object, as a concept, represents a basic or fundamental unit in our game logic because the player character should be actively searching the level looking for coins to collect before a timer runs out. The coin has a functional purpose in this game and is not just an aesthetic prop. Therefore, the coin object, as it stands, is lacking in two essential respects. Firstly, it looks dull and gray—it doesn't stand out and grab the player's attention. Secondly, the coin cannot be collected yet. The player can walk into the coin, but nothing appropriate happens in response.
In this section, we'll focus on improving the coin appearance using a Material. A Material defines an algorithm (or instruction set) specifying how the coin should be rendered. A Material doesn't just say what the coin should look like in terms of color; it defines how shiny or smooth a surface is, as opposed to being rough and diffuse. This is important to recognize and is why the terms texture and Material refer to different things. A texture is an image file loaded in memory, which can be wrapped around a 3D object via its UV mapping. In contrast, a Material defines how one or more textures can be combined and applied to an object to shape its appearance. So now we know the difference, let's create a Material to make the coin objects look more realistic.
Creating a coin Material
To create a new Material asset in Unity, do the following:
- Right-click on an empty area in the Project panel.
- From the context menu, choose Create | Material. You can also choose Assets | Create | Material from the application menu:
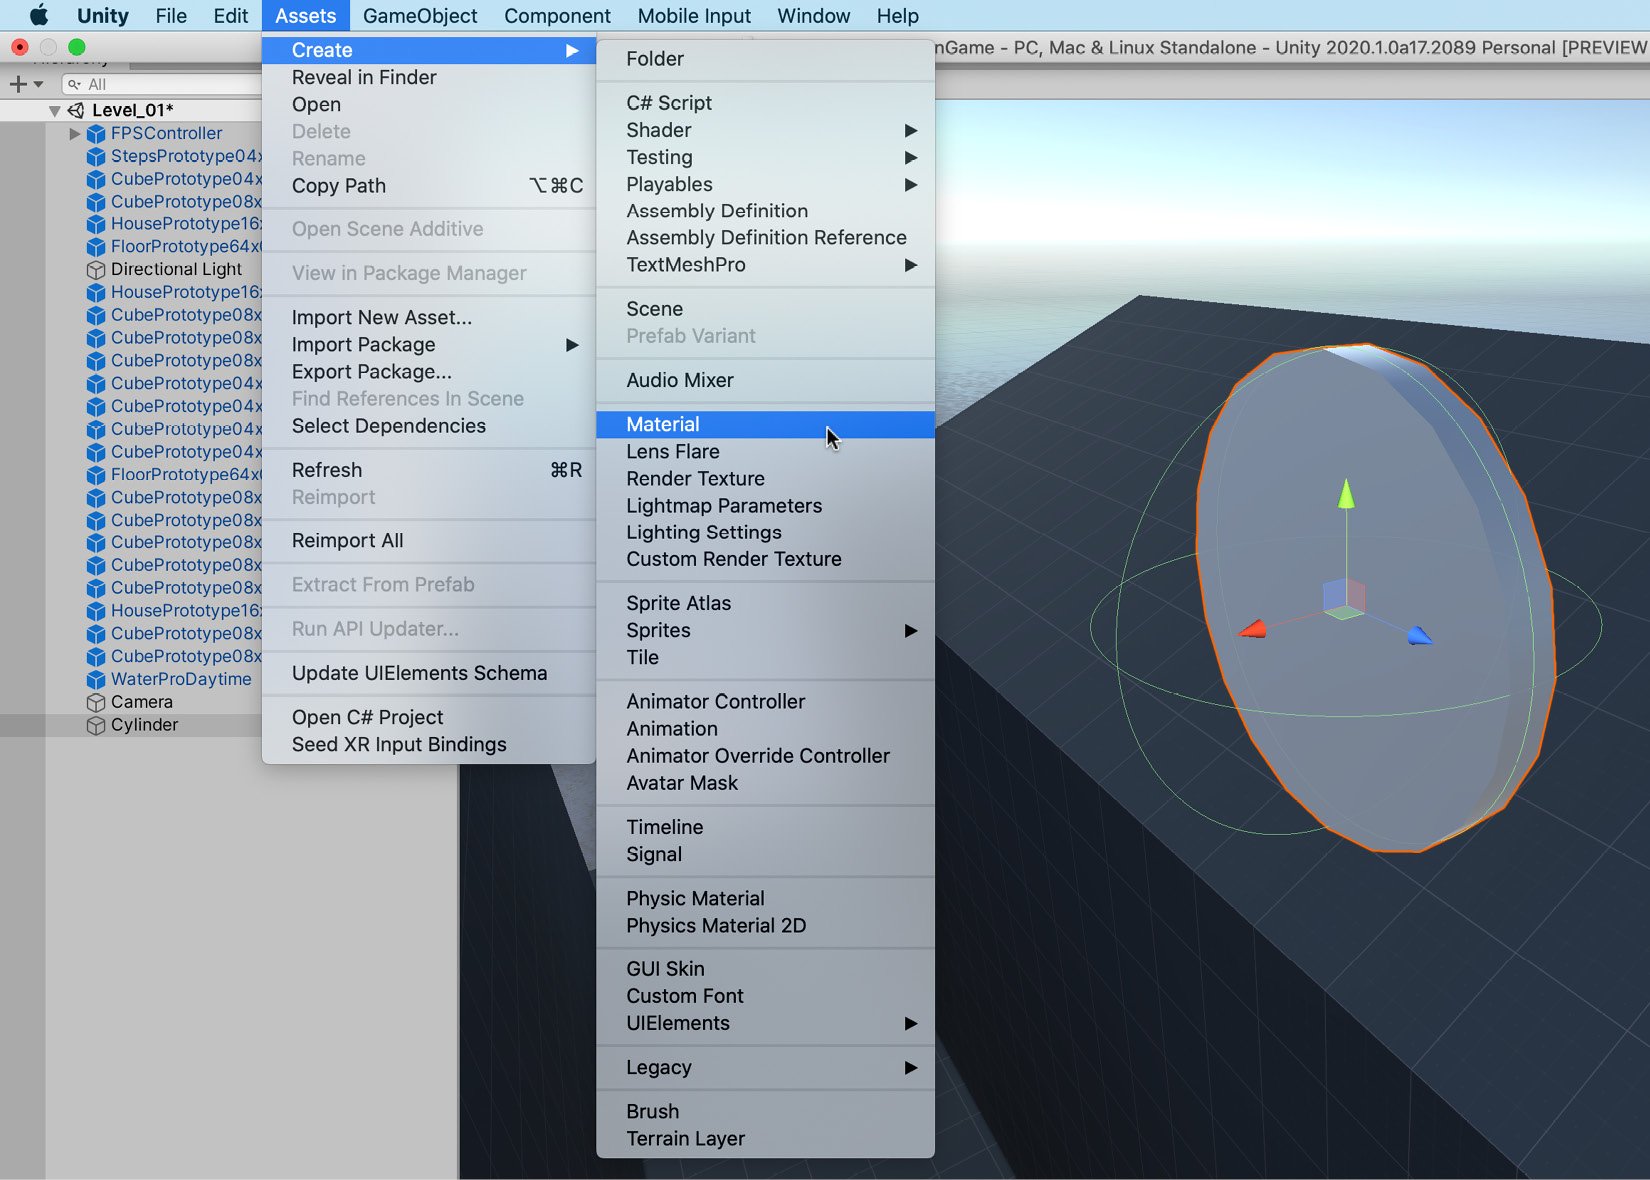
Figure 2.2 – Creating a Material
Important note
A Material is sometimes called a Shader. If needed, you can create custom Materials using a Shader language or you can use a Unity add-on, such as Shader Forge.
After creating a new Material, do the following:
- Assign it an appropriate name from the Project panel. As I'm aiming for a gold look, I've named the Material
GoldCoin. - Create a folder to store the Material (if not already present) by right-clicking in the Assets folder and selecting Create | Folder. Name the folder
Materials. - Move the Material to the newly created
Materialsfolder.

Figure 2.3 – The new Material asset
We now have a generic Material that we can edit to suit our purposes; now, let's edit the Material.
Editing the Material
To edit the Material, first, select the Material asset in the Project panel to display its properties in the Inspector. Several properties will be listed in the Inspector, as well as a preview. The preview shows you how the Material would look, based on its current settings, applied to a 3D object. As you change the Material's settings from the Inspector, the Preview panel updates automatically to reflect your changes, offering instant feedback on how the Material would look:
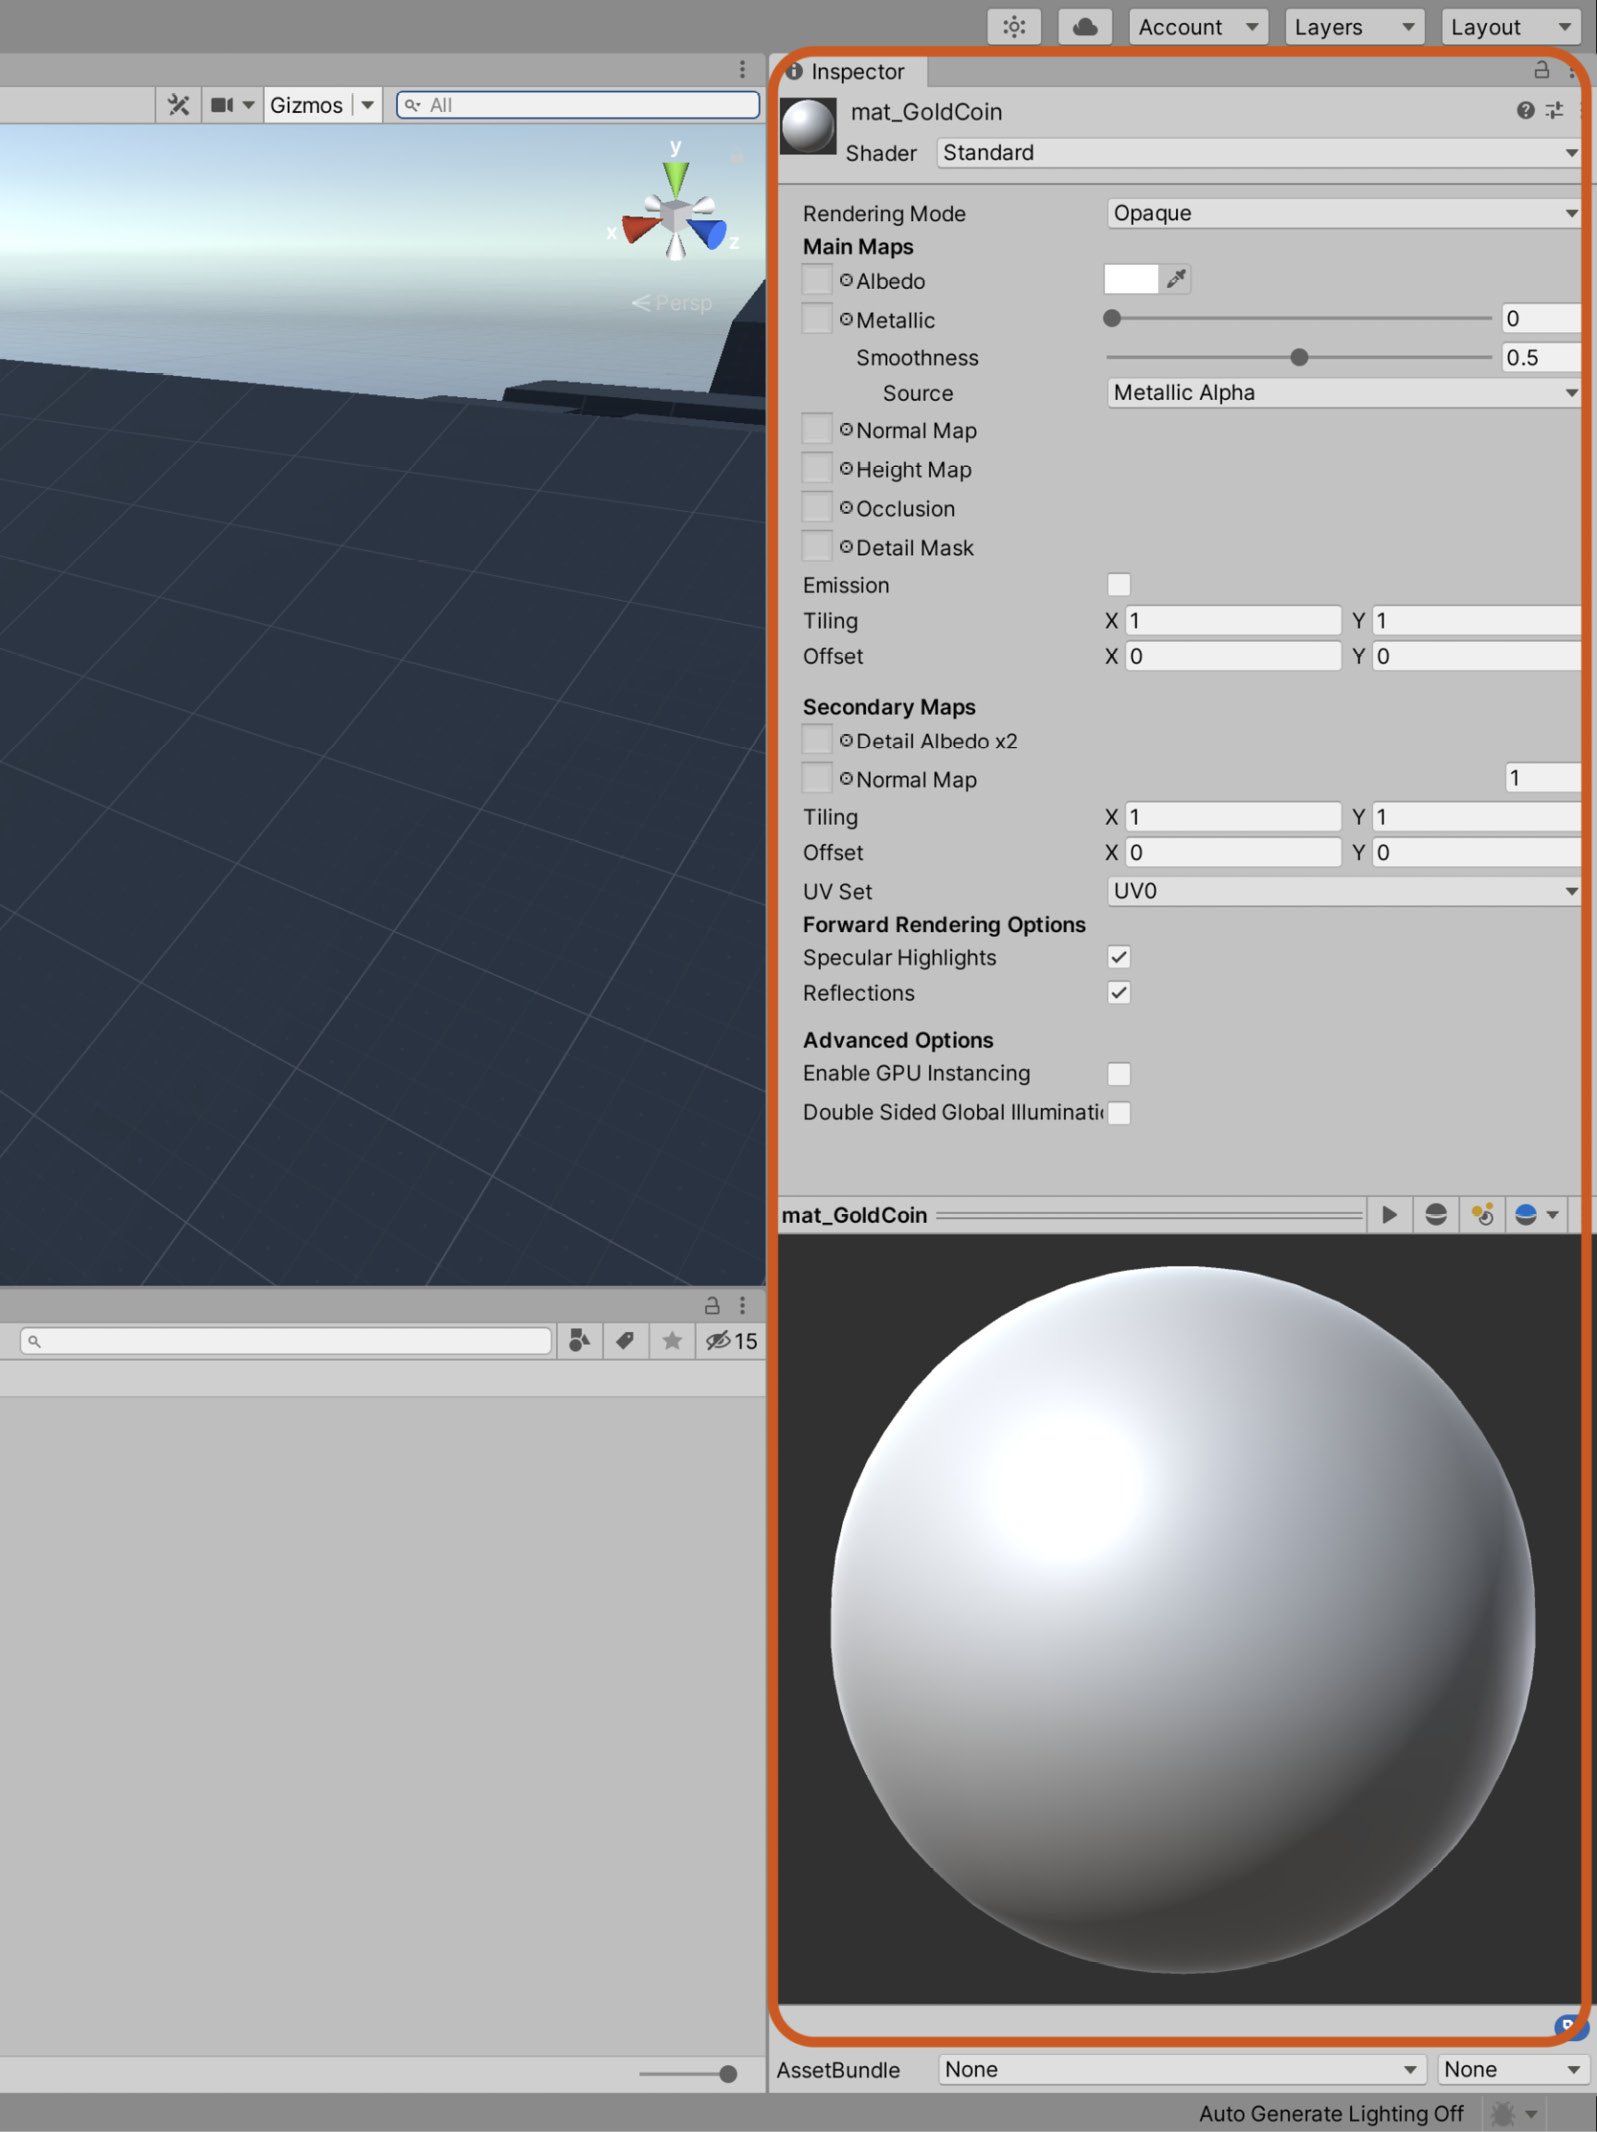
Figure 2.4 – Material properties are changed from the object Inspector
We'll edit these properties to create a gold Material for the coin. When creating any Material, the first setting to choose is the Shader type because this setting affects all other parameters available to you. The Shader type determines which algorithm will be used to shade your object. There are many different choices, but most Material types can be approximated using either Standard or Standard (Specular setup). For the gold coin, we can leave Shader as Standard:
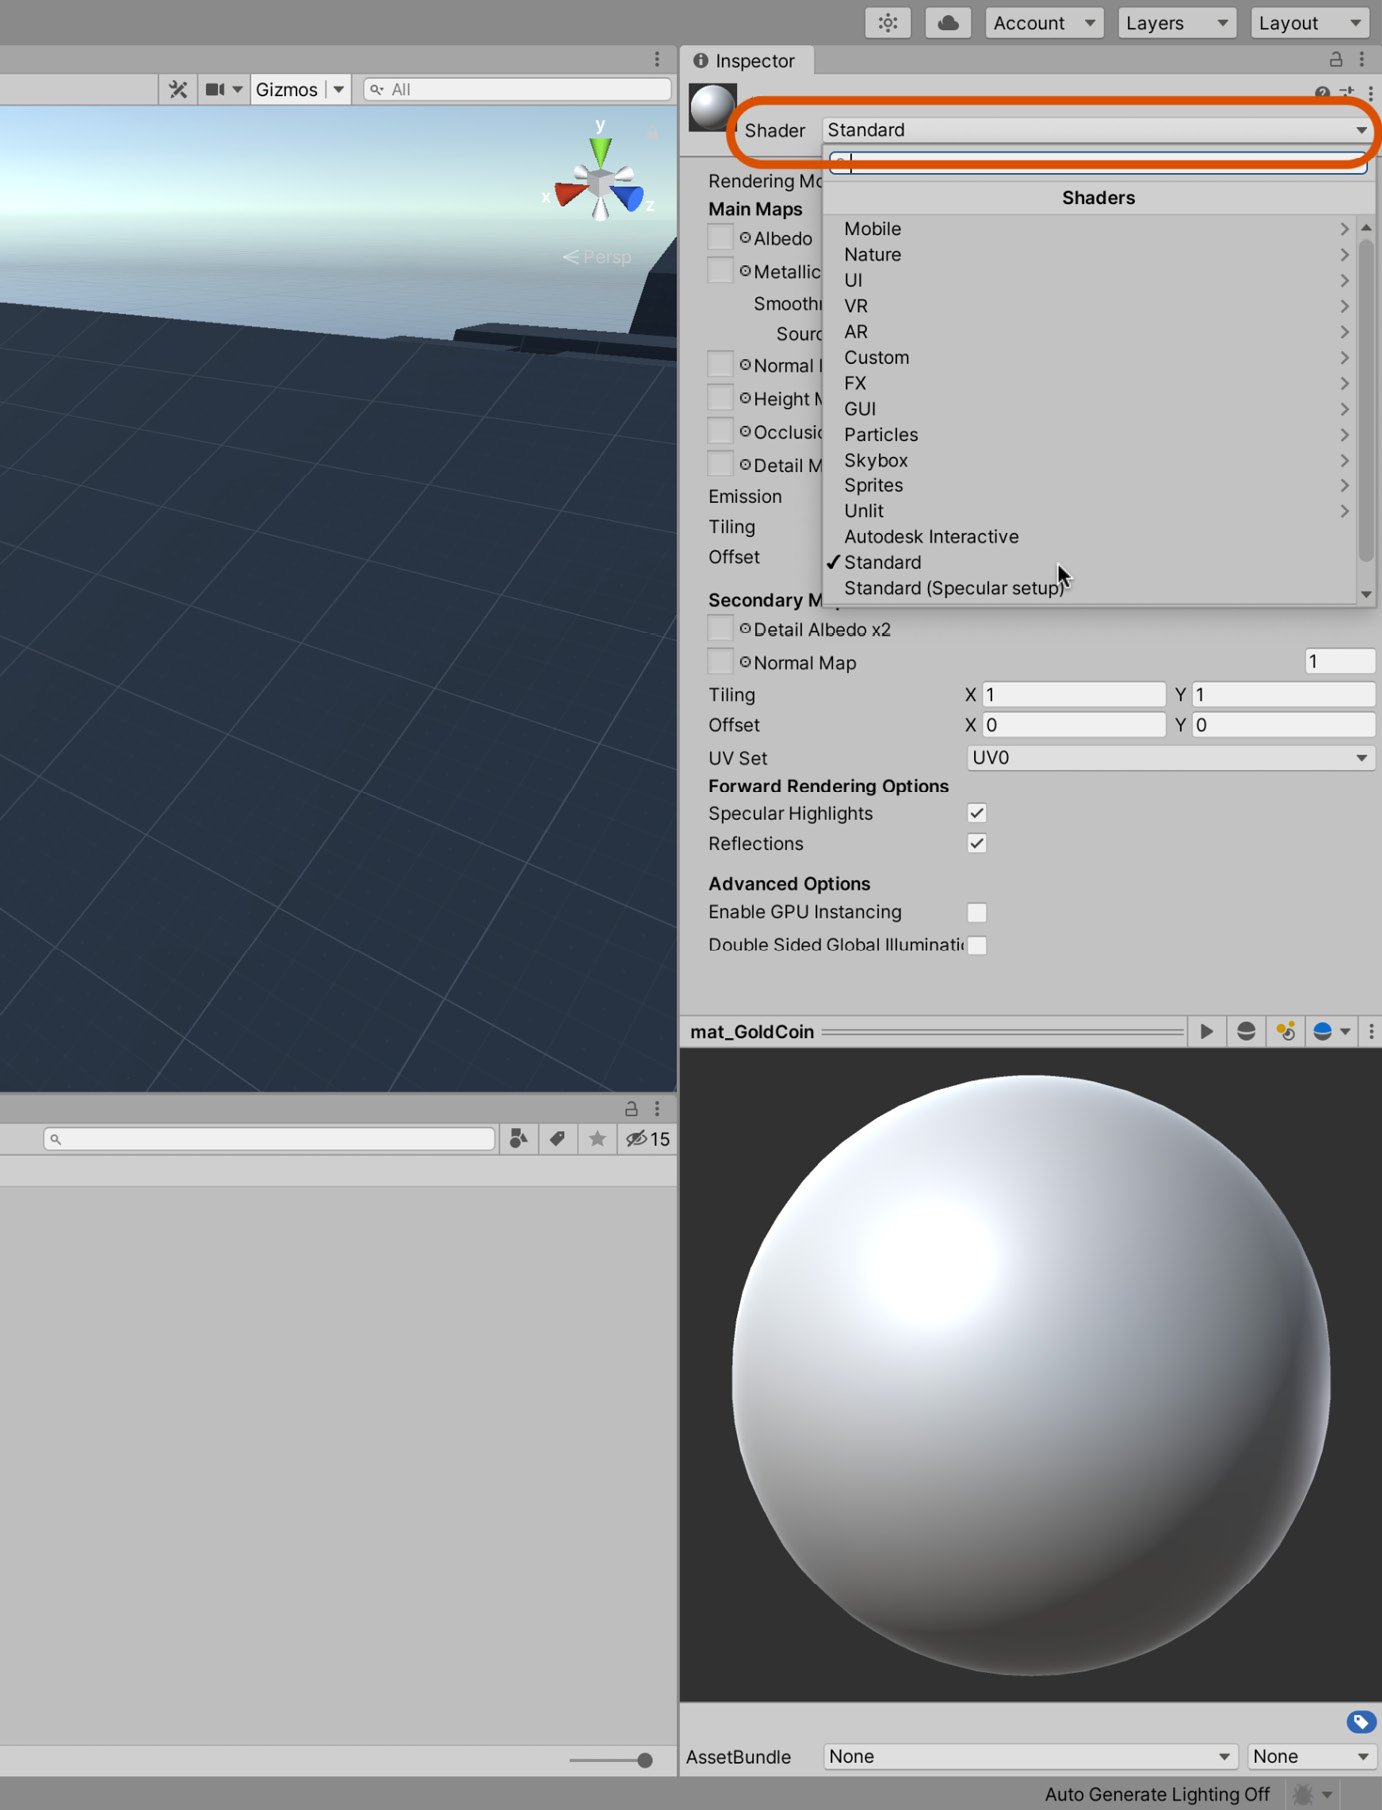
Figure 2.5 – Setting the Material Shader type
Right now, the Preview panel displays the Material as a dull gray, which is far from what we need. To define a gold color, we must specify the Albedo color. To do this, take the following steps:
- Click on the Albedo color slot to display a color picker.
- From the color picker dialog, select a gold color. The Material preview updates in response to reflect the changes:
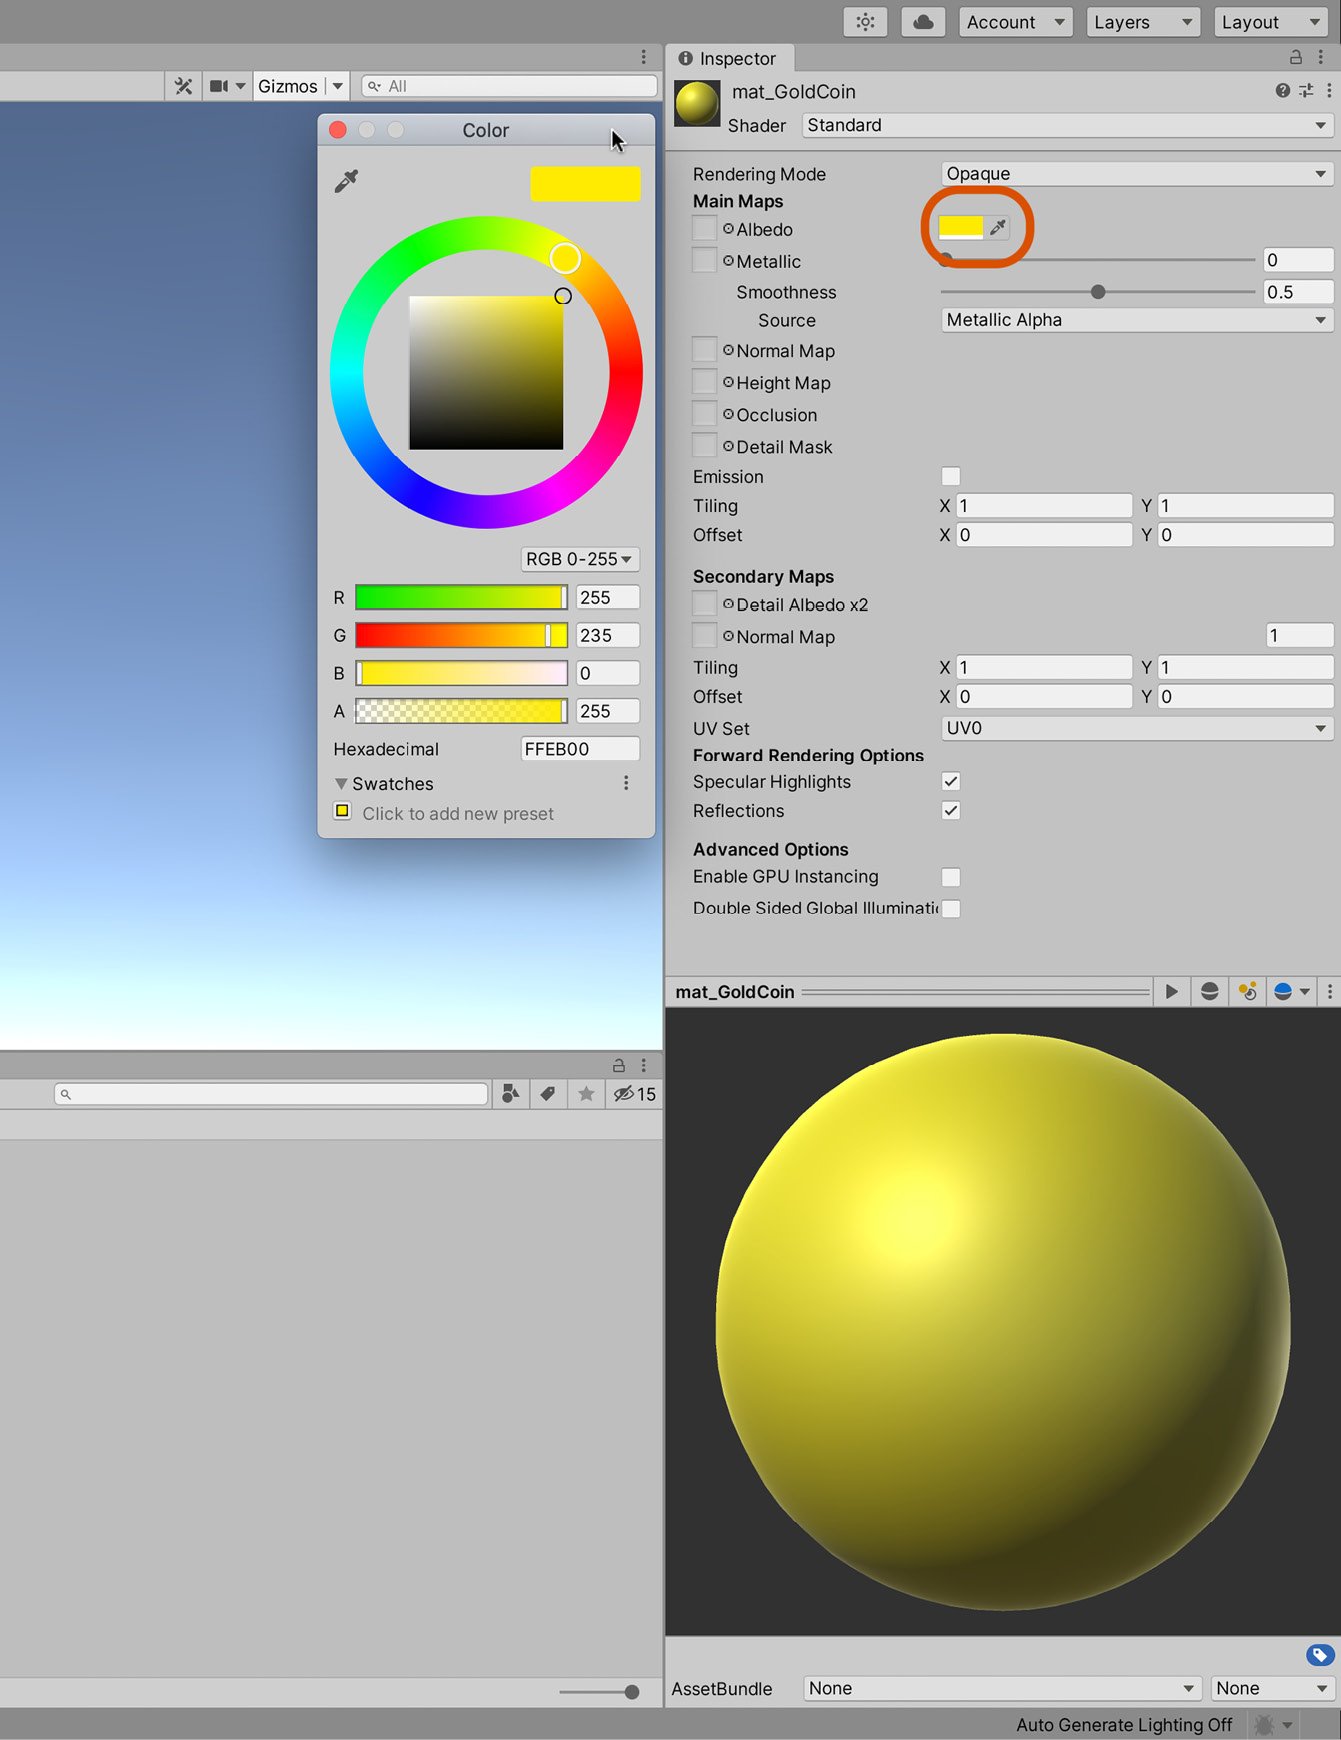
Figure 2.6 – Selecting a gold color for the Albedo channel
The coin Material is looking better than it did but is still not quite right as it is supposed to represent a metallic surface, which tends to be shiny and reflective. To add this quality to our Material, click and drag the Metallic slider in the Inspector to the right-hand side, setting its value to 1. This value indicates that the Material represents a fully metal surface as opposed to a diffuse surface such as cloth or hair. Again, the Preview panel will update to reflect the change:
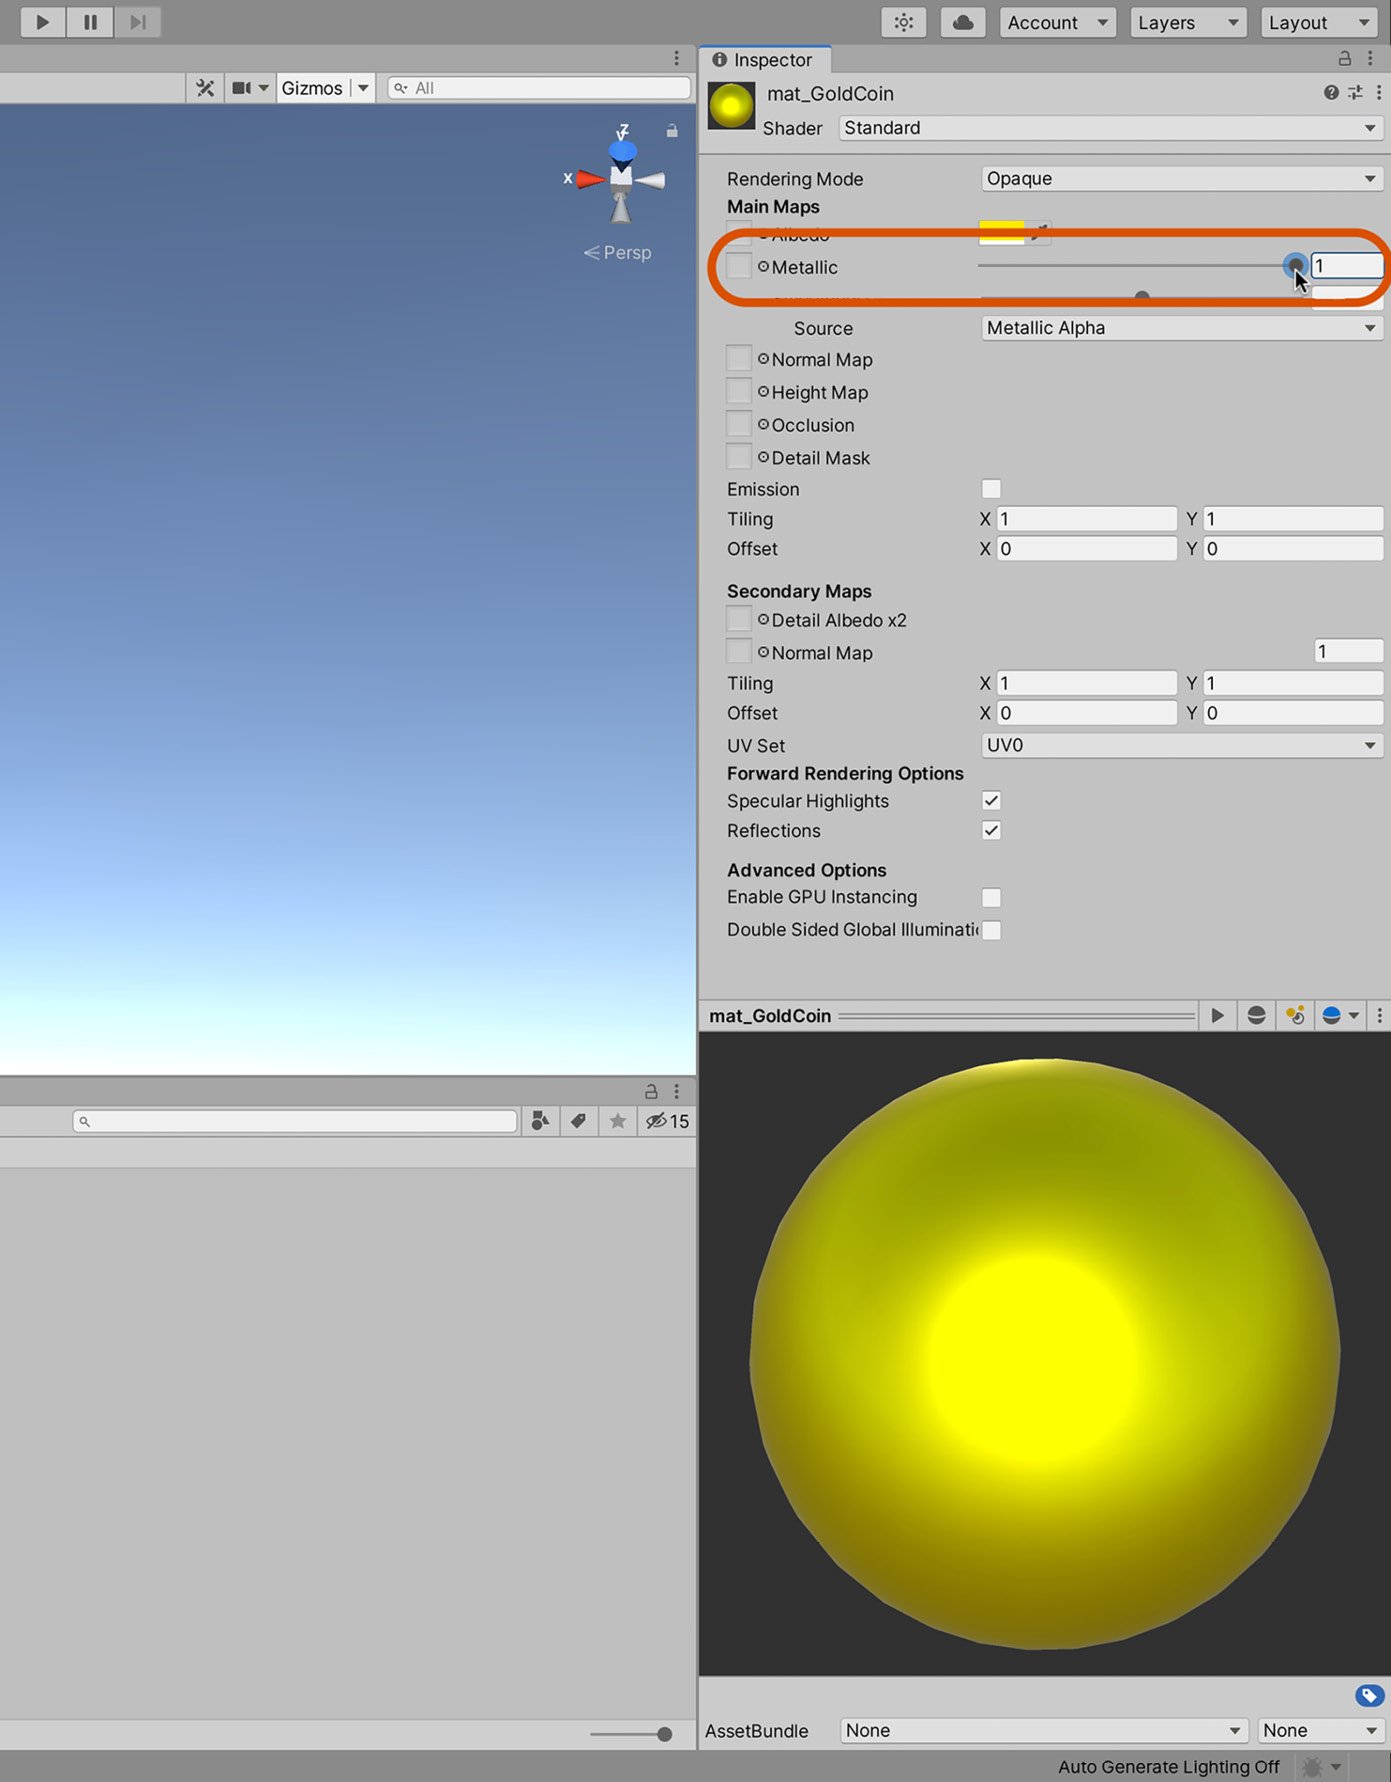
Figure 2.7 – Creating a metallic Material
When you're happy with what is shown in the preview, it's time to assign the Material to the coin object.
Assigning the Material
We now have a gold Material created, and it's looking good in the Preview panel. If needed, you can change the kind of object used for a preview. By default, Unity assigns the created Material to a sphere, but other primitive objects are allowed, including cubes, cylinders, and toruses. You can change the object by clicking on the geometry button directly above the Preview panel to cycle through them. Viewing different objects will help you preview Materials under different conditions:
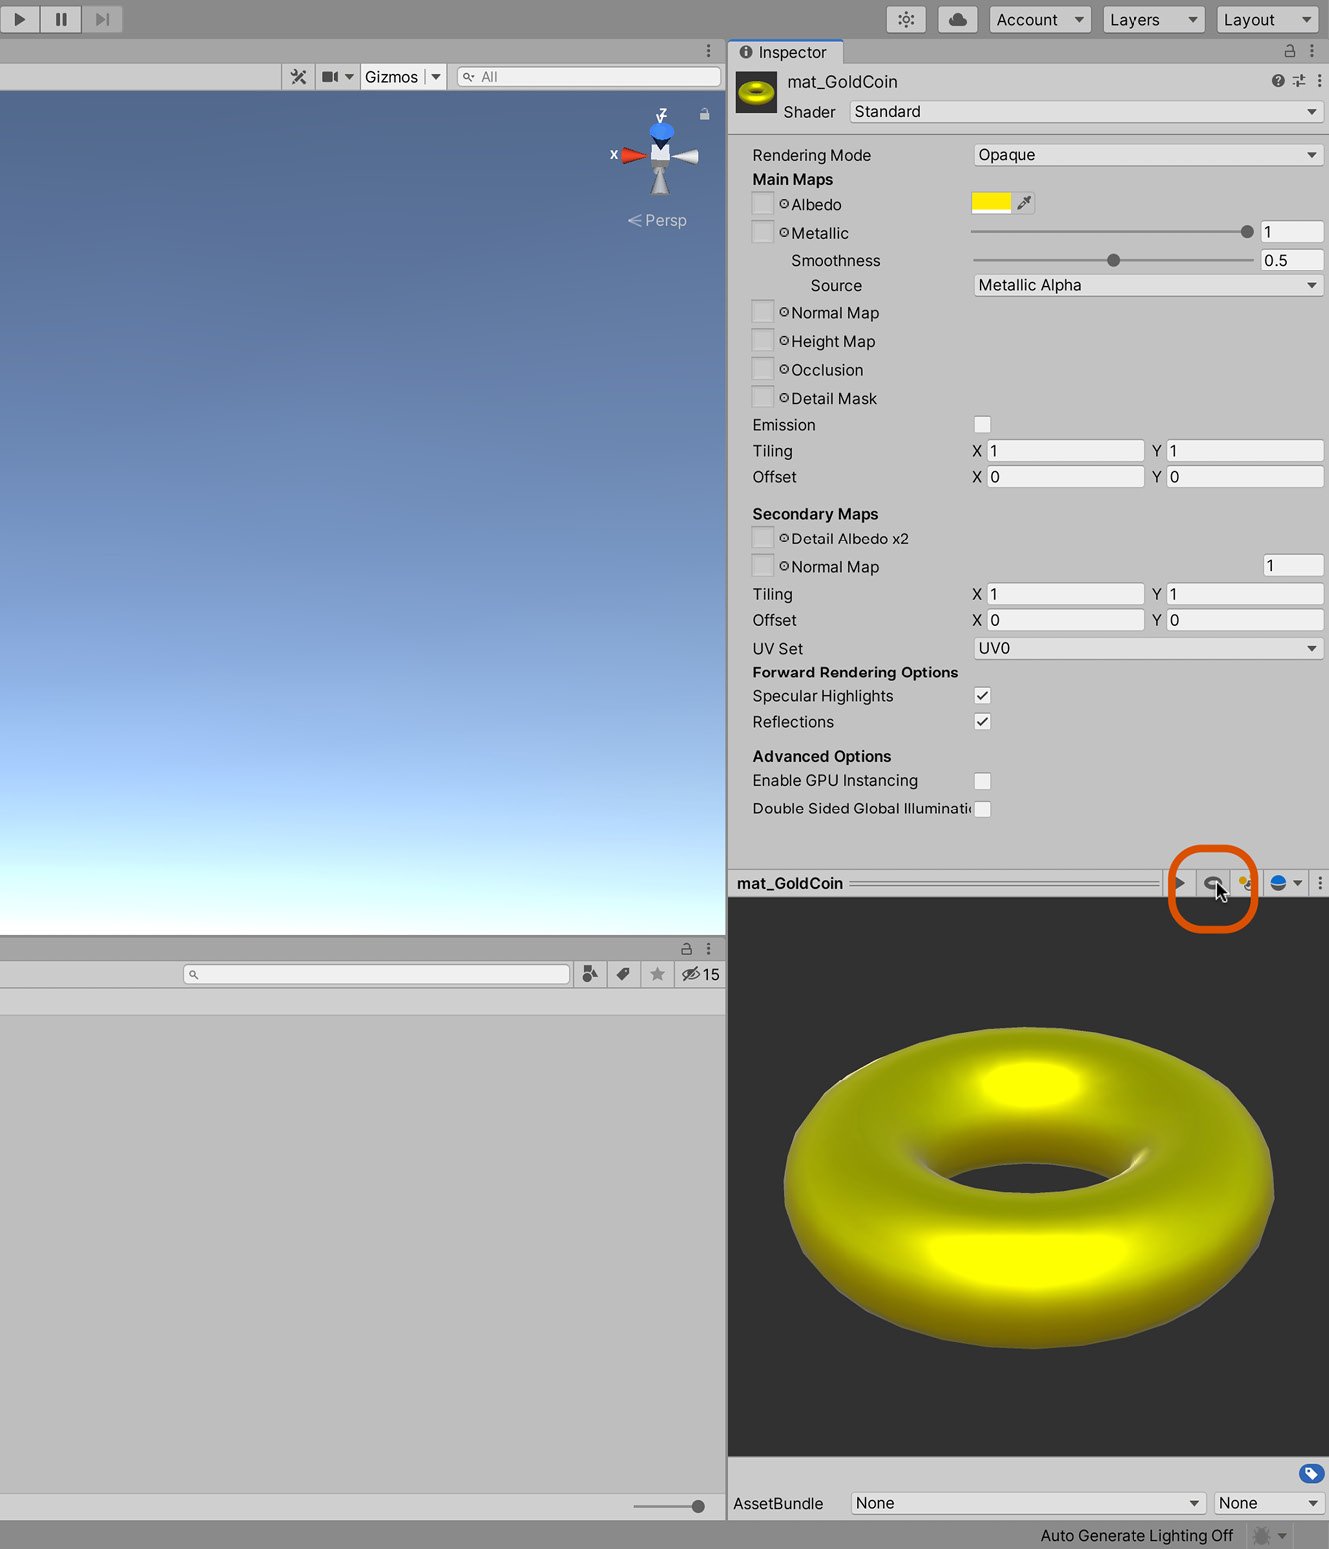
Figure 2.8 – Previewing a Material on an object
When your Material is ready, you can assign it directly to meshes in your scene by dragging and dropping from the Project panel to the object (either in the Scene view or Hierarchy panel). Let's assign the coin Material to the coin. Click and drag the Material from the Project panel to the coin object in the scene. On dropping the Material, the coin will change appearance to reflect the change of Material:

Figure 2.9 – Assigning the Material to the coin
You can confirm that Material assignment occurred successfully and can even identify which Material was assigned by selecting the Coin object in the scene and viewing its Mesh Renderer component in the Inspector. The Mesh Renderer component is responsible for making sure that a mesh object is visible in the scene. The Mesh Renderer component contains a Materials field, which lists all Materials currently assigned to the object. By clicking on the Material name from the Materials field, Unity automatically selects the Material in the Project panel, making it quick and easy to locate Materials:
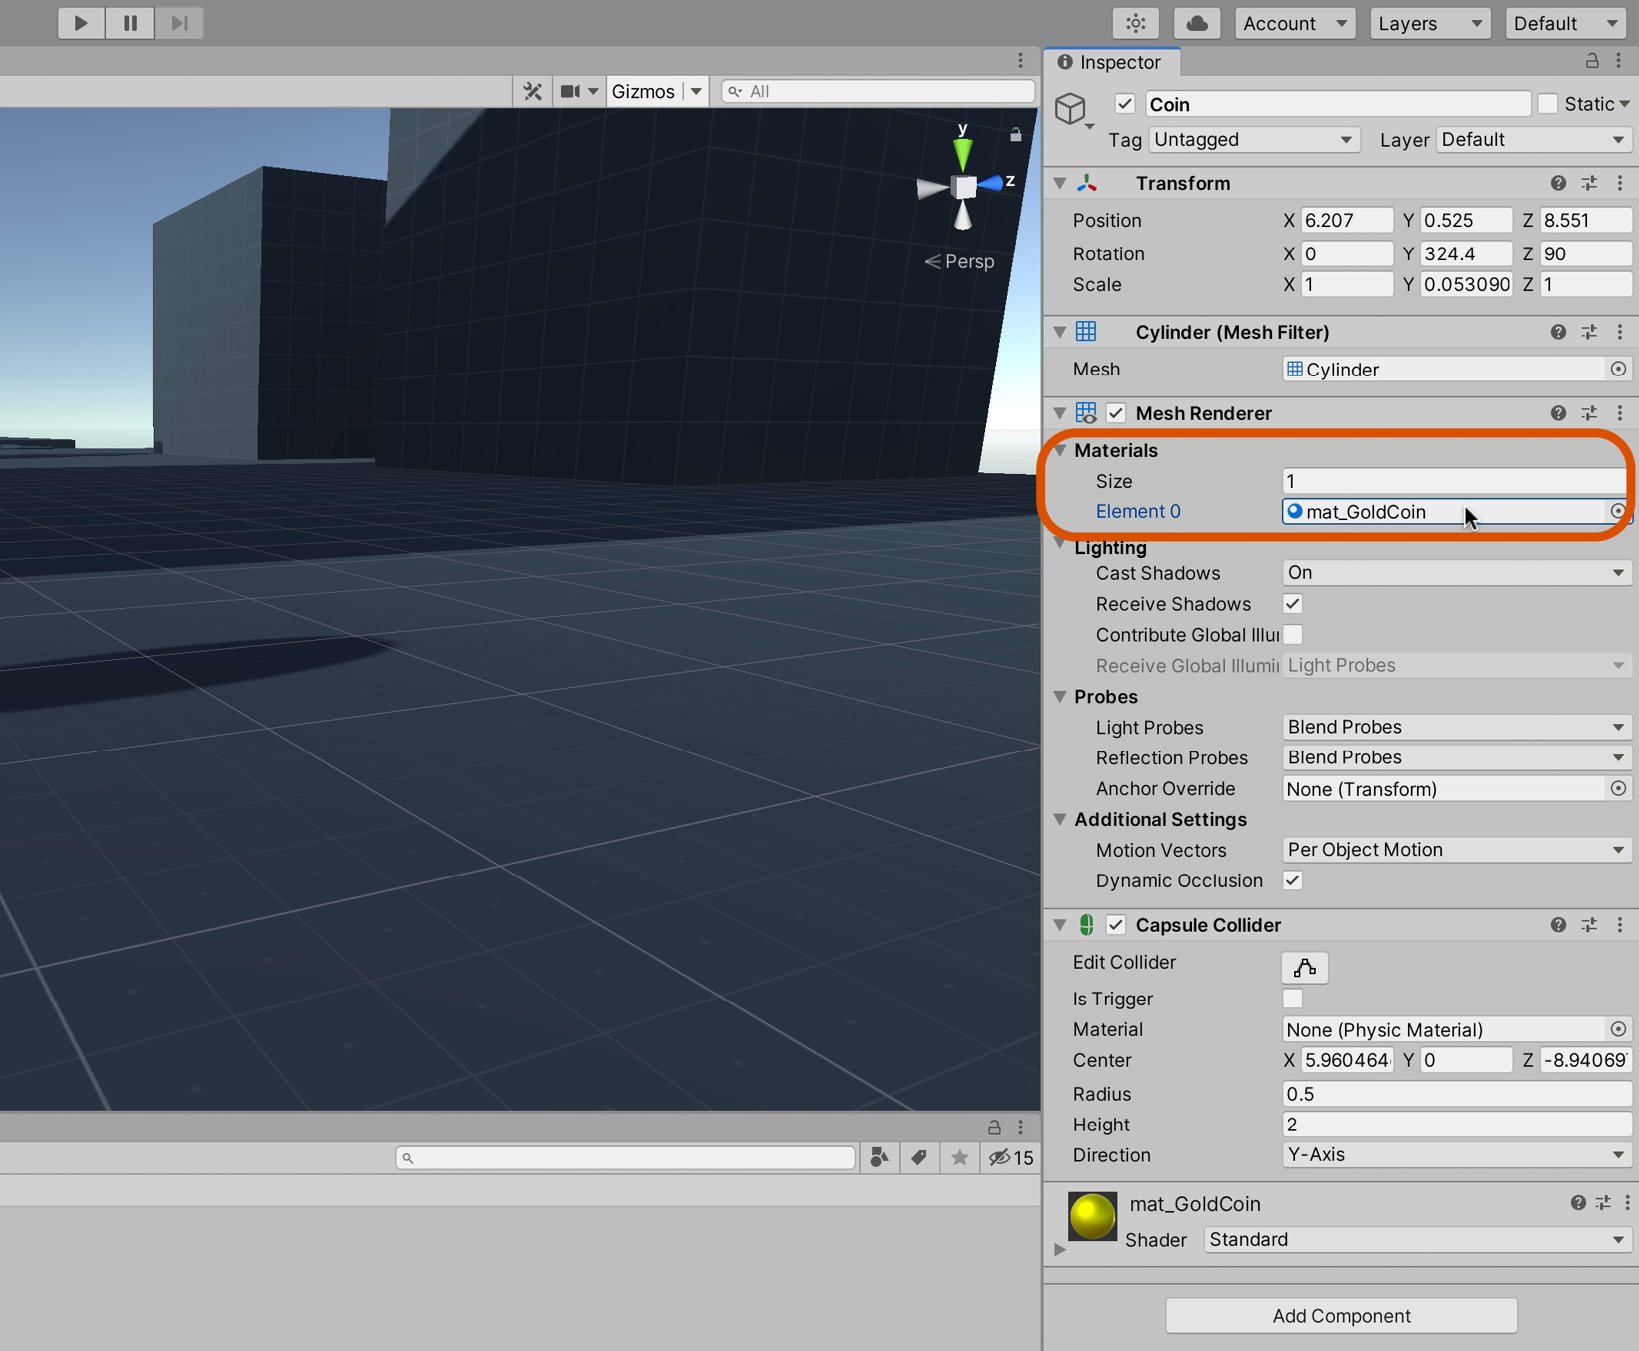
Figure 2.10 – The Mesh Renderer component lists all Materials assigned to an object
Tip
Mesh objects may have multiple Materials, with different Materials assigned to different faces. For the best in-game performance, use as few unique Materials on an object as necessary. Make the extra effort to share Materials across multiple objects, if possible. Doing so can significantly enhance the performance of your game. For more information on optimizing rendering performance, see the online documentation at https://docs.unity3d.com/Manual/OptimizingGraphicsPerformance.html.
We now have a complete and functional gold Material for the collectible coin. However, we're still not finished with the coin. It may look correct, but it doesn't behave in the way we want. For example, it doesn't disappear when touched, and we don't yet keep track of how many coins the player has collected overall. To address this, we'll need to write a script.
Scripting in Unity
Defining game logic, rules, and behavior often requires scripting. Specifically, to transform a static scene with objects into an environment that does something interesting, a developer needs to code behaviors. It requires the developer to define how things should act and react under specific conditions. The coin collection game is no exception to this. In particular, it requires three main features:
- To know when the player collects a coin
- To keep track of how many coins are collected during gameplay
- To determine whether a timer has expired
Now we have an understanding of the requirements, it's time to create our first script!
Creating a script
There's no default out-of-the-box functionality included with Unity to handle the custom logic we require, so we must write some code to achieve it. Unity's programming language of choice is C#. Previous versions had support for UnityScript (a language similar to JavaScript), but this has been officially deprecated, and you can no longer create new UnityScript files. For this reason, this book will use C#. We'll start coding the three features in sequence. To create a new script file, do the following:
- Right-click on an empty area in the Project panel.
- From the context menu, choose Create | C# Script. Alternatively, you can navigate to Assets | Create | C# Script from the application menu:
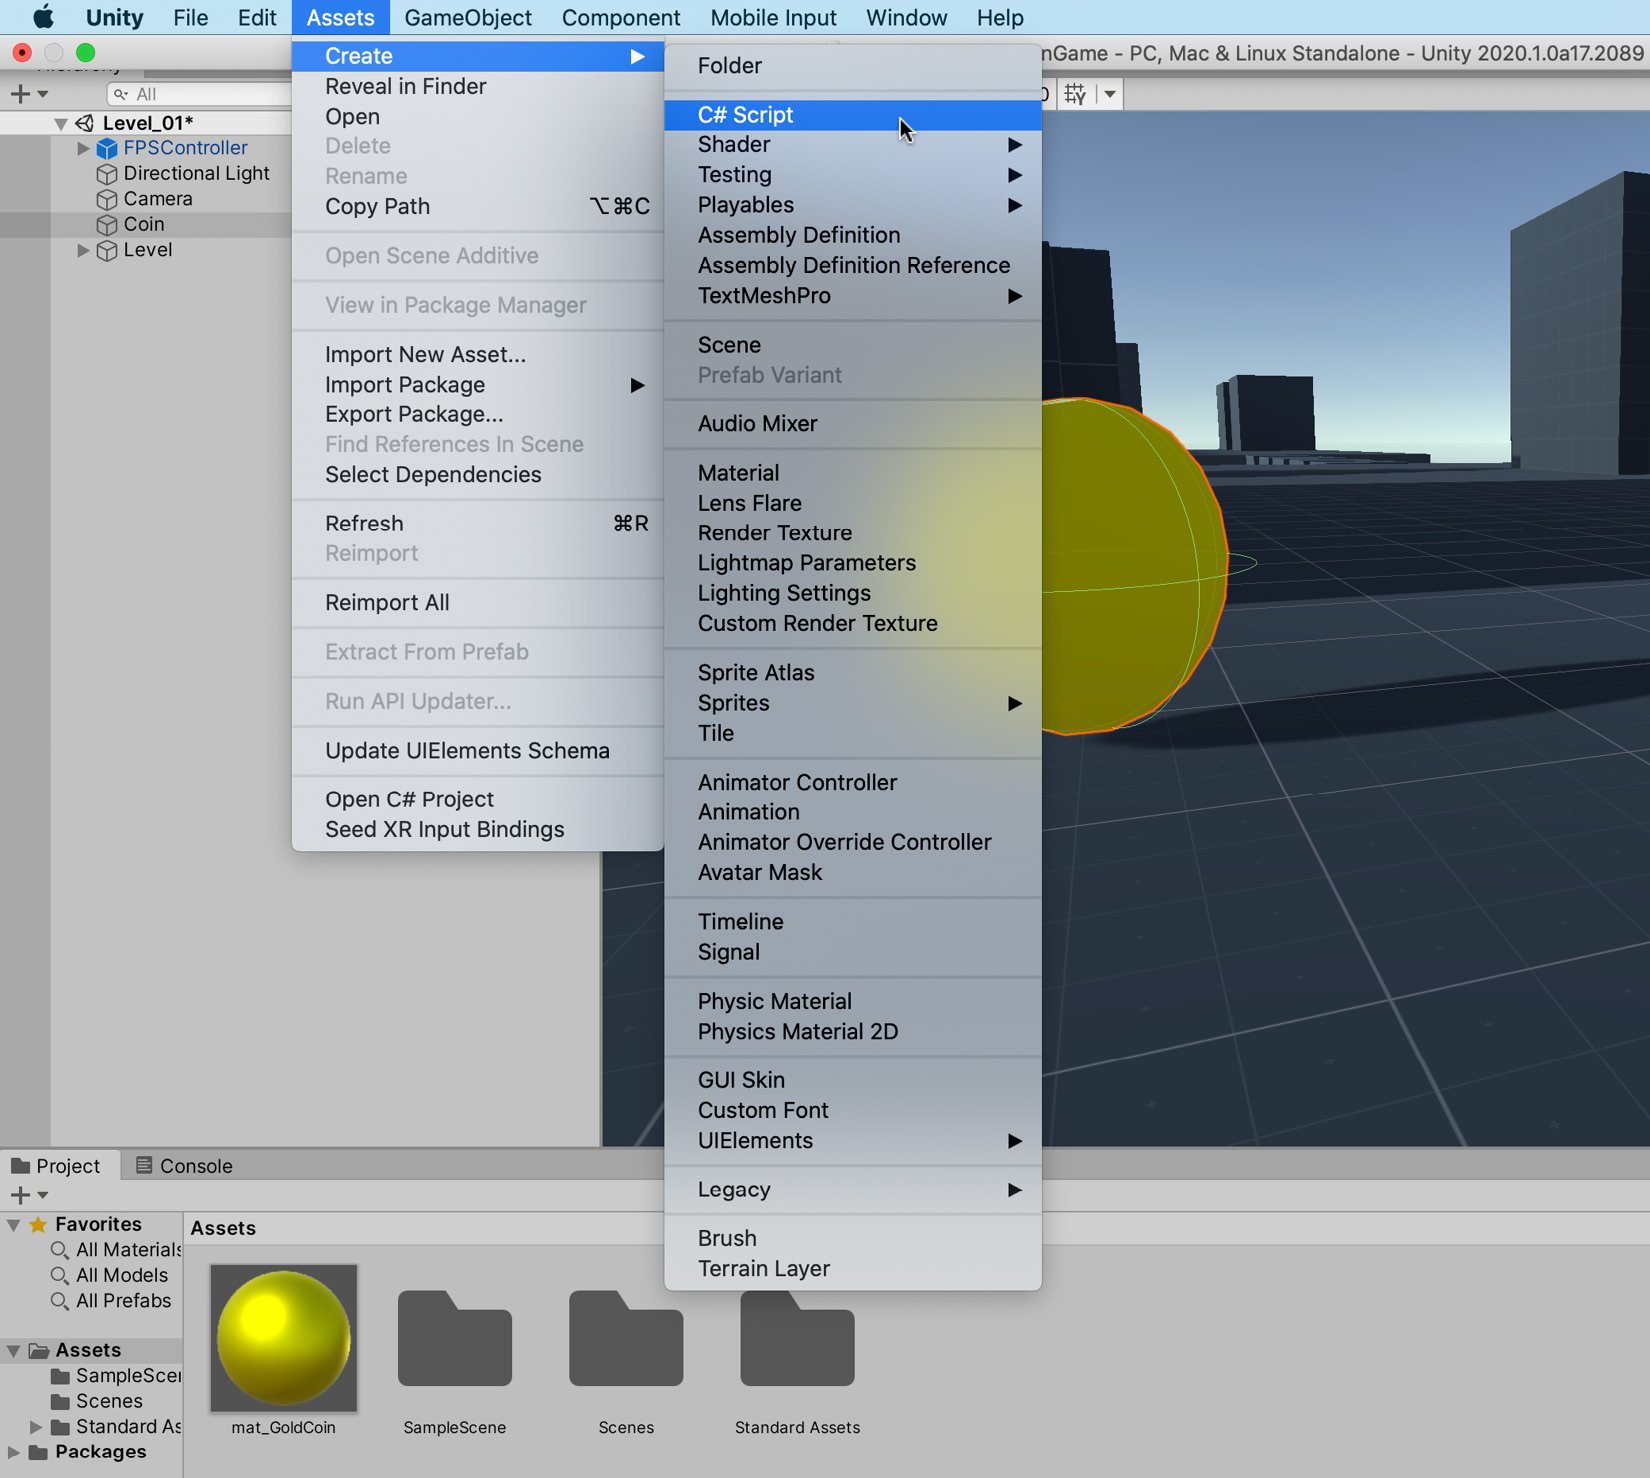
Figure 2.11 – Creating a new C# script
Once the file is created, assign a descriptive name to it. I'll call it Coin.cs. By default, each script file represents a single, discrete class with a name matching the filename. Hence, the Coin.cs file encodes the Coin class. The Coin class will encapsulate the behavior of a Coin object and will, eventually, be attached to the Coin object in the scene. However, at the moment, our Coin class doesn't do anything, as we'll see shortly.
Understanding the coin script
Double-click on the Coin.cs file in the Project panel to open it in Visual Studio (VS 2019 8.4 for Mac) a third-party IDE that ships with Unity. This program lets you edit and write code for your games. Once opened in Visual Studio, the source file will appear, as shown in Code Sample 2.1:
using UnityEngine;
using System.Collections;
public class Coin : MonoBehaviour
{
   // Use this for initialization
   void Start ()
   {
   }

   // Update is called once per frame
   Void Update ()
   {
   }
}
Downloading the example code
Remember, you can download the example code files for this book from GitHub with the link provided in the Technical requirements section.
By default, all newly created classes derive from MonoBehavior, which defines a common set of functionality shared by all components. The Coin class features two autogenerated functions: Start and Update. These functions are invoked automatically by Unity. Start is called once (and only once) when the GameObject, to which the script is attached, is created in the Scene, and Update is called once per frame. Start is useful for initialization code and Update is useful for adding behavior over time, such as motion.
Important note
There are other functions that are called before the Start function. We will examine the Unity event execution order in more detail later in the book as it is an important concept to understand. However, for a sneak peek at the execution order, see Unity's online documentation: https://docs.unity3d.com/Manual/ExecutionOrder.html.
The script is not yet attached to our object, therefore the functions would not be called if we were to play the game now. As you'll see shortly, this is easily remedied.
Running the script
Before the script is run, it needs to be attached to the Coin object in the Scene. To do this, drag and drop the Coin.cs script file from the Project panel to the Coin object. When you do this, a new Coin component is added to the object, as shown in Figure 2.12:
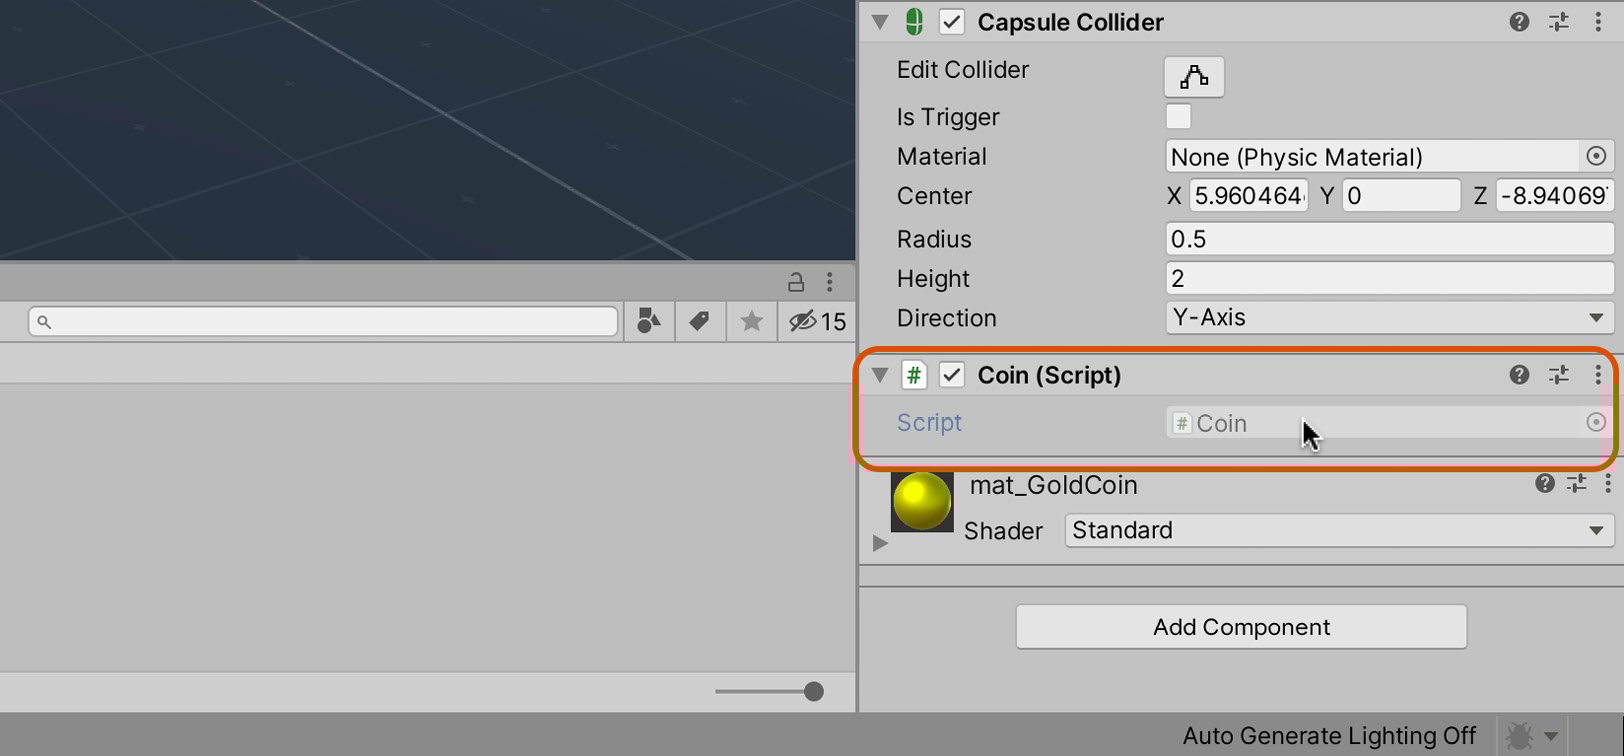
Figure 2.12 – Attaching a script file to an object
When a script is attached to an object, it exists on the object as a component and is instantiated with the object. A script file can usually be added to multiple objects and even to the same object multiple times. Each component represents a separate and unique instantiation of the class. When a script is attached in this way, Unity automatically invokes its events, such as Start and Update. You can confirm that your script is working normally by including a Debug.Log statement in the Start function:
using UnityEngine;
using System.Collections;
public class Coin : MonoBehaviour
{
   // Use this for initialization
   void Start ()
   {
      Debug.Log ("Object Created");
   }
   // Update is called once per frame
   void Update ()
   {
   }
}
If you now press play (Ctrl + P) on the toolbar to run your game, you will see the message Object Created printed to the Console window—once for each instantiation of the class:
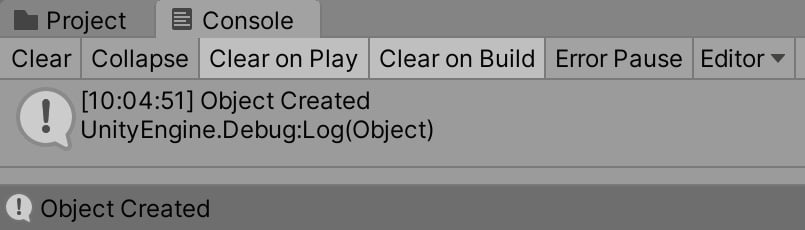
Figure 2.13 – Printing messages to the Console window
Good work! We've now created a basic script for the Coin class and attached it to the coin. Next, let's update our Coin.cs file to keep track of coins as they are collected.
Recording the total coin count
The coin collection game wouldn't be much of a game if there were only one coin. The central idea is that a level should feature many coins, all of which the player should collect before a timer expires. To know when all the coins have been collected, we'll need to know how many coins there are in the scene. After all, if we don't know how many coins there are, then we can't know whether we've collected them all. We'll configure the Coin class to keep track of the total number of coins in the scene at any moment. Consider Code Sample 2.3, which adapts the Coin class to achieve this:
public class Coin : MonoBehaviour
{
  //Keeps track of total coin count in scene
  public static int CoinCount = 0;
   void Start ()
   {
      //Object created, increment coin count
      ++Coin.CoinCount;
   }
   //Called when object is destroyed
   void OnDestroy()
   {
      --Coin.CoinCount;
      if(Coin.CoinCount <= 0)
      {
         //We have won
      }
   }
}
Let's summarize the preceding code:
- The
Coinclass maintains a static member variable,CoinCount, which, being static, is shared across all instances of the class. This variable keeps a count of the total number of coins in the scene, and each instance has access to it. - The
Startfunction is called once perCoininstance when the object is created in the scene. For coins that are present when the scene begins, theStartevent is called at scene startup. This function increments theCoinCountvariable by one per instance, thus keeping count of all coins. - The
OnDestroyfunction is called once per instance when the object is destroyed. This decrements theCoinCountvariable, reducing the count for each coin destroyed.
Being able to keep track of the number of coins is a great start, but the player cannot currently collect the coins, so the coin count will never decrement. Let's fix that now.
Collecting coins
Thinking carefully, we know that a coin is considered collected whenever the player walks into it. We can say a coin is obtained when the player and the coin intersect or collide. To determine when a collision occurs, we must approximate the volume of both objects (coin and player) and then have some way of knowing when the two volumes overlap in space. This is achieved in Unity through colliders, which are special physics components attached to objects that can tell us when two GameObjects intersect. When two objects with colliders intersect, a function will be called in our script. In this section, I will walk you step by step through this process, starting with an overview of the colliders that are already present in our scene.
Introducing colliders
The FPSController object (first-person controller) already has a collider on it, included as part of the Character Controller component. This can be confirmed by selecting the FPSController object in the scene and examining the green wireframe cage. It is capsule-shaped and approximates the physical body of a generic person, as shown in Figure 2.14:
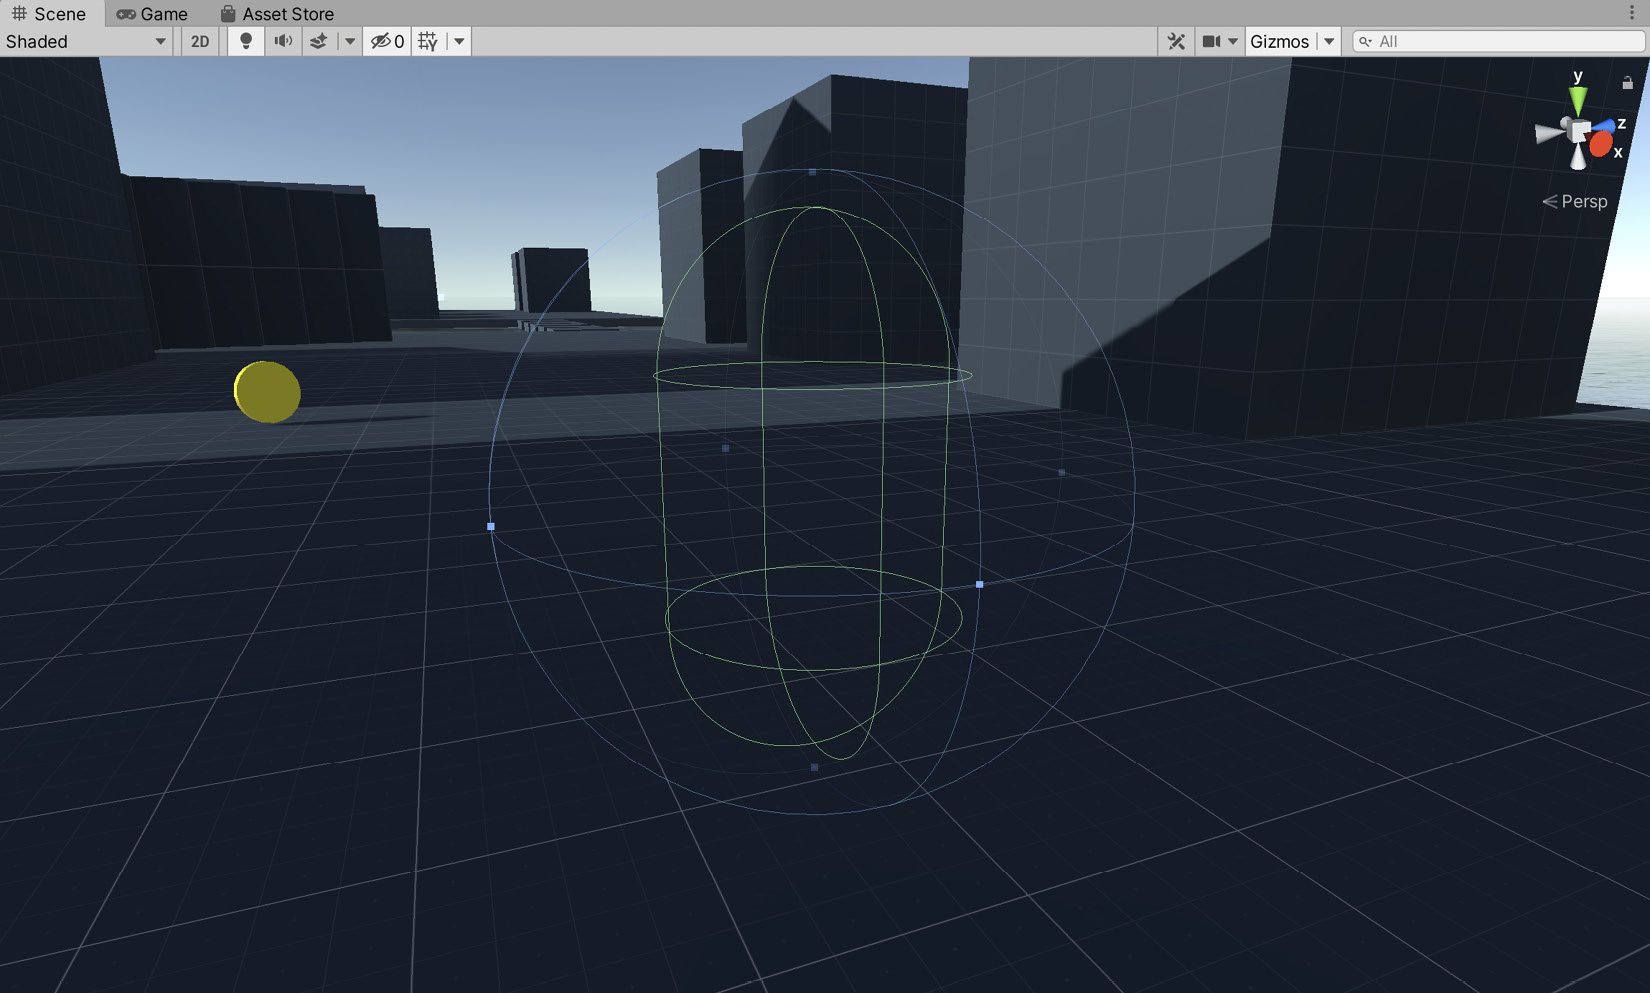
Figure 2.14 – The Character Controller component features a collider to approximate the player's body
Important note
The Character Controller inherits from Collider and provides specialized movement behavior on top of the functionality offered by the Collider component. It is more common (and better practice) to add a collider as a component and then write a script that interacts with the Collider component but doesn't inherit from it. We'll follow this pattern when we create the movement for the player's ship in Chapter 3, Creating a Space Shooter.
FPSController has a Character Controller component attached, which is configured by default with a radius, height, and center. These settings define the physical extents of the character in the scene. These settings can be left unchanged for our game:
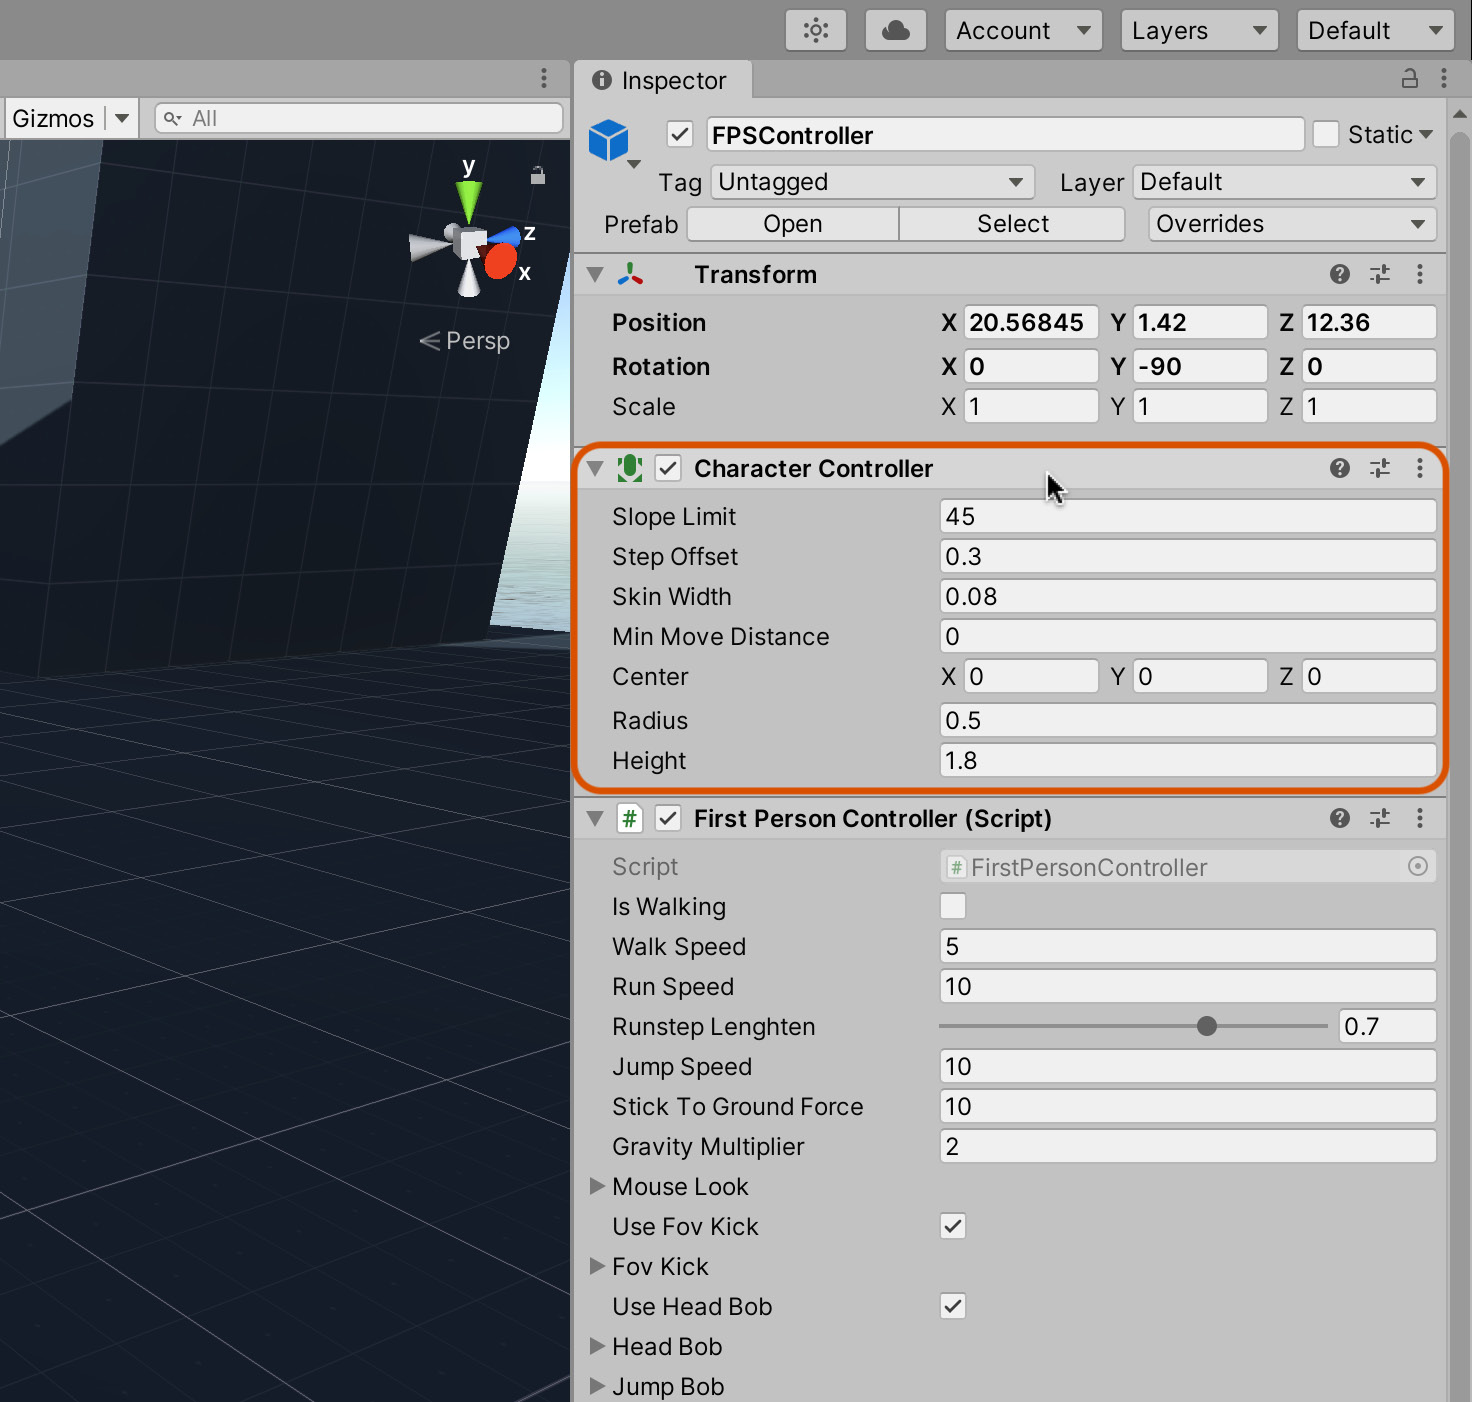
Figure 2.15 – FPSController features a Character Controller component
The Coin object, in contrast, features only a Capsule Collider component, which was automatically added when we created the cylinder primitive earlier. This collider approximates the coin's physical volume in the scene without adding any additional features specific to characters and motion. This is perfect for our needs as the coin is a static object, not a moving and dynamic object like the FPSController. The Capsule Collider is shown in Figure 2.16:
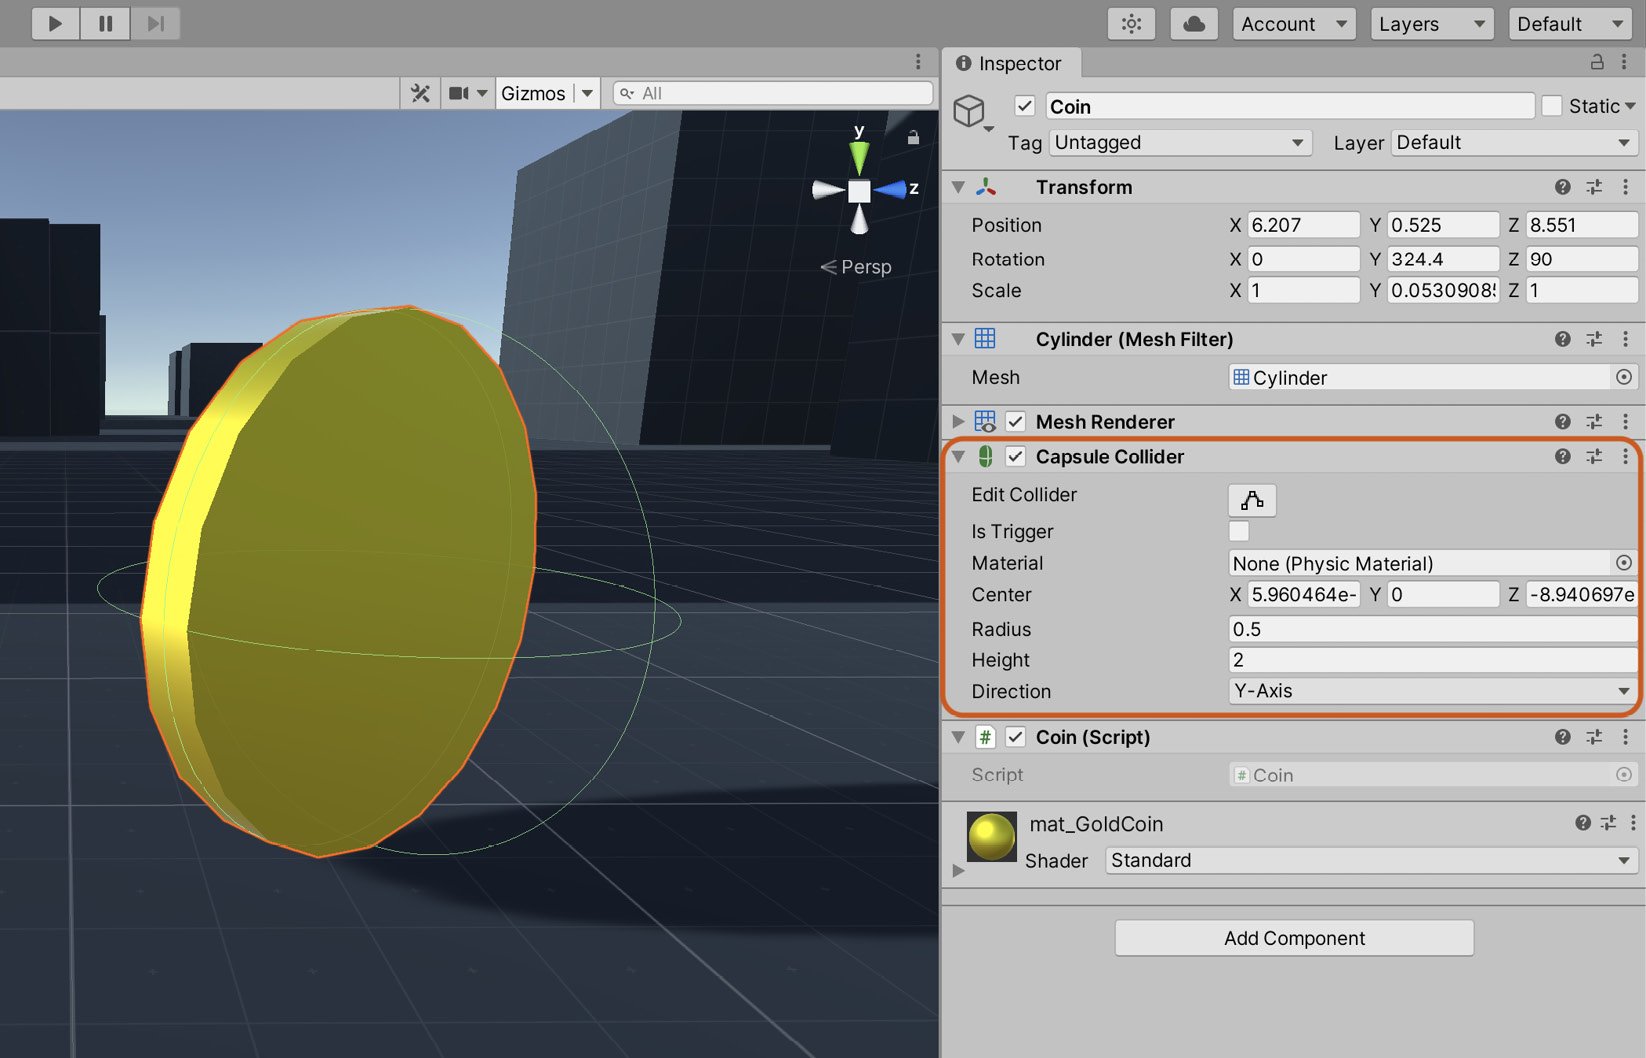
Figure 2.16 – Cylinder primitives feature a Capsule Collider component
For this project, we'll continue to use a Capsule Collider component for the Coin object. If you want to change the attached collider to a different shape instead, you can do this by doing the following:
- Click on the cog icon of the component in the Inspector.
- Select Remove Component from the context menu, as shown in Figure 2.17:
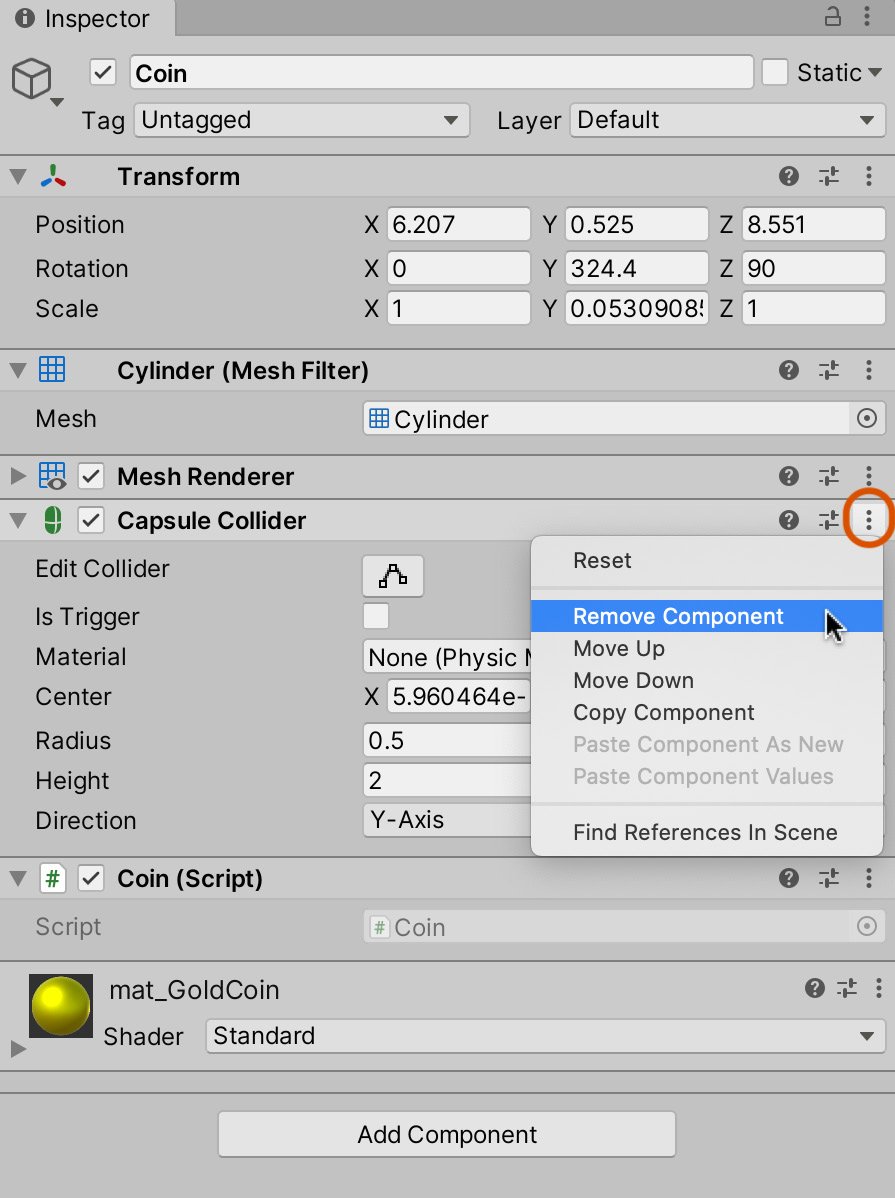
Figure 2.17 – Removing a component from an object
Add a new collider component to the selected object by choosing Component | Physics from the application menu and choosing a suitably shaped collider:
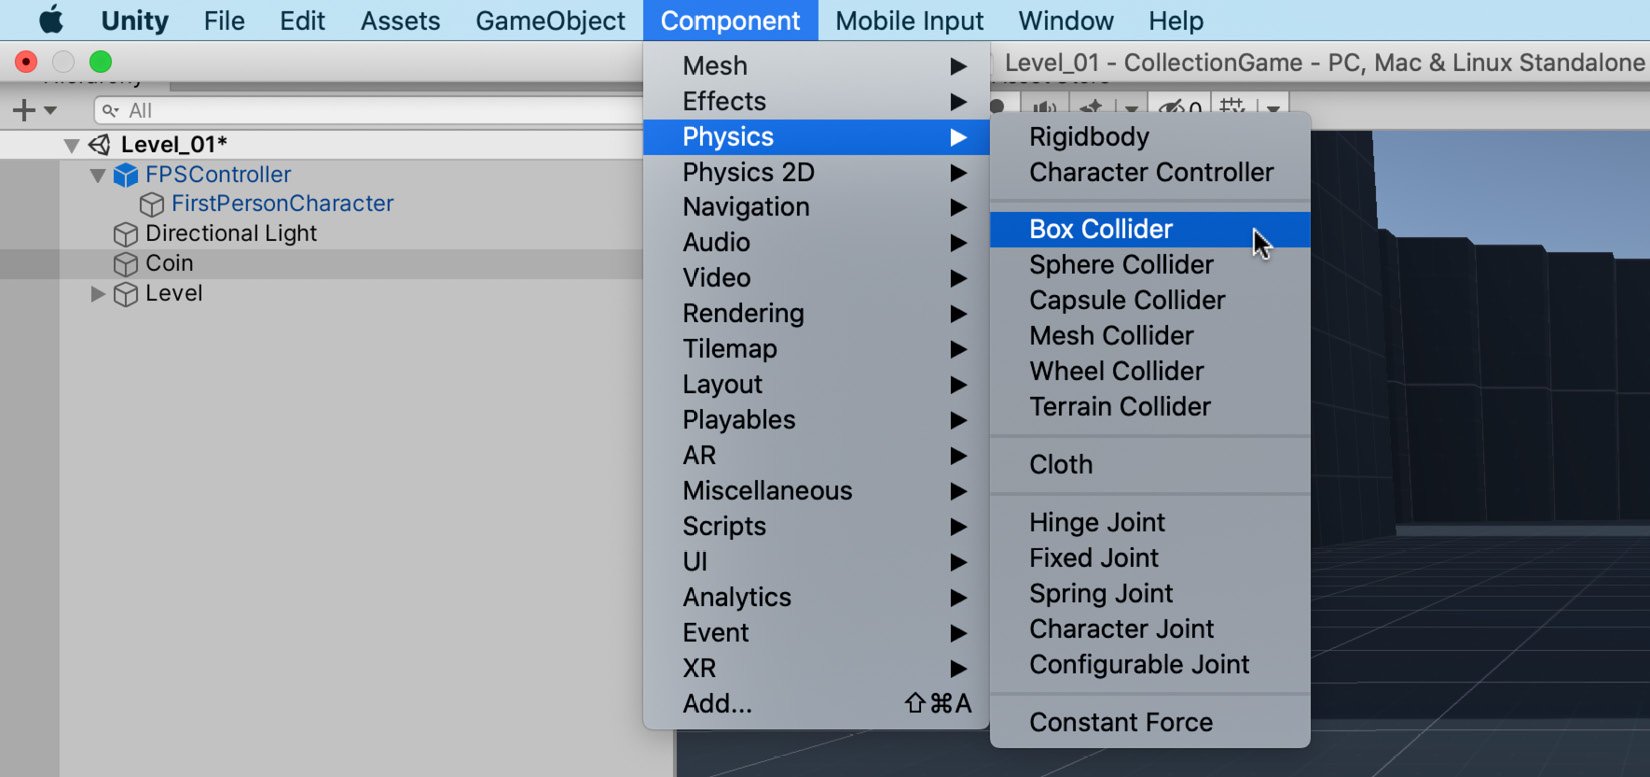
Figure 2.18 – Adding a component to the selected object
Regardless of the collider type used, there's a minor problem. If you play the game now and try to run through the coin, it'll block your path. The coin acts as a solid, physical object through which the FPSController cannot pass. However, for our purposes, this isn't how the coin should behave. It's supposed to be a collectible object—one that we can walk through. To fix this, take the following steps:
- Select the Coin object.
- Enable the Is Trigger checkbox on the Capsule Collider component in the Inspector:
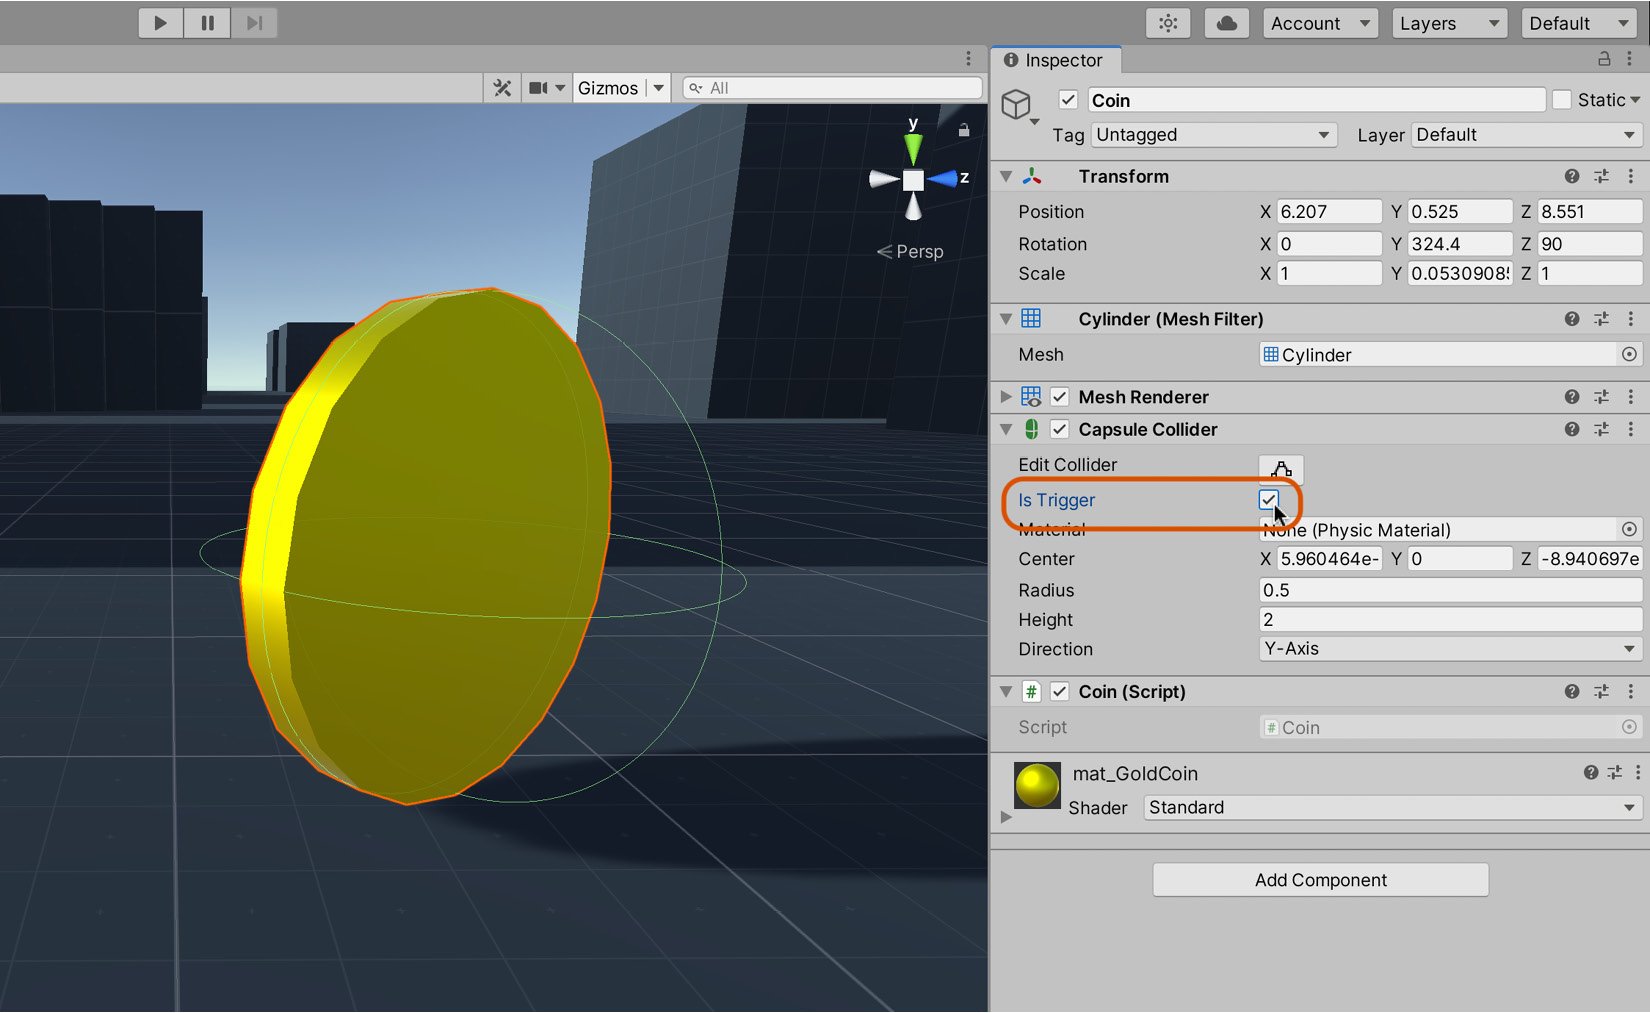
Figure 2.19 – The Is Trigger setting allows objects to pass through colliders
The Is Trigger setting appears for almost all collider types. It lets us detect collisions and intersections with other colliders while allowing them to pass through. With the collider attached, and properly configured, we can update the Coin.cs script to count the number of coins collected.
Counting coins
If you play the game now, the FPSController will be able to walk through the coin objects in the scene. However, the coins don't disappear when touched; they still don't get collected. To achieve this, we'll need to add additional code to the Coin.cs file. Specifically, we'll add an OnTriggerEnter function. This function is automatically called when an object, like the player, enters a collider. For now, we'll add a Debug.Log statement to print a debug message when the player enters the collider for test purposes:
public class Coin : MonoBehaviour
{
…
    void OnTriggerEnter(Collider Col)
    {
        Debug.Log ("Entered Collider");
    }
}
Tip
More information on the style function can be found in the online Unity documentation here: https://docs.unity3d.com/ScriptReference/MonoBehaviour.OnTriggerEnter.html.
Test Code Sample 2.4 by pressing play on the toolbar. When you run into a coin, the OnTriggerEnter function will be executed and the message will be displayed. However, the question remains as to what object initiated this function in the first place. Something indeed collided with the coin, but what exactly? Was it the player, an enemy, a falling brick, or something else? To check this, we'll use a feature in Unity called Tags.
Working with Tags
The Tag attribute lets you mark specific objects in the scene with a label. We can then use this label in our code to identify which object is colliding with the coin. After all, it should only be the player that can collect coins. So, firstly, we'll assign the player object a Tag called Player:
- Select the FPSController object in the scene.
- Click on the Tag drop-down box in the Inspector.
- Select the Player Tag:
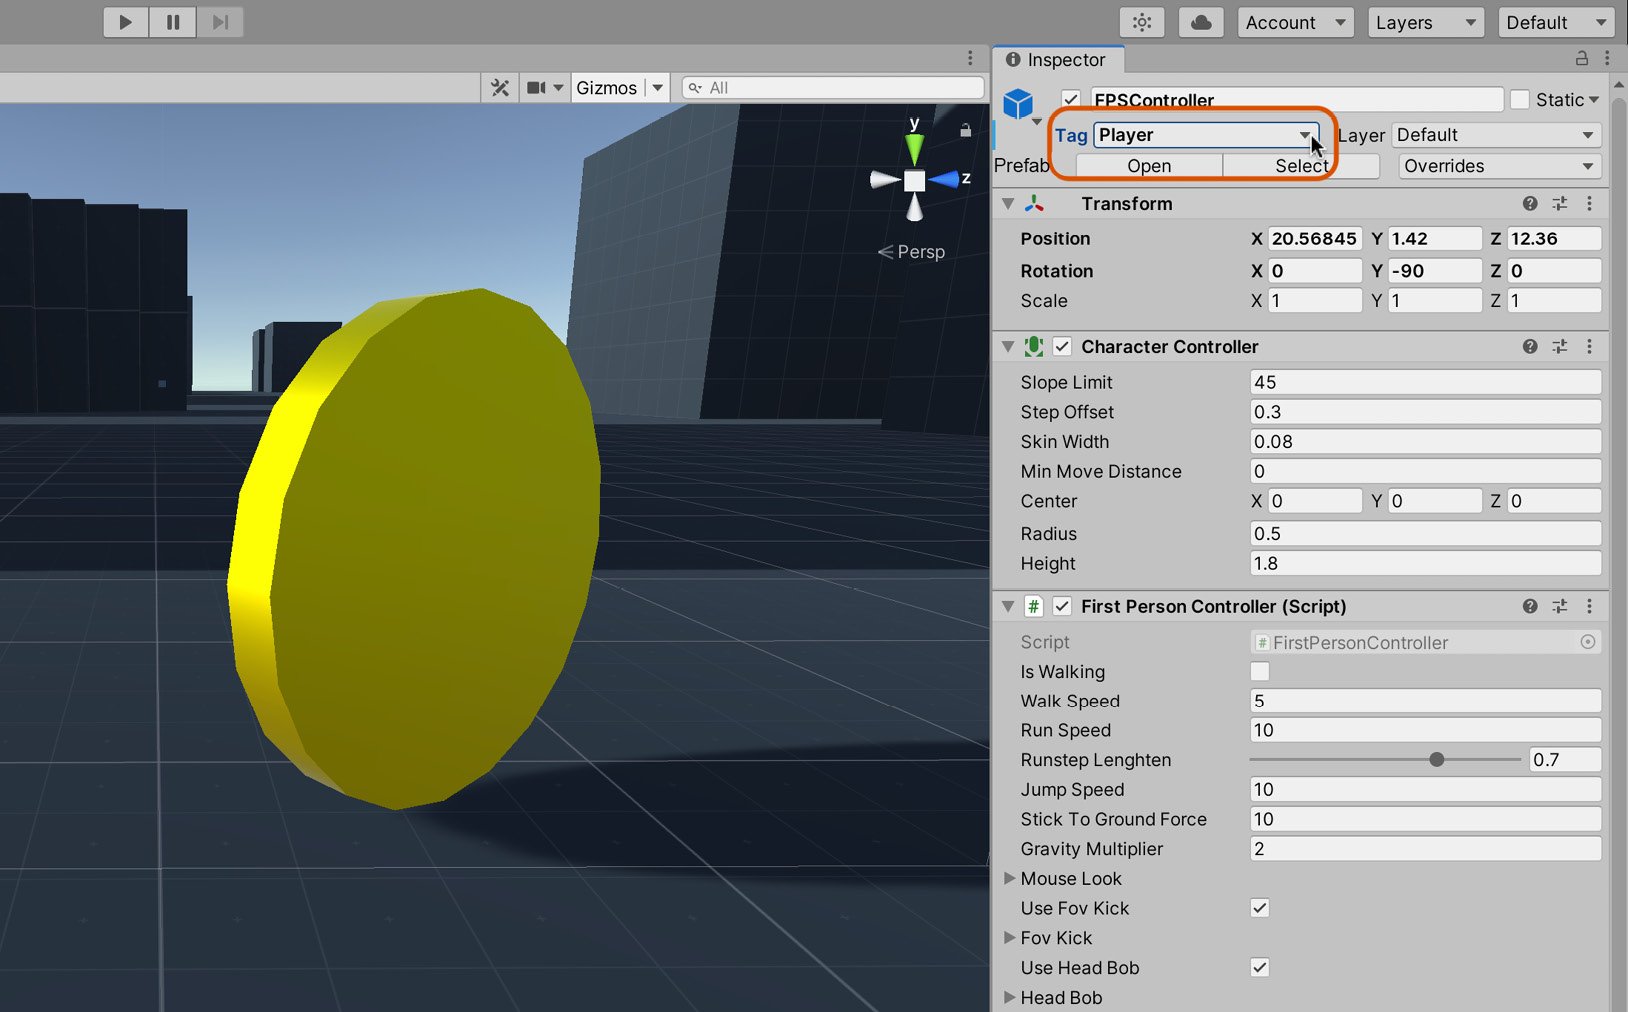
Figure 2.20 – Tagging FPSController as Player
With FPSController now tagged as Player, we can refine the Coin.cs file, as shown in Code Sample 2.5. This change handles coin collection, making coins disappear on touch and decreasing the coin count:
using UnityEngine;
using System.Collections;
public class Coin : MonoBehaviour
{
   …
   void OnTriggerEnter(Collider Col)
   {
      //If player collected coin, then destroy object       if(Col.CompareTag("Player"))
      {
          Destroy(gameObject);
      }
   }
}
The following points summarize the code sample:
OnTriggerEnteris called once automatically by Unity each time an object intersects theCoinobject.- When
OnTriggerEnteris called, theColargument contains information about the object that entered the collider on this occasion. - The
CompareTagfunction determines whether the colliding object is thePlayeras opposed to a different object. - The
Destroyfunction is called to destroy theCoinobject itself, represented internally by the inherited member variable,gameObject. This call removes the coin from the game. - When the
Destroyfunction is called, theOnDestroyevent is invoked automatically, which decrements the coin count.
When two objects with colliders intersect, several different script events can be called. Factors that affect which (if any) event function is called include the following:
- Does the object have a Rigidbody component attached?
- Is the collider set as a trigger?
- Is the Rigidbody component kinematic or not?
- Is the collider 2D or 3D?
We will discuss these combinations and which events they call in more detail as we progress through the book. For now, it's enough to know that because we've haven't added a Rigidbody component to our coin object, and the collider is a Trigger, the object has a static trigger collider. When an object has a static trigger collider, the OnTriggerEnter function will be called when colliding with any object that has a 3D Rigidbody and a 3D Collider component attached, such as the Character Controller.
Tip
You can find the complete collision action matrix here: https://docs.unity3d.com/Manual/CollidersOverview.html.
Excellent work! You've just created your first working coin. The player can now run into the coin, collect it, and remove it from the scene. Next up: adding additional coins to the scene. We could duplicate the existing coin many times and reposition each duplicate. However, there's a better way, as we'll see shortly.
Working with prefabs
With the basic coin functionality created, it's time to add additional coins to the scene. The problem with simply duplicating a coin arises if we make a change to one of these coins and need to propagate that change to the other coins. We'd then need to delete the former duplicates and manually replace them with newer, amended versions. To avoid this tedious process, we can use prefabs. Prefabs let you convert an object in a scene to an asset. The asset can then be instantiated in the scene as frequently as needed, as though it were any other kind of asset. The advantage is that changes made to the prefab can be easily applied to all instances of the object in the project, even across multiple scenes.
Now we know the benefits of prefabs, let's convert the coin object to one now. To do this, select the Coin object in the scene and then drag and drop it in the Project panel:
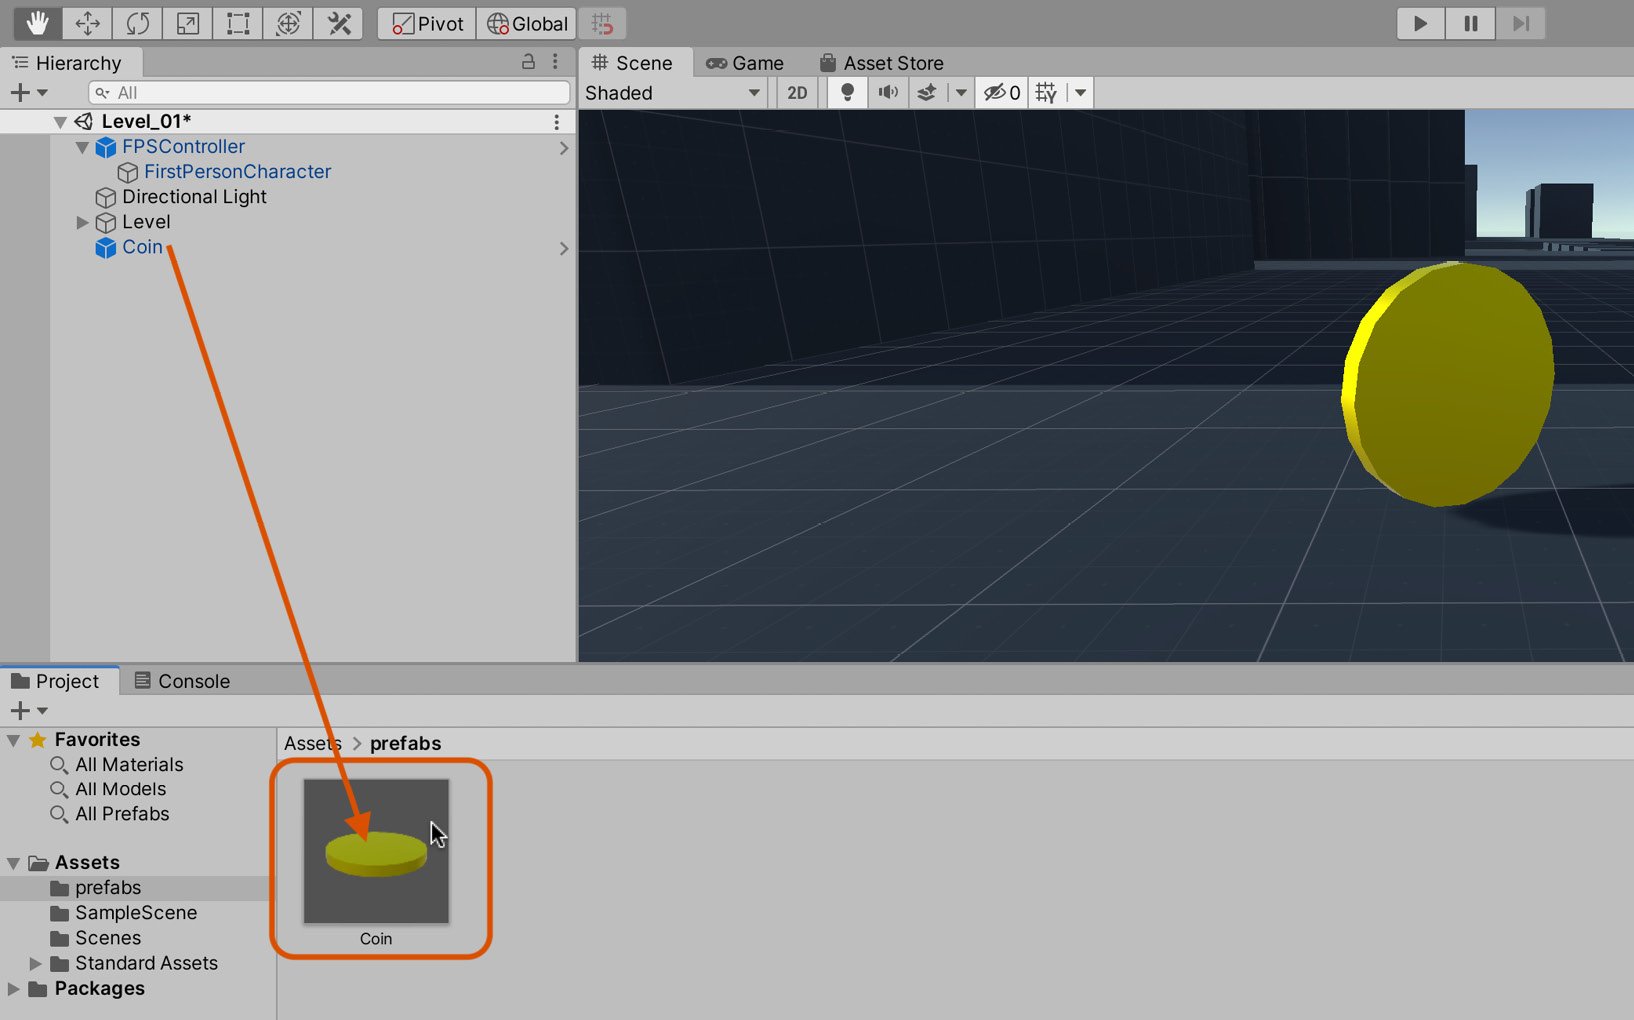
Figure 2.21 – Creating a coin prefab
A new prefab will be created, and the object in the scene will be automatically updated to be an instance of that prefab. This means that if the asset is deleted from the Project panel, the instance will become invalidated.
Once the prefab has been created, you can add more instances of the coin to the level by dragging and dropping the prefab from the Project panel to the scene. Each instance is linked to the original prefab asset, which means that all changes made to the prefab will propagate to all instances. Add as many Coin prefabs to the level as suitable for your coin collection game. Refer to the following figure for my arrangement:
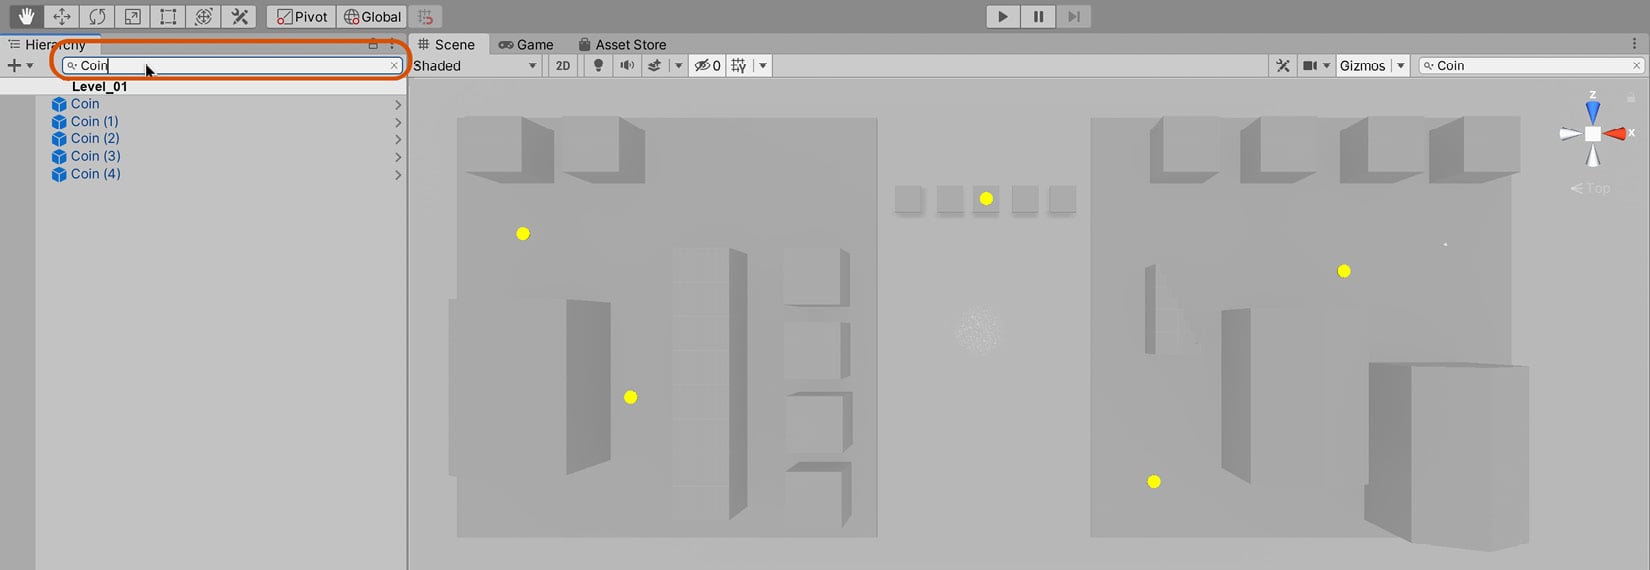
Figure 2.22 – Adding coin prefabs to the level
One question that naturally arises is how you can transform a prefab back into an independent GameObject that is no longer connected to the prefab asset. This is useful to do if you want some objects to be based on a prefab but to deviate from it slightly. To achieve this, right-click a prefab instance in the Scene, and then navigate to Prefab | Unpack Completely:
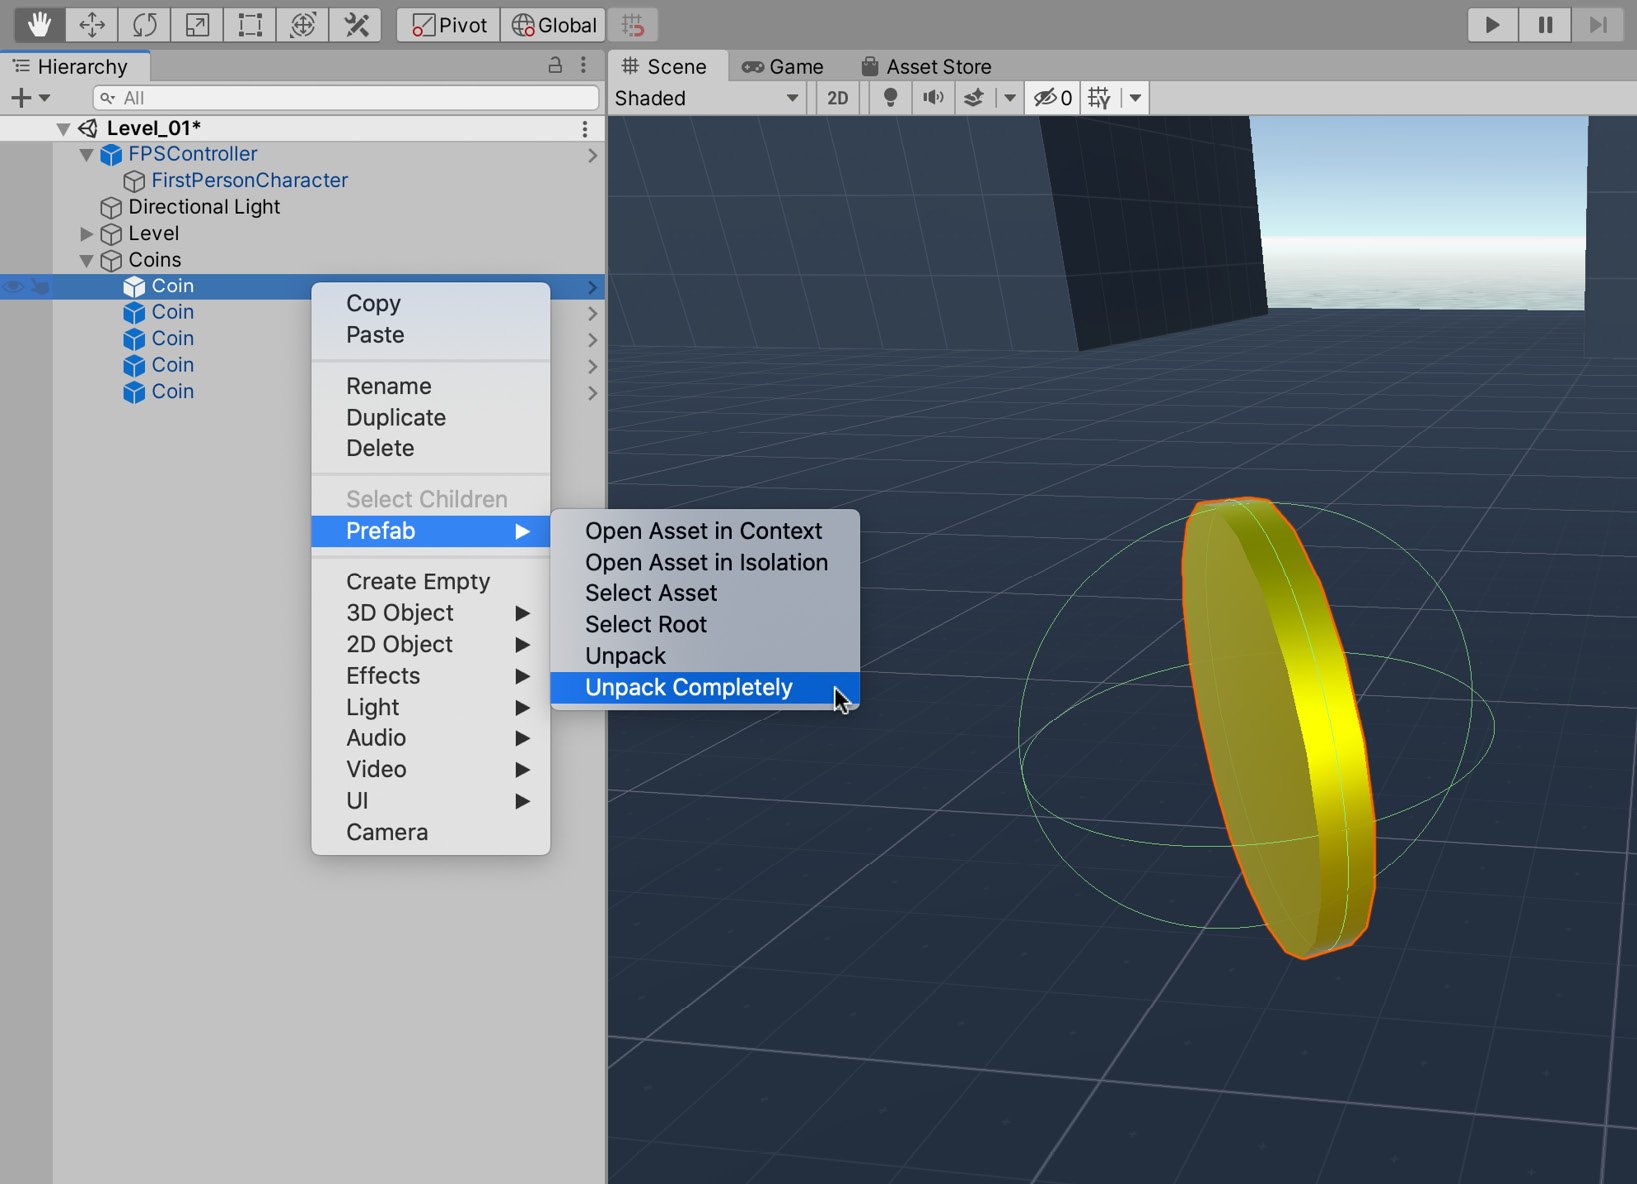
Figure 2.23 – Breaking the prefab instance
You may have noticed that you have two choices, Unpack or Unpack Completely. Both will return the Coin object to a regular GameObject; however, Unpack Completely will also unpack any child objects that are prefabs. As the coin has no child objects that are themselves prefabs, either of these options would be suitable for our purposes.
Conversely, if you wanted to apply changes you made to the Coin object upstream to the prefab asset, you would do the following:
- Select the Coin object.
- In the Inspector panel, click on the Overrides drop-down box. The window that appears lists all of the changes made to this instance that will be applied to the prefab.
- Select Apply All:
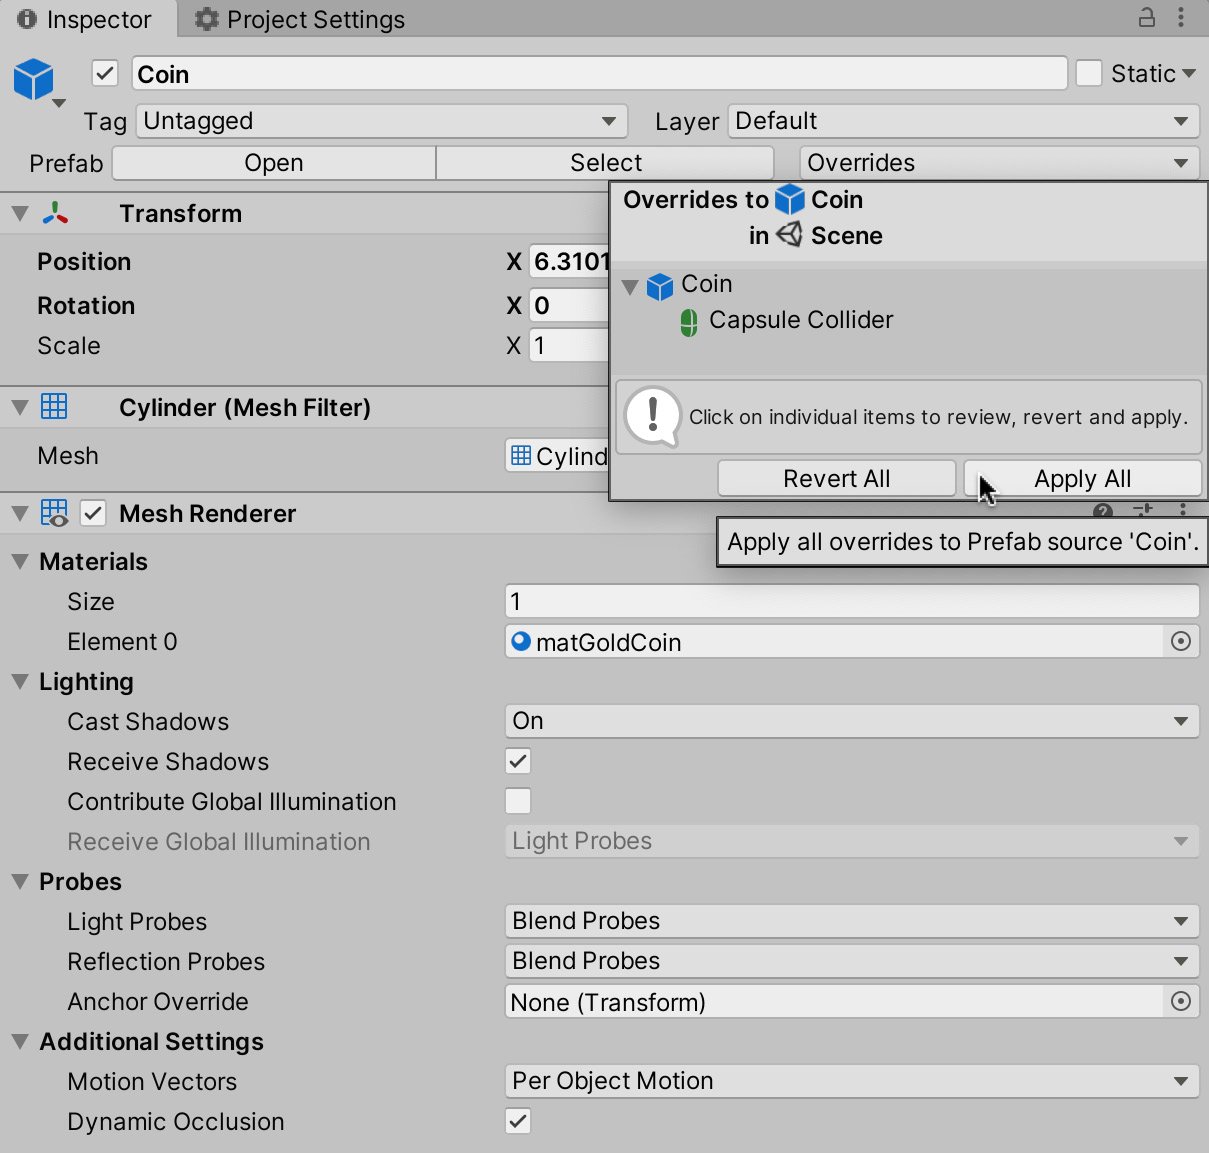
Figure 2.24 – Applying changes to the prefab
One last thing we should discuss regarding prefabs, at least for now, is Prefab Mode. Using this tool, you can easily edit a prefab. Enter Prefab Mode by clicking on the arrow next to the object's name in the Hierarchy panel:

Figure 2.25 – Entering Prefab Mode
When you enter Prefab Mode, everything in the scene apart from the prefab will become gray—enabling you to focus on your prefab:
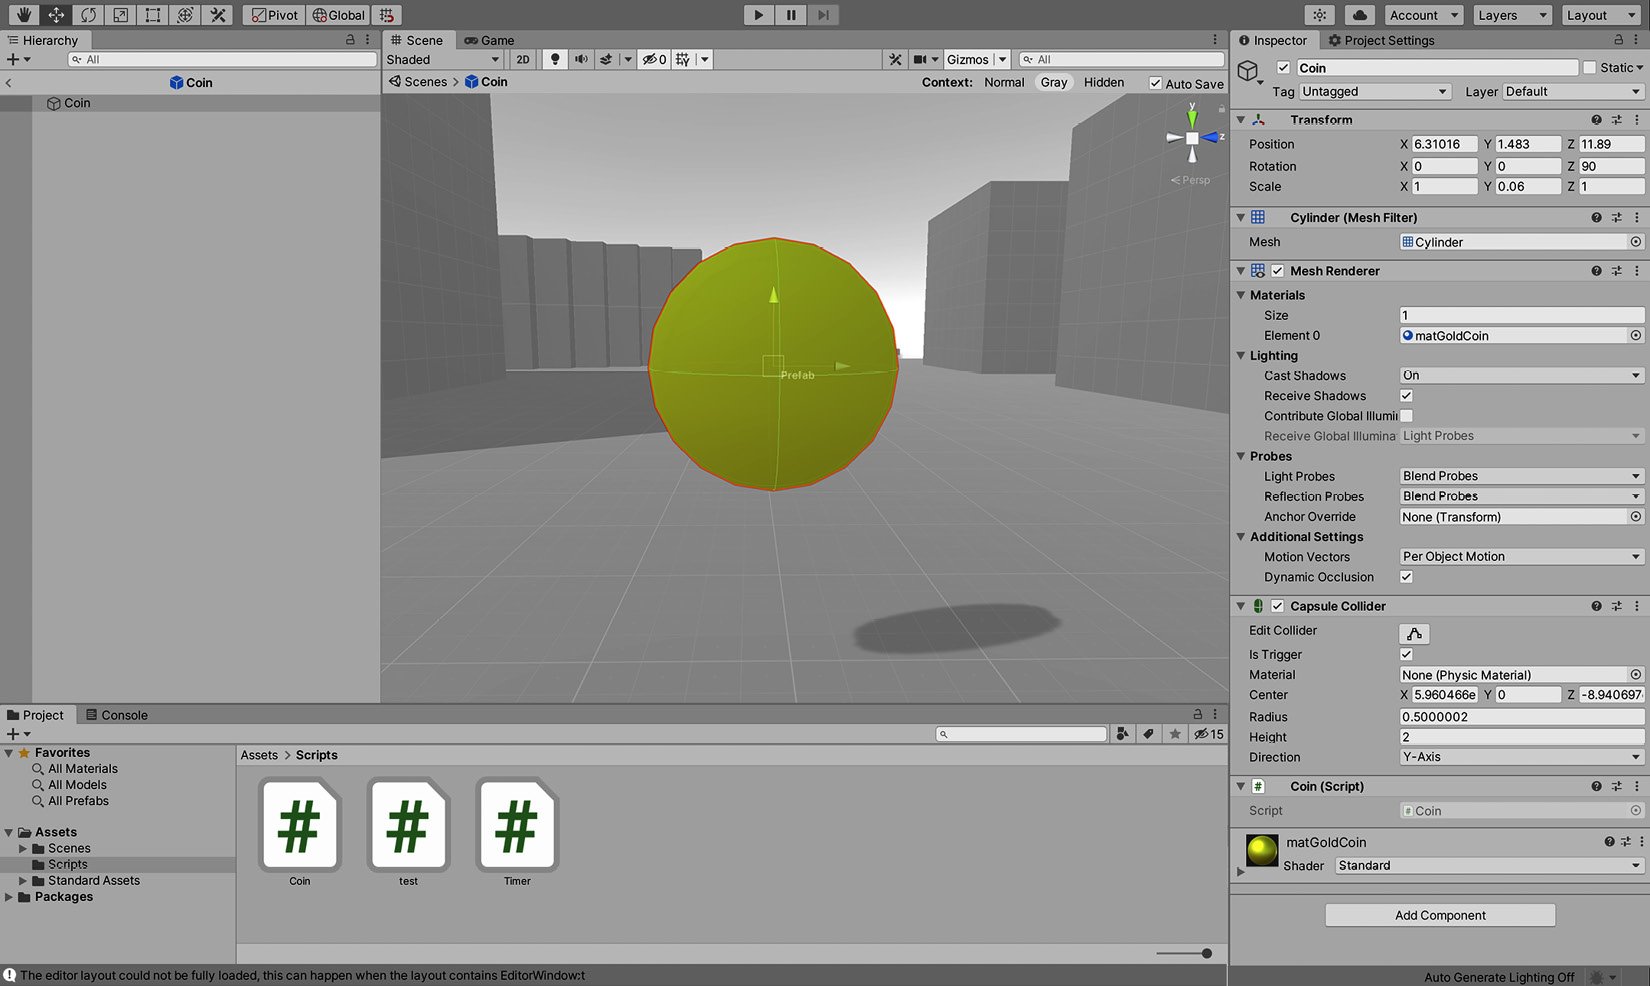
Figure 2.26 – Prefab Mode for the Coin object
Important note
Any changes you make to the prefab in Prefab Mode will be applied to all instances of the prefab.
You should now have a level complete with geometry and coin objects. Thanks to our newly added Coin.cs script, the coins are both countable and collectible. Even so, the level still poses little or no challenge to the player as there's nothing for the player to achieve. This is why a time limit is essential for the game: it defines a win and loss condition. We'll create a timer now.
Creating a timer
Before we create the timer script, we'll create the object to which we'll attach the script:
- Create an empty game object by selecting GameObject | Create Empty.
- Name the new object
LevelTimer:
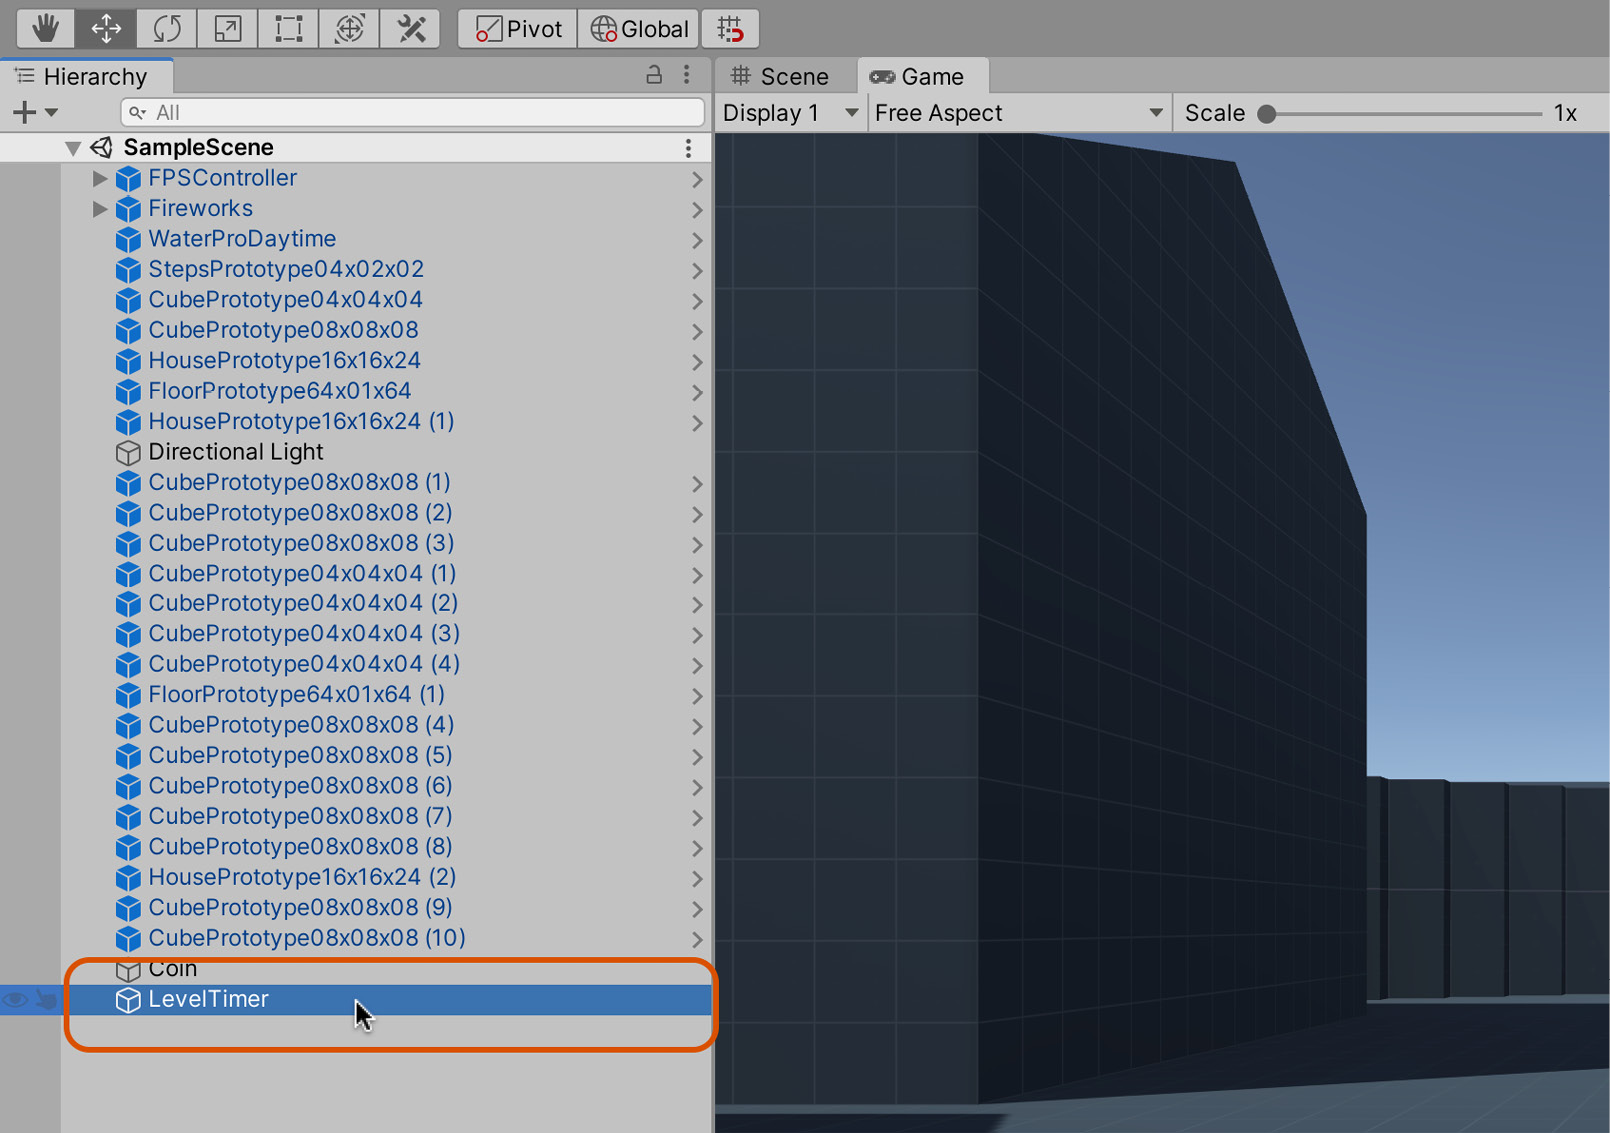
Figure 2.27 – Renaming the timer object
Important note
Remember that the player cannot see empty game objects because they have no Mesh Renderer component. Invisible objects are especially useful to create functionality and behaviors that don't correspond directly to physical and visible entities, such as timers, managers, and game logic controllers.
Next, create a new script file named Timer.cs and add it to the LevelTimer object in the scene. Make sure that the timer script is only added to one object, and no more than one. Otherwise, there will effectively be multiple, competing timers in the same scene. You can always search a scene to find all components of a specified type by using the Hierarchy panel. To do this, take the following steps:
- Click in the Hierarchy search box and type
t:timer. - Press Enter on the keyboard to confirm the search. This will display all objects with a Timer component attached in the Hierarchy panel. The
tprefix in the search string indicates a search by type operation:
Figure 2.28 – Searching for objects with a component of a matching type
- You can easily cancel a search and return the Hierarchy panel to its original state by clicking on the small cross icon to the right-hand side of the search field, as shown in Figure 2.28.
- Now we've added the script to an object, we need to complete the script by writing the code for the timer:
public class Timer : MonoBehaviour
{
	//Maximum time to complete level (in seconds)
	public float MaxTime = 60f;

	[SerializeField] private float CountDown = 0;

	void Start ()
	{
		CountDown = MaxTime;
	}
	void Update ()
	{
		//Reduce time
		CountDown -= Time.deltaTime;
		//Restart level if time runs out
		if(CountDown <= 0)
		{
			//Reset coin count
			Coin.CoinCount=0;
		      SceneManager.LoadScene(SceneManager.                   GetActiveScene().buildIndex);
		}
	}
}
The following points summarize the code sample:
- In Unity, class variables declared as
public(such aspublic float MaxTime) are displayed as editable fields in the Inspector of the Unity editor. These fields enable developers to monitor and set public variables directly from the Inspector without the need to recompile the code for every change.Privatevariables, in contrast, are hidden from the Inspector by default. However, you can force them to be visible, if needed, using theSerializeFieldattribute. Private variables prefixed with this attribute, such as theCountDownvariable, will be displayed in the Inspector just like a public variable, even though the variable's scope remains private. - The
Updatefunction is a native Unity event supported by all classes derived fromMonoBehaviour.Updateis invoked automatically once per frame for all active GameObjects in the scene, notifying them of frame change events.Updateis usually called many times per second; the game's FPS is a general indicator of how many times each second, but the actual number of calls will vary in practice.Updateis especially useful to animate, update, and change objects over time. In the case of theCountDownclass, it'll be used to keep track of time as it passes. More information on theUpdatefunction can be found here: http://docs.unity3d.com/ScriptReference/MonoBehaviour.Update.html.Important note
In addition to the
Updatefunction, Unity also supports two other related functions, namely:FixedUpdateandLateUpdate.FixedUpdateis typically used for physics calculations, as we'll see later, and is called a fixed number of times per frame.LateUpdateis called once per frame for each active object, but theLateUpdatecall will always happen after every object has received anUpdateevent. There are numerous reasons why we would want to perform an action afterUpdate, and a few of them will be explored later in this book. - The static
Time.deltaTimefloating-point variable describes the amount of time (in seconds) that has passed since the previous frame ended. For example, if your game has a frame rate of 2 FPS (a very low frame rate!), then thedeltaTimewill be0.5. This is because, each second, there would be two frames, and thus each frame would be half a second. ThedeltaTimeis useful in our game because, if added over time, it tells us how much time has elapsed or passed since the game began. For this reason, thedeltaTimevariable is used in theUpdatefunction to subtract the elapsed time from the countdown total. More information can be found online at http://docs.unity3d.com/ScriptReference/Time-deltaTime.html. - The static
SceneManager.LoadScenefunction can be called anywhere to change the active scene at runtime. It causes Unity to terminate the active scene, destroying all its contents, and load a new scene. It can also be used to restart the active scene by retrieving the current scene'sbuildIndexusingSceneManager.GetActiveScene().buildIndex.SceneManager.LoadSceneis most appropriate for games with clearly defined levels that have distinct beginnings and endings.
Once you have created the timer script, select the LevelTimer object in the scene, and, using the Inspector, set the maximum time (in seconds) that the player is allowed to complete the level, as shown in Figure 2.29. I've set the total time to 60 seconds. If the player takes longer than this to collect all of the coins, the level is reloaded.
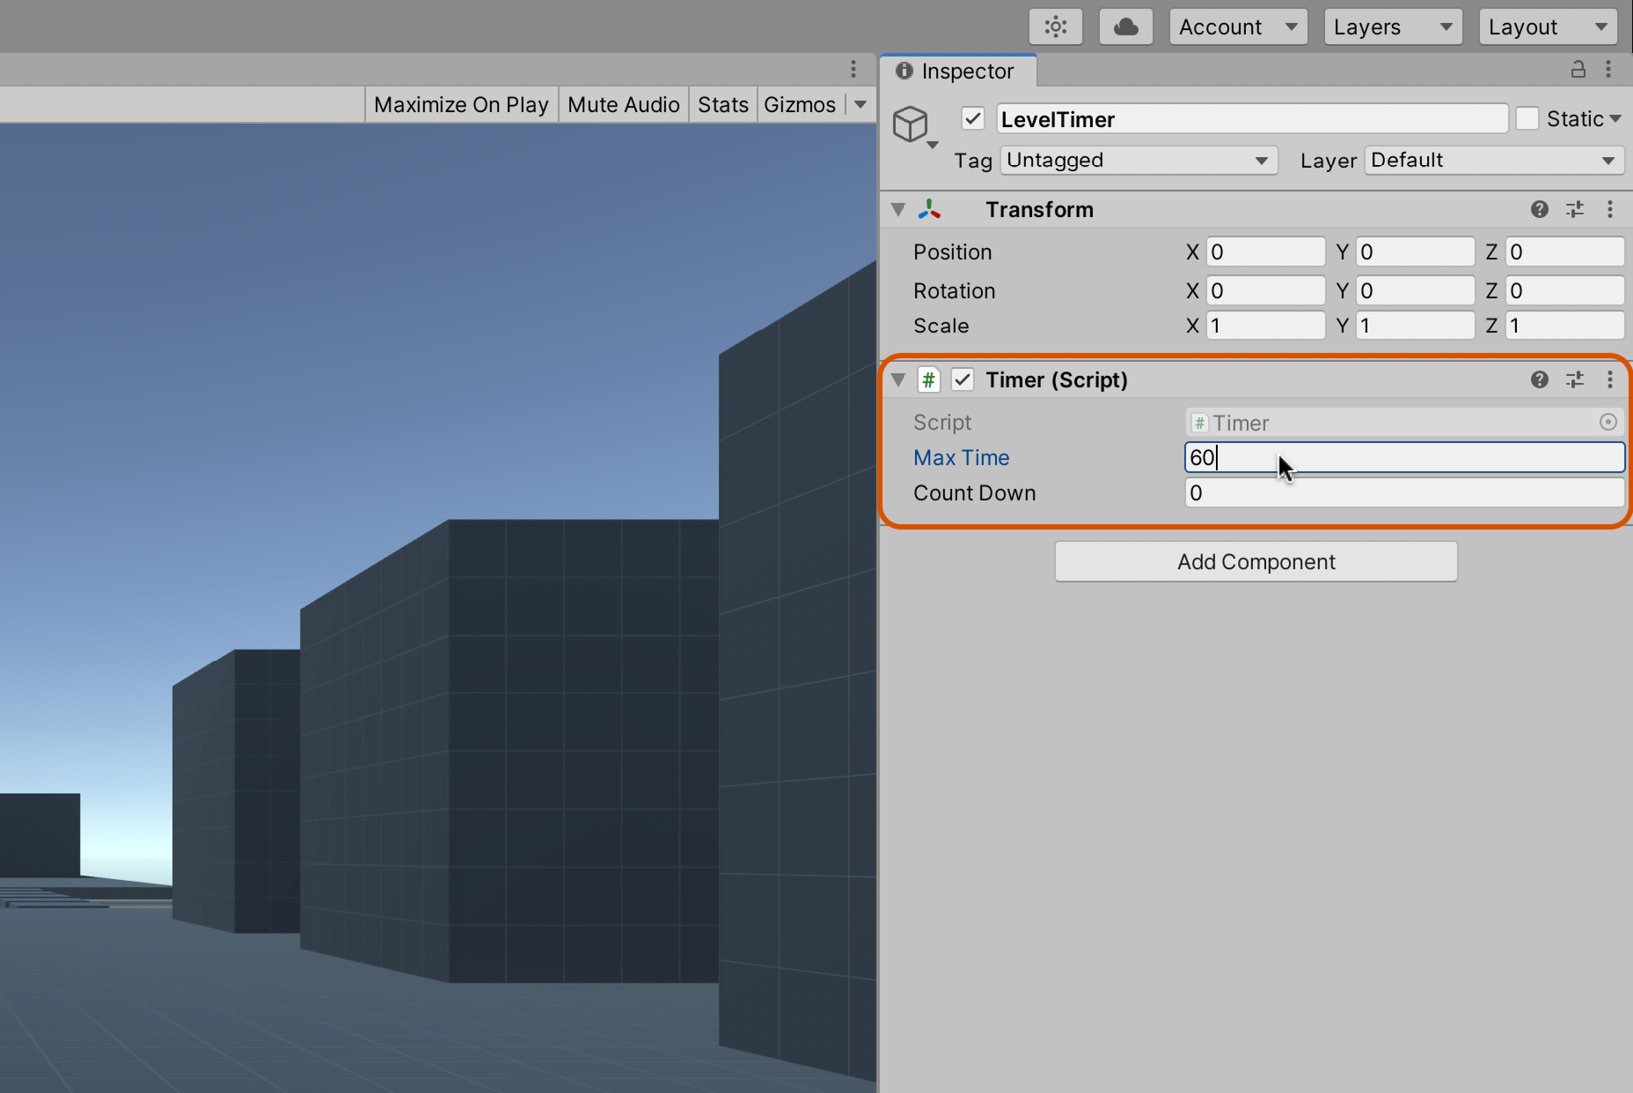
Figure 2.29 – Setting the level's total time
Great work! You now have a completed level with a countdown that works. You can collect coins, and the timer can expire. Overall, the game is taking shape, but there is still no win condition. We'll address this now.
Creating a win condition
The coin collection game is nearly finished. Coins can be collected, and a timer expires, but the win condition itself is not yet handled. When all coins are collected before the time expires, nothing happens to show the player that they've won; the countdown still proceeds and the level even restarts as though the win condition hadn't been satisfied at all. When the win scenario happens, we should delete the timer object to prevent further countdown and show visual feedback to signify that the level has been completed. For the visual feedback, we'll add some fireworks!
Adding fireworks
You can add these from the Unity Particle System packages:
- Navigate to the Standard Assets | ParticleSystems | Prefabs folder.
- Drag and drop the Fireworks particle system in the Scene.
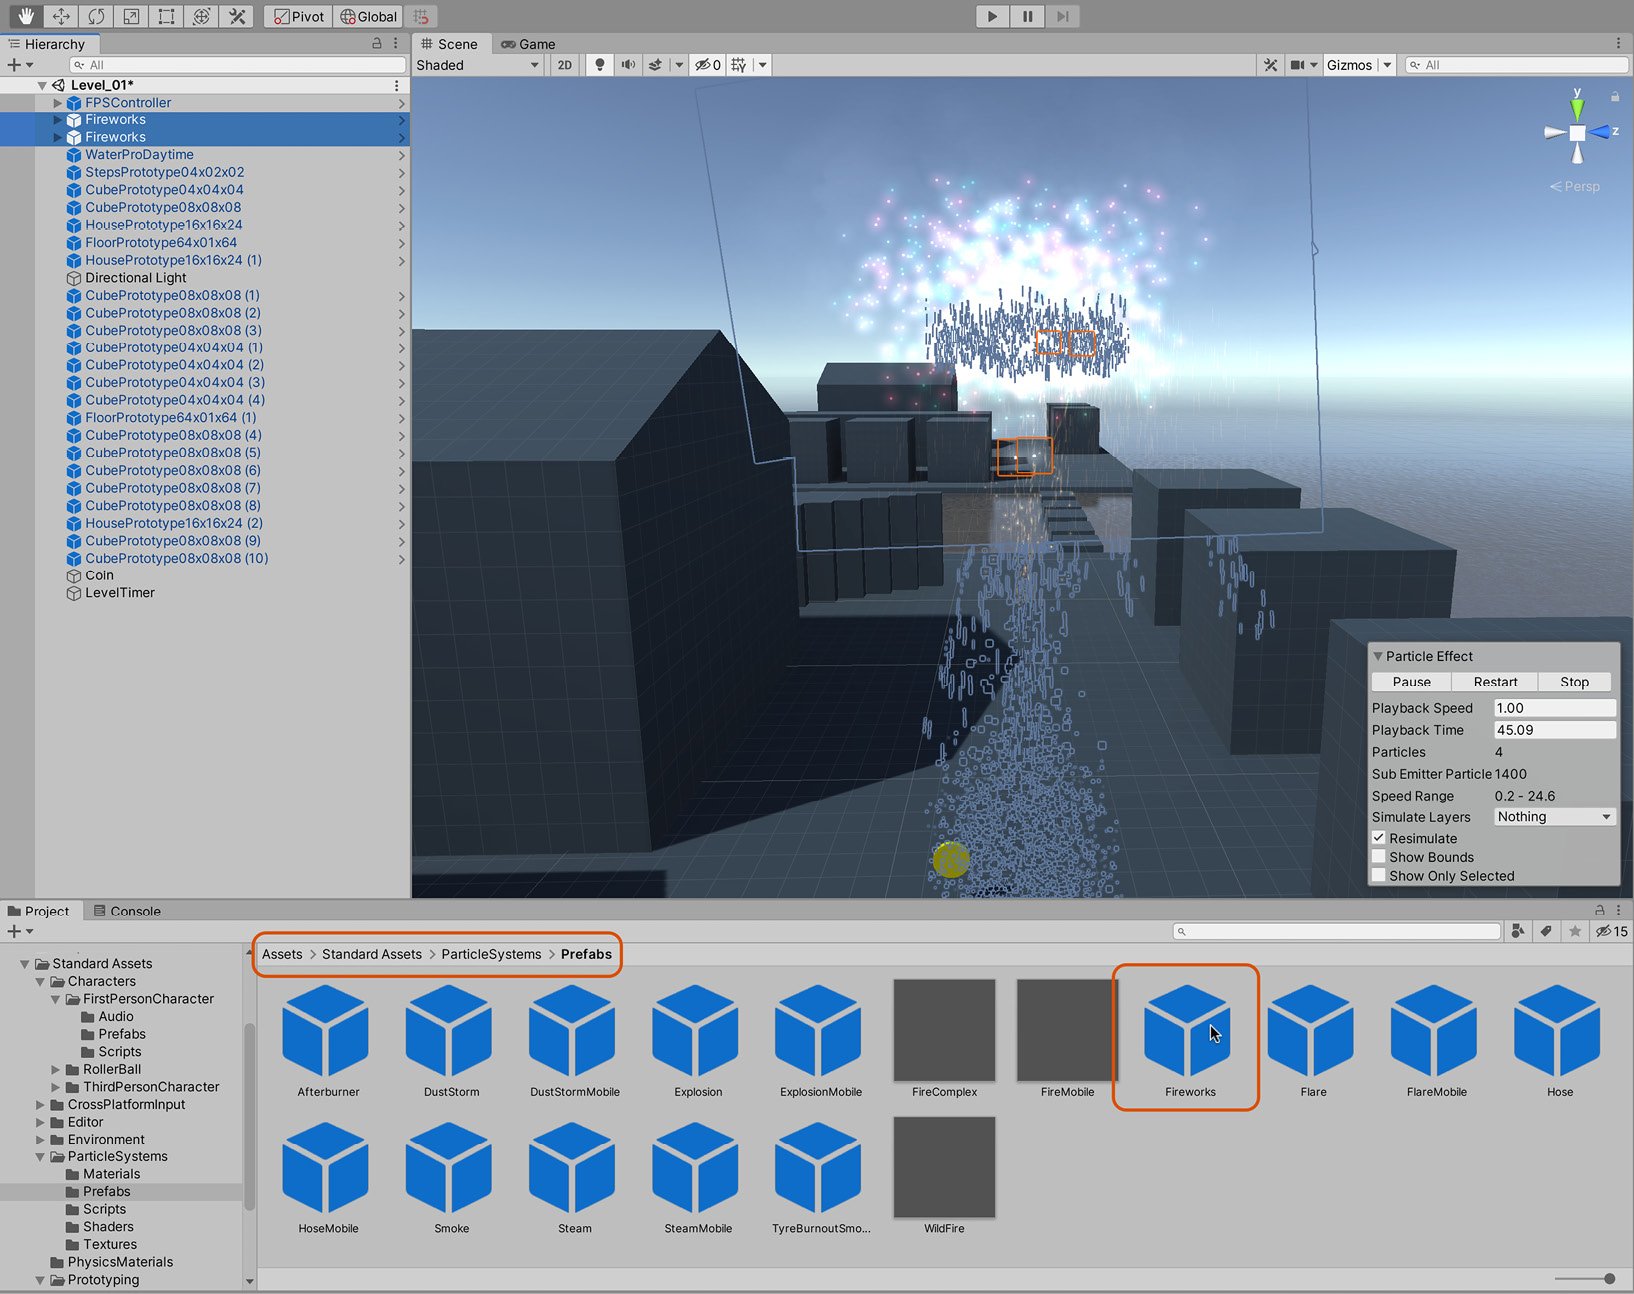
Figure 2.30 – Adding two Fireworks prefabs
As you can see in Figure 2.30, I've added a couple of Fireworks prefabs to the scene. By default, all Fireworks particle systems will play when the level begins. You can test this by pressing play on the toolbar. We only want the fireworks to play when the win condition has been satisfied. To disable playback on level startup, do the following:
- Select the Particle System object in the Scene.
- Disable the Play On Awake checkbox on the Particle System component in the Inspector:
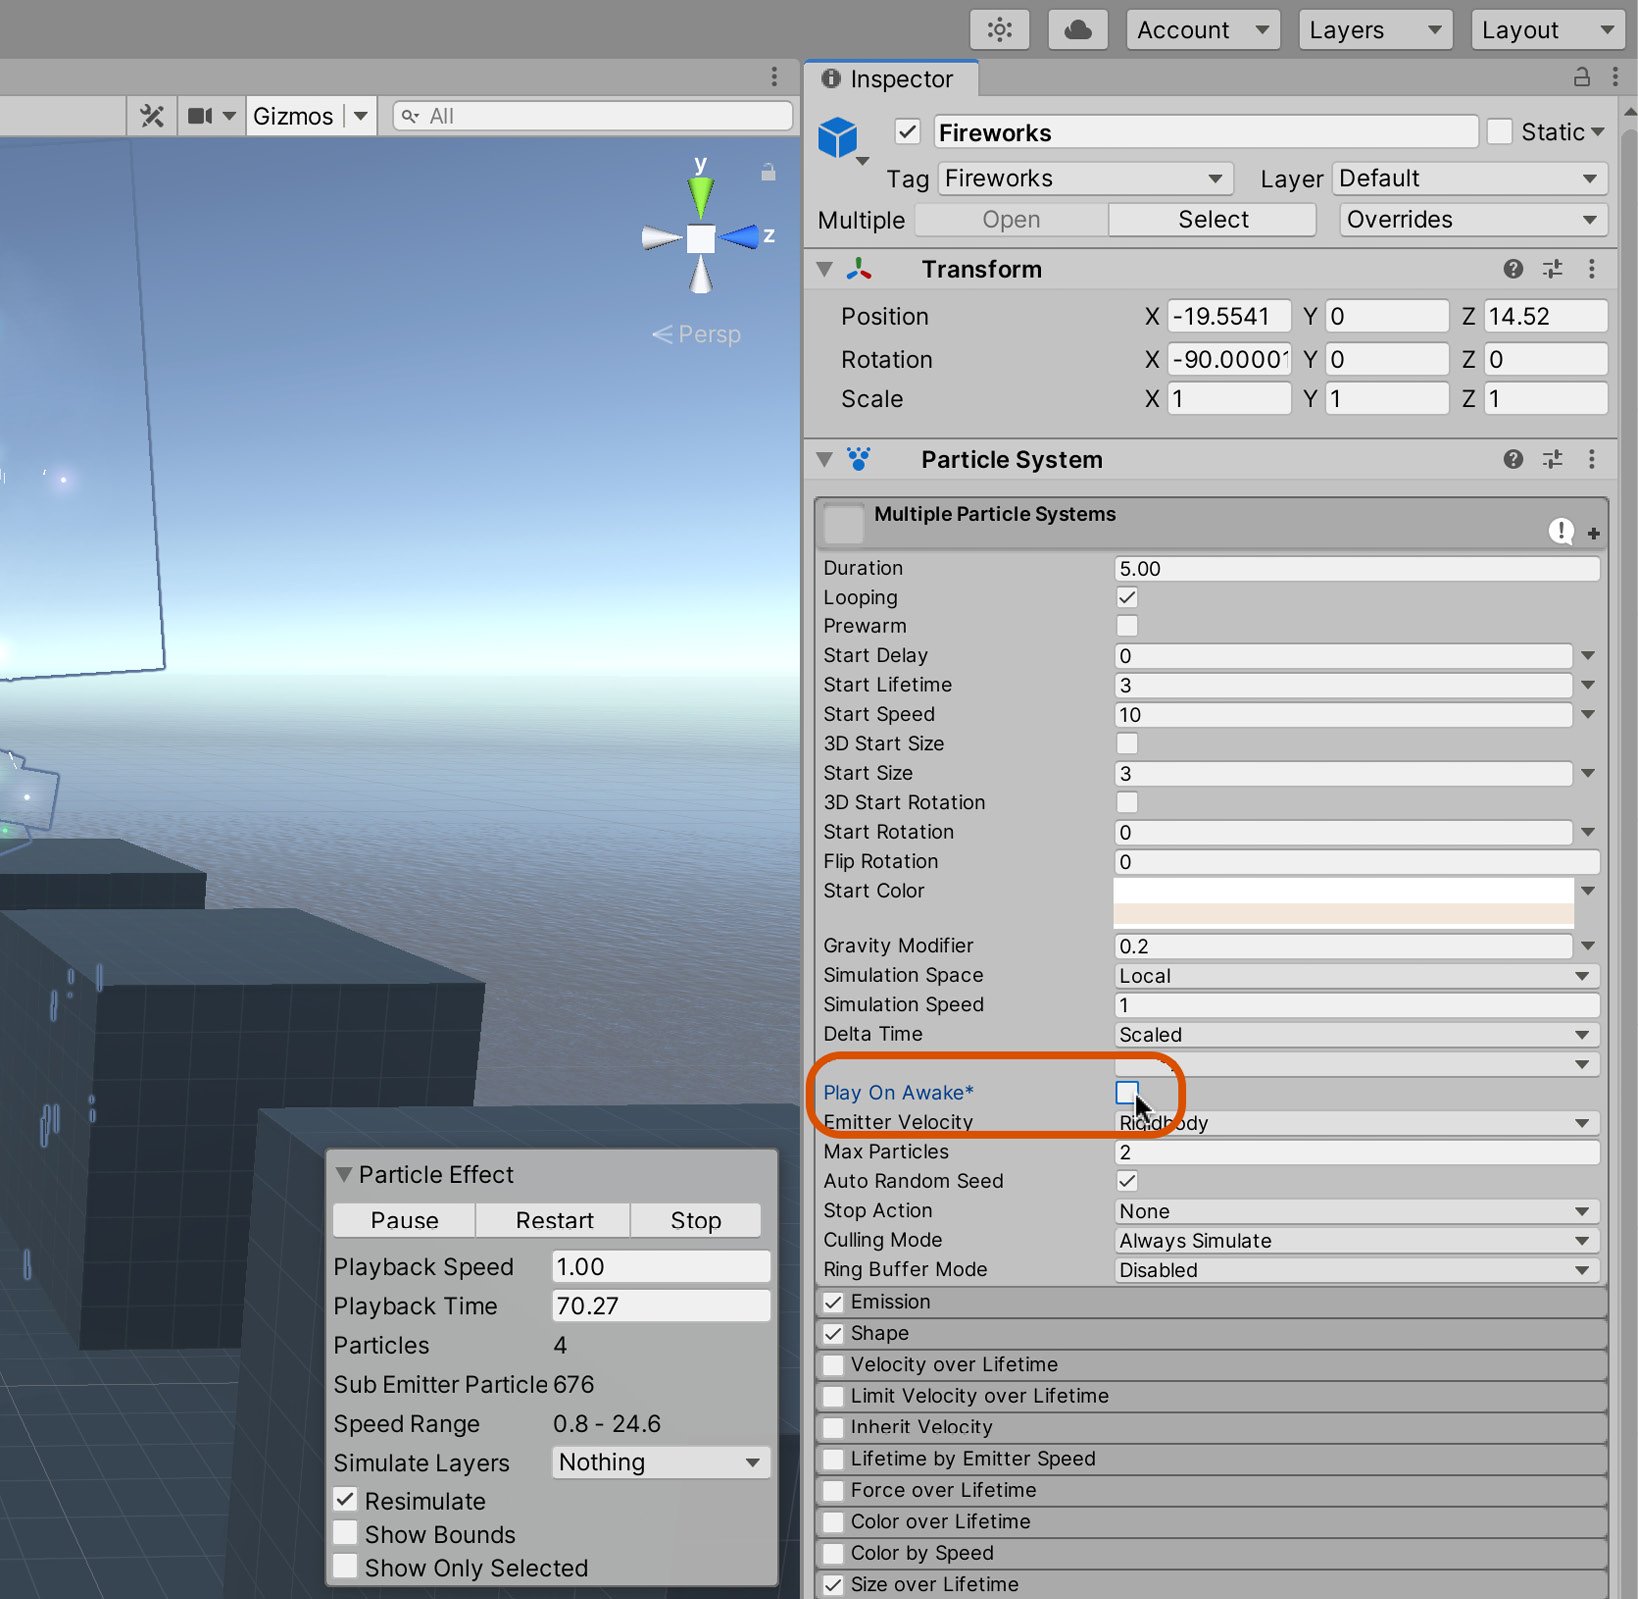
Figure 2.31 – Disabling Play On Awake
Disabling Play On Awake prevents particle systems from playing automatically at level startup. This is fine, but if they are ever to play at all, something must manually start them at the right time. We can achieve this through code. However, we'll first mark all firework objects with an appropriate Tag. The reason for this is that, in code, we'll want to search for all firework objects in the scene and trigger them to play when needed. To isolate the firework objects from all other objects, we'll use Tags. So, let's create a new Fireworks Tag and assign it to the Fireworks objects in the Scene:
- Select the Fireworks object in the Hierarchy panel.
- In the Inspector, at the top, select the Tag drop-down menu.
- Select Add Tag…:

Figure 2.32 – Opening the Tags & Layers settings
- Click the plus sign under the Tags heading.
- Type the name
Fireworksand click Save:
Figure 2.33 – Adding a new Tag
With the Tag created, we can assign it to the Fireworks object
- Once again, select the Fireworks object in the Hierarchy.
- You'll see our custom Tag in the Tag menu; select it:
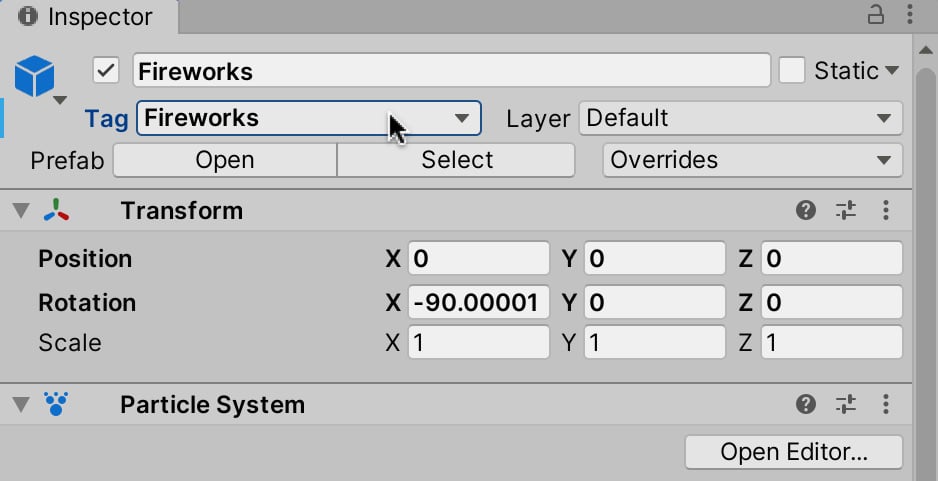
Figure 2.34 – Assigning the custom Tag
The firework object now has a custom Tag that we can use in our code to find the object in the scene, which is exactly what we'll do next to play the fireworks at the right moment.
Lighting the fireworks
With the firework objects now tagged, we can refine the Coin.cs script class to play the fireworks particle system when the player has collected all of the coins:
public class Coin : MonoBehaviour
{
	…
    void OnDestroy()
    {
        --Coin.CoinCount;
    if(Coin.CoinCount <= 0)
    {
        GameObject Timer = GameObject.Find("LevelTimer");         Destroy(Timer);
        GameObject[] FireworkSystems =           GameObject.FindGameObjectsWithTag("Fireworks");          if (FireworkSystems.Length <= 0) { return; }
        foreach(GameObject GO in FireworkSystems)
        {
           GO.GetComponent<ParticleSystem>().Play();
        }
    }
}
}
Let's summarize the preceding code:
- The
OnDestroyfunction is called automatically whenever the GameObject is destroyed. In our game, this occurs when a coin is collected. In the function, anifstatement is used to determine when all coins are collected (the win scenario). - When a win scenario happens, the
GameObject.Findfunction is called to search the complete scene hierarchy for any active object namedLevelTimer. If found, the object is deleted. This prevents the countdown from progressing. If the scene contains multiple objects with a matching name, then only the first object is returned. This is one reason why the scene should have one, and only one, timer.Tip
Try to avoid using
GameObject.Findwherever possible as it's relatively slow. Instead, useFindGameObjectsWithTag.GameObject.Findhas been used here only to demonstrate its existence and purpose. Sometimes, you'll need to use it to find a single, miscellaneous object that has no specific Tag. - In addition to deleting the
LevelTimerobject, theOnDestroyfunction finds all fireworks in the scene, gets theirParticleSystemcomponent, and plays the particle animation. It finds all objects using theGameObject.FindGameObjectsWithTagfunction, which returns an array of objects with the Fireworks Tag. TheGetComponentfunction is used to retrieve a reference to any specified component, giving you direct access to its public properties and methods. TheOnDestroyfunction in the preceding code usesGetComponentto retrieve a reference to theParticleSystemcomponent attached to the object.GetComponentis an important function, which you'll often use as a Unity developer. More information onGetComponentcan be found online at https://docs.unity3d.com/ScriptReference/GameObject.GetComponent.html.Important note
As mentioned, each GameObject in Unity is really made from a collection of attached and related components. An object is the sum of its components. For example, a standard cube (created using GameObject | 3D Object | Cube) is made from a Transform component, a Mesh Filter component, a Mesh Renderer component, and a Box Collider component. These components together make the cube what it is and behave how it does.
You've now completed your first game in Unity! It's time to take it for a test run and then finally to compile an executable that can be run from outside of Unity.
Playtesting
The basics of testing in Unity are very straightforward; you press play on the toolbar and play your game to see that it works as intended from the perspective of a gamer. However, there are two tools worth mentioning that will help with this process:
- Inspector debugging
- The game stats panel
Let's look at each of these in more detail.
Enabling Inspector debugging
In addition to playing, you can also enable debugging mode from the Inspector to keep a watchful eye on all public and private variables during runtime, making sure that no variable is assigned an unexpected value. To activate the Debug mode:
- Click on the menu icon in the top-right corner of the Inspector.
- From the context menu that appears, select the Debug option:
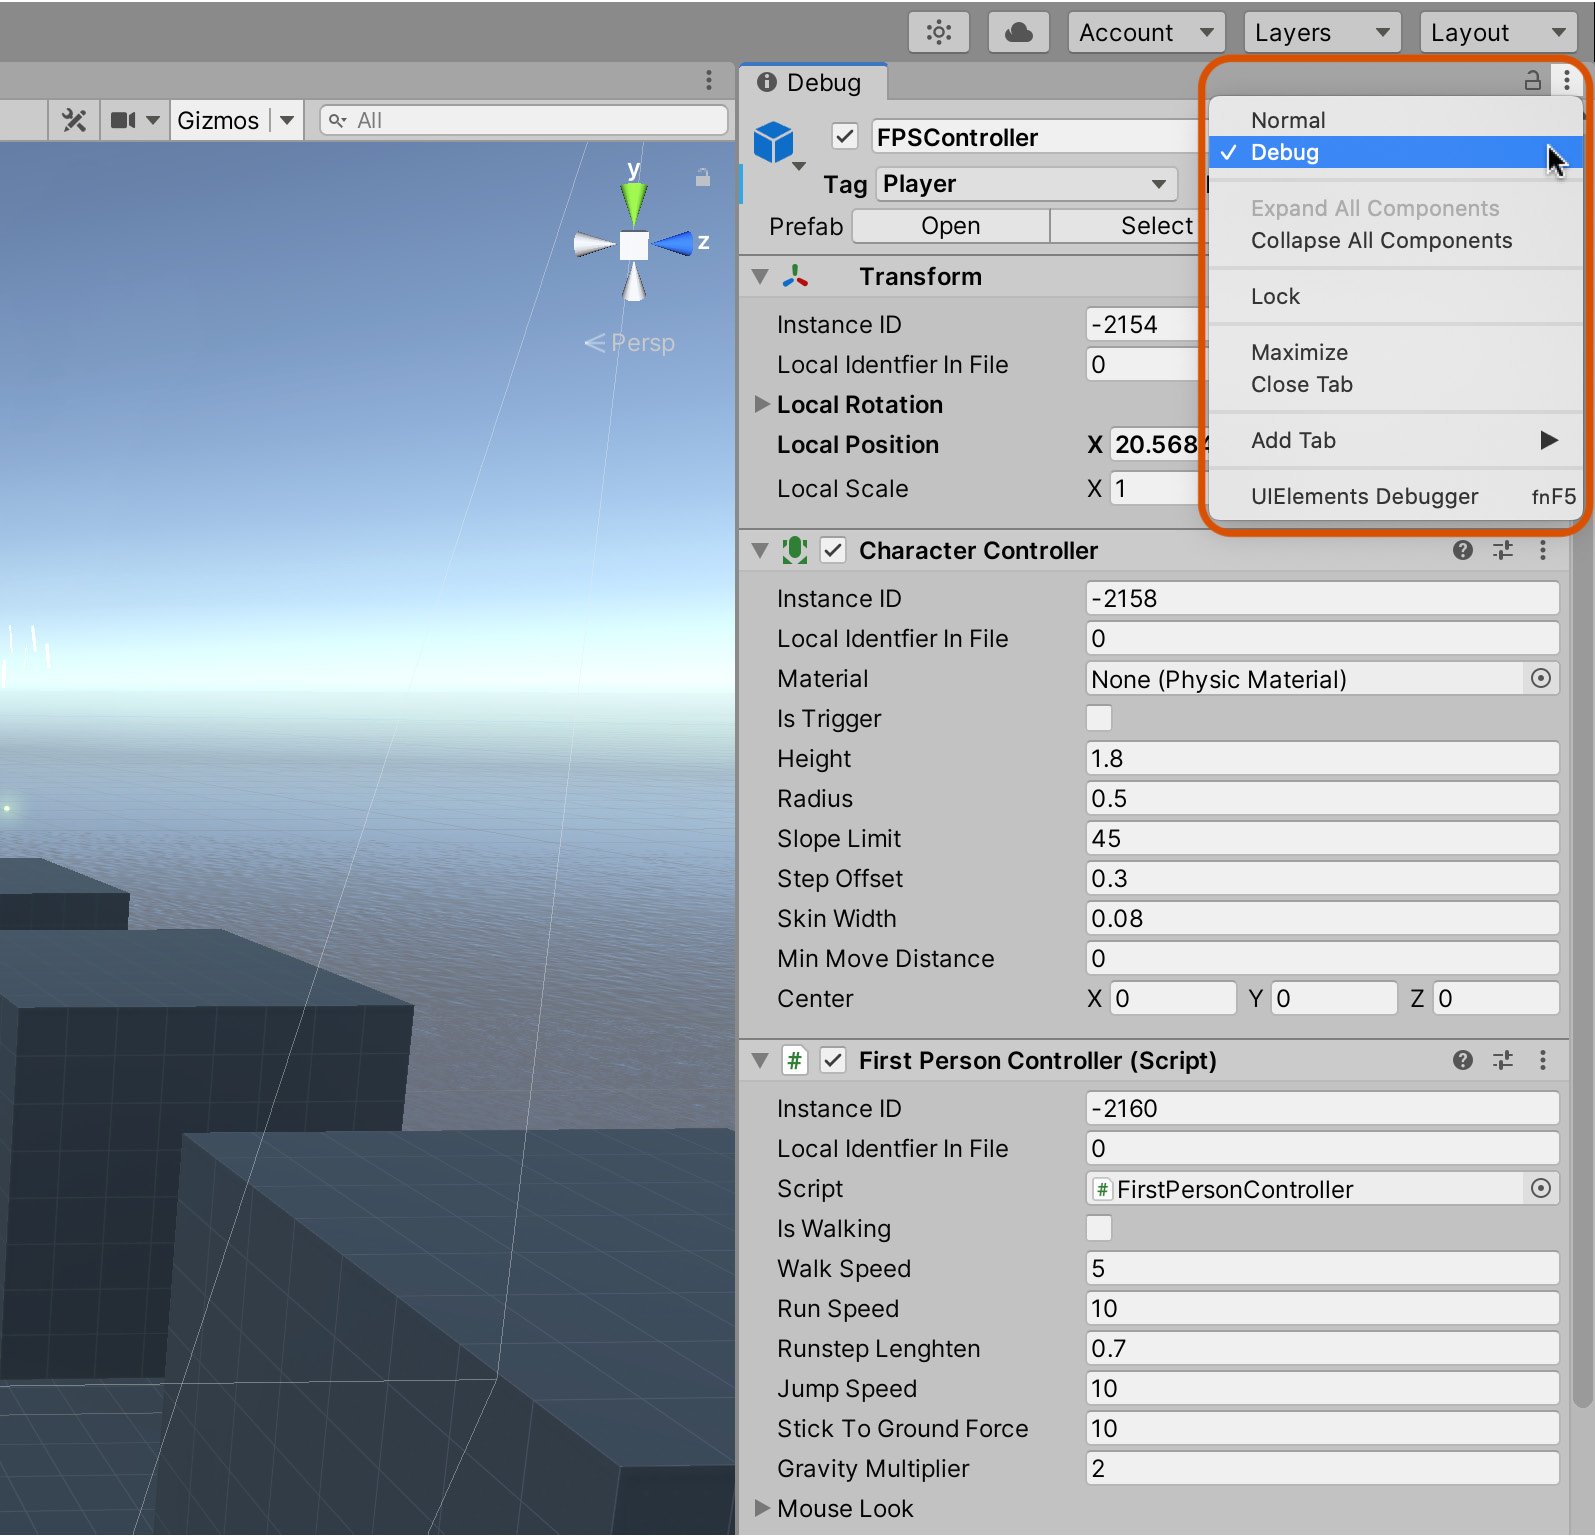
Figure 2.35 – Activating Debug mode from the object Inspector
After activating the Debug mode, the appearance of some variables and components in the Inspector may change. Typically, you'll get a more detailed and accurate view of your variables, and you'll also be able to see most private variables. See Figure 2.36 for the Transform component in Debug mode:
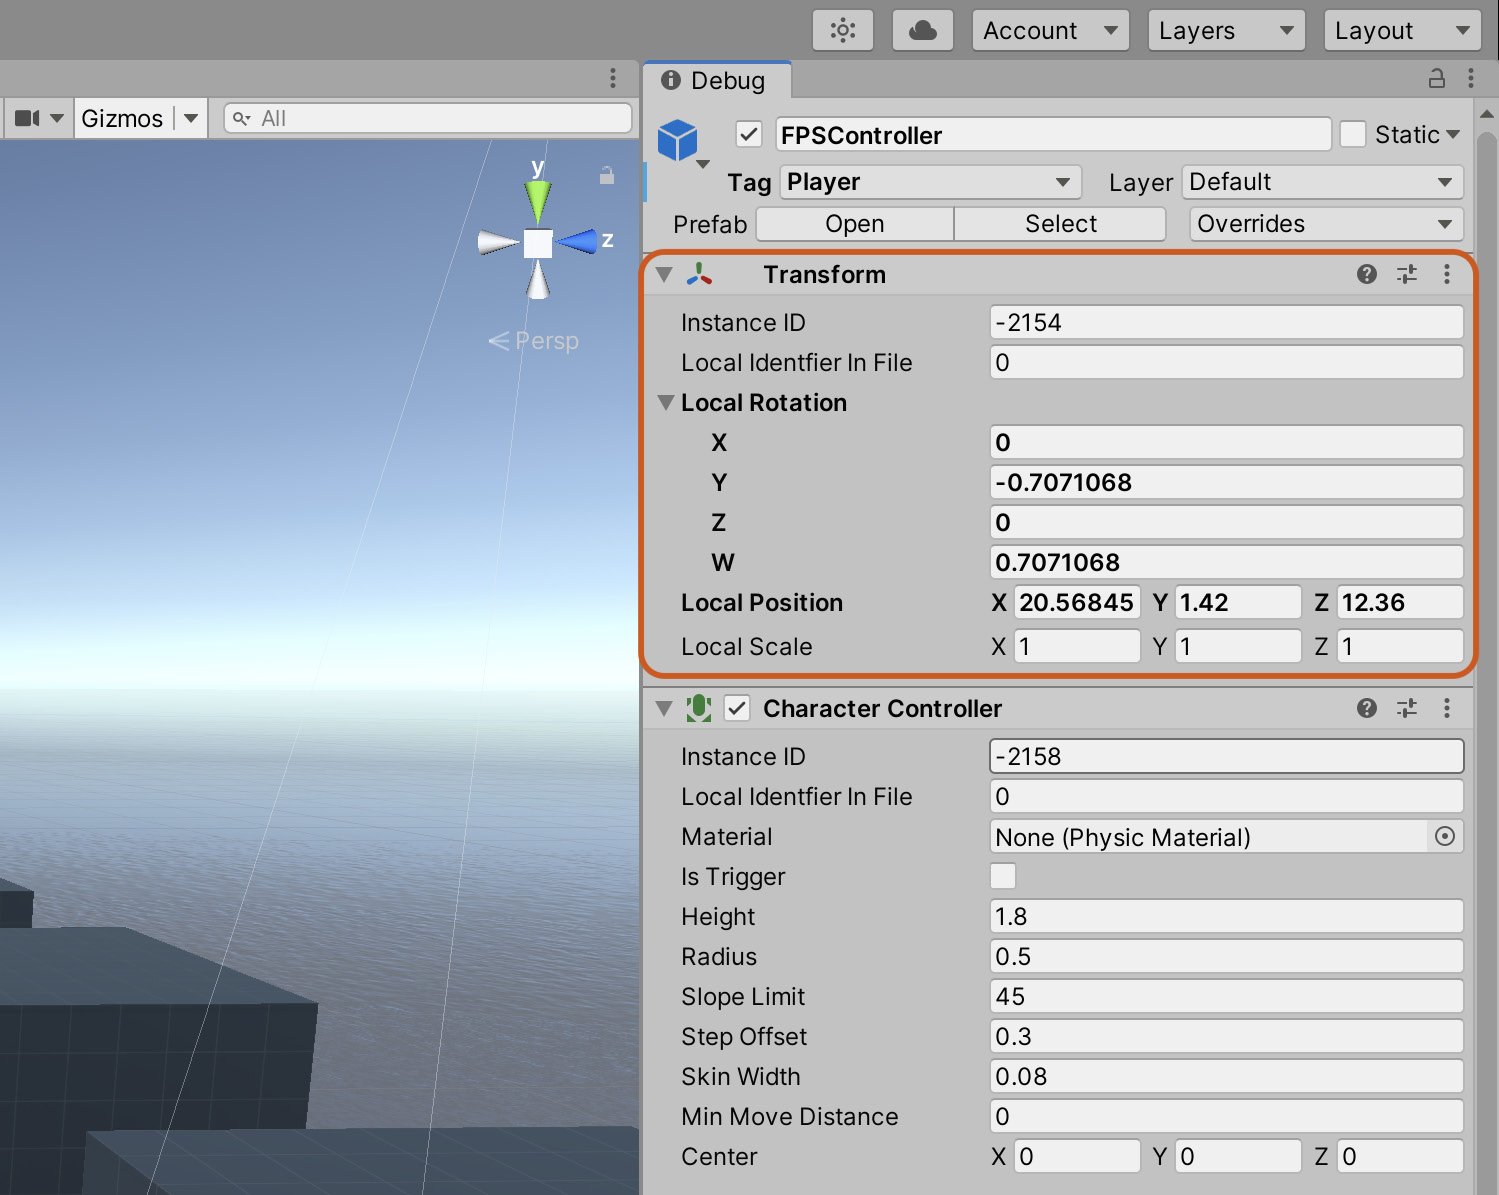
Figure 2.36 – Viewing the Transform component in Debug mode
Debugging individual components can be very useful when you are having problems with specific areas of your game; for example, when your player isn't moving as intended, you can see the private variables of your Character Controller script. However, to gain a broader understanding of how your game is performing, you will want to use the Stats panel.
Monitoring game stats
Another useful debugging tool at runtime is the Stats panel. This can be accessed from the Game tab by clicking on the Stats button on the toolbar, as shown in Figure 2.37:
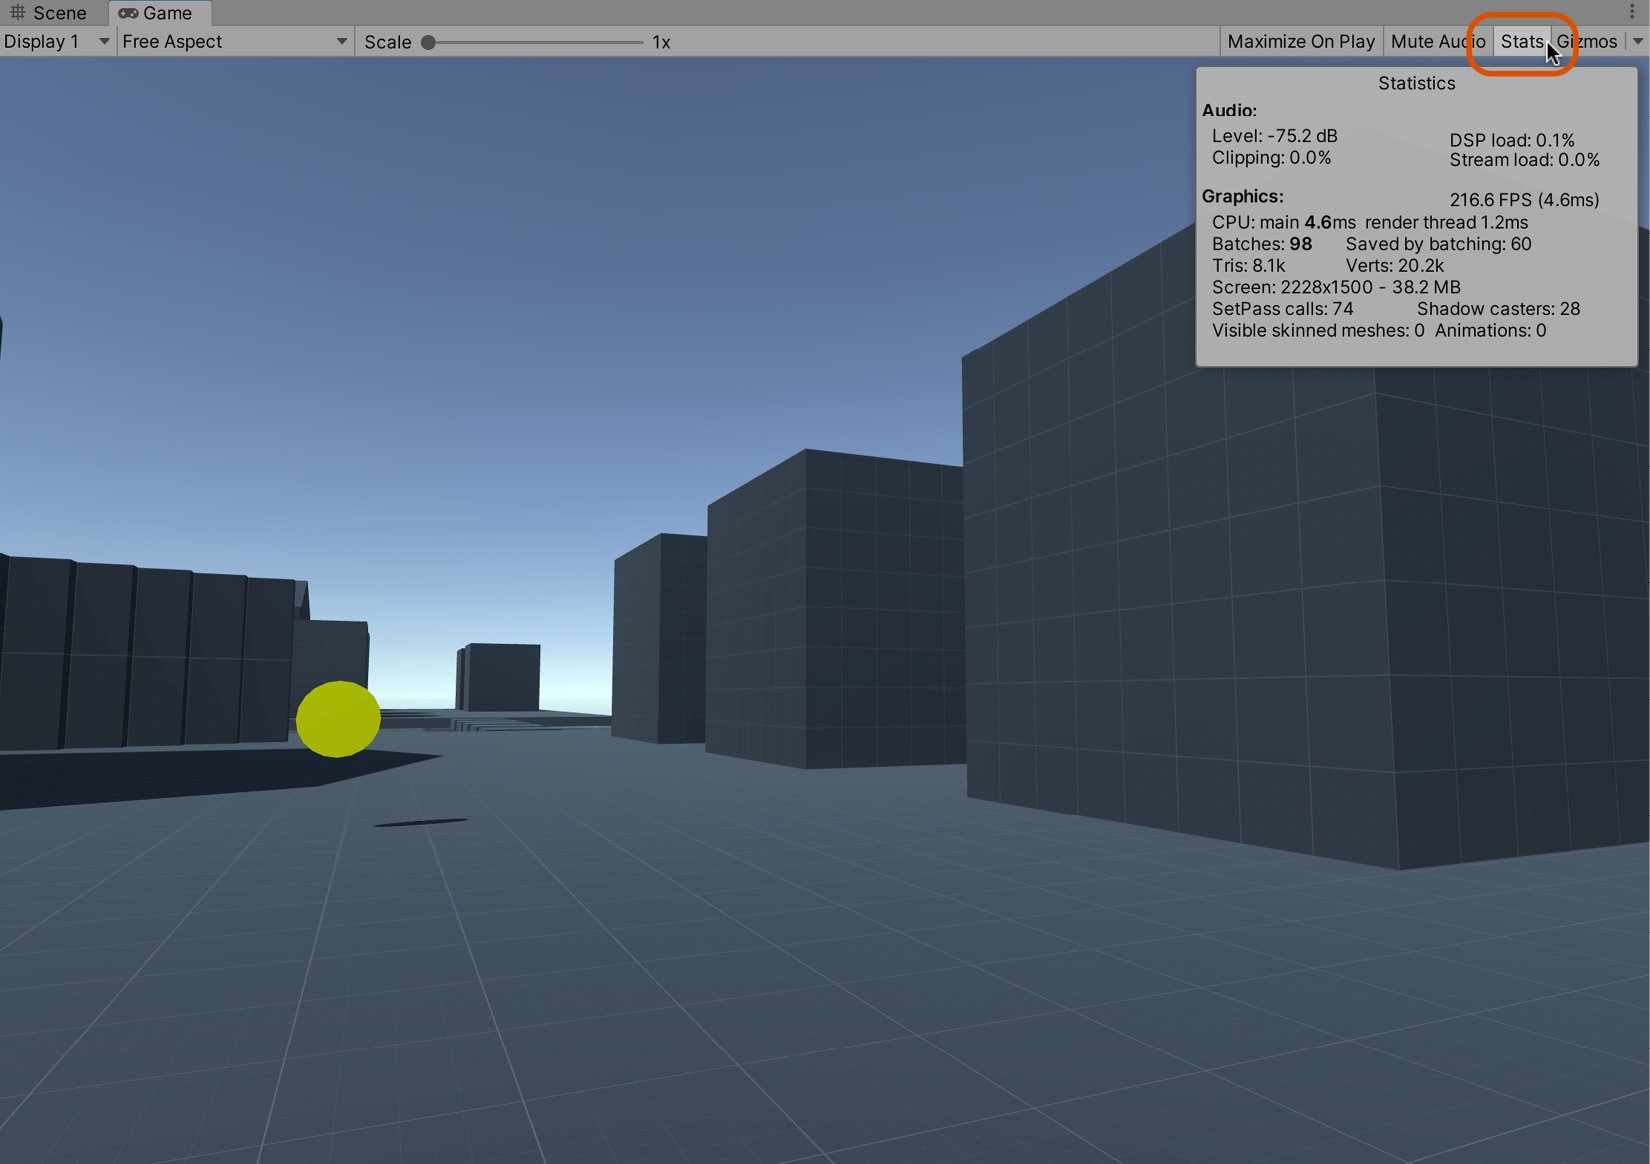
Figure 2.37 – Accessing the Stats panel from the Game tab
The Stats panel is only useful during the Play mode. In this mode, it details critical performance statistics for your game, such as Frame Rate per Second (FPS) and memory usage. With these stats, you can diagnose or determine whether any problems may be affecting your game. The FPS represents the total number of frames (ticks or cycles) per second that your game can sustain on average. There is no right, wrong, or magical FPS, but higher values are better than lower ones. Higher values represent better performance because it means that your game can sustain more cycles in 1 second. If your FPS falls below 20 or 15, your game will likely appear choppy or laggy. Many variables can affect FPS, some internal, and some external to your game. Internal factors include the following:
- The number of lights in a scene
- The vertex density of meshes
- The number of instructions, and the complexity of the code
Some external factors include the following:
- The quality of your computer's hardware
- The number of other applications and processes running at the same time
- The amount of hard drive space
In short, if your FPS is low, then it indicates a problem that needs attention. The solution to that problem varies depending on the context, and you'll need to use judgment; for example, are your meshes too complex? Do they have too many vertices? Are your textures too large? Are there too many sounds playing?
Important note
The completed game source code can be found in the book companion files in the Chapter02/End folder.
Once you're happy with how your game is performing, it's time to build the game so it can be run without Unity.
Building the game
In this section, I will take you through how to compile and package the game into a standalone and self-executing form that anyone can run and play without requiring the Unity editor. Typically, when developing games, you'll decide your target platform (such as Windows, iOS, Android, and others) during the design phase and not at the end of development. It's often said that Unity is a develop once, deploy everywhere tool. This slogan can conjure up the unfortunate image that, after a game is made, it'll work just as effortlessly on every platform supported by Unity as it does on the desktop.
Unfortunately, things are not so simple; games that work well on desktop systems don't necessarily perform equally well on mobiles and vice versa. This is primarily due to the significant differences in target hardware and industry standards that hold between them. Due to these differences, we'll focus our attention here on the Windows and Mac desktop platforms, ignoring mobiles and consoles and other platforms (for now). To create a build for a desktop platform, take the following steps:
- Select File | Build Settings... from the Application menu:

Figure 2.38 – Accessing the Build Settings for the project
- The Build Settings dialog is then displayed. The Scenes In Build section contains a list of all scenes to be included in the build, regardless of whether the gamer will visit them in the game. In short, if you want a scene in your game, then it needs to be on this list. If the list is empty, make sure that the game scene is open and then click Add Open Scenes:

Figure 2.39 – Adding a level to the Build Settings dialog
Tip
You can also add scenes to the list by dragging and dropping the scene asset from the Project panel to the Scenes In Build list.
Unity automatically assigns scenes a number, depending on their order in the list. 0 represents the first item, 1 the next item, and so on. The first scene (scene 0) will always be the starting scene. When the build runs, Unity automatically begins execution from scene 0. For this reason, scene 0 will typically be your splash or intro scene.
- Next, be sure to select your target platform from the Platform list on the bottom left-hand side of the Build Settings dialog. For desktop platforms, choose PC, Mac & Linux Standalone, which should be selected by default. Then, from the options, set the Target Platform drop-down list to either Windows, Linux, or Mac OS X, depending on your system:

Figure 2.40 – Choosing a target build platform
Important note
If you've previously been testing your game for multiple platforms or trying out other platforms such as Android and iOS, the Build button (shown in Figure 2.40) may instead say Switch Platform when you select the Standalone option. If it does, click on the Switch Platform button to confirm to Unity that you intend to build for that platform. On clicking this, Unity may spend a few minutes configuring your assets for the selected platform.
- Before building for the first time, you'll probably want to view the Player Settings… options to fine-tune important build parameters, such as game resolution, quality settings, executable icon, and information, among other settings. To access the player settings, click on the Player Settings… button from the Build Settings dialog or select Edit | Project Settings in the application menu and then click on Player in the new panel that opens.
- From the Player settings options, set the Company Name and Product Name as this information is baked and stored within the built executable. You can also specify an icon image for the executable, as well as a default mouse cursor if one is required. For the collection game, however, these latter two settings will be left empty:

Figure 2.41: Setting Company Name and Product Name
- The Resolution and Presentation tab is especially important as it specifies the game screen size and resolution. From this tab, ensure that Fullscreen Mode is set to Full screen Window, so that the game will use the total size of the system's screen as opposed to a smaller, movable window:

Figure 2.42 – Enabling Fullscreen Mode
- Now you're ready to compile your first build! Click on the Build button from the Build Settings dialog or choose File | Build And Run from the application menu:

Figure 2.43 – Building and running a game
- When you do this, Unity presents you with a Save dialog, asking you to specify a target location on your computer where the build should be made. Select a location and choose Save, and the build process will be completed.
Occasionally, this process can generate errors, which are printed in red in the Console window. This can happen, for example, when you save to a read-only drive, have insufficient hard drive space, or don't have the necessary administrative privileges on your computer. However, generally, the build process succeeds if your game runs properly in the editor.
After the build is complete, Unity generates new files at your destination location. On macOS, it generates an app file that contains all the necessary data to run the game. On Windows, it will create a folder containing the executable and several other files, as shown in Figure 2.44:
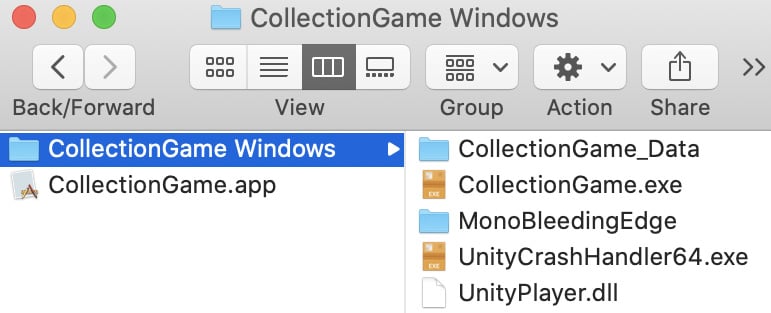
Figure 2.44 – Unity builds several files
It's worth quickly running through what each file and folder contains:
- The
CollectionGame_Datafolder contains all the data necessary to run the project. CollectionGame.exeis the executable, the entry point into our game. Run this to play the game.MonoBleedingEdgecontains the C# andMonoDeveloplibraries required by our game.UnityCrashHandler64.exehas the same lifetime as your game. It is automatically started and closed with the game and handles any crashes that occur.UnityPlayer.dllcontains the native Unity engine code required by our game.
The files are essential and interdependent. If you want to distribute your game and have other people play it without needing to install Unity, you'll need to send users both the executable file and associated data folders and all their contents.
By running CollectionGame.exe on Windows or CollectionGame.app on macOS, the game will start:
Figure 2.45 – Running the coin collection game in Fullscreen mode
Tip
As there's no quit button or main menu option, to quit the game press Alt + F4 (Windows), cmd + Q (macOS), or Ctrl + Q (Linux).
Congratulations! Your game is now completed and built, and you can send it to your friends and family for playtesting.
Summary
Excellent work! On reaching this point, you've completed the coin collection game, as well as your first game in Unity. On achieving this, you've seen a wide range of Unity features. While there's a lot more to learn about scripting in Unity (and we'll cover more throughout this book), the information provided in this chapter provides a solid foundation for any future projects.
Taking advantage of prefabs will save you time, reduce the need to duplicate work, and makes spawning custom objects easy. You can even share prefabs between projects as packages or upload them for sale to the Unity Asset Store to kickstart your career as a Unity developer!
You now have a complete overview of a project's lifecycle from initial project creation to compiling the project to be distributed. This process will be the same for all new projects, whether personal or professional. Of course, there's a lot more to be said and explored for all these areas, but we've pulled them together to make a playable game that can be distributed. In the next chapter, we'll start a new 2D project, and in doing so, examine entirely new features of Unity. We'll look at how to write scripts for character movement and enemy AI, as well as discussing issues specific to 2D games.
Test your knowledge
Q1. You can easily find GameObject in code using…
A. Layers
B. Tags
C. Components
D. Integers
Q2. You can search the hierarchy for objects that contain specific component types by using a prefix of...
A. C
B. T
C. W
D. D
Q3. Static variables are always...
A. Shared across all instances of a class
B. Public
C. Reset on every new frame
D. The same
Q4. The main color for a Material is defined by the...
A. Normal channel
B. Detail channel
C. Albedo channel
D. Specular channel
Q5. The main scripting language for Unity is…
A. C#
B. JavaScript
C. UnityScript
D. C++
Further reading
You can check out these links for more information:
- https://unity3d.com/learn/tutorials/s/scripting
- https://www.packtpub.com/game-development/unity-c-scripting-complete-c-for-unity-game-development-video
- Mastering Unity Scripting – Alan Thorn
- https://www.packtpub.com/game-development/mastering-unity-5x-scripting
- http://docs.unity3d.com/ScriptReference/MonoBehaviour.FixedUpdate.html
- http://docs.unity3d.com/ScriptReference/MonoBehaviour.LateUpdate.html
- https://docs.unity3d.com/Manual/CollidersOverview.html


