


 Download code from GitHub
Speaking C#
This chapter is all about the basics of the C# programming language. Over the course of this chapter, you'll learn how to write statements using the grammar of C#, as well as being introduced to some of the common vocabulary that you will use every day. In addition to this, by the end of the chapter, you'll feel confident in knowing how to temporarily store and work with information in your computer's memory.
This chapter covers the following topics:
- Introducing C#
- Understanding the basics of C#
- Working with variables
- Working with null values
- Further exploring console applications
Introducing C#
This part of the book is about the C# language—the grammar and vocabulary that you will use every day to write the source code for your applications.
Programming languages have many similarities to human languages, except that in programming languages, you can make up your own words, just like Dr. Seuss!
In a book written by Dr. Seuss in 1950, If I Ran the Zoo, he states this:
"And then, just to show them, I'll sail to Ka-Troo And Bring Back an It-Kutch, a Preep, and a Proo, A Nerkle, a Nerd, and a Seersucker, too!"
Understanding language versions and features
This part of the book covers the C# programming language and is written primarily for beginners, so it covers the fundamental topics that all developers need to know, from declaring variables to storing data to how to define your own custom data types.
Advanced and obscure topics like ref local variable reassignment and reference semantics with value types are not covered.
This book covers features of the C# language from version 1.0 up to the latest version, 9.0. If you already have some familiarity with older versions of C# and are excited to find out about the new features in the most recent versions of C#, I have made it easier for you to jump around by listing language versions and their important new features below, along with the chapter number and topic title where you can learn about them.
More Information: You can learn more about the current status of the C# language at this link: https://github.com/dotnet/roslyn/blob/master/docs/Language%20Feature%20Status.md
C# 1.0
C# 1.0 was released in 2002 and included all the important features of a statically typed object-oriented modern language, as you will see throughout chapters 2 to 6.
C# 2.0
C# 2.0 was released in 2005 and focused on enabling strong data typing using generics, to improve code performance and reduce type errors, including the topics listed in the following table:
|
Feature |
Chapter |
Topic |
|
Nullable value types |
2 |
Making a value type nullable |
|
Generics |
6 |
Making types more reusable with generics |
C# 3.0
C# 3.0 was released in 2007 and focused on enabling declarative coding with Language INtegrated Queries (LINQ) and related features like anonymous types and lambda expressions, including the topics listed in the following table:
|
Feature |
Chapter |
Topic |
|
Implicitly typed local variables |
2 |
Inferring the type of a local variable |
|
LINQ |
12 |
All topics in Chapter 12, Querying and Manipulating Data Using LINQ |
C# 4.0
C# 4.0 was released in 2010 and focused on improving interoperability with dynamic languages like F# and Python, including the topics listed in the following table:
|
Feature |
Chapter |
Topic |
|
Dynamic types |
2 |
The |
|
Named/optional arguments |
5 |
Optional parameters and named arguments |
C# 5.0
C# 5.0 was released in 2012 and focused on simplifying asynchronous operation support by automatically implementing complex state machines while writing what looks like synchronous statements, including the topics listed in the following table:
|
Feature |
Chapter |
Topic |
|
Simplified asynchronous tasks |
13 |
Understanding |
More Information: You can download the C# Language Specification 5.0 from the following link: https://www.microsoft.com/en-us/download/details.aspx?id=7029
C# 6.0
C# 6.0 was released in 2015 and focused on minor refinements to the language, including the topics listed in the following table:
|
Feature |
Chapter |
Topic |
|
|
2 |
Simplifying the usage of the console |
|
Interpolated strings |
2 |
Displaying output to the user |
|
Expression bodied members |
5 |
Defining read-only properties |
More Information: You can read draft proposals for C# Language Specifications for 6.0 and later at the following link: https://docs.microsoft.com/en-us/dotnet/csharp/language-reference/
C# 7.0
C# 7.0 was released in March 2017 and focused on adding functional language features like tuples and pattern matching, as well as minor refinements to the language, including the topics listed in the following table:
|
Feature |
Chapter |
Topic |
|
Binary literals and digit separators |
2 |
Storing whole numbers |
|
Pattern matching |
3 |
Pattern matching with the |
|
|
5 |
Controlling how parameters are passed |
|
Tuples |
5 |
Combining multiple values with tuples |
|
Local functions |
6 |
Defining local functions |
C# 7.1
C# 7.1 was released in August 2017 and focused on minor refinements to the language, including the topics listed in the following table:
|
Feature |
Chapter |
Topic |
|
Default literal expressions |
5 |
Setting fields with default literal |
|
Inferred tuple element names |
5 |
Inferring tuple names |
|
|
13 |
Improving responsiveness for console apps |
C# 7.2
C# 7.2 was released in November 2017 and focused on minor refinements to the language, including the topics listed in the following table:
|
Feature |
Chapter |
Topic |
|
Leading underscores in numeric literals |
2 |
Storing whole numbers |
|
Non-trailing named arguments |
5 |
Optional parameters and named arguments |
|
|
5 |
Understanding access modifiers |
|
You can test |
5 |
Comparing tuples |
C# 7.3
C# 7.3 was released in May 2018 and focused on performance-oriented safe code that improves ref variables, pointers, and stackalloc. These are advanced and rarely needed for most developers, so they are not covered in this book.
More Information: If you're interested, you can read the details at the following link: https://docs.microsoft.com/en-us/dotnet/csharp/whats-new/csharp-7-3
C# 8.0
C# 8.0 was released in September 2019 and focused on a major change to the language related to null handling, including the topics listed in the following table:
|
Feature |
Chapter |
Topic |
|
Nullable reference types |
2 |
Making a reference type nullable |
|
Switch expressions |
3 |
Simplifying |
|
Default interface methods |
6 |
Understanding default interface methods |
C# 9.0
C# 9.0 was released in November 2020 and focused on record types, refinements to pattern matching, and minimal-code console apps, including the topics listed in the following table:
|
Feature |
Chapter |
Topic |
|
Minimal-code console apps |
1 |
Top-level programs |
|
Enhanced pattern matching |
5 |
Pattern matching with objects |
|
Records |
5 |
Working with records |
More Information: You can read more about new C# 9.0 features at the following link: https://docs.microsoft.com/en-us/dotnet/csharp/whats-new/csharp-9
Discovering your C# compiler versions
With the C# 7.x generation, Microsoft decided to increase the cadence of language releases, releasing minor version numbers, also known as point releases, for the first time since C# 1.1.
.NET language compilers for C# and Visual Basic, also known as Roslyn, along with a separate compiler for F#, are distributed as part of .NET SDK. To use a specific version of C#, you must have at least that version of .NET SDK installed, as shown in the following table:
|
.NET SDK |
Roslyn |
C# |
|
1.0.4 |
2.0 - 2.2 |
7.0 |
|
1.1.4 |
2.3 - 2.4 |
7.1 |
|
2.1.2 |
2.6 - 2.7 |
7.2 |
|
2.1.200 |
2.8 - 2.10 |
7.3 |
|
3.0 |
3.0 - 3.4 |
8.0 |
|
5.0 |
5.0 |
9.0 |
More Information: You can see a list of versions at the following link: https://github.com/dotnet/roslyn/blob/master/docs/wiki/NuGet-packages.md
Let's see what .NET SDK and C# language compiler versions you have available:
- Start Visual Studio Code.
- Navigate to View | Terminal.
- To determine which version of the .NET SDK you have available, enter the following command:
dotnet --version - Note the version at the time of writing is 5.0.100, indicating that it is the initial version of the SDK without any bug fixes or new features yet, as shown in the following output:
5.0.100 - To determine which versions of the C# compiler you have available, enter the following command:
csc -langversion:? - Note all the versions available at the time of writing, as shown in the following output:
Supported language versions:
default
1
2
3
4
5
6
7.0
7.1
7.2
7.3
8.0
9.0 (default)
latestmajor
preview
latest
More Information: On Windows, the preceding command returns the error, The name "csc" is not recognized as the name of a command, function, script file, or executable program. Check the spelling of the name, as well as the presence and correctness of the path. To fix this issue, follow the instructions at the following link: https://docs.microsoft.com/en-us/dotnet/csharp/language-reference/compiler-options/command-line-building-with-csc-exe
Enabling a specific language version compiler
Developer tools like Visual Studio Code and the dotnet command-line interface assume that you want to use the latest major version of a C# language compiler by default. Before C# 8.0 was released, C# 7.0 was the latest major version and was used by default. To use the improvements in a C# point release like 7.1, 7.2, or 7.3, you had to add a configuration element to the project file, as shown in the following markup:
<LangVersion>7.3</LangVersion>
After the release of C# 9.0 with .NET 5.0, if Microsoft releases a C# 9.1 compiler and you want to use its new language features then you will have to add a configuration element to your project file, as shown in the following markup:
<LangVersion>9.1</LangVersion>
Potential values for the <LangVersion> are shown in the following table:
|
LangVersion |
Description |
|
7, 7.1, 7.2, 7.3, 8, 9 |
Entering a specific version number will use that compiler if it has been installed. |
|
|
Uses the highest major number, for example, 7.0 in August 2019, 8.0 in October 2019, 9.0 in November 2020. |
|
|
Uses the highest major and highest minor number, for example, 7.2 in 2017, 7.3 in 2018, 8 in 2019, 9 in 2020, perhaps 9.1 in early 2021. |
|
|
Uses the highest available preview version, for example, 9.0 in May 2020 with .NET 5.0 Preview 4 installed. |
After creating a new project with the dotnet command-line tool, you can edit the csproj file and add the <LangVersion> element, as shown highlighted in the following markup:
<Project Sdk="Microsoft.NET.Sdk">
  <PropertyGroup>
    <OutputType>Exe</OutputType>
    <TargetFramework>net5.0</TargetFramework>
    <LangVersion>preview</LangVersion>
  </PropertyGroup>
</Project>
Your projects must target net5.0 to use the full features of C# 9.
If you have not done so already, install the extension MSBuild project tools. This will give you IntelliSense while editing .csproj files, including making it easy to add the <LangVersion> element with appropriate values.
More Information: You can read about C# language versioning at the following link: https://docs.microsoft.com/en-us/dotnet/csharp/language-reference/configure-language-version
Understanding C# basics
To learn C#, you will need to create some simple applications. To avoid overloading you with too much information too soon, the chapters in the first part of this book will use the simplest type of application: a console application.
Let's start by looking at the basics of the grammar and vocabulary of C#. Throughout this chapter, you will create multiple console applications, with each one showing a feature of the C# language. We will start by creating a console app that shows the compiler version.
- If you've completed Chapter 1, Hello, C#! Welcome, .NET!, then you will already have a
Codefolder in your user folder. If not, then you'll need to create it. - Create a subfolder named
Chapter02, with a sub-folder namedBasics. - Start Visual Studio Code and open the
Chapter02/Basicsfolder. - In Visual Studio Code, navigate to View | Terminal, and enter the following command:
dotnet new console - In EXPLORER, click the
Program.csfile, and then click on Yes to add the missing required assets. - Open the
Program.csfile, and at the top of the file, under theusingstatement, add a statement to show the current C# version as an error, as shown in the following code:#error version - Navigate to View | Problems, and note the compiler version and language version appear as a compiler error message number CS8304, as shown in the following screenshot:

Figure 2.1: A compiler error that shows the C# language version
- Comment out the statement that causes the error, as shown in the following code:
// #error version
Understanding C# grammar
The grammar of C# includes statements and blocks. To document your code, you can use comments.
Good Practice: Comments should never be the only way that you document your code. Choosing sensible names for variables and functions, writing unit tests, and creating literal documents are other ways to document your code.
Statements
In English, we indicate the end of a sentence with a full stop. A sentence can be composed of multiple words and phrases, with the order of words being part of the grammar. For example, in English, we say "the black cat."
The adjective, black, comes before the noun, cat. Whereas French grammar has a different order; the adjective comes after the noun: "le chat noir." What's important to take away from this is that the order matters.
C# indicates the end of a statement with a semicolon. A statement can be composed of multiple variables and expressions. For example, in the following statement, totalPrice is a variable and subtotal + salesTax is an expression:
var totalPrice = subtotal + salesTax;
The expression is made up of an operand named subtotal, an operator +, and another operand named salesTax. The order of operands and operators matters.
Comments
When writing your code, you're able to add comments to explain your code using a double slash, //. By inserting // the compiler will ignore everything after the // until the end of the line, as shown in the following code:
// sales tax must be added to the subtotal
var totalPrice = subtotal + salesTax;
Visual Studio Code will add or remove the comment double slashes at the start of the currently selected line(s) if you press Ctrl + K + C to add them or Ctrl + K + U to remove them. In macOS, press Cmd instead of Ctrl.
To write a multiline comment, use /* at the beginning and */ at the end of the comment, as shown in the following code:
/*
This is a multi-line
comment.
*/
Blocks
In English, we indicate a new paragraph by starting a new line. C# indicates a block of code with the use of curly brackets, { }. Blocks start with a declaration to indicate what is being defined. For example, a block can define a namespace, class, method, or a statement, something we will learn more about later.
In your current project, note that the grammar of C# is written for you by the dotnet CLI tool. I've added some comments to the statements written by the project template, as shown in the following code:
using System; // a semicolon indicates the end of a statement
namespace Basics
{ // an open brace indicates the start of a block
  class Program
  {
    static void Main(string[] args)
    {
      Console.WriteLine("Hello World!"); // a statement
    }
  }
} // a close brace indicates the end of a block
Understanding C# vocabulary
The C# vocabulary is made up of keywords, symbol characters, and types.
Some of the predefined, reserved keywords that you will see in this book include using, namespace, class, static, int, string, double, bool, if, switch, break, while, do, for, and foreach.
Some of the symbol characters that you will see include ", ', +, -, *, /, %, @, and $.
Changing the color scheme for syntax
By default, Visual Studio Code shows C# keywords in blue in order to make them easier to differentiate from other code. Visual Studio Code allows you to customize the color scheme:
- In Visual Studio Code, navigate to Code | Preferences | Color Theme (it is on the File menu on Windows), or press Ctrl or Cmd + K, Ctrl or Cmd + T.
- Select a color theme. For reference, I'll use the Light+ (default light) color theme so that the screenshots look good in a printed book.
There are other contextual keywords that only have a special meaning in a specific context. However, that still means that there are only about 100 actual C# keywords in the language.
Comparing programming languages to human languages
The English language has more than 250,000 distinct words, so how does C# get away with only having about 100 keywords? Moreover, why is C# so difficult to learn if it has only 0.0416% of the number of words in the English language?
One of the key differences between a human language and a programming language is that developers need to be able to define the new "words" with new meanings. Apart from the 104 keywords in the C# language, this book will teach you about some of the hundreds of thousands of "words" that other developers have defined, but you will also learn how to define your own "words."
More Information: Programmers all over the world must learn English because most programming languages use English words such as namespace and class. There are programming languages that use other human languages, such as Arabic, but they are rare. If you are interested in learning, this YouTube video shows a demonstration of an Arabic programming language: https://youtu.be/dkO8cdwf6v8
Help for writing correct code
Plain text editors such as Notepad don't help you write correct English. Likewise, Notepad won't help you write correct C# either.
Microsoft Word can help you write English by highlighting spelling mistakes with red squiggles, with Word saying that "icecream" should be ice-cream or ice cream, and grammatical errors with blue squiggles, such as a sentence should have an uppercase first letter.
Similarly, Visual Studio Code's C# extension helps you write C# code by highlighting spelling mistakes, such as the method name should be WriteLine with an uppercase L, and grammatical errors, such as statements that must end with a semicolon.
The C# extension constantly watches what you type and gives you feedback by highlighting problems with colored squiggly lines, similar to that of Microsoft Word.
Let's see it in action:
- In
Program.cs, change theLin theWriteLinemethod to lowercase. - Delete the semicolon at the end of the statement.
- Navigate to View | Problems, or press Ctrl or Cmd + Shift + M, and note that a red squiggle appears under the code mistakes and details are shown in the PROBLEMS window, as you can see in the following screenshot:

Figure 2.2: The PROBLEMS window showing two compile errors
- Fix the two coding mistakes.
Verbs are methods
In English, verbs are doing or action words, like run and jump. In C#, doing or action words are called methods. There are hundreds of thousands of methods available to C#. In English, verbs change how they are written based on when in time the action happens. For example, Amir was jumping in the past, Beth jumps in the present, they jumped in the past, and Charlie will jump in the future.
In C#, methods such as WriteLine change how they are called or executed based on the specifics of the action. This is called overloading, which is something we will cover in more detail in Chapter 5, Building Your Own Types with Object-Oriented Programming. But for now, consider the following example:
// outputs a carriage-return
Console.WriteLine();
// outputs the greeting and a carriage-return
Console.WriteLine("Hello Ahmed");
// outputs a formatted number and date and a carriage-return
Console.WriteLine(
  "Temperature on {0:D} is {1}°C.", DateTime.Today, 23.4);
A different analogy is that some words are spelled the same, but have different meanings depending on the context.
Nouns are types, fields, and variables
In English, nouns are names that refer to things. For example, Fido is the name of a dog. The word "dog" tells us the type of thing that Fido is, and so in order for Fido to fetch a ball, we would use his name.
In C#, their equivalents are types, fields, and variables. For example, Animal and Car are types; that is, they are nouns for categorizing things. Head and Engine are fields, that is, nouns that belong to Animal and Car. While Fido and Bob are variables, that is, nouns for referring to a specific thing.
There are tens of thousands of types available to C#, though have you noticed how I didn't say, "There are tens of thousands of types in C#?" The difference is subtle but important. The language of C# only has a few keywords for types, such as string and int, and strictly speaking, C# doesn't define any types. Keywords such as string that look like types are aliases, which represent types provided by the platform on which C# runs.
It's important to know that C# cannot exist alone; after all, it's a language that runs on variants of .NET. In theory, someone could write a compiler for C# that uses a different platform, with different underlying types. In practice, the platform for C# is .NET, which provides tens of thousands of types to C#, including System.Int32, which is the C# keyword alias int maps to, as well as many more complex types, such as System.Xml.Linq.XDocument.
It's worth taking note that the term type is often confused with class. Have you ever played the parlor game Twenty Questions, also known as Animal, Vegetable, or Mineral? In the game, everything can be categorized as an animal, vegetable, or mineral. In C#, every type can be categorized as a class, struct, enum, interface, or delegate. The C# keyword string is a class, but int is a struct. So, it is best to use the term type to refer to both.
Revealing the extent of the C# vocabulary
We know that there are more than 100 keywords in C#, but how many types are there? Let's now write some code to find out how many types (and their methods) are available to C# in our simple console application.
Don't worry about how this code works for now; it uses a technique called reflection:
- We'll start by adding the following statements at the top of the
Program.csfile:using System.Linq; using System.Reflection; - Inside the
Mainmethod, delete the statement that writesHello World!and replace it with the following code:// loop through the assemblies that this app references foreach (var r in Assembly.GetEntryAssembly() .GetReferencedAssemblies()) { // load the assembly so we can read its details var a = Assembly.Load(new AssemblyName(r.FullName)); // declare a variable to count the number of methods int methodCount = 0; // loop through all the types in the assembly foreach (var t in a.DefinedTypes) { // add up the counts of methods methodCount += t.GetMethods().Count(); } // output the count of types and their methods Console.WriteLine( "{0:N0} types with {1:N0} methods in {2} assembly.", arg0: a.DefinedTypes.Count(), arg1: methodCount, arg2: r.Name); } - Navigate to View | Terminal.
- In TERMINAL, enter the following command:
dotnet run - After running that command, you will see the actual number of types and methods that are available to you in the simplest application when running on your OS. The numbers of types and methods displayed will be different depending on the operating system that you are using, as shown in the following outputs:
// Output on Windows 0 types with 0 methods in System.Runtime assembly. 103 types with 1,094 methods in System.Linq assembly. 46 types with 662 methods in System.Console assembly. // Output on macOS 0 types with 0 methods in System.Runtime assembly. 103 types with 1,094 methods in System.Linq assembly. 57 types with 701 methods in System.Console assembly. - Add statements to the top of the
Mainmethod to declare some variables, as shown highlighted in the following code:static void Main(string[] args) { // declare some unused variables using types // in additional assemblies System.Data.DataSet ds; System.Net.Http.HttpClient client;By declaring variables that use types in other assemblies, those assemblies are loaded with our application, which allows our code to see all the types and methods in them. The compiler will warn you that you have unused variables but that won't stop your code from running.
- Run the console application again and view the results, which should look similar to the following outputs:
// Output on Windows
0 types with 0 methods in System.Runtime assembly.
376 types with 6,763 methods in System.Data.Common assembly.
533 types with 5,193 methods in System.Net.Http assembly.
103 types with 1,094 methods in System.Linq assembly.
46 types with 662 methods in System.Console assembly.
// Output on macOS
0 types with 0 methods in System.Runtime assembly.
376 types with 6,763 methods in System.Data.Common assembly.
522 types with 5,141 methods in System.Net.Http assembly.
103 types with 1,094 methods in System.Linq assembly.
57 types with 701 methods in System.Console assembly.
Now, you have a better sense of why learning C# is a challenge, because there are so many types and methods to learn. Methods are only one category of a member that a type can have, and other programmers are constantly defining new members!
Working with variables
All applications process data. Data comes in, data is processed, and then data goes out. Data usually comes into our program from files, databases, or user input, and it can be put temporarily into variables that will be stored in the memory of the running program. When the program ends, the data in memory is lost. Data is usually output to files and databases, or to the screen or a printer. When using variables, you should think about, firstly, how much space the variable takes in the memory, and, secondly, how fast it can be processed.
We control this by picking an appropriate type. You can think of simple common types such as int and double as being different-sized storage boxes, where a smaller box would take less memory but may not be as fast at being processed; for example, adding 16-bit numbers might not be processed as fast as adding 64-bit numbers on a 64-bit operating system. Some of these boxes may be stacked close by, and some may be thrown into a big heap further away.
Naming things and assigning values
There are naming conventions for things, and it is good practice to follow them, as shown in the following table:
|
Naming convention |
Examples |
Used for |
|
Camel case |
|
Local variables, private fields. |
|
Title case |
|
Types, non-private fields, and other members like methods. |
Good Practice: Following a consistent set of naming conventions will enable your code to be easily understood by other developers (and yourself in the future!). You can read more about naming guidelines at the following link: https://docs.microsoft.com/en-us/dotnet/standard/design-guidelines/naming-guidelines
The following code block shows an example of declaring a named local variable and assigning a value to it with the = symbol. You should note that you can output the name of a variable using a keyword introduced in C# 6.0, nameof:
// let the heightInMetres variable become equal to the value 1.88
double heightInMetres = 1.88;
Console.WriteLine($"The variable {nameof(heightInMetres)} has the value {heightInMetres}.");
The message in double quotes in the preceding code wraps onto a second line because the width of a printed page is too narrow. When entering a statement like this in your code editor, type it all in a single line.
Literal values
When you assign to a variable, you often, but not always, assign a literal value. But what is a literal value? A literal is a notation that represents a fixed value. Data types have different notations for their literal values, and over the next few sections, you will see examples of using literal notation to assign values to variables.
Storing text
For text, a single letter, such as an A, is stored as a char type and is assigned using single quotes around the literal value, or assigning the return value of a function call, as shown in the following code:
char letter = 'A'; // assigning literal characters
char digit = '1';
char symbol = '$';
char userChoice = GetKeystroke(); // assigning from a function
For text, multiple letters, such as Bob, are stored as a string type and are assigned using double quotes around the literal value, or assigning the return value of a function call, as shown in the following code:
string firstName = "Bob"; // assigning literal strings
string lastName = "Smith";
string phoneNumber = "(215) 555-4256";
// assigning a string returned from a function call
string address = GetAddressFromDatabase(id: 563);
Understanding verbatim strings
When storing text in a string variable, you can include escape sequences, which represent special characters like tabs and new lines using a backslash, as shown in the following code:
string fullNameWithTabSeparator = "Bob\tSmith";
More Information: You can read more about escape sequences at the following link: https://devblogs.microsoft.com/csharpfaq/what-character-escape-sequences-are-available/
But what if you are storing the path to a file, and one of the folder names starts with a T, as shown in the following code:
string filePath = "C:\televisions\sony\bravia.txt";
The compiler will convert the \t into a tab character and you will get errors!
You must prefix with the @ symbol to use a verbatim literal string, as shown in the following code:
string filePath = @"C:\televisions\sony\bravia.txt";
More Information: You can read more about verbatim strings at the following link: https://docs.microsoft.com/en-us/dotnet/csharp/language-reference/tokens/verbatim
To summarize:
- Literal string: Characters enclosed in double-quote characters. They can use escape characters like
\tfor tab. - Verbatim string: A literal string prefixed with
@to disable escape characters so that a backslash is a backslash. - Interpolated string: A literal string prefixed with
$to enable embedded formatted variables. You will learn more about this later in this chapter.
Storing numbers
Numbers are data that we want to perform an arithmetic calculation on, for example, multiplying. A telephone number is not a number. To decide whether a variable should be stored as a number or not, ask yourself whether you need to perform arithmetic operations on the number or whether the number includes non-digit characters such as parentheses or hyphens to format the number as (414) 555-1234. In this case, the number is a sequence of characters, so it should be stored as a string.
Numbers can be natural numbers, such as 42, used for counting (also called whole numbers); they can also be negative numbers, such as -42 (called integers); or, they can be real numbers, such as 3.9 (with a fractional part), which are called single- or double-precision floating point numbers in computing.
Let's explore numbers.
- Create a new folder inside the
Chapter02folder namedNumbers. - In Visual Studio Code, open the
Numbersfolder. - In TERMINAL, create a new console application using the
dotnet new consolecommand. - Inside the
Mainmethod, type statements to declare some number variables using various data types, as shown in the following code:// unsigned integer means positive whole number // including 0 uint naturalNumber = 23; // integer means negative or positive whole number // including 0 int integerNumber = -23; // float means single-precision floating point // F suffix makes it a float literal float realNumber = 2.3F; // double means double-precision floating point double anotherRealNumber = 2.3; // double literal
Storing whole numbers
You might know that computers store everything as bits. The value of a bit is either 0 or 1. This is called a binary number system. Humans use a decimal number system.
The decimal number system, also known as Base 10, has 10 as its base, meaning there are ten digits, from 0 to 9. Although it is the number base most commonly used by human civilizations, other number-base systems are popular in science, engineering, and computing. The binary number system also known as Base 2 has two as its base, meaning there are two digits, 0 and 1.
The following table shows how computers store the decimal number 10. Take note of the bits with the value 1 in the 8 and the 2 columns; 8 + 2 = 10:
|
128 |
64 |
32 |
16 |
8 |
4 |
2 |
1 |
|
0 |
0 |
0 |
0 |
1 |
0 |
1 |
0 |
So, 10 in decimal is 00001010 in binary.
Two of the improvements seen in C# 7.0 and later are the use of the underscore character, _, as a digit separator, and support for binary literals. You can insert underscores anywhere into the digits of a number literal, including decimal, binary, or hexadecimal notation, to improve legibility. For example, you could write the value for 1 million in decimal notation, that is, Base 10, as 1_000_000.
To use binary notation, that is, Base 2, using only 1s and 0s, start the number literal with 0b. To use hexadecimal notation, that is, Base 16, using 0 to 9 and A to F, start the number literal with 0x. Let's enter some code to see some examples.
- At the bottom of the
Mainmethod, type statements to declare some number variables using underscore separators, as shown in the following code:// three variables that store the number 2 million int decimalNotation = 2_000_000; int binaryNotation = 0b_0001_1110_1000_0100_1000_0000; int hexadecimalNotation = 0x_001E_8480; // check the three variables have the same value // both statements output true Console.WriteLine($"{decimalNotation == binaryNotation}"); Console.WriteLine( $"{decimalNotation == hexadecimalNotation}"); - Run the console app and note the result is that all three numbers are the same, as shown in the following output:
True
True
Computers can always exactly represent integers using the int type or one of its sibling types such as long and short.
Storing real numbers
Computers cannot always exactly represent floating point numbers. The float and double types store real numbers using single- and double-precision floating points.
Most programming languages implement the IEEE Standard for Floating-Point Arithmetic. IEEE 754 is a technical standard for floating-point arithmetic established in 1985 by the Institute of Electrical and Electronics Engineers (IEEE).
More Information: If you want to dive deep into understanding floating point numbers, then you can read an excellent primer at the following link: https://ciechanow.ski/exposing-floating-point/
The following table shows a simplification of how a computer represents the number 12.75 in binary notation. Note the bits with the value 1 in the 8, 4, ½, and ¼ columns.
8 + 4 + ½ + ¼ = 12¾ = 12.75.
|
128 |
64 |
32 |
16 |
8 |
4 |
2 |
1 |
. |
½ |
¼ |
1/8 |
1/16 |
|
0 |
0 |
0 |
0 |
1 |
1 |
0 |
0 |
. |
1 |
1 |
0 |
0 |
So, 12.75 in decimal is 00001100.1100 in binary. As you can see, the number 12.75 can be exactly represented using bits. However, some numbers can't, something that we'll be exploring shortly.
Writing code to explore number sizes
C# has an operator named sizeof() that returns the number of bytes that a type uses in memory. Some types have members named MinValue and MaxValue, which return the minimum and maximum values that can be stored in a variable of that type. We are now going to use these features to create a console application to explore number types.
- Inside the
Mainmethod, type statements to show the size of three number data types, as shown in the following code:Console.WriteLine($"int uses {sizeof(int)} bytes and can store numbers in the range {int.MinValue:N0} to {int.MaxValue:N0}."); Console.WriteLine($"double uses {sizeof(double)} bytes and can store numbers in the range {double.MinValue:N0} to {double.MaxValue:N0}."); Console.WriteLine($"decimal uses {sizeof(decimal)} bytes and can store numbers in the range {decimal.MinValue:N0} to {decimal.MaxValue:N0}.");The width of the printed pages in this book make the
stringvalues (in double-quotes) wrap over multiple lines. You must type them on a single line, or you will get compile errors. - Run the console application by entering
dotnet run, and view the output, as shown in the following screenshot:
Figure 2.3: Information on number data types
An int variable uses four bytes of memory and can store positive or negative numbers up to about 2 billion. A double variable uses eight bytes of memory and can store much bigger values! A decimal variable uses 16 bytes of memory and can store big numbers, but not as big as a double type.
But you may be asking yourself, why might a double variable be able to store bigger numbers than a decimal variable, yet it's only using half the space in memory? Well, let's now find out!
Comparing double and decimal types
You will now write some code to compare double and decimal values. Although it isn't hard to follow, don't worry about understanding the syntax right now:
- Under the previous statements, enter statements to declare two
doublevariables, add them together and compare them to the expected result, and write the result to the console, as shown in the following code:Console.WriteLine("Using doubles:"); double a = 0.1; double b = 0.2; if (a + b == 0.3) { Console.WriteLine($"{a} + {b} equals 0.3"); } else { Console.WriteLine($"{a} + {b} does NOT equal 0.3"); } - Run the console application and view the result, as shown in the following output:
Using doubles:
0.1 + 0.2 does NOT equal 0.3
The
doubletype is not guaranteed to be accurate because some numbers literally cannot be represented as floating-point values.More Information: You can read more about why 0.1 does not exist in floating-point numbers at the following link: https://www.exploringbinary.com/why-0-point-1-does-not-exist-in-floating-point/
As a rule of thumb, you should only use
doublewhen accuracy, especially when comparing the equality of two numbers, is not important. An example of this may be when you're measuring a person's height.The problem with the preceding code is illustrated by how the computer stores the number
0.1, or multiples of0.1. To represent0.1in binary, the computer stores1in the 1/16 column,1in the 1/32 column,1in the 1/256 column,1in the 1/512 column, and so on.The number
0.1in decimal is0.00011001100110011…repeating forever:4
2
1
.
½
¼
1/8
1/16
1/32
1/64
1/128
1/256
1/512
1/1024
1/2048
0
0
0
.
0
0
0
1
1
0
0
1
1
0
0
Good Practice: Never compare
doublevalues using==. During the First Gulf War, an American Patriot missile battery useddoublevalues in its calculations. The inaccuracy caused it to fail to track and intercept an incoming Iraqi Scud missile, and 28 soldiers were killed; you can read about this at https://www.ima.umn.edu/~arnold/disasters/patriot.html - Copy and paste the statements that you wrote before (that used the
doublevariables). - Modify the statements to use
decimaland rename the variables tocandd, as shown in the following code:Console.WriteLine("Using decimals:"); decimal c = 0.1M; // M suffix means a decimal literal value decimal d = 0.2M; if (c + d == 0.3M) { Console.WriteLine($"{c} + {d} equals 0.3"); } else { Console.WriteLine($"{c} + {d} does NOT equal 0.3"); } - Run the console application and view the result, as shown in the following output:
Using decimals:
0.1 + 0.2 equals 0.3
The decimal type is accurate because it stores the number as a large integer and shifts the decimal point. For example, 0.1 is stored as 1, with a note to shift the decimal point one place to the left. 12.75 is stored as 1275, with a note to shift the decimal point two places to the left.
Good Practice: Use int for whole numbers and double for real numbers that will not be compared to other values. Use decimal for money, CAD drawings, general engineering, and wherever the accuracy of a real number is important.
The double type has some useful special values: double.NaN means not-a-number, double.Epsilon is the smallest positive number that can be stored in a double, and double.Infinity means an infinitely large value.
Storing Booleans
Booleans can only contain one of the two literal values true or false, as shown in the following code:
bool happy = true;
bool sad = false;
They are most commonly used to branch and loop. You don't need to fully understand them yet, as they are covered more in Chapter 3, Controlling Flow and Converting Types.
Using Visual Studio Code workspaces
Before we create any more projects, let's talk about workspaces.
Although we could continue to create and open separate folders for each project, it can be useful to have multiple folders open at the same time. Visual Studio has a feature called workspaces that enables this.
Let's create a workspace for the two projects we have created so far in this chapter:
- In Visual Studio Code, navigate to File | Save Workspace As….
- Enter
Chapter02for the workspace name, change to theChapter02folder, and click Save, as shown in the following screenshot:
Figure 2.4: Saving a workspace
- Navigate to File | Add Folder to Workspace…
- Select the
Basicsfolder, click Add, and note that bothBasicsandNumbersare now part of theChapter02workspace.
Good Practice: When using workspaces, be careful when entering commands in Terminal. Be sure that you are in the correct folder before entering potentially destructive commands! You will see how in the next task.
Storing any type of object
There is a special type named object that can store any type of data, but its flexibility comes at the cost of messier code and possibly poor performance. Because of those two reasons, you should avoid it whenever possible. The following steps show how to use object types if you need to use them:
- Create a new folder named
Variablesand add it to theChapter02workspace. - Navigate to Terminal | New Terminal.
- Select the Variables project, as shown in the following screenshot:

Figure 2.5: Selecting the Variables project
- Enter the command to create a new console application:
dotnet new console. - Navigate to View | Command Palette.
- Enter and select OmniSharp: Select Project.
- Select the Variables project, and if prompted, click Yes to add required assets to debug.
- In EXPLORER, in the Variables project, open
Program.cs. - In the
Mainmethod, add statements to declare and use some variables using theobjecttype, as shown in the following code:object height = 1.88; // storing a double in an object object name = "Amir"; // storing a string in an object Console.WriteLine($"{name} is {height} metres tall."); int length1 = name.Length; // gives compile error! int length2 = ((string)name).Length; // tell compiler it is a string Console.WriteLine($"{name} has {length2} characters."); - In TERMINAL, execute the code by entering
dotnet run, and note that the fourth statement cannot compile because the data type of thenamevariable is not known by the compiler. - Add comment double slashes to the beginning of the statement that cannot compile to "comment it out."
- In TERMINAL, execute the code by entering
dotnet run, and note that the compiler can access the length of astringif the programmer explicitly tells the compiler that theobjectvariable contains astring, as shown in the following output:Amir is 1.88 metres tall. Amir has 4 characters.
The object type has been available since the first version of C#, but C# 2.0 and later have a better alternative called generics, which we will cover in Chapter 6, Implementing Interfaces and Inheriting Classes, which will provide us with the flexibility we want, but without the performance overhead.
Storing dynamic types
There is another special type named dynamic that can also store any type of data, but even more than object, its flexibility comes at the cost of performance. The dynamic keyword was introduced in C# 4.0. However, unlike object, the value stored in the variable can have its members invoked without an explicit cast. Let's make use of a dynamic type:
- In the
Mainmethod, add statements to declare adynamicvariable and assign astringvalue, as shown in the following code:// storing a string in a dynamic object dynamic anotherName = "Ahmed"; - Add a statement to get the length of the
stringvalue, as shown in the following code:// this compiles but would throw an exception at run-time // if you later store a data type that does not have a // property named Length int length = anotherName.Length;
One limitation of dynamic is that Visual Studio Code cannot show IntelliSense to help you write the code. This is because the compiler cannot check what the type is during build time. Instead, the CLR checks for the member at runtime and throws an exception if it is missing.
Exceptions are a way to indicate that something has gone wrong. You will learn more about them and how to handle them in Chapter 3, Controlling Flow and Converting Types.
Declaring local variables
Local variables are declared inside methods, and they only exist during the execution of that method, and once the method returns, the memory allocated to any local variables is released.
Strictly speaking, value types are released while reference types must wait for a garbage collection. You will learn about the difference between value types and reference types in Chapter 6, Implementing Interfaces and Inheriting Classes.
Specifying and inferring the type of a local variable
Let's explore local variables declared with specific types and using type inference.
- Inside the
Mainmethod, enter statements to declare and assign values to some local variables using specific types, as shown in the following code:int population = 66_000_000; // 66 million in UK double weight = 1.88; // in kilograms decimal price = 4.99M; // in pounds sterling string fruit = "Apples"; // strings use double-quotes char letter = 'Z'; // chars use single-quotes bool happy = true; // Booleans have value of true or falseVisual Studio Code will show green squiggles under each of the variable names to warn you that the variable is assigned but its value is never used.
You can use the
varkeyword to declare local variables. The compiler will infer the type from the value that you assign after the assignment operator,=.A literal number without a decimal point is inferred as an
intvariable, that is, unless you add theLsuffix, in which case, it infers alongvariable.A literal number with a decimal point is inferred as
doubleunless you add theMsuffix, in which case, it infers adecimalvariable, or theFsuffix, in which case, it infers afloatvariable. Double quotes indicate astringvariable, single quotes indicate acharvariable, and thetrueandfalsevalues infer abooltype. - Modify the previous statements to use
var, as shown in the following code:var population = 66_000_000; // 66 million in UK var weight = 1.88; // in kilograms var price = 4.99M; // in pounds sterling var fruit = "Apples"; // strings use double-quotes var letter = 'Z'; // chars use single-quotes var happy = true; // Booleans have value of true or falseGood Practice: Although using
varis convenient, some developers avoid using it, to make it easier for a code reader to understand the types in use. Personally, I use it only when the type is obvious. For example, in the following code statements, the first statement is just as clear as the second in stating what the type of thexmlvariable is, but it is shorter. However, the third statement isn't clear, so the fourth is better. If in doubt, spell it out! - At the top of the class file, import some namespaces, as shown in the following code:
using System.IO; using System.Xml; - Under the precious statements, add statements to create some new objects, as shown in the following code:
// good use of var because it avoids the repeated type
// as shown in the more verbose second statement
var xml1 = new XmlDocument();
XmlDocument xml2 = new XmlDocument();
// bad use of var because we cannot tell the type, so we
// should use a specific type declaration as shown in
// the second statement
var file1 = File.CreateText(@"C:\something.txt");
StreamWriter file2 = File.CreateText(@"C:\something.txt");
Using target-typed new to instantiate objects
With C# 9, Microsoft introduced another syntax for instantiating objects known as target-typed new. When instantiating an object, you can specify the type first and then use new without repeating the type, as shown in the following code:
XmlDocument xml3 = new(); // target-typed new in C# 9
Getting default values for types
Most of the primitive types except string are value types, which means that they must have a value. You can determine the default value of a type using the default() operator.
The string type is a reference type. This means that string variables contain the memory address of a value, not the value itself. A reference type variable can have a null value, which is a literal that indicates that the variable does not reference anything (yet). null is the default for all reference types.
You'll learn more about value types and reference types in Chapter 6, Implementing Interfaces and Inheriting Classes.
Let's explore default values.
- In the
Mainmethod, add statements to show the default values of anint,bool,DateTime, andstring, as shown in the following code:Console.WriteLine($"default(int) = {default(int)}"); Console.WriteLine($"default(bool) = {default(bool)}"); Console.WriteLine( $"default(DateTime) = {default(DateTime)}"); Console.WriteLine( $"default(string) = {default(string)}"); - Run the console app and view the result, noting that your output for the date and time might be formatted differently if you are not running it in the UK, as shown in the following output:
default(int) = 0
default(bool) = False
default(DateTime) = 01/01/0001 00:00:00
default(string) =
Storing multiple values
When you need to store multiple values of the same type, you can declare an array. For example, you may do this when you need to store four names in a string array.
The code that you will write next will allocate memory for an array for storing four string values. It will then store string values at index positions 0 to 3 (arrays count from zero, so the last item is one less than the length of the array). Finally, it will loop through each item in the array using a for statement, something that we will cover in more detail in Chapter 3, Controlling Flow and Converting Types.
Let's look at how to use an array in detail:
- In the
Chapter02folder, create a new folder namedArrays. - Add the
Arraysfolder to theChapter02workspace. - Create a new Terminal window for the
Arraysproject. - Create a new console application project in the
Arraysfolder. - Select
Arraysas the current project for OmniSharp. - In the
Arraysproject, inProgram.cs, in theMainmethod, add statements to declare and use an array of string values, as shown in the following code:string[] names; // can reference any array of strings // allocating memory for four strings in an array names = new string[4]; // storing items at index positions names[0] = "Kate"; names[1] = "Jack"; names[2] = "Rebecca"; names[3] = "Tom"; // looping through the names for (int i = 0; i < names.Length; i++) { // output the item at index position i Console.WriteLine(names[i]); } - Run the console app and note the result, as shown in the following output:
Kate
Jack
Rebecca
Tom
Arrays are always of a fixed size at the time of memory allocation, so you need to decide how many items you want to store before instantiating them.
Arrays are useful for temporarily storing multiple items, but collections are a more flexible option when adding and removing items dynamically. You don't need to worry about collections right now, as we will cover them in Chapter 8, Working with Common .NET Types.
Working with null values
You have now seen how to store primitive values like numbers in variables. But what if a variable does not yet have a value? How can we indicate that? C# has the concept of a null value, which can be used to indicate that a variable has not been set.
Making a value type nullable
By default, value types like int and DateTime must always have a value, hence their name. Sometimes, for example, when reading values stored in a database that allows empty, missing, or null values, it is convenient to allow a value type to be null. We call this a nullable value type.
You can enable this by adding a question mark as a suffix to the type when declaring a variable. Let's see an example:
- In the
Chapter02folder, create a new folder namedNullHandling. - Add the
NullHandlingfolder to theChapter02workspace. - Create a new Terminal window for the
NullHandlingproject. - Create a new console application project in the
NullHandlingfolder. - Select
NullHandlingas the current project for OmniSharp. - In the
NullHandlingproject, inProgram.cs, in theMainmethod, add statements to declare and assign values, includingnull, tointvariables, as shown in the following code:int thisCannotBeNull = 4; thisCannotBeNull = null; // compile error! int? thisCouldBeNull = null; Console.WriteLine(thisCouldBeNull); Console.WriteLine(thisCouldBeNull.GetValueOrDefault()); thisCouldBeNull = 7; Console.WriteLine(thisCouldBeNull); Console.WriteLine(thisCouldBeNull.GetValueOrDefault()); - Comment out the statement that gives a compile error.
- Run the application and view the result, as shown in the following output:
0
7
7
The first line is blank because it is outputting the null value!
Understanding nullable reference types
The use of the null value is so common, in so many languages, that many experienced programmers never question the need for its existence. But there are many scenarios where we could write better, simpler code if a variable is not allowed to have a null value.
More Information: You can find out more through the following link, where the inventor of null, Sir Charles Antony Richard Hoare, admits his mistake in a recorded hour-long talk: https://www.infoq.com/presentations/Null-References-The-Billion-Dollar-Mistake-Tony-Hoare
The most significant change to the language in C# 8.0 was the introduction of nullable and non-nullable reference types. "But wait!", you are probably thinking, "Reference types are already nullable!"
And you would be right, but in C# 8.0 and later, reference types can be configured to no longer allow the null value by setting a file- or project-level option to enable this useful new feature. Since this is a big change for C#, Microsoft decided to make the feature opt-in.
It will take multiple years for this new C# language feature to make an impact since there are thousands of existing library packages and apps that will expect the old behavior. Even Microsoft has not had time to fully implement this new feature in all the main .NET 5 packages.
More Information: You can read the tweet about achieving 80% annotations in .NET 5 at the following link: https://twitter.com/terrajobst/status/1296566363880742917
During the transition, you can choose between several approaches for your own projects:
- Default: No changes are needed. Non-nullable reference types are not supported.
- Opt-in project, opt-out files: Enable the feature at the project level and, for any files that need to remain compatible with old behavior, opt out. This is the approach Microsoft is using internally while it updates its own packages to use this new feature.
- Opt-in files: Only enable the feature for individual files.
Enabling nullable and non-nullable reference types
To enable the feature at the project level, add the following to your project file:
<PropertyGroup>
  <Nullable>enable</Nullable>
</PropertyGroup>
To disable the feature at the file level, add the following to the top of a code file:
#nullable disable
To enable the feature at the file level, add the following to the top of a code file:
#nullable enable
Declaring non-nullable variables and parameters
If you enable nullable reference types and you want a reference type to be assigned the null value, then you will have to use the same syntax as making a value type nullable, that is, adding a ? symbol after the type declaration.
So, how do nullable reference types work? Let's look at an example. When storing information about an address, you might want to force a value for the street, city, and region, but the building can be left blank, that is, null:
- In
NullHandling.csproj, add an element to enable nullable reference types, as shown highlighted in the following markup:<Project Sdk="Microsoft.NET.Sdk"> <PropertyGroup> <OutputType>Exe</OutputType> <TargetFramework>net5.0</TargetFramework> <Nullable>enable</Nullable> </PropertyGroup> </Project> - In
Program.cs, at the top of the file add a statement to enable nullable reference types, as shown in the following code:#nullable enable - In
Program.cs, in theNullHandlingnamespace, above theProgramclass, add statements to declare anAddressclass with four fields, as shown in the following code:class Address { public string? Building; public string Street; public string City; public string Region; } - After a few seconds, note that the C# extension warns of problems with non-nullable fields like
Street, as shown in the following screenshot:
Figure 2.6: Warning messages about non-nullable fields in the PROBLEMS window
- Assign the empty string value to each of the three fields that are non-nullable, as shown in the following code:
public string Street = string.Empty; public string City = string.Empty; public string Region = string.Empty; - In
Main, add statements to instantiate anAddressand set its properties, as shown in the following code:var address = new Address(); address.Building = null; address.Street = null; address.City = "London"; address.Region = null; - Note the warnings, as shown in the following screenshot:

Figure 2.7: Warning message about assigning null to a non-nullable field
So, this is why the new language feature is named nullable reference types. Starting with C# 8.0, unadorned reference types can become non-nullable, and the same syntax is used to make a reference type nullable as is used for value types.
More Information: You can watch a video to learn how to get rid of null reference exceptions forever at the following link: https://channel9.msdn.com/Shows/On-NET/This-is-how-you-get-rid-of-null-reference-exceptions-forever
Checking for null
Checking whether a nullable reference type or nullable value type variable currently contains null is important because if you do not, a NullReferenceException can be thrown, which results in an error. You should check for a null value before using a nullable variable, as shown in the following code:
// check that the variable is not null before using it
if (thisCouldBeNull != null)
{
  // access a member of thisCouldBeNull
  int length = thisCouldBeNull.Length; // could throw exception
  ...
}
If you are trying to use a member of a variable that might be null, use the null-conditional operator ?., as shown in the following code:
string authorName = null;
// the following throws a NullReferenceException
int x = authorName.Length;
// instead of throwing an exception, null is assigned to y
int? y = authorName?.Length;
More Information: You can read more about the null-conditional operator at the following link: https://docs.microsoft.com/en-us/dotnet/csharp/language-reference/operators/null-conditional-operators
Sometimes you want to either assign a variable to a result or use an alternative value, such as 3, if the variable is null. You do this using the null-coalescing operator, ??, as shown in the following code:
// result will be 3 if authorName?.Length is null
var result = authorName?.Length ?? 3;
Console.WriteLine(result);
More Information: You can read about the null-coalescing operator at the following link: https://docs.microsoft.com/en-us/dotnet/csharp/language-reference/operators/null-coalescing-operator
Exploring console applications further
We have already created and used basic console applications, but we're now at a stage where we should delve into them more deeply.
Console applications are text-based and are run at the command line. They typically perform simple tasks that need to be scripted, such as compiling a file or encrypting a section of a configuration file.
Equally, they can also have arguments passed to them to control their behavior. An example of this would be to create a new console app using the F# language with a specified name instead of using the name of the current folder, as shown in the following command line:
dotnet new console -lang "F#" --name "ExploringConsole"
Displaying output to the user
The two most common tasks that a console application performs are writing and reading data. We have already been using the WriteLine method to output, but if we didn't want a carriage return at the end of the lines, we could have used the Write method.
Formatting using numbered positional arguments
One way of generating formatted strings is to use numbered positional arguments.
This feature is supported by methods like Write and WriteLine, and for methods that do not support the feature, the string parameter can be formatted using the Format method of string.
Let's begin formatting:
- Add a new console application project named
Formattingto theChapter02folder and workspace. - In the
Mainmethod, add statements to declare some number variables and write them to the console, as shown in the following code:int numberOfApples = 12; decimal pricePerApple = 0.35M; Console.WriteLine( format: "{0} apples costs {1:C}", arg0: numberOfApples, arg1: pricePerApple * numberOfApples); string formatted = string.Format( format: "{0} apples costs {1:C}", arg0: numberOfApples, arg1: pricePerApple * numberOfApples); //WriteToFile(formatted); // writes the string into a file
The WriteToFile method is a nonexistent method used to illustrate the idea.
Formatting using interpolated strings
C# 6.0 and later has a handy feature named interpolated strings. A string prefixed with $ can use curly braces around the name of a variable or expression to output the current value of that variable or expression at that position in the string as the following shows:
- In the
Mainmethod, enter a statement at the bottom of theMainmethod, as shown in the following code:Console.WriteLine($"{numberOfApples} apples costs {pricePerApple * numberOfApples:C}"); - Run the console app, and view the result, as shown in the following partial output:
12 apples costs £4.20
For short formatted strings, an interpolated string can be easier for people to read. But for code examples in a book, where lines need to wrap over multiple lines, this can be tricky. For many of the code examples in this book, I will use numbered positional arguments.
Understanding format strings
A variable or expression can be formatted using a format string after a comma or colon.
An N0 format string means a number with thousand separators and no decimal places, while a C format string means currency. The currency format will be determined by the current thread. For instance, if you run this code on a PC in the UK, you'll get pounds sterling with commas as the thousand separators, but if you run this code on a PC in Germany, you will get Euros with dots as the thousand separators.
The full syntax of a format item is:
{ index [, alignment ] [ : formatString ] }
Each format item can have an alignment, which is useful when outputting tables of values, some of which might need to be left- or right-aligned within a width of characters. Alignment values are integers. Positive integers are right-aligned and negative integers are left-aligned.
For example, to output a table of fruit and how many of each there are, we might want to left-align the names within a column of 8 characters and right-align the counts formatted as numbers with zero decimal places within a column of six characters:
- In the
Mainmethod, enter the following statements at the bottom:string applesText = "Apples"; int applesCount = 1234; string bananasText = "Bananas"; int bananasCount = 56789; Console.WriteLine( format: "{0,-8} {1,6:N0}", arg0: "Name", arg1: "Count"); Console.WriteLine( format: "{0,-8} {1,6:N0}", arg0: applesText, arg1: applesCount); Console.WriteLine( format: "{0,-8} {1,6:N0}", arg0: bananasText, arg1: bananasCount); - Run the console app and note the effect of the alignment and number format, as shown in the following output:
Name     Count
Apples   1,234
Bananas 56,789
More Information: You can read more details about formatting types in .NET at the following link: https://docs.microsoft.com/en-us/dotnet/standard/base-types/formatting-types
Getting text input from the user
We can get text input from the user using the ReadLine method. This method waits for the user to type some text, then as soon as the user presses Enter, whatever the user has typed is returned as a string value:
- In the
Mainmethod, type statements to ask the user for their name and age and then output what they entered, as shown in the following code:Console.Write("Type your first name and press ENTER: "); string firstName = Console.ReadLine(); Console.Write("Type your age and press ENTER: "); string age = Console.ReadLine(); Console.WriteLine( $"Hello {firstName}, you look good for {age}."); - Run the console application.
- Enter a name and age, as shown in the following output:
Type your name and press ENTER: Gary
Type your age and press ENTER: 34
Hello Gary, you look good for 34.
Importing a namespace
You might have noticed that unlike our very first application in Chapter 1, Hello, C#! Welcome, .NET!, we have not been typing System before Console. This is because System is a namespace, which is like an address for a type. To refer to someone exactly, you might use Oxford.HighStreet.BobSmith, which tells us to look for a person named Bob Smith on the High Street in the city of Oxford.
The System.Console.WriteLine line tells the compiler to look for a method named WriteLine in a type named Console in a namespace named System. To simplify our code, the dotnet new console command added a statement at the top of the code file to tell the compiler to always look in the System namespace for types that haven't been prefixed with their namespace, as shown in the following code:
using System;
We call this importing the namespace. The effect of importing a namespace is that all available types in that namespace will be available to your program without needing to enter the namespace prefix and will be seen in IntelliSense while you write code.
Simplifying the usage of the console
In C# 6.0 and later, the using statement can be used to further simplify our code. Then, we won't need to enter the Console type throughout our code. We can use Visual Studio Code's Replace feature to remove the times we have previously written Console.:
- Add a statement to statically import the
System.Consoleclass to the top of theProgram.csfile, as shown in the following code:using static System.Console; - Select the first
Console.in your code, ensuring that you select the dot after the wordConsoletoo. - Navigate to Edit | Replace and note that an overlay dialog appears ready for you to enter what you would like to replace
Console.with, as shown in the following screenshot:
Figure 2.8: Using the Replace dialog box to simplify code
- Click on the Replace All button (the second of the two buttons to the right of the
replacebox) or press Alt + A or Alt + Cmd + Enter to replace all, and then close thereplacebox by clicking on the cross in its top-right corner.
Getting key input from the user
We can get key input from the user using the ReadKey method. This method waits for the user to press a key or key combination that is then returned as a ConsoleKeyInfo value:
- In the
Mainmethod, type statements to ask the user to press any key combination and then output information about it, as shown in the following code:Write("Press any key combination: "); ConsoleKeyInfo key = ReadKey(); WriteLine(); WriteLine("Key: {0}, Char: {1}, Modifiers: {2}", arg0: key.Key, arg1: key.KeyChar, arg2: key.Modifiers); - Run the console application, press the
Kkey, and note the result, as shown in the following output:Press any key combination: k Key: K, Char: k, Modifiers: 0 - Run the console application, hold down
Shiftand press theKkey, and note the result, as shown in the following output:Press any key combination: K Key: K, Char: K, Modifiers: Shift - Run the console application, press the
F12key, and note the result, as shown in the following output:Press any key combination: Key: F12, Char: , Modifiers: 0
When running a console application in Terminal within Visual Studio Code, some keyboard combinations will be captured by the code editor or operating system before they can be processed by your app.
Getting arguments
You might have been wondering what the string[] args arguments are in the Main method. They're an array used to pass arguments into a console application; let's take a look to see how it works.
Command-line arguments are separated by spaces. Other characters like hyphens and colons are treated as part of an argument value. To include spaces in an argument value, enclose the argument value in single or double quotes.
Imagine that we want to be able to enter the names of some colors for the foreground and background, and the dimensions of the Terminal window at the command line. We would be able to read the colors and numbers by reading them from the args array, which is always passed into the Main method of a console application.
- Create a new folder for a console application project named
Argumentsand add it to theChapter02workspace. - Add a statement to statically import the
System.Consoletype and a statement to output the number of arguments passed to the application, as shown highlighted in the following code:using System; using static System.Console; namespace Arguments { class Program { static void Main(string[] args) { WriteLine($"There are {args.Length} arguments."); } } }Good Practice: Remember to statically import the
System.Consoletype in all future projects to simplify your code, as these instructions will not be repeated every time. - Run the console application and view the result, as shown in the following output:
There are 0 arguments. - In TERMINAL, enter some arguments after the
dotnet runcommand, as shown in the following command line:dotnet run firstarg second-arg third:arg "fourth arg" - Note the result indicates four arguments, as shown in the following output:
There are 4 arguments. - To enumerate or iterate (that is, loop through) the values of those four arguments, add the following statements after outputting the length of the array:
foreach (string arg in args) { WriteLine(arg); } - In TERMINAL, repeat the same arguments after the
dotnet runcommand, as shown in the following command line:dotnet run firstarg second-arg third:arg "fourth arg" - Note the result shows the details of the four arguments, as shown in the following output:
There are 4 arguments.
firstarg
second-arg
third:arg
fourth arg
Setting options with arguments
We will now use these arguments to allow the user to pick a color for the background, foreground, and cursor size of the output window. The cursor size can be an integer value from 1, meaning a line at the bottom of the cursor cell, up to 100, meaning a percentage of the height of the cursor cell.
The System namespace is already imported so that the compiler knows about the ConsoleColor and Enum types. If you cannot see either of these types in the IntelliSense list, it is because you are missing the using System; statement at the top of the file.
- Add statements to warn the user if they do not enter three arguments and then parse those arguments and use them to set the color and dimensions of the console window, as shown in the following code:
if (args.Length < 3) { WriteLine("You must specify two colors and cursor size, e.g."); WriteLine("dotnet run red yellow 50"); return; // stop running } ForegroundColor = (ConsoleColor)Enum.Parse( enumType: typeof(ConsoleColor), value: args[0], ignoreCase: true); BackgroundColor = (ConsoleColor)Enum.Parse( enumType: typeof(ConsoleColor), value: args[1], ignoreCase: true); CursorSize = int.Parse(args[2]); - Enter the following command in TERMINAL:
dotnet run red yellow 50
On Linux, this will work correctly. On Windows, this will run, but the cursor will not change size. On macOS, you'll see an unhandled exception, as shown in the following screenshot:
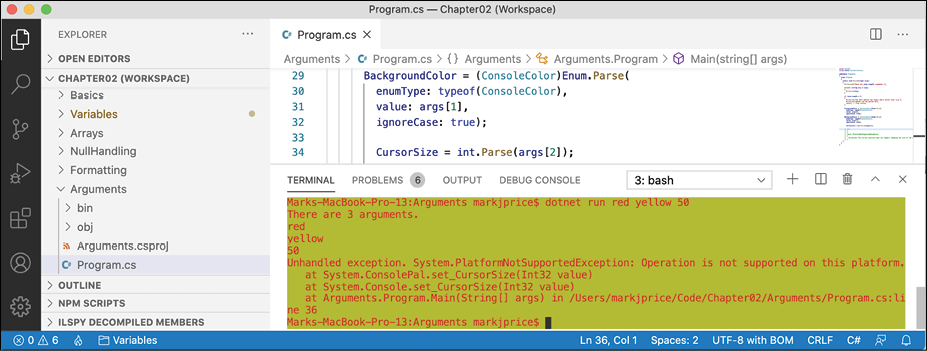
Figure 2.9: An unhandled exception on unsupported macOS
Although the compiler did not give an error or warning, at runtime some API calls may fail on some platforms. Although a console application running on Linux can change its cursor size, on macOS, it cannot, and complains if you try.
Handling platforms that do not support an API
So how do we solve this problem? We can solve this by using an exception handler. You will learn more details about the try-catch statement in Chapter 3, Controlling Flow and Converting Types, so for now, just enter the code.
- Modify the code to wrap the lines that change the cursor size in a
trystatement, as shown in the following code:try { CursorSize = int.Parse(args[2]); } catch (PlatformNotSupportedException) { WriteLine("The current platform does not support changing the size of the cursor."); } - Rerun the console application; note the exception is caught, and a friendlier message is shown to the user.
Another way to handle differences in operating systems is to use the OperatingSystem class, as shown in the following code:
if (OperatingSystem.IsWindows())
{
  // execute code that only works on Windows
}
The OperatingSystem class has equivalent methods for other common OSes like Android, iOS, Linux, macOS, and even the browser, which is useful for Blazor web components.
Practicing and exploring
Test your knowledge and understanding by answering some questions, get some hands-on practice, and explore the topics covered in this chapter with deeper research.
Exercise 2.1 – Test your knowledge
To get the best answer to some of these questions, you will need to do your own research. I want you to "think outside the book" so I have deliberately not provided all the answers in the book.
I want to encourage you to get in the good habit of looking for help elsewhere, following the principle of "teach a person to fish."
What type would you choose for the following "numbers"?
- A person's telephone number
- A person's height
- A person's age
- A person's salary
- A book's ISBN
- A book's price
- A book's shipping weight
- A country's population
- The number of stars in the universe
- The number of employees in each of the small or medium businesses in the United Kingdom (up to about 50,000 employees per business)
Exercise 2.2 – Practice number sizes and ranges
Create a console application project named Exercise02 that outputs the number of bytes in memory that each of the following number types uses, and the minimum and maximum values they can have: sbyte, byte, short, ushort, int, uint, long, ulong, float, double, and decimal.
More Information: You can always read the documentation, available at https://docs.microsoft.com/en-us/dotnet/standard/base-types/composite-formatting for Composite Formatting to learn how to align text in a console application.
The result of running your console application should look something like the following screenshot:

Figure 2.10: The result of the console application
Exercise 2.3 – Explore topics
Use the following links to read more about the topics covered in this chapter:
- C# Keywords: https://docs.microsoft.com/en-us/dotnet/csharp/language-reference/keywords/index
- Main() and command-line arguments (C# Programming Guide): https://docs.microsoft.com/en-us/dotnet/csharp/programming-guide/main-and-command-args/
- Types (C# Programming Guide): https://docs.microsoft.com/en-us/dotnet/csharp/programming-guide/types/
- Statements, Expressions, and Operators (C# Programming Guide): https://docs.microsoft.com/en-us/dotnet/csharp/programming-guide/statements-expressions-operators/
- Strings (C# Programming Guide): https://docs.microsoft.com/en-us/dotnet/csharp/programming-guide/strings/
- Nullable Types (C# Programming Guide): https://docs.microsoft.com/en-us/dotnet/csharp/programming-guide/nullable-types/
- Nullable reference types: https://docs.microsoft.com/en-us/dotnet/csharp/nullable-references
- Console Class: https://docs.microsoft.com/en-us/dotnet/api/system.console
Summary
In this chapter, you learned how to declare variables with a specified or an inferred type; we discussed some of the built-in types for numbers, text, and Booleans; we covered how to choose between number types; we covered the nullability of types; we learned how to control output formatting in console apps.
In the next chapter, you will learn about operators, branching, looping, and converting between types.