Reader small image

You're reading from  Metabase Up and Running

Product typeBook
Published inSep 2020
Reading LevelBeginner
PublisherPackt
ISBN-139781800202313
Edition1st Edition
Languages
Right arrow
Author (1)
Tim Abraham
Tim Abraham
author image
Tim Abraham

Tim Abraham is originally from Oakland, California, and currently living in the San Francisco Bay Area. He has been working in Data Science for 10 years, spending his time working at consumer technology companies like StumbleUpon, Twitter, and Airbnb and advising a few others. He also spent time as a Data Scientist in Residence at Expa, the Startup Studio that Metabase came out of, which is where he got to know the product and the founding team. Find him on Twitter @timabe.
Read more about Tim Abraham

Right arrow

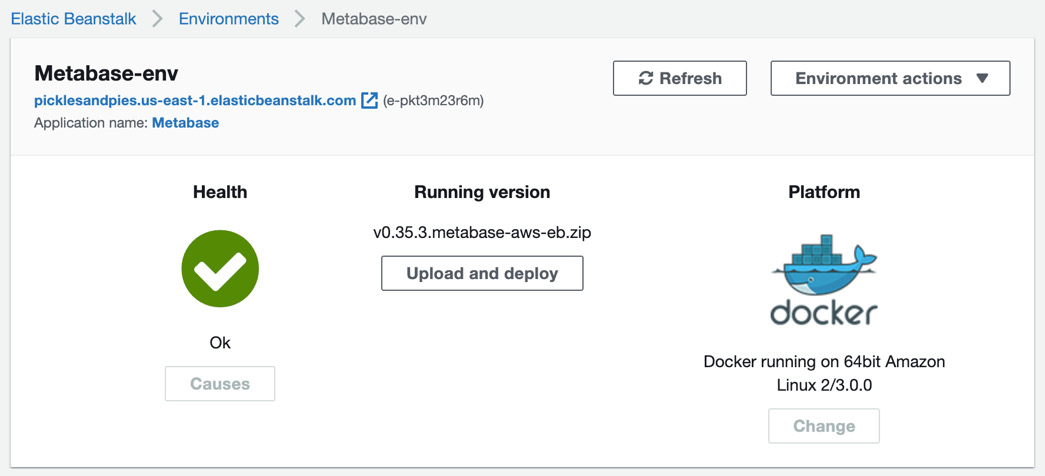
Chapter 2: Deploying Metabase with AWS

Now that we have learned the simple way to deploy Metabase to the cloud, this chapter will focus on the official paved path for users who want to self-host. This path involves using Amazon Web Services, or AWS as I'll be referring to it going forward. For software, AWS can do just about everything – it is massively complex, and explaining it thoroughly would fill entire libraries. A full explanation of all AWS can offer is far beyond the scope of this book, and as such, this chapter's goal is to explain only the relevant parts of AWS in a gentle but thorough manner.

Readers with backgrounds in technical operations or experience with AWS may skip some of the sections in this chapter. However, many people interested in using Metabase have backgrounds in analytics but know very little about software development operations. For users such as these, this chapter will be extremely useful as I will gently but comprehensively explain...

Technical requirements

You will need to sign up for an AWS account. The account offers free access to many services for one year but does require you to enter a credit card. The services we will be using throughout this book can all be used cost-free, provided you complete everything within one year of signing up. I also highly recommend having some password management software, as we'll be creating many different login credentials and you will be glad to have them organized.

Introduction to Amazon Web Services

While most of us think of Amazon as a retailer, their web services actually account for the bulk of the tech giant's profits. Many internet services we use daily are being run on Amazon's various data centers around the world. Today, AWS is the most broadly adopted cloud platform in the world.

AWS is made up of various services. A service can be vaguely thought of as a cloud-based solution to some technical problems, such as database management, machine learning, or computation. As of this writing, AWS has over 175 unique services, but luckily for us, we will only need to use a few.

Rather than explain upfront what all these services are and do, let's start instead by signing up for an AWS account and learn as we go.

Signing up for a free trial of AWS

The first thing we will need to do is sign up for an AWS account. To get started, visit https://aws.amazon.com/ in your browser. Note the yellow button in the middle of the page reading Create a Free Account. Click that button to begin the signup process.

You can learn about what the Free Tier actually offers by clicking the link underneath the Sign Up button. The relevant parts of the free tier for our purposes are the following:

  • 12 full months of selected free services, starting at the time you create an account.
  • 750 hours per month of compute and database services. A 31-day month has 744 hours in it, so 750 hours is enough to let them run all month without worry.
  • 5 GB of storage. We will use their storage service, S3, to keep log files and things of that nature, so 5 GB is plenty.

After clicking the Sign Up button, you may create your account:

  1. Enter your email, a strong password, and a username.
  2. On the next...

Metabase on Elastic Beanstalk

One of the most popular services AWS offers is called EC2, and stands for Elastic Cloud Compute. You can think of these EC2 instances as virtualized servers, and they are building blocks for many of the other services offered. We will be running Metabase on one or more of these EC2 instances and connecting it to a Postgres application database.

While we could deploy these services individually and connect them up, doing so is not easy. This is where the Elastic Beanstalk service comes in handy, and that is what we will use to deploy our Metabase application. The Elastic Beanstalk service abstracts away a lot of the challenges in software deployment, like installing the software, provisioning the database, monitoring the service, and handling spikes in traffic. In that sense, Elastic Beanstalk is similar to Heroku.

Specifically, when we use Elastic Beanstalk to deploy Metabase, it will automatically do the following with just a little bit of configuration...

Quick launch on Elastic Beanstalk

Let's learn how to quickly launch Metabase on Elastic Beanstalk. These are the absolute minimum number of steps needed:

  1. After you sign in to the AWS Management Console as the root user, open a new browser tab, and visit .
  2. Halfway down the page, you will find a link in purple font reading Launch Metabase on Elastic Beanstalk. Click this link.
  3. Your browser will redirect you to the AWS console with a prompt to Create a Web App. Note that if you were in any other region than Northern Virginia up to this point, clicking this link will change your default region to Northern Virginia.

Many of the fields in the Create a web app form will be pre-populated:

  1. The Application Name field should be populated with Metabase.
  2. The Environment Name field should read Metabase-env.
  3. The Platform section as of this writing will have the platform set as Docker, the Platform Branch set as Docker running on 64bit Amazon Linux 2...

Using best practices for Metabase on AWS

In the last section, we deployed Metabase with Elastic Beanstalk using the minimum number of steps to configure and secure the application. In this section, we trade speed for best practices. By following best practices, we can have more control over our application, make it more scalable and robust, and monitor its performance. If you are going to be administering Metabase within your organization, you will want to follow this guide.

The first thing we want to do is stop using our root credentials. As mentioned previously, using root credentials to build in AWS is not recommended, as it is too easy to make a critical error. The recommended path is to create individual accounts with limited permissions, and that's exactly what we will do in the next section.

Creating an IAM user

When we deployed Metabase in the last section, we did so as the Root User. I mentioned that the root user has all the power and permissions, including deleting all your services and even your AWS account.

If you are working in an organization that already uses AWS today, don't expect to be given Root user access. The standard practice is to create accounts within AWS that let the user do only what they need to do. In this section, we'll learn how to create an account with the IAM service to use going forward for all things related to Metabase:

  1. In the AWS Management Console, click Services in the upper left-hand corner.
  2. A dropdown showing the 175+ services will appear. Rather than finding IAM manually, just type it in the search bar and select it, as in Figure 2.5:
    Figure 2.5 – Searching for the IAM service in the AWS console

    Figure 2.5 – Searching for the IAM service in the AWS console

  3. Within the IAM service, we will expand the Create individual IAM users dropdown and click Manage Users...

Creating a Virtual Private Cloud

As mentioned earlier, AWS configures a default VPC for you in each region when you create your account. You can also create your own VPC, which is exactly what we will learn to do in this section. Even if your organization already has an AWS account with a VPC configured, going through this section will still be a valuable learning experience. It will also help you understand what configuration changes may be necessary for your existing VPC to launch Metabase.

In this section, we'll learn how to create a VPC configured with the required network infrastructure for Metabase. Specifically, that means creating a VPC with two public subnets in two different availability zones, both with internet gateways in their routing table. We'll also learn what all this means, and why it's important. To get started, search for the VPC service in the AWS Management Console, just as we did with the IAM service. This will take you to the VPC Management...

Creating the Metabase application

With our sizing decisions made, and our IAM user and VPC created, we can now configure and deploy our Metabase instance inside our new VPC. We'll get started by leaving AWS momentarily to visit :

  1. Scroll down to the bottom of the page, where it reads Read about how to run Metabase on AWS, and click the AWS link.
  2. From there, click the Launch Metabase on Elastic Beanstalk link. You'll be redirected to the AWS console and prompted to create the web app.

Creating a web app in Elastic Beanstalk

Before we continue on the Create a web app page, let's get clarity on some confusing AWS terminology.

In Elastic Beanstalk, an application is defined as a "logical collection of components, including environments and configurations" and can be thought of as a folder. The actual running instance of Metabase, what we generally think of as "our application," is called an Environment in Elastic Beanstalk parlance...

Monitoring costs on AWS

At any time, if you want to see how much of your free tier allotment you have used, you can do so in the Billing Dashboard. You can find it by clicking on your username in the AWS Management Console and selecting Billing Dashboard. However, because we did not give our metabase-admin IAM user permissions to view this, you will get a message explaining that you don't have permissions. Sign back in with your root user credentials.

On the Billing Dashboard, you can see multiple views of the costs your account is incurring. It is good to check on this, if you truly want to avoid spending any money. Sometimes you may forget to turn something off, or accidentally use a resource that's not on the free tier, and end up getting charged a few dollars at the end of the month. The easiest way to see what you have consumed and how much you have been charged for it is to click Bill details in the upper right-hand corner of the page.

Remember that most enterprise...

Monitoring app performance

On the Elastic Beanstalk dashboard, we can see the overall health of our environment. Most of the time it should have the green checkmark, as in Figure 2.11. If you deploy using the smaller t2.micro EC2 instances, it may occasionally be in the Warning state (although I've noticed the actual app works fine in those cases):

Figure 2.12 -

Figure 2.12 -

In addition to the overall health check, we can drill into specific performance-related statistics around the resources we've deployed. Let's learn how to do that.

From the Elastic Beanstalk dashboard, click Monitoring on the left rail. This will bring up the performance monitoring overview, where you can view several high-level statistics about your app.

Rather than going over all the statistics presented on the dashboard, let's just learn how to create a chart of the average NetworkOut for our EC2 Instances. Recall that in the Scaling Triggers section of our environment...

Summary

In this chapter, we learned best practices for deploying Metabase using AWS. We learned how to sign up for a free AWS account and create both root and IAM users to log in with. We created a VPC with the necessary network setup for our application to exist in. Finally, we deployed Metabase using best practices for scalability, availability, cost, logging, and health monitoring.

In other words, we covered a lot in this chapter. If you came into it with no knowledge of AWS, you may feel overwhelmed by all the information covered. If you feel that way, do not worry! Deploying Metabase is a lot more complicated than using it, especially for people with backgrounds in analytics. If you have gotten this far, congratulations! Now we'll get to the fun part, where we will actually set up Metabase to work with our data. We will be covering all of that in the next chapter.

lock icon
The rest of the chapter is locked
You have been reading a chapter from
Metabase Up and Running
Published in: Sep 2020Publisher: PacktISBN-13: 9781800202313
Register for a free Packt account to unlock a world of extra content!
A free Packt account unlocks extra newsletters, articles, discounted offers, and much more. Start advancing your knowledge today.
undefined
Unlock this book and the full library FREE for 7 days
Get unlimited access to 7000+ expert-authored eBooks and videos courses covering every tech area you can think of
Renews at $15.99/month. Cancel anytime

Author (1)

author image
Tim Abraham

Tim Abraham is originally from Oakland, California, and currently living in the San Francisco Bay Area. He has been working in Data Science for 10 years, spending his time working at consumer technology companies like StumbleUpon, Twitter, and Airbnb and advising a few others. He also spent time as a Data Scientist in Residence at Expa, the Startup Studio that Metabase came out of, which is where he got to know the product and the founding team. Find him on Twitter @timabe.
Read more about Tim Abraham