Reader small image

You're reading from  Learning Pentaho CTools

Product typeBook
Published inMay 2016
Reading LevelIntermediate
PublisherPackt
ISBN-139781785283420
Edition1st Edition
Languages
Tools
Right arrow
Author (1)
Miguel Gaspar
Miguel Gaspar
author image
Miguel Gaspar

Miguel Gaspar started working at Webdetails about 3 years ago, some time before the acquisition of Webdetails by Pentaho. He was a consultant in the Implementation team and his work involved developing dashboard solutions as part of services. He is now acting as the technical owner of some of the Implementations projects as part of the Webdetails team in Pentaho. He likes to be as professional as possible, but in an informal way. One of his favorite hobbies is learning and his particular areas of interest are: business analytics, predictive analysis and big data, augmented reality, and cloud computing. He likes to play and is a huge martial arts fan and also one of the worst soccer players ever. He is married and a parent of two young and lovely daughters, who would like to spend more time playing like crazies with him. He also likes to spend time with friends or just having a drink and a good talk with someone else, if possible with his family at his side. He really hates liars.
Read more about Miguel Gaspar

Right arrow

Chapter 2. Acquiring Data with CDA

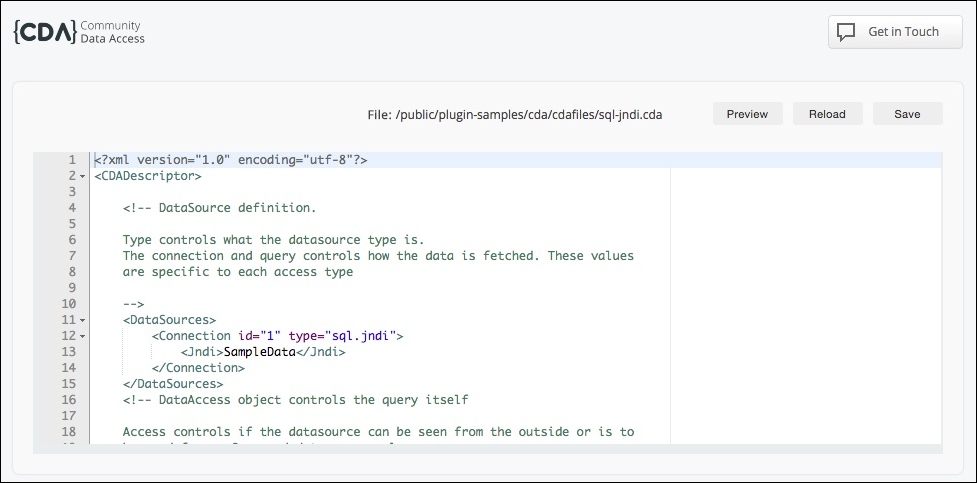
When we want to display data on a dashboard, we need to get this data from anywhere and display it in the easiest way possible, without having to write code to parse the results in a way that components can make use of these results. Using Pentaho, you have many ways to access data. If you are calling a report built with Pentaho plugins or client tools, you will be able to select one kind of data source, but if you want to use your own application and make use of Pentaho data, it would be possible for you to use XMLA, Kettle transformations as web services, and the Community Data Access (CDA) plugin.

The purpose of this book is to cover Community Tools, so this chapter is focused on the use of CDA. You will learn about the available data sources, how to create a new data source, how to pass some parameters to the query to get the right results, and then how to preview the results. You can write your own customized queries but if this is not enough, then...

Introduction to CDA


CDA was one of the first CTools. Its main purpose is to provide data abstraction for multiple kinds of data sources wrapped as web services. It was first created to be used as an interface between the data connections and the Community Dashboard Framework (CDF), but nowadays it can also be used in Report Designer to embed data in third-party applications.

CDA includes many different output types that we can configure, and also includes some configurable cache options to optimize performance, which you will have the chance to learn about. Another great feature in CDA that is somehow related to performance, is to sort and paginate on the server side.

The following diagram is an example of how CDA can be used to acquire data from. CDA is able to provide data to a CDF and/or CDE dashboards. However, an external application can get data directly from CDA using its endpoints. When requested for data, CDA will check whether the cache is enabled and whether there are results...

Creating a new CDA data source


There are multiple ways to create CDA data sources. One of the ways is to use CDE, where no code or XML is needed, and we will cover this later in the CDE chapter. There is another way, which is using the CDA editor, or just editing the file by hand using the Pentaho Text Editor plugin.

For now, I want you to understand the internals of CDA, so we need to start with the hardest way to create a CDA file—by creating/editing an XML file. The CDA files that are XML files will define the Pentaho repository and will have a .cda extension. This way, Pentaho will recognize the file extension and will provide the capability to preview the results or edit the file. The main structure of a CDA file is the following:

<?xml version="1.0" encoding="UTF-8"?>
<CDADescriptor>
   <DataSources>
      <!—- HERE LIVES EACH ONE OF <Connection>-->
   </DataSources>
   <!—- HERE LIVES EACH ONE OF <DataAccess> -->
</CDADescriptor>...

Available types of CDA data sources


The data sources covered in this book are the ones already pointed out previously, but we need to see them in detail. To create a new data source, you should also specify the attribute type that will be used to distinguish the method to be called on the server side to get the data and return the results. Depending on the data source that you are creating, you should also specify some properties that may be different depending on the kind of data source. Let's look at each one of the available options.

Each one of the following distinguished subsections will give you a brief overview and inform you about the properties that should be defined for the connections and also for the Data Access types. There are some common properties, such as the columns, that we will cover later in this chapter. For now, we will only focus on the different ones.

SQL databases

You can use this type of connection to get data from any source that uses Structured Query Language (SQL...

Common properties


There are some common properties that should or can be used when defining a Data Access. These properties are:

  • Cache: The cache can also be defined as an attribute when defining a Data Access. When defining the cache as an element, we should also specify the two attributes, duration and enabled. The first attribute is used to define the time that the query will be cached since the last execution. The enabled attribute will be set to true or false depending on whether you want to enable it or disable it.

  • Name: This is the friendly name of the data access being defined.

  • Columns: This is an element that can create a different output by changing the name of a column or just by adding new ones using calculated columns. To change the name of columns, you would just need to specify the columns' idx, starting from 0, and the desired name, as shown in the following example:

    <Column idx="0">
       <Name> Region </Name>    
    </Column>
    <Column idx="1">
       ...

Editing and previewing


Once you have created a file and uploaded it to BA Server, the .cda extension will tell Pentaho how to handle this file. When clicking on a .cda file, in the context menu that becomes available on the right side of Pentaho User Console (PUC), you will be able to edit and open the previewer. When selecting edit, you will see a screen like the following:

You can see the editor on the center of the page, and three buttons on the right-hand side, above the editor. We are able to change the XML file and use the buttons to trigger some actions. The available actions are:

  • Save: To save the changes we can make in the editor

  • Reload: To reload the content of the file

  • Preview: This will open the previewer so that we can see the results of the execution of the data source

There are two ways to preview a query result when using CDA. The first one is using the CDA previewer, a GUI that will let you select the Data Access that you would like to execute. To open the previewer, you...

Manipulating the output of a data source


Manipulating the result of a data source is really simple. You can use the child element Output when setting the Data Access. Let's suppose we are performing a query that is returning 10 columns, but we only want to display the first two. If that's the case, then you should set the following child element in the Data Access definition:

<Output indexes="0,1" mode="include"/>

This child element tells CDA that it should use the first and second columns, identified by index 0 and 1. The mode will tell CDA that these are the columns to be included; otherwise, if you use exclude, you will get all the columns except the first two.

When accessing a query through a URL, another way to manipulate the output is to have a different output format. This can be achieved by calling the URL and adding a parameter outputType of one of the following formats: JSON, XML, CSV, XLS, or HTML.

For example, if you want to manipulate the output of the data source, you can...

CDA cache


CDA is able to cache the queries that have been executed. Every query that runs will be cached or not cached, and by the time defined in the Cache property element when defining the Data Access. You can also set the interval of time to grab results from the cache, avoiding new requests to the server.

Managing the cache and the scheduler

In the PUC menu, click on Tools | Refresh | CDA Cache Manager, and you will have the ability to clean the CDA cache. When choosing this option, every single cache will be flushed.

It's also possible to manage what has been cached or is scheduled to be cached. By clicking on the PUC menu and going to Tools | CDA Cache Manager, it will open a new tab with the scheduled/cached queries manager. When opening the manager, you have the ability to choose between two modes by using the Scheduled Queries or Cached Queries buttons, respectively:

The previous image is an example of the Scheduled Queries manager, and it will display all the queries that have been...

Web API reference


One of the interesting things in knowing how to work with the API is that we can use CDA to get data into an external application. This is interesting if we're not using CDE or CDF to build the dashboard. Anyhow, a good reason for you to know about the API is so you can go further when using CTools.

You can make requests to CDA using Web API. The base URL to use is $BASE_URL/$WEBAPP/plugin/cda/api/, where $BASE_URL is the protocol, hostname, and port, and $WEBAPP is the web application name used on Apache Tomcat, and the default webapp is defined as pentaho.

For example, the following URL is referring the pentaho webapp: http://localhost:8080/pentaho/plugin/cda/api/doQuery?path=/public/plugin-samples/cda/cdafiles/mondrian-jndi.cda&dataAccessId=1&paramstatus=Shipped

Next we will cover the available endpoint. An endpoint, defines the particulars of a specific endpoint at which a given service is available.

getCdaList

The getCdaList endpoint will get a list of all the...

Hands-on dashboards


Now it's time for you to create your data sources. In order to display the results from the queries, in the next chapter, you should create a CDA file with the following content:

<?xml version="1.0" encoding="utf-8"?>
<CDADescriptor>
<!—-Data source for the dashboard, a unique data source is used for all connections-->
    <DataSources>
        <Connection id="SampleData" type="mondrian.jndi">
            <Jndi>SampleData</Jndi>
            <Catalog>mondrian:/SteelWheels</Catalog>
            <Cube>SteelWheelsSales</Cube>
        </Connection>
    </DataSources>
 <!-—Data Access to get the territories values-->
    <DataAccess id="territories" connection="SampleData" type="mdx" access="public">
        <Name>territories</Name>
        <BandedMode>compact</BandedMode>
        <Query>
            WITH 
                MEMBER [Measures].[UID] AS [Markets...

Summary


Now you know how to create data sources that can bring data to your reports/dashboards. You should now understand how to create different types of queries by defining all the XML elements. There is an important part of the chapter on how to send parameters to the queries. One of the query types is a Kettle query, where you need to specify the mapping between the parameters that come from the dashboard and the variables defined inside the kettle transformation. If necessary, we can blend data, just by creating queries for different data sources that will later be combined using a join or union in a compound query.

We also covered how to preview the queries, how to edit a CDA file, and how to manage or clean segments of the CDA cache. You should now be able to schedule the queries so that they can be cached and give shorter response times to the users who are accessing the same query.

This chapter showed you how to create or edit a CDA file manually; however, you don't always need to...

lock icon
The rest of the chapter is locked
You have been reading a chapter from
Learning Pentaho CTools
Published in: May 2016Publisher: PacktISBN-13: 9781785283420
Register for a free Packt account to unlock a world of extra content!
A free Packt account unlocks extra newsletters, articles, discounted offers, and much more. Start advancing your knowledge today.
undefined
Unlock this book and the full library FREE for 7 days
Get unlimited access to 7000+ expert-authored eBooks and videos courses covering every tech area you can think of
Renews at $15.99/month. Cancel anytime

Author (1)

author image
Miguel Gaspar

Miguel Gaspar started working at Webdetails about 3 years ago, some time before the acquisition of Webdetails by Pentaho. He was a consultant in the Implementation team and his work involved developing dashboard solutions as part of services. He is now acting as the technical owner of some of the Implementations projects as part of the Webdetails team in Pentaho. He likes to be as professional as possible, but in an informal way. One of his favorite hobbies is learning and his particular areas of interest are: business analytics, predictive analysis and big data, augmented reality, and cloud computing. He likes to play and is a huge martial arts fan and also one of the worst soccer players ever. He is married and a parent of two young and lovely daughters, who would like to spend more time playing like crazies with him. He also likes to spend time with friends or just having a drink and a good talk with someone else, if possible with his family at his side. He really hates liars.
Read more about Miguel Gaspar