Planning the Sub' Hunter game
The objective of this game is to find and destroy the enemy sub' in as few moves as possible. The player takes a shot and each time guesses the location of the sub' by taking into account the distance feedback (or sonar ping) from all of the previous shots.
The game starts with the player facing an empty grid with a randomly placed (hidden) submarine lurking somewhere within it:
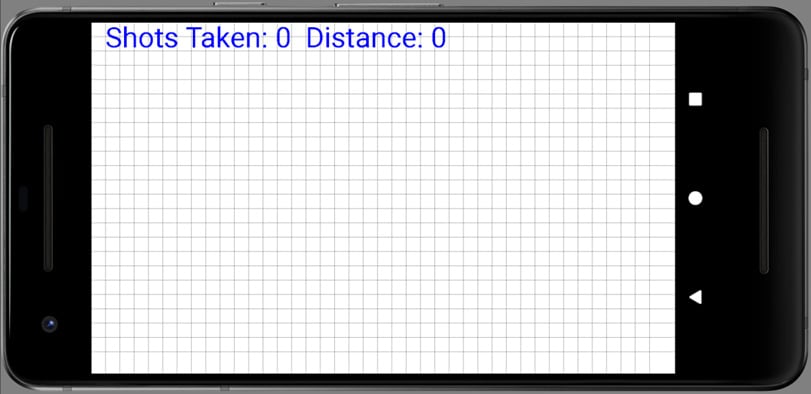
Figure 2.1 – The Sub' Hunter game screen
The grid represents the sea, and each place on the grid is a possible hiding place for the submarine that the player is hunting. The player takes shots at the sub' by guessing where it might be hiding and tapping one of the squares on the grid. In the following screenshot, the tapped square is highlighted, and the distance to the sub' from the tapped square is shown as a number at the top of the screen:
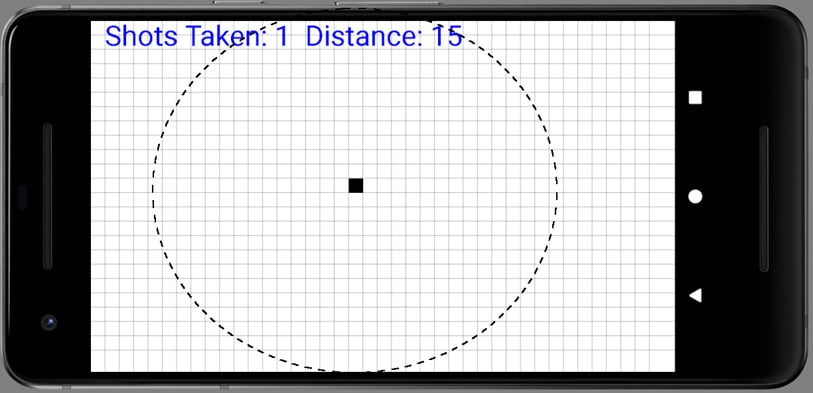
Figure 2.2 – Taking shots in the Sub' Hunter game
This feedback means the sub' is hiding somewhere on (not within) the radius of 15 squares, as demonstrated in the previous screenshot.
Important note
Note that the dashed circle in the previous screenshot is not part of the game. It is my attempt to explain the possible hiding places of the sub' based on the distance.
As a player takes more shots, they can build up a better mental picture of the likely location of the sub' until, eventually, they guess the exact square and the game is won:

Figure 2.3 – Taking a shot to start the game again
Once the player has destroyed the sub', the next tap on the screen will spawn a new sub' in a random location and the game starts again.
In addition to the game itself, we will be writing code to display debugging information so that we can test the game and check whether everything is working as it should be. The following screenshot shows the game running with the debugging information enabled:
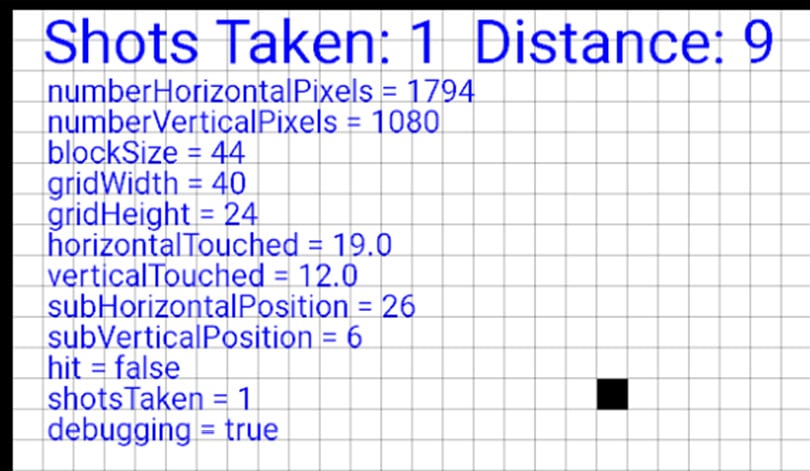
Figure 2.4 – The debugging information of the game
Let's look more closely at the player's actions and how the game will need to respond to them.
The actions flowchart/diagram
We need to plan our code before we start hammering away at the keyboard. You might be wondering how you can plan your code before you have learned how to code, but it is quite straightforward. Study the following flowchart; we will discuss it and then introduce a new Java concept to help us put the plan into action. Follow the path of the arrows and note the diamond shape on the flowchart where our code will make a decision, and the execution of the code could go either way:
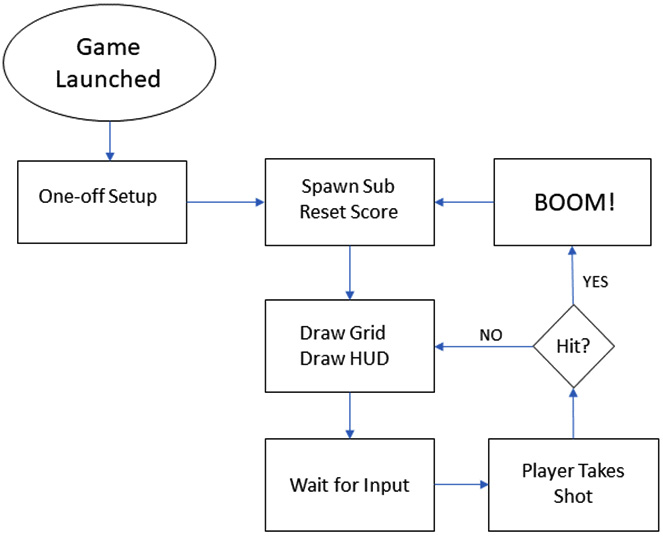
Figure 2.5 – Planning the game using a flowchart
The flowchart shows the steps the game will take, as follows:
- The game is launched by tapping on its icon in the app drawer (or running it in Android Studio).
- The sub' is placed in a random location by generating random horizontal and vertical numbers. The score is set to zero if this is not the first play of the game.
- Next, everything is drawn to the screen: the grid-lines and the text (heads-up display or HUD), including the debugging text (if enabled).
- At this point, the game does nothing. It is waiting for the player to tap on the screen.
- When the player taps on the screen, the pixel that has been tapped is converted into a location on the grid, and that location is compared to the location of the sub'. The Hit? diamond illustrates this comparison. Here, the program could branch back to the drawing phase to redraw everything, including the grid location.
- Alternatively, if there was a hit, then the BOOM! screen is shown.
- In fact, the BOOM! part isn't exactly as we see it there. The Wait for Input phase also handles waiting for a screen tap at this point. When the screen is tapped again, it is considered the first shot of the next game; the flow of the code moves back to the Spawn Sub Reset Score code, and the whole process starts again. This will become clearer as the project progresses.
The next two sections of this chapter will show you how to flesh out this design with real Java code. Then, in the next chapter, we will be able to view real results on the screen.
Code comments
As you become more advanced in writing Java programs, the solutions you use to create your programs will become longer and more complicated. Furthermore, as you will see in this chapter and following on throughout the book, Java was designed to manage complexity by having us divide our code into separate chunks and, very often, across multiple files.
Comments are a part of the Java program that does not have any function in the program itself. The compiler ignores them. They serve to help the programmer to document, explain, and clarify their code to make it more understandable to themselves later (maybe even a long time later) or to other programmers who might need to refer to or modify the code. So, a good piece of code will be liberally sprinkled with lines like this:
// This is a comment explaining what is going on
The preceding comment begins with the two forward slash characters, //. The comment ends at the end of the line. This is known as a single-line comment. So, anything on that line is for humans only, while anything on the next line (unless it's another comment) needs to be syntactically correct Java code:
// I can write anything I like here
but this line will cause an error unless it is valid code
We can also use multiple single-line comments:
// Below is an important note
// I am an important note
// We can have many single line comments
Single-line comments are also useful if we want to temporarily disable a line of code. We can put // in front of the code and it will not be included in the program. This next code is valid code, which causes Android to draw our game on the screen. We will see it in many of the projects in this book:
// setContentView(gameView);
In the preceding scenario, the code will not run, as the compiler considers it to be a comment and the screen will be blank. There is another type of comment in Java – the multiline comment. This is useful for longer comments and to add things such as copyright information at the top of a code file. Additionally, like the single-line comment, it can be used to temporarily disable code – in this case, it is usually multiple lines.
Everything in between the leading /* signs and the ending */ signs is ignored by the compiler. Here are some examples:
/*
A Java expert wrote this program.
You can tell I am good at this because
the code has so many helpful comments in it.
*/
There is no limit to the number of lines in a multiline comment. Which type of comment is best to use will depend upon the situation. In this book, I will always explain every line of code explicitly, but you will also find liberally sprinkled comments within the code itself that add further explanation, insight, or clarification. So, it's always a good idea to read all of the code:
/*
The winning lottery numbers for next Saturday are
9,7,12,34,29,22
But you still want to learn Java? Right?
*/
Tip
All the best Java programmers liberally sprinkle their code with comments.
Let's add some useful comments to the Sub' Hunter project.
Mapping out our code using comments
Now, we will add some single-line and multiline comments to our code, so we know where we will be adding code throughout the project and what its intended purpose is.
In Chapter 1, Java, Android, and Game Development, we left the code with just a couple of lines to the AndroidManifest.xml file in order to lock the player's screen to landscape and use the full screen.
Open Android Studio and click on the SubHunter.java tab in the Editor window. You can now see the code in the class file.
Referring to our flowchart, we have the One-off Setup element. In Android, the operating system dictates where some parts of our program must take place. For this reason, add the highlighted multiline comment, as shown next, among the existing code. We will explore why this part of the code is where we do the One-off Setup element later, in the Linking up our methods section.
Important note
The complete code for this chapter can be found on the GitHub repo in the Chapter 2 folder.
Now, add the highlighted code shown here:
package com.gamecodeschool.c2subhunter;
import android.app.Activity;
import android.os.Bundle;
public class SubHunter extends Activity {
    /*
        Android runs this code just before
        the player sees the app.
        This makes it a good place to add
        the code for the one-time setup phase.
     */

@Override
    protected void onCreate(Bundle savedInstanceState) {
        super.onCreate(savedInstanceState);
    }
}
Next, immediately before the final curly brace, }, of the code, add the following highlighted comments. I have highlighted some of the existing code before the new comments to make it clear where exactly to add the new comments:
   …
@Override
    protected void onCreate(Bundle savedInstanceState) {
        super.onCreate(savedInstanceState);
    }
    /*
        This code will execute when a new
        game needs to be started. It will
        happen when the app is first started
        and after the player wins a game.
     */
    /*
        Here we will do all the drawing.
        The grid lines, the HUD and
        the touch indicator
     */
    /*
        This part of the code will
        handle detecting that the player
        has tapped the screen
     */
    /*
        The code here will execute when
        the player taps the screen. It will
        calculate the distance from the sub'
        and decide a hit or miss
     */
    // This code says "BOOM!"
    // This code prints the debugging text
}
The preceding comments serve a few purposes. First, we can see that each aspect of our flowchart plan has a place where its code will go. Second, the comments will be a useful reminder of what the code that follows does, and, finally, when we get around to adding the code for each section, I will be able to demonstrate where you need to type in the new code because it will be in the same context with these comments.
Tip
Ensure you have read the comments and studied the flowchart before moving ahead.
We will also add more comments to explain specific lines of code within each of the sections.
I keep mentioning sections. Java has a word for that: methods.