

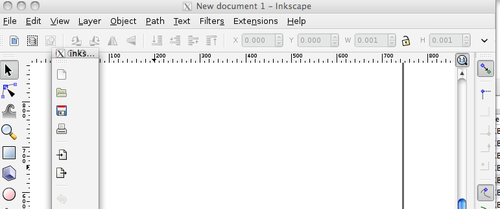
When you open Inkscape for the first time, you'll see that the main screen and a new blank document opened are ready to go.
The Inkscape interface is based on the GNOME UI standard, which uses visual cues and feedback for any icons. For example:
- Hovering your mouse over any icon displays a pop-up description of the icon.
- If an icon has a dark gray border, it is active and can be used.
- If an icon is grayed out, it is not currently available to use with the current selection.
- All icons that are in execution mode (or busy) are covered by a dark shadow. This signifies that the application is busy and won't respond to any edit request.
- There is a Notification Display on the main screen that displays dynamic help messages to key shortcuts and basic information on how to use the Inkscape software in its current state or based on what objects and tools are selected.
Within the main screen there is the main menu, a command, snap and status bar, tool controls, and a palette bar.

You will use the main menu bar the most when working on your projects. This is the central location to find every tool and menu item in the program—even those found in the visual-based toolbars below it on the screen. When you select a main menu item the Inkscape dialog displays the icon, a text description, and shortcut key combination for the feature. This can be helpful while first learning the program—as it provides you with easier and often faster ways to use your most commonly-used functions of the program.

Let's take a general tour of the toolbars seen on this main screen. We'll pay close attention to the tools we'll use most frequently.
If you don't like the location of any of the toolbars, you can also make them as floating windows on your screen. This lets you move them from their pre-defined locations and move them to a location of your liking. To move any of the toolbars, from their docking point on the left side, click and drag them out of the window. When you click the upper left button to close the toolbar window, it will be relocated back into the screen.
This toolbar represents the common and most frequently-used commands in Inkscape:

As seen in the previous screenshot you can create a new document, open an existing one, save, print, cut, paste, zoom, add text, and much more. Hover your mouse over each icon for details on its function. By default, when you open Inkscape, this toolbar is on the right side of the main screen.

Also found vertically on the right side of the main screen, this toolbar is designed to help with the Snap to features of Inkscape. It lets you easily align items (snap to guides), force objects to align to paths (snap to paths), or snap to bounding boxes and edges.

This toolbar's options change depending on which tool you have selected in the toolbox (described in the next section). When you are creating objects, it provides you all the detailed options—size, position, angles, and attributes specific to the tool you are currently using. By default, it looks like the following screenshot:

You have options to select/deselect objects within a layer, rotate or mirror objects, adjust object locations on the canvas, and scaling options and much more. Use it to define object properties when they are selected on the canvas.
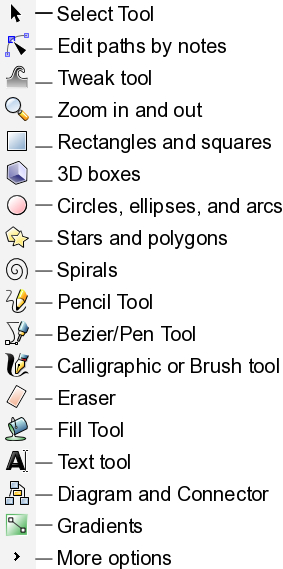
You'll use the toolbox frequently. It contains all of the main tools for creating objects, selecting and modifying objects, and drawing. To select a tool, click the icon. If you double-click a tool, you can see that tool's preferences (and change them).
If you are new to Inkscape, there are a couple of hints about creating and editing text. The Text tool (A icon) in the Tool Box shown above is the only way of creating new text on the canvas. The T icon shown in the Command Bar is used only while editing text that already exists on the canvas.
This section of the Inkscape screen controls fill and stroke color options. Fill is the color that fills the object or shape. Alternatively, stroke is the outline around the object or shape.

There are a few ways you can set the fill and stroke in Inkscape:
- From the Palette bar, click a color and drag it from the palette onto objects to change their Fill. If you hold the Shift key and drag a color box onto an object, it will set the stroke color.
- Select an object on your canvas, and then right-click a color box in the palette. A pop-up menu appears with options to set the fill and stroke.
- Select the object on your canvas and then left-click a color box in the palette to immediately set the fill of an object. Shift+Left-Click a color box to immediately set the stroke color.
There are a large number of color boxes to choose from. Use the Palette bar scroll bar along the bottom to see more choices to the right of those displaying on the screen.
This toolbar contains information relating to a selected object within the canvas or page of your document.

You can also use it to modify canvas settings. Here are the details:
- Style Indicator: This focuses a bit more on the selected object. If you choose any object in your canvas, you can change its fill (overall color of the object) or stroke (border color). Drag a color from the palette to this section for easy color changes. Right-clicking the Style Indicators provides a pop-up menu letting you make quick and easy coloring edits. Double-clicking the Style Indicators will launch the Fill & Stroke Menu. If you right-click the number next to the Stroke Style Indicator, you get a choice of Stroke thicknesses to choose from.
- Opacity Setting: This is the drop-down box near the Style Indicators. Right-click the drop-down box to change the opacity percentage (%) value (the default is 100%). A pop-up menu displays a set of preset values to choose from.

- Layer Indicator: Within Inkscape when you create documents you can have many layers of objects. This gives great flexibility when creating web layouts. You can move groups of objects at once (placing a group of them on a layer), separate objects by layer to manipulate and play with how they interact with one another when stacked, re-ordered, or hidden. You can also set certain settings by layer. You can even create drafts or different versions of mockups and keep all of this in one file.
The Layer Indicator drop-down menu lets you choose which layer you are currently using and placing objects to—this is called the drawing layer. You can then set whether this layer is visible or locked. Sometimes you can use your documents as a "working draft" and decide to hide certain layers while developing others. You might also lock layers when you have specified the exact positioning determined and you don't want it accidentally changed while manipulating other layers.
- Notification Area: This contains hints or tricks about the objects or area you currently have selected in your document. Keep an eye on this area because it guides you with helpful information as you work within the layer. This feature is unique to Inkscape and the help messages change and update as you work with objects to reflect your available options.
- Pointer or Cursor Position: When designing any space print or Web it is often important to get precise placement of objects. To help do this, sometimes you want to see when or where your cursor or pointer is placed on the screen. This is the area on the Inkscape main screen where you can always see the exact x (horizontal) and y (vertical) placement of your cursor within the document.
- Zoom: Use the zoom tools to magnify your canvas for super close-up work or zoom out to see the whole canvas in one shot. If you right-click the zoom field a pop-up menu with commonly-used preset zoom levels is displayed and you can select one to immediately adjust the canvas to. It's nice because you can customize your viewable magnification at any time, and to whatever level you would like.
- Window resize: By default, Inkscape opens to a default window size. With the resize window option in the lower right side of this area you can click, hold, and drag the window to an appropriate size for your computer screen. Or you can choose to make the window full screen by going to the main menu and choosing View and then Full Screen (press F11 on a Windows or Linux-based system).
Let's open a new document in Inkscape and discuss this portion of the screen.
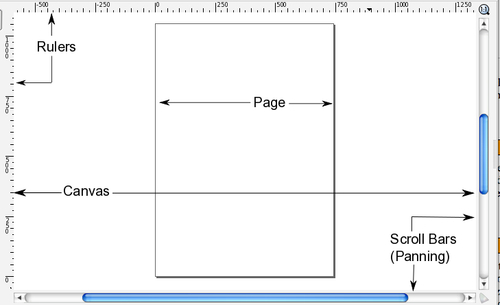
The terms canvas and page are used interchangeably within the Inkscape interface. For simplicity, we'll refer to the canvas as the entire portion of the open document screen. A page is the portion of the canvas that is contained within the printable area—seen as a black bordered box in the previous screenshot.
You can always adjust the page—or printable area—size. Go to the main menu and select File and then Document Properties. In the Document Properties window's Page tab, look in the Format field. You can select any number of pre-defined sizes, or change the Custom Size field measurements to your liking.
The pre-defined sizes are specific to print media, whereas those found in the main menu, File | New path give common web design, logo, or web banner sized templates.
As soon as you make changes to these properties, you can see them reflected on your screen.

Dockable Dialogs are a great feature in Inkscape 0.48. They give you more freedom in your screen layout. You can Show (or Hide) dialog boxes on the right side of your screen or move to the top of your screen.

Useful dialogs to be shown here are:
- Layers
- Transform
- Path Effect
- SVG Font Editor
- Filter Editor
The docked dialogs can be minimized, rearranged, stacked, and pulled into a separate window on your desktop. Here's how to do some of the basics:
- Showing dialog boxes: To show these dialog boxes, on the main menu select View and select Show/Hide Dialogs. Then go to the Layer, Object, Path, or Text menus and choose the Editor, Layer, or Property options to show the correlating dialog box.
- Displaying more than one dialog box: If you open more than one dialog box, they stack in the order that they were opened in the Dialog area of the main screen. Use the scroll bar to see those below the first viewable.
- Minimizing dialog boxes: To minimize a dialog, press the right arrow button, along the right side of the title bar of each dialog box. This places a shortcut along the left side of the Inkscape screen. To re-open it, just click the text/icon and the dialog re-opens to the large state on the screen.
- Floating dialog boxes: Dialogs can also be dragged off of the main window into their own window. Each dialog can have its own window or they can be grouped in floating docks.
- Closing dialog boxes: To close the dialog window, you can click the X on title bar for that box. It immediately closes.
For initial web design using these docks can be extremely useful. Particularly useful is having the Layers Dock visible, as it lets you re-order and select layers and the items in each layer quickly. To determine which dialog you have opened, there is a visual cue—the layer's menu title will be darker in title.

There are several ways to view your canvas or page in an open document. Panning means moving left, right, or up and down on the main screen.

The easiest way to pan to the left and right is to use the horizontal scroll bar along the bottom of your Inkscape screen. Panning up and down can be done with the vertical scroll bar on the right side of the screen. But, if you own a mouse with a scroll wheel you can use it to pan as well. Just scrolling with the wheel moves the canvas up and down, pressing Shift on the keyboard and then using the scroll wheel moves it sideways.
As discussed in the Status bar overview, you can use the Zoom tool to magnify your canvas so that you can see a lot of detail (zoomed in) or the entire canvas at a glance (zoomed out). By default, Inkscape opens documents at about 35%. You can also use the Zoom tool on theTool Box
 ,a mouse with a scroll wheel, or use your keypad (= or + zooms in and-zooms out).