Reader small image

You're reading from  Inkscape 0.48 Essentials for Web Designers: LITE

Product typeBook
Published inMay 2011
Publisher
ISBN-139781849516181
Edition1st Edition
Concepts
Right arrow
Author (1)
Bethany Hiitola
Bethany Hiitola
author image
Bethany Hiitola

Bethany Hiitola is a working writer and technology geek. With a degree in Scientific and Technical Communications, she's worked as a technical writer and multimedia developer for over 12 yearsshe spends the rest of her time as a wife, mother, gadget geek, and Master of the Household. She's written more user manuals than she can count, essays, novels, and a few technical booksincluding Inkscape 0.48 Essentials for Web Designers. More details are at her website: bethanyhiitola.com
Read more about Bethany Hiitola

Right arrow

Chapter 2. Designing Site Layouts

Designing a web page layout is one of many steps in making a website. How involved you are in each part of this process depends on whether you are creating a website for yourself or a client (you do it all) or for a company in which you work. In this book, we'll take the stance of a web designer who is a part of a team of people that will help creating the website. We focus primarily on the design and graphical elements of a web page and assume that other members of the team are working on the back-end tasks.

In this chapter, we will focus on:

  • How to create the overall front or main page design of a website
  • Defining some basic design elements
  • Options for using grids and guidelines for alignment
  • Common screen sizes
  • Creating a basic example layout and then learning how to export the page as images for final integration into a website

Architecting a website

Although as a web designer you will usually be regarded as the "look and feel" person for a website, you are also a key partner in determining the site architecture. As you design, you often define how the site will be navigated. Is this website one page or will an end-user "click around" the site to other areas or sub-pages and explore? Where will each page inter-link or link out to other websites? What is the main navigational element: a navigation bar? Where will it reside on all the pages? Is this site content or search driven? All these questions (and many more) require the entire team's involvement (and a client's opinion) to make the appropriate decisions. As the web designer, it is your job to work with all of these elements at a visual level—navigation bars, search fields, buttons, title bars, footers, and more—and fit them into the overall website design.

Web layout—principles and basics

Designing for the Web and for print are similar in that they have the same principles and goals for an end-viewer: appealing content that works together in the space. You may find it helpful to review these four basic design techniques as written in the The Non-Designer's Design Book: Design and Typographic Principles for the Visual Novice by Robin Williams. Although the principles are basic, they represent guidelines that improve any web page design. Here are the techniques:

  • Proximity or grouping similar information together on a web page. You can get creative in how you group this information by using alignment, icons, and even just white space, but regardless, the technique and principles are the same. Information that belongs together should be together.
  • Alignment is the simple idea of making sure all of the elements line up on the screen. If you have everything left aligned, keep it that way on the page. Use natural alignments within an entire...

The basic design

Before designing the layout in Inkscape, it can help to plan the placement of the main areas of a web page—in essence to help with the design's overall alignment of items and proximity of similar items. For our purposes, we'll create a simple main web page for a small business. This main page will have these areas:

  • Header
  • Footer
  • Sidebar
  • Content
  • Navigation

Each web page project is different and you may have to add more page elements to this list or delete some so that the final list of elements fits the needs of the overall design. For the purposes of getting agreement from a team working on this project, a good practice is to create a basic layout showing where each of the areas will be placed on the screen—and is often referred to as the web page wireframe. Typically, wireframes are completed before any graphics are created. The following screenshot illustrates a basic layout or wireframe:

The basic design

This high-level approach is a great start to actually building...

Starting a new design project

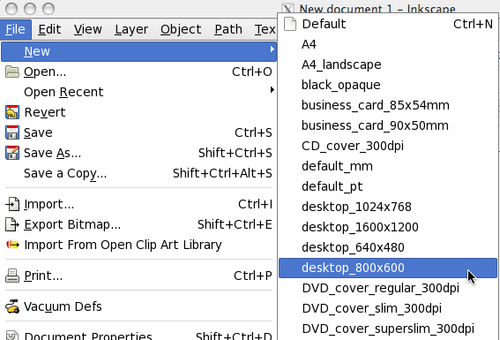
When you open Inkscape, it opens to a new document. However, we want to ensure that we have a page size that is the right size for our web page, so we create a new document based on predefined desktop sizes, which are common web page sizes, as follows:

  1. From the main menu select File and then New. A pop-up menu appears showing a number of default page sizes to choose from.
    Starting a new design project

    Choose a template size based on the browser standards or specifications.

    Tip

    Most of the templates in this menu are based on web designs. If you want to view the print media template sizes, go to the main menu and select File and Document Properties and view the Format section.

  2. We'll choose desktop_800x600. However, the dimensions should be specified by how your target viewer will view the site, whether it is via a computer, or via a mobile device. Also, sometimes your client or company will specify a specific size your web pages need to be.

    A new document opens in Inkscape and you are...

Using grids and guidelines

When designing any space on the Web keep the page clean and—as stated in the design principles and techniques—aligned. So let's make the canvas grid viewable on the screen and set up some guidelines based on our wireframes.

Viewing the grid

With your new document still open on your computer, on the Inkscape main menu select View and then Grid.

Viewing the grid

You'll see that a blue grid will appear across the entire canvas area. We'll use these grids to create basic areas of our layout and then create guides to begin creating our actual layout elements.

Making guides

Guides are lines on the screen that you will use for aligning i.e. guiding objects. These lines are only seen while you are working in Inkscape and we can set objects to "snap to" them when we are designing. Both of these simple tools (guides and the Snap to feature) will give you automatic alignment for the basic areas of your web page layout which in turn will help your web...

Creating a layout example

Now it's time for the fun part—creating your web page layout! This part of web development allows the most creative expression for web designers. It's creating a mock up of how the web page will look when complete. Mock ups are graphic images of the web page, so we don't worry about all the technical details in making the web page work, just how it looks.

For this layout example, we'll continue our simple web page design for a small business. We'll be using very basic shapes and limited effects. But don't worry, the next chapters will show how we can make these very simple elements into something much more polished and elegant.

Let's get started!

Designing the background

In Inkscape, since your canvas is white, it looks like your web page might have a white background. It does not, without creating a background image, currently it would be transparent or 0 percent opacity. So we need to start by determining which colors to...

Exporting design mock-ups

Once the design in final, it is time to export our design. We'll do this in two general steps—slicing the web page into separate images (via a layer we'll name slice) and then exporting all of sliced images into an appropriate directory.

Creating a slice layer

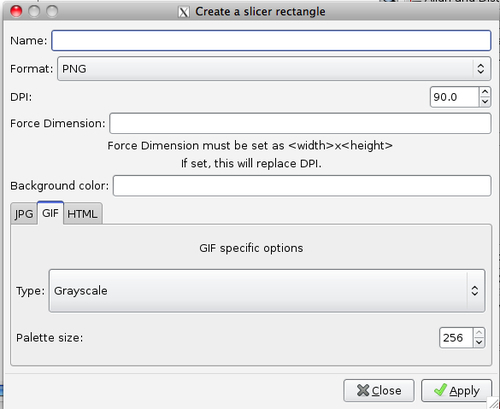
What is slicing? It is a term used to describe breaking of an image created in a graphics program apart so that it can be re-assembled in HTML to create a web page. To do this, we'll use Web Slicer Extension.

  1. From the main menu select Extensions | Web | Slicer | Create a slicer rectangle.
    Creating a slice layer
  2. Type an appropriate name for this 'slice'. Ideally it would be a recognizable name like Header, so that when exporting all the slices of the image, the files will be named in a way that is intuitive to place it all back together into the specified design.
  3. Specify the format for this slice. The default PNG format works best.
  4. You can force the slicer to a certain size by entering it in the Force...

Working with programmers

You've done a lot of work to create the look and feel for this website, and even built what essentially will be the interface for this website—at least from a graphical standpoint. Now it is time for programmers to take your images, and make them work together on a website. At a basic level they will take each graphic image you exported and then piece them back together—but not from within a graphics program. They will use HTML code to make this happen.

Working with programmers

Then the hard part starts—they start coding links, dynamic content plugins that will pull content into the content areas and more. As a designer, you might also be asked to help do the layout for some sub-pages within this website (if the header, footer or sidebar changes). Or you might also be asked to help make the graphics for dynamic menus that might 'drop down' from the navigation bar we created in the example web page.

So what do you provide to the programming team?

  • The PNG...

Summary

From architecting a website to exporting image files for inclusion in a web pages code we've done it all in this chapter. We discussed design techniques that can make web pages move from good to great, and then started designing a sample web page project. Using many layers we created a header, navigation bar, content areas, and footer for our site, and then worked to slice it into images and export for final integration into a website.

In the next chapter, we'll learn how to create other elements in Inkscape-diagrams, flow charts, site maps, and more.

lock icon
The rest of the chapter is locked
You have been reading a chapter from
Inkscape 0.48 Essentials for Web Designers: LITE
Published in: May 2011Publisher: ISBN-13: 9781849516181
Register for a free Packt account to unlock a world of extra content!
A free Packt account unlocks extra newsletters, articles, discounted offers, and much more. Start advancing your knowledge today.
undefined
Unlock this book and the full library FREE for 7 days
Get unlimited access to 7000+ expert-authored eBooks and videos courses covering every tech area you can think of
Renews at $15.99/month. Cancel anytime

Author (1)

author image
Bethany Hiitola

Bethany Hiitola is a working writer and technology geek. With a degree in Scientific and Technical Communications, she's worked as a technical writer and multimedia developer for over 12 yearsshe spends the rest of her time as a wife, mother, gadget geek, and Master of the Household. She's written more user manuals than she can count, essays, novels, and a few technical booksincluding Inkscape 0.48 Essentials for Web Designers. More details are at her website: bethanyhiitola.com
Read more about Bethany Hiitola