Reader small image

You're reading from  Building Wireless Sensor Networks Using Arduino

Product typeBook
Published inOct 2015
Publisher
ISBN-139781784395582
Edition1st Edition
Tools
Concepts
Right arrow
Author (1)
Matthijs Kooijman
Matthijs Kooijman
author image
Matthijs Kooijman

Matthijs Kooijman is an independent embedded software developer who is firmly connected with the maker movement through a local fab lab and his work on the Arduino project. Since his youth, Matthijs has been interested in making things; for example, he built his first television remote control before the age of 10 (using a piece of rope to pull on the volume slider, not a solution that he would choose today). Matthijs has a firm belief in the merits of open source software and enjoys contributing to the software that he uses—both by coding and helping out other users. His work experience is broad—ranging from Web development to Linux driver hacking, from tech support to various forms of wireless networking, but almost always related to open source software in some way.
Read more about Matthijs Kooijman

Right arrow

Chapter 5. Standalone XBee Operation

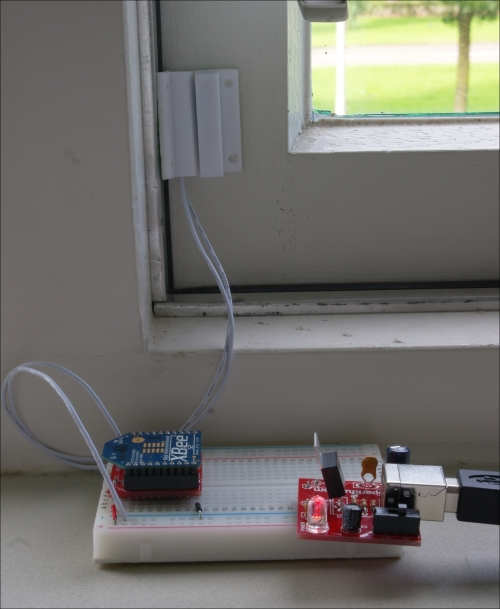
So far, your XBee modules have been under the direct control of your computer or an Arduino. However, the XBee modules are also capable of running on standalone, which can be useful if you do not need the capability of a programmable microcontroller but just need to remotely read or toggle a few pins.

By using special API frames and radio packets, every XBee module allows reading most of its pins remotely or controlling their output level. Both the digital and analog inputs and digital output is available on all the modules. Some modules also allow you to use PWM (Pulse-Width-Modulation) for the output, though typically only on selected pins.

Using these features, you can build a device using just an XBee module, thereby saving the additional cost and size of an Arduino and a corresponding shield. Note that you can also control the pins on an XBee module connected to an Arduino, though most shields leave all these pins unconnected.

In this chapter, you will...

Creating a window sensor


This example will use a standalone XBee module to read the status of a reed switch in order to detect whether a window is open or closed. In this section, some options for the hardware setup are given. The setup using the recommended hardware items looks as follows:

In addition to setting up the hardware, some configuration is needed to let the standalone module send out the pin state whenever it changes and some modifications must be made to the coordinator sketch to process these messages, all of which will be described next.

Connecting things

To let the XBee module work standalone, you will have to connect a few things to it. As the XBee module pins are fairly short, you cannot just connect the female jumper wires to them, and because XBee uses 2.0 mm spacing, it cannot be directly connected to a breadboard, stripboard, or similar boards (as these use 2.54 mm spacing). You could directly solder some wires to the pins but it is easier to use a breakout board.

A breakout...

Creating a standalone relay


In addition to reading the input pins remotely, you can also control them remotely. All the XBee modules support a digital output (low/high) and some also support PWM output (pulse width modulation, as used by analogWrite in Arduino).

This section shows how to use a digital output pin to control a relay, letting you make a simpler version of the remote relay that you saw in Chapter 4, Controlling the World. Obviously, the wiring will be different as there is no Arduino involved anymore. The coordinator sketch will also need some modifications as the XBee module needs a different kind of a message to change its output pin.

When using the recommended hardware items, this example should look as follows:

Connecting things

Most of the wiring is the same as with the window sensor. You will need some kind of a breakout board and power supply. The relay module can be wired up by connecting GND and VCC/5V to the power supply and the relay control pin to the DIO1 pin on XBee...

Summary


In this chapter, you have seen that an XBee module can be used by itself, without an Arduino connected. You can remotely change its configuration, read the digital and analog signals on its pins, and control the output voltages.

For simple applications, you can now include a standalone XBee module in your network thereby saving some costs, allowing for a smaller device, and saving power.

In the next chapter, you will look at making your modules battery-powered and exploring the techniques to radically reduce their power usage.

lock icon
The rest of the chapter is locked
You have been reading a chapter from
Building Wireless Sensor Networks Using Arduino
Published in: Oct 2015Publisher: ISBN-13: 9781784395582
Register for a free Packt account to unlock a world of extra content!
A free Packt account unlocks extra newsletters, articles, discounted offers, and much more. Start advancing your knowledge today.
undefined
Unlock this book and the full library FREE for 7 days
Get unlimited access to 7000+ expert-authored eBooks and videos courses covering every tech area you can think of
Renews at $15.99/month. Cancel anytime

Author (1)

author image
Matthijs Kooijman

Matthijs Kooijman is an independent embedded software developer who is firmly connected with the maker movement through a local fab lab and his work on the Arduino project. Since his youth, Matthijs has been interested in making things; for example, he built his first television remote control before the age of 10 (using a piece of rope to pull on the volume slider, not a solution that he would choose today). Matthijs has a firm belief in the merits of open source software and enjoys contributing to the software that he uses—both by coding and helping out other users. His work experience is broad—ranging from Web development to Linux driver hacking, from tech support to various forms of wireless networking, but almost always related to open source software in some way.
Read more about Matthijs Kooijman