Reader small image

You're reading from  Apple Watch App Development

Product typeBook
Published inApr 2016
Reading LevelIntermediate
Publisher
ISBN-139781785886362
Edition1st Edition
Languages
Right arrow
Author (1)
Steven F. Daniel
Steven F. Daniel
author image
Steven F. Daniel

Steven F. Daniel is the CEO and founder of GENIESOFT STUDIOS, a software development company based in Melbourne, Victoria, that focuses primarily on developing games and business applications for the iOS, Android, and Mac OS X platforms. He is an experienced software engineer with more than 17 years' experience and is extremely passionate about making people employable by helping them use their existing skills in iOS, Android, and Xamarin to get the job done. He is a member of the SQL Server Special Interest Group (SQLSIG), CocoaHeads, and the Java Community. He was the co-founder and Chief Technology Officer (CTO) at SoftMpire Pty Ltd., a company focused primarily on developing business applications for the iOS and Android platforms.
Read more about Steven F. Daniel

Right arrow

Chapter 9. Incorporating Notifications within Your App

Notifications were first introduced in iOS 3 and have increased over the years with iOS 7 introducing silent remote notifications, which allow apps to wake up in the background to perform important tasks, such as meeting appointments, Skype notifications, or an incoming SMS or iMessage message.

With the release of iOS 8, Apple introduced actionable notifications, which allowed users to respond to an action within a notification message without the need of opening the app. In watchOS, your existing iOS apps that currently support notifications will still work on the Apple Watch without the need of making changes to your existing code. This is because watchOS uses the default system interface to show notifications, which inherits from the WKInterfaceController class, to make use of a number of method callbacks that handle responding to local notifications and remote notifications.

In this chapter, we will begin by providing an overview of...

Working with WatchKit notifications


Before we can begin using notifications within our Shopping List application, we need to get a better understanding of how they work within the WatchKit framework. We did touch on this in Chapter 2, Understanding Apple Watch, so much of this will be quite familiar.

In the next section, we will talk a bit about the notification controller life cycle; you will notice that the notification controller inherits all of the existing functionality of the WKInterfaceController class and contains a variety of method calls that help determine whenever a notification becomes active or the controller context instance becomes awake.

As we mentioned in the introduction to the chapter, notifications that appear on an iOS device will also appear on Apple Watch, which means that you don't need to physically take your phone out of your pocket whenever you feel it vibrating. You can simply just glance at your watch and respond to the action accordingly.

The WatchKit framework...

Configuring the notification scheme for our Shopping List app


In this section, our next step is to configure our Shopping List app so that it has the ability to display custom notification messages within our dynamic notifications when an order is successfully processed for the chosen product item from the shopping list, which we will use later on to set up the Outlets within this class. Perform the following steps:

  1. Select the ShoppingList.xcodeproj file from the Chapter 08 folder in the accompanying code bundle, as shown in the following screenshot:

  2. Next, ensure that the ShoppingList Xcode project file is open within the Xcode development IDE.

    When you start developing notifications for your application, you have the option of running the notification directly within the Watch simulator using the notification scheme to ensure that everything is working correctly. This saves time compared to having to swipe down from the top of the watch face, so you can see your notification appear.

    In this...

Adding Action buttons to your dynamic notifications


Apple introduced the ability to allow developers to test remote notifications on the Apple Watch simulator with the release of Xcode 6.2. This is achieved using a local file, PushNotificationPayload.apns, to mimic the JSON payload file information that is sent by the Apple Push Notification service. Here are the steps to perform:

  1. Select the PushNotificationPayload.apns file located within the folder at ShoppingList WatchKit Extension | Supporting Files in the project navigation window.

  2. Ensure that the PushNotificationPayload.apns file is displayed within the editor window, as shown in the following screenshot:

  3. Next, modify the PushNotificationPayload.apns file by entering the following highlighted code sections:

    {
        "aps": {
            "alert": {
                "body": "ShoppingList Test Message.",
                "title": "Custom Message",
                "receipt": "Custom Receipt"
            },
            "category": "ORDER_PLACED"
        },
        
        "WatchKit...

Establishing our notification controller connections


In the previous sections, we successfully created our NotificationController class that will be used to display the selected shopping list item within our notification. Our next step is to create the Outlets for our shopping list item name as well as the associated order information. Perform the following steps:

  1. Open the Assistant Editor window by navigating to Navigate | Open in Assistant Editor or pressing Option + Command + ,.

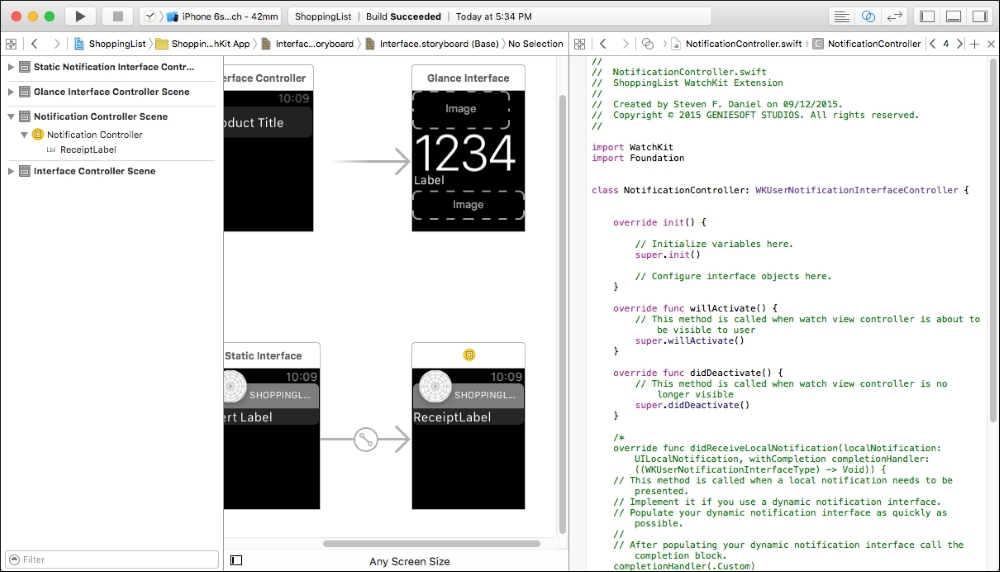
  2. Ensure that the NotificationController.swift file is displayed within the Assistant Editor window, as shown in the following screenshot:

  3. Next, select the ReceiptLabel (WKInterfaceLabel) control, then hold down the Control key, and drag it into the NotificationController.swift file within the body of class NotificationController: WKInterfaceController.

  4. Choose Outlet from the Connection drop-down menu for the type of connection to create and enter receiptLabel for the name of the Outlet property to create.

  5. Next, select...

Configuring a category for our static interface controller


When working with notifications, each notification interface must be assigned a notification category that tells Apple Watch when to use it. If you remember, back in our PushNotificationPayload.apns file, within the aps dictionary object, we specified an ORDER_PLACED category string value within the payload that Apple Watch uses to determine which notification scenes to display within your Interface.storyboard file.

If Apple Watch determines that an incoming notification doesn't include a value for our category string, it will display the notification interface that is configured with the default category.

In this section, we will look at the steps involved in setting up a notification category for our notification interface controller:

  1. Select the Interface.storyboard file from the project navigation window.

  2. Next, choose Static Notification Interface Controller and click on the Show Attributes Inspector button.

  3. Next, click on the myCategory...

Scheduling notifications with your notification controller


In this section, we will look at how we can set up and schedule notifications using the UIApplication and UILocalNotification classes to send notification messages once an order is successfully processed so that it can then be displayed within the dynamic notification controller class. Here are the steps:

  1. Open the AppDelegate.swift file located within the ShoppingList group in the project navigation window.

  2. Next, locate the didFinishLaunchingWithOptions method and enter the following highlighted code snippet:

    func application(application: UIApplication, didFinishLaunchingWithOptions launchOptions: [NSObject: AnyObject]?) -> Bool {
            
       // Override point for customization after application launch.
       let notificationCategory:UIMutableUserNotificationCategory =
       UIMutableUserNotificationCategory()
    
       // Initialize our Notification Category
       notificationCategory.identifier = "ORDER_PLACED"
            
       // Register our Notification...

Displaying messages within the notification interface


In our last section, we modified the view controller class for our iOS app so that it could set up and schedule a notification message once the order is successfully processed; it could then display the receipt information associated for the chosen product within our Apple Watch notification controller.

In this section, we need to create the necessary code that will be responsible for displaying the notification information within our dynamic interface controller. Take a look at the following steps:

  1. Open the NotificationController.swift file located within the ShoppingList WatchKit Extension group in the project navigation window.

  2. Next, locate the didReceiveLocalNotification method and replace it with the following code snippet:

    override func didReceiveLocalNotification(localNotification: UILocalNotification, withCompletion completionHandler: ((WKUserNotificationInterfaceType) -> Void)) {
        // This method is called when a local notification...

Understanding the notification interface guidelines


The Apple Watch interface guidelines document describes guidelines and principles that help you design consistent user interfaces and experiences for your Watch apps as well as ensure that your applications run efficiently within the Apple Watch platform.

You need to consider the screen sizes for your custom layouts while ensuring the consistency of your application while navigating from screen to screen, and the principles for designing good user interfaces are also covered.

There is also information related to the proper use and appearance of views and controls for navigation, alerts, notifications, table views, buttons, and images as well as the creation of custom icons and images.

Some of the Apple Watch notification interface guidelines are as follows:

  • Notifications should be designed appropriately so that they make use of graphics, colors, and text that convey information to the user clearly.

  • When incorporating notifications within your...

Running the Shopping List application – WatchKit


In this section, we will look at how to compile and run our Shopping List application. We will run this within iOS simulator and WatchKit simulator so that we can see what happens when we receive a local notification and have this result displayed within our dynamic notification interface. Perform the following steps:

  1. To run the app, select the ShoppingList WatchKit App scheme and choose your preferred device from the iOS Simulators section, as shown in the following screenshot:

  2. Next, build and run the application by navigating to Product | Run from the Product menu or pressing Command + R.

When the compilation is complete, the Shopping List app will be installed on the watchOS simulator. The following screenshot shows you the process of what happens when a product is successfully processed using Apple Pay; the user receives a notification dialog popup on the iOS device, and this same message is sent from the iOS device to the WatchKit extension...

Summary


In this chapter, you learned about WatchKit notifications and how you can go about incorporating them within our existing Shopping List Apple Watch application. You then learned about WatchKit notifications and the notifications life cycle. We then looked at how to configure an existing notification scheme with the added benefit of being able to test your static and custom dynamic notifications within the simulator.

You then moved on to learning about the Apple Push Notification service and how you can go about adding buttons to a static interface controller and respond to Action buttons using the handleActionWithIdentifier method, which receives remote notifications.

After learning about the Apple Push Notification service, we talked a bit about the differences between static and dynamic interface controllers and how when developing notifications, you must at least have a static interface controller but the dynamic controllers are optional. You learned how to configure the static...

lock icon
The rest of the chapter is locked
You have been reading a chapter from
Apple Watch App Development
Published in: Apr 2016Publisher: ISBN-13: 9781785886362
Register for a free Packt account to unlock a world of extra content!
A free Packt account unlocks extra newsletters, articles, discounted offers, and much more. Start advancing your knowledge today.
undefined
Unlock this book and the full library FREE for 7 days
Get unlimited access to 7000+ expert-authored eBooks and videos courses covering every tech area you can think of
Renews at $15.99/month. Cancel anytime

Author (1)

author image
Steven F. Daniel

Steven F. Daniel is the CEO and founder of GENIESOFT STUDIOS, a software development company based in Melbourne, Victoria, that focuses primarily on developing games and business applications for the iOS, Android, and Mac OS X platforms. He is an experienced software engineer with more than 17 years' experience and is extremely passionate about making people employable by helping them use their existing skills in iOS, Android, and Xamarin to get the job done. He is a member of the SQL Server Special Interest Group (SQLSIG), CocoaHeads, and the Java Community. He was the co-founder and Chief Technology Officer (CTO) at SoftMpire Pty Ltd., a company focused primarily on developing business applications for the iOS and Android platforms.
Read more about Steven F. Daniel