Reader small image

You're reading from  3D Character Rigging in Blender

Product typeBook
Published inApr 2024
PublisherPackt
ISBN-139781803238807
Edition1st Edition
Concepts
Right arrow
Author (1)
Jaime Kelly
Jaime Kelly
author image
Jaime Kelly

Jaime Kelly is a freelance artist with over five years of experience with works in animation, rigging, and 3D design. He has worked within all manners of industries, including product promotion materials, animated media such as animated breakdowns of systems in training material, and, of course, 3D rigging for pre-rendered and real-time media.
Read more about Jaime Kelly

Right arrow

Getting Started with Weight Painting

In the previous chapter, we started setting up a model and adding an armature, and then we placed all the necessary bones inside the model and named all the bones.

In this chapter, we will cover weight painting, the second half of the process of bringing a mesh to life. We already touched on the basics in Chapter 3, but now, we will move on to applying more advanced thinking to more complex problems. We will run into issues such as creasing and stretching, so we will learn to overcome them with careful attention to both weights and bone placement. This will help us to produce a result that is both pleasing in performance and can produce expected results.

We will move from limb to limb, discovering the unique problems each can bring, and see how we can mitigate/eliminate these issues.

In this chapter, we will cover the following topics:

  • Setting up empty weights
  • Rigging the feet
  • Understanding mesh seams and overlaps
  • Rigging...

Setting up empty weights

To get started, let’s set up some empty weights. Use Armature Deform | With Empty Groups, as this option generates groups with empty weights. If we leave the weights up to Blender by choosing the default options, we are guaranteed to have to clean up a frustrating mess.

We will start by parenting the mesh to the rig we have just made, and then we will enter Weight Paint Mode. If you have forgotten how exactly to do this, here’s a quick series of steps as a reminder:

  1. In Object Mode, select all the meshes (head, body, hands, feet).
  2. Staying in Object Mode, press Shift to select the armature.
  3. Press Ctrl + P to open the parenting menu, and select Armature Deform | With Empty Groups.

    You can verify this has worked by grabbing the armature and dragging it around; all the mesh will follow. If any mesh doesn’t follow, you can just select said meshes and parent them on their own, and they will be added.

  4. If for some reason this...

Rigging the feet

You should already know the process for painting weights, but here it is again:

  1. As we did in the previous section, select the correct bones and mesh in weight paint mode.
  2. Set the weight and strength of the default brush you have to a desired amount (1.0 will do for now).
  3. Hold and left-click over the mesh to begin painting weights onto it.

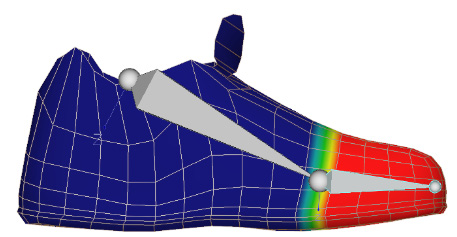
By following these steps, you should have something that looks like this:

Figure 5.3 – Initial toe weights

Figure 5.3 – Initial toe weights

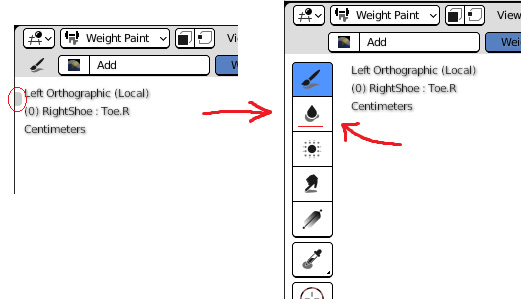
With your current brush, Draw, you will see that you paint hard lines; there’s a Blur brush we can use to give softer edges once we have laid down our weights. The Blur tool is great for making soft transitions between two bones; here is how to find it:

  1. Head to the left-hand side of Blender to find a small gray pull tab.
  2. Click this tab to reveal brushes you can use in Weight Paint Mode:
Figure 5.4 – Finding the Blur tool

Figure 5.4 – Finding...

Understanding mesh seams and overlaps

Before we start weight painting our legs, it’s important to discuss how models are made, their topology, and geometry. More specifically, we will examine mesh seams and overlaps. Take a look at Figure 5.11, which shows two different ways of merging geometry:

Figure 5.11 – Mesh overlaps

Figure 5.11 – Mesh overlaps

You can imagine the planes shown in Figure 5.11 as two parts of a model. An artist has decided the vertices should not be connected. There are a number of reasons for doing this, such as the following:

  • Tech/engine limitations: Some engines (mostly real-time game engines) of significant age have limitations with how they can display materials and textures. Separating meshes allows artists to treat different parts completely differently. This should only apply to old tech; hopefully, you will not have to deal with anything similar.
  • Artistic: Another instance where you may find geometry like this is if certain...

Rigging the knee

Let’s move on to the knee, which is exceptionally simple. There are two things to note here – creases and curves.

Think about your knee – if you bend it, the front of the knee produces a nice curve while the inside of your knee becomes folded. We can replicate this with weights. A tight gradient will produce a crease while a large smooth gradient will produce a curve.

The following diagrams show some ideal weights for you to aim for – sharp in the crease and soft in the bend:

Figure 5.16 – The front of the knee weights

Figure 5.16 – The front of the knee weights

Figure 5.17 – The rear of the knee weights

Figure 5.17 – The rear of the knee weights

Remember to place the bones in stress poses, and then bring the leg up to see how it looks. If the leg creases and folds too much, smooth the weights out. If there’s not enough folding and the back of the leg does not close properly, make your handoff gradient tighter.

The following diagram shows...

Rigging the hips

Moving onto the hip region, I’ll give you a general idea of what I normally do to rig the hips:

  1. Selecting the thigh bone, paint the whole of the upper leg.

    Figure 5.19 shows some very rough weights, which is how my weights start out before I go ahead and refine them.

Figure 5.19 – The thigh weights started

Figure 5.19 – The thigh weights started

  1. Selecting the base of the spine, paint a rough belt where you expect the legs to bend. It doesn’t need to be too precise for now; use the smoothing tool to smooth any rough work later. Figure 5.19 shows my rough work for the hips:
Figure 5.20 – The rough groin area weights

Figure 5.20 – The rough groin area weights

  1. Then, smooth out all the weights between the leg and spine to clean things up and get a better idea of what’s going on.
  2. Push the leg into some stress positions, and when you encounter any positions that do not look right, hold the leg there and edit your weights to your desired...

Rigging the spine

Rigging the spine is a relatively easy and quick affair. We’ll only encounter problems as we approach the upper chest/shoulders.

Paint a generalized area for the second bone in the spine. We already have some weight for the first bone from doing the legs. Figure 5.24 shows a rough weighted region for the second bone in the spine chain. There’s a good chance you already know what region you want to paint for this bone; however, things do become more complex further up the spine.

Figure 5.24 – The spine weight regions

Figure 5.24 – The spine weight regions

Aim for your handoffs to land close to these lines, as this follows the joints of the spine. Once you have painted some rough weights, put the second bone in the spine into stress positions – forward, back, and side to side.

The side-to-side position might show clipping from the pants; that’s because the second bone shifts the geometry too far down, so you should reduce its reach and...

Rigging the hands

Hands are one of the most awkward parts of weight painting in Blender. Very small geometry packed together tightly means painting the correct parts can be a hassle, but the basic concept is just the same as the rest of the body. Take a guess, paint it, stress it, and fix it.

The following diagrams show some ideal starting weights; feel free to use these as a guide:

Figure 5.28 – Finger segment weights

Figure 5.28 – Finger segment weights

Figure 5.29 – Thumb base weights

Figure 5.29 – Thumb base weights

Figure 5.30 – The metacarpal bone (used for squeezing motions)

Figure 5.30 – The metacarpal bone (used for squeezing motions)

Oftentimes, you may intend to paint one finger but end up hitting other fingers. It’s easy to miss sometimes, but when stressing the fingers, observe each one to see whether any geometry moves unintentionally.

For areas that are hard to reach, you can often use the Blur tool. If surrounding weights are at 1.0 the result of the Blur tool will be close enough...

Summary

We started this chapter by parenting a mesh to an armature with empty weight groups, giving us a clean slate to work with. We then moved on to weight paint mode, using the draw tool to set weights and the Blur tool to soften the border between different weight zones. We continued by covering the rest of the body, front and back, with the figure diagrams serving as guidance. Finally, we applied some touchups while bending the rig into stress positions to find poor deformation.

  • Used Ctrl + P to parent a mesh to an armature, selecting the mesh and then the armature
  • Selected an empty weights option to give us a clean start
  • Experimented with how bone placement can affect deformation quality
  • Followed the provided diagrams for rough guidance on the zones each bone should control

That concludes this chapter – you now know how to take any mesh and any armature and bind them together to bring models to life.

In the next chapter, we will cover shape...

lock icon
The rest of the chapter is locked
You have been reading a chapter from
3D Character Rigging in Blender
Published in: Apr 2024Publisher: PacktISBN-13: 9781803238807
Register for a free Packt account to unlock a world of extra content!
A free Packt account unlocks extra newsletters, articles, discounted offers, and much more. Start advancing your knowledge today.
undefined
Unlock this book and the full library FREE for 7 days
Get unlimited access to 7000+ expert-authored eBooks and videos courses covering every tech area you can think of
Renews at €14.99/month. Cancel anytime

Author (1)

author image
Jaime Kelly

Jaime Kelly is a freelance artist with over five years of experience with works in animation, rigging, and 3D design. He has worked within all manners of industries, including product promotion materials, animated media such as animated breakdowns of systems in training material, and, of course, 3D rigging for pre-rendered and real-time media.
Read more about Jaime Kelly