Reader small image

You're reading from  Creative Motion Mastery with Adobe After Effects

Product typeBook
Published inFeb 2024
PublisherPackt
ISBN-139781804617281
Edition1st Edition
Right arrow
Author (1)
Vishu Aggarwal
Vishu Aggarwal
author image
Vishu Aggarwal

Vishu Aggarwal is a Passionate, Professional & Multi Vendor Certified Trainer. He's an enthusiastic learner, creative designer, and an individual always eager to explore more in the fields of Graphic & Web Designing, Digital Video-Sound Editing, Instructional Design, Digital Marketing, UX/UI, 3D Animation, Virtual Reality, and Game Design. Being a career focused professional, he supports businesses across industries with extensive media and digital marketing services. His all-around experience and expertise in delivering niche multimedia and graphic design training, video editing, and many such media-related areas enable him to contribute towards accelerated organizational branding and performance with unparalleled creative outcomes.
Read more about Vishu Aggarwal

Right arrow

Working with 2D and 3D Tracking

In this chapter, we will look into 2D and 3D tracking. In After Effects, 2D tracking involves analyzing the motion in a video clip and applying that information to another element, allowing it to follow the movement of the tracked object. It’s commonly used for adding text, logos, or other 2D elements to moving objects in videos. On the other hand, 3D tracking goes beyond 2D tracking by also analyzing the depth information in the scene. This allows you to composite elements into a scene in a way that respects the three-dimensional space. 3D tracking is crucial in visual effects for adding complex 3D models, CGI elements, or entire scenes into live-action footage, creating seamless and realistic interactions between the real and virtual worlds.

The After Effects tracking capabilities empower filmmakers and motion graphics artists to enhance their projects, whether it’s for professional video editing, visual effects in films, or creative...

Technical requirements

The lesson files for this chapter can be found in the Chapter 11 folder at https://packt.link/gbz/9781804617281.

Before starting the chapter, it is beneficial to preview the final output and end project file provided with the Chapter 11 | lesson 11 exercise files. By doing so, you can gain a clear understanding of the desired outcome and have a visual representation of what you will be working toward throughout the chapter.

Previewing the final output allows you to see the completed project, demonstrating how the various elements, effects, and animations come together. You can observe the overall look and feel, the arrangement of different components, and how they interact with each other. This preview serves as a reference point, giving you a target to aim for as you progress through the chapter.

Opening up the project

For this chapter, open the given project in the exercise files as follows:

  1. Open After Effects.
  2. To open the project, click on Open Project in the After Effects startup window. Alternatively, you can go to File | Open Project... in the menu bar.
  3. In the file browser, locate the Lesson11_start.aep project file in the Chapter 11 folder of the exercise file.

The project has three compositions, which we will be using to learn about 2D and 3D tracking.

Figure 11.1: The Lesson 11_start project with default workspace

Figure 11.1: The Lesson 11_start project with default workspace

Keep the project open for the rest of the topics.

Using single-point tracking

Single-point tracking in After Effects is a fundamental technique used in motion graphics, video editing, and visual effects to make an element follow a specific point in a video clip. This technique involves tracking the movement of a single point in the video and applying that motion data to another element, creating a seamless integration between the real footage and the added visual elements. It is part of the 2D tracking system of After Effects.

Go to the Point Tracker composition and play the composition – notice how the Call Out text isn’t moving with the bicycle in the composition. So, we will be tracking a point in the Bicycle.mp4 layer given in the Point Tracker composition so that we can move the Call Out text with the bicycle.

Follow these steps to track the point in the Bicycle.mp4 layer:

  1. Locate the Point Tracking composition in the Project panel and double-click the composition to open it in the timeline if not already...

Working with four-point tracking

Four-point tracking in After Effects, also known as corner-pin tracking, involves tracking the motion of four specific points in a video frame. This technique is used when you need to replace or modify the contents of a rectangular area, such as a TV screen, billboard, or the side of a building.

We will be using four-point tracking to replace the laptop screen in the 4 Point Tracking composition in the Laptop.mp4 layer with the War Scene.mp4 layer, which we created in Chapter 10 while working with particle simulation.

Before we jump into tracking, we will have to increase the duration of the War Scene.mp4 footage from 5 seconds to 10 seconds, for which we will be using the Time Stretch option in After Effects, so that it matches the duration of the Laptop.m4 footage.

Time Stretch

Firstly, we need to extend the timing of the War Scene.mp4 layer in the 4 Point Tracking composition because the duration of the War Scene.mp4 layer is only 5 seconds...

Using 3D camera tracking

In Adobe After Effects, 3D camera tracking is a technique used to track the motion of a camera in 2D video footage (when the motion involves changes in depth due to moving the camera) and integrate 3D elements into the scene. It’s a powerful tool that allows you to add graphics, text, or other 3D elements to your videos, making these elements appear as if they are part of the original footage.

In the 3D Track composition, we will do the camera tracking, and after that, we will add text and graphics on top of the lake footage in the 3D Track composition.

Follow these steps to do the 3D camera tracking:

  1. Select the Lake.mp4 layer in the 3D Track composition and right-click on the layer. Then, go to Track & Stabilize | Track Camera.

    After Effects will start analyzing the footage. This might take a while depending on the length and complexity of your video. Once the analysis is complete, After Effects will create track points.

...

Adding graphics

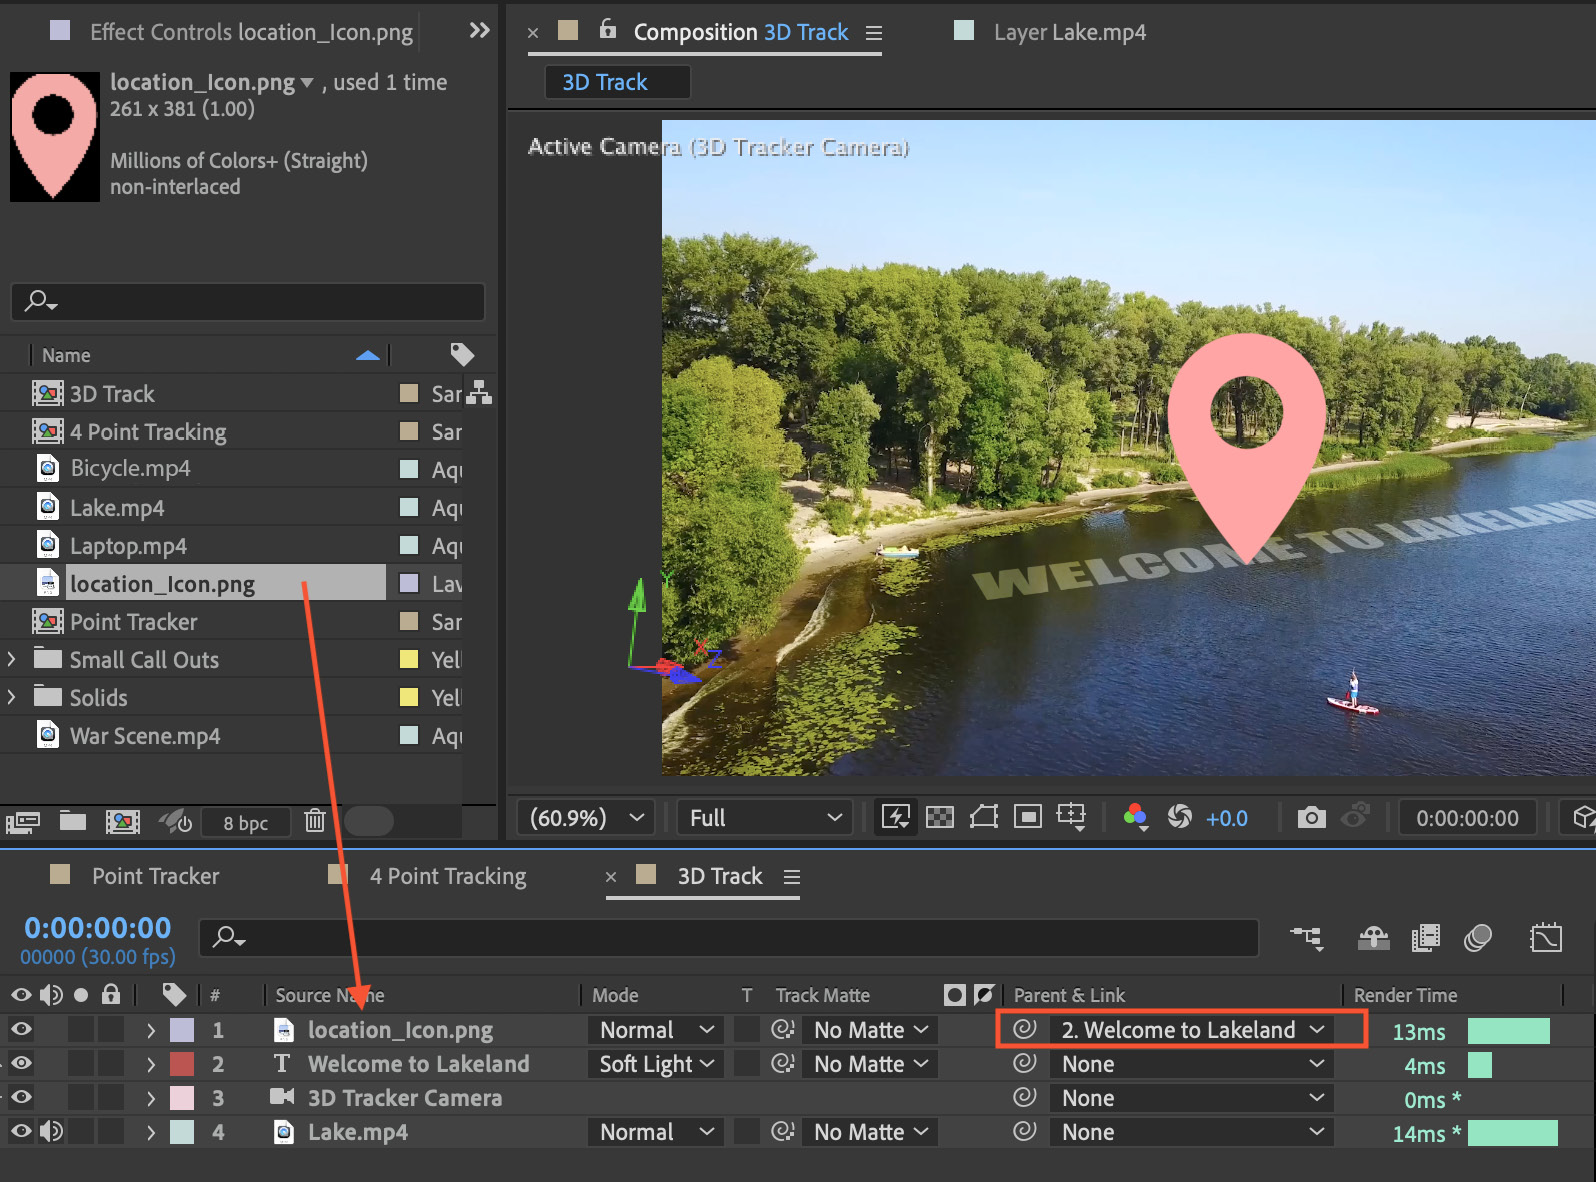
We can also add graphics imported in After Effects to the 3D Track footage, which can add visual appeal. So, we will add a location graphic to the 3D Track composition. To do so, follow these steps:

  1. Locate the location_Icon.png layer in the Project panel and drag it in the 3D Track composition on top of the Welcome to Lakeland layer.
  2. Now, make the location_Icon.png layer the child of the Welcome to Lakeland layer by selecting the Welcome to Lakeland layer in the Parent & Link field of the location_Icon.png layer.
Figure 11.22: Making the location_Icon.png layer the child of Welcome to Lakeland

Figure 11.22: Making the location_Icon.png layer the child of Welcome to Lakeland

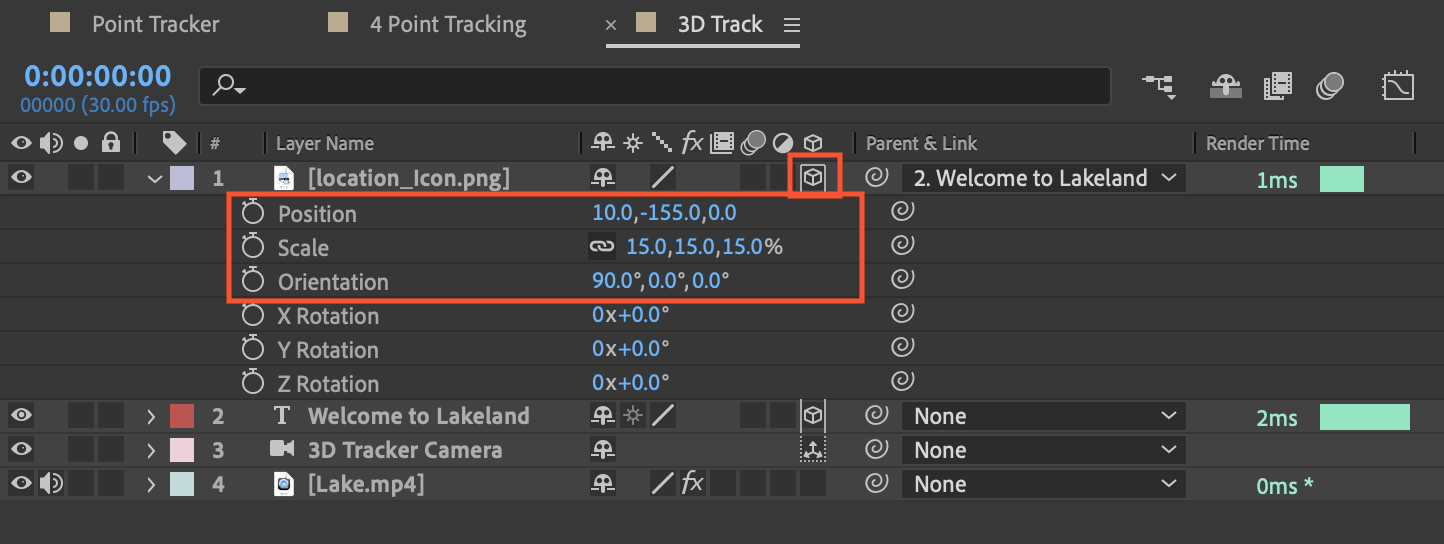
  1. Now, enable the 3D switch of the location_Icon.png layer to convert this layer to a 3D layer.
  2. Now, change the Transform properties of the location_Icon.png layer as follows:
    • Position: 10.0, -155.0, 0.0
    • Scale: 15.0, 15.0, 15.0
    • Orientation: 90.0, 0.0, 0.0

Figure 11.23 shows these updates:

Figure 11.23: The location_Icon.png layer converted to a 3D layer and the Transform properties changed

Figure...

Summary

In this chapter, we learned how to use 2D tracking with single-point and four-point tracking, and how to use 3D tracking in After Effects. The tracker in After Effects is a powerful tool used to analyze and follow the motion of elements within video footage. It automatically generates keyframes based on the movement, allowing for easy integration of effects, text, or other visual elements that follow the tracked object’s path.

Additionally, the chapter covered the techniques of 3D camera tracking, a feature enabling the precise integration of 3D elements into live-action footage.

In the next chapter, we will learn how to collect project files and archive them in After Effects. We will also learn how to export compositions from After Effects using the Render Queue panel and Adobe Media Encoder.

lock icon
The rest of the chapter is locked
You have been reading a chapter from
Creative Motion Mastery with Adobe After Effects
Published in: Feb 2024Publisher: PacktISBN-13: 9781804617281
Register for a free Packt account to unlock a world of extra content!
A free Packt account unlocks extra newsletters, articles, discounted offers, and much more. Start advancing your knowledge today.
undefined
Unlock this book and the full library FREE for 7 days
Get unlimited access to 7000+ expert-authored eBooks and videos courses covering every tech area you can think of
Renews at $15.99/month. Cancel anytime

Author (1)

author image
Vishu Aggarwal

Vishu Aggarwal is a Passionate, Professional & Multi Vendor Certified Trainer. He's an enthusiastic learner, creative designer, and an individual always eager to explore more in the fields of Graphic & Web Designing, Digital Video-Sound Editing, Instructional Design, Digital Marketing, UX/UI, 3D Animation, Virtual Reality, and Game Design. Being a career focused professional, he supports businesses across industries with extensive media and digital marketing services. His all-around experience and expertise in delivering niche multimedia and graphic design training, video editing, and many such media-related areas enable him to contribute towards accelerated organizational branding and performance with unparalleled creative outcomes.
Read more about Vishu Aggarwal