Search icon
Arrow left icon
All Products
Best Sellers
New Releases
Books
Videos
Audiobooks
Learning Hub
Newsletters
Free Learning
Arrow right icon
Creative Motion Mastery with Adobe After Effects

You're reading from  Creative Motion Mastery with Adobe After Effects

Product type Book
Published in Feb 2024
Publisher Packt
ISBN-13 9781804617281
Pages 332 pages
Edition 1st Edition
Languages
Author (1):
Vishu Aggarwal Vishu Aggarwal
Profile icon Vishu Aggarwal

Table of Contents (18) Chapters

Preface 1. Part 1: Working with Motion Graphics
2. Chapter 1: Getting to Know the User Interface and Workflow 3. Chapter 2: Applying Effects and Presets to Create Animated Graphics 4. Chapter 3: Deep-Dive into Text Animations 5. Chapter 4: Animating Shape Layers 6. Chapter 5: Adding Motion to Photoshop and Illustrator Graphics 7. Chapter 6: Creating Motion Graphic Templates for Premiere Pro 8. Part 2: Post-Production and Visual Effects
9. Chapter 7: Color Correction and Color Grading 10. Chapter 8: Rotoscoping and Mask Tracking Techniques 11. Chapter 9: Chroma Keying 12. Chapter 10: Working with Particle Simulations 13. Part 3: 2D and 3D Tracking, and Rendering
14. Chapter 11: Working with 2D and 3D Tracking 15. Chapter 12: Exporting and Managing Projects 16. Index 17. Other Books You May Enjoy

Chroma Keying

In this chapter, we will look into chroma keying. Chroma keying, often referred to as green screen or blue screen technology, is a visual effects (VFX) technique used in film, video production, and photography. It involves separating a subject or object from its background by keying out a specific color (usually green or blue) and replacing it with another image or video.

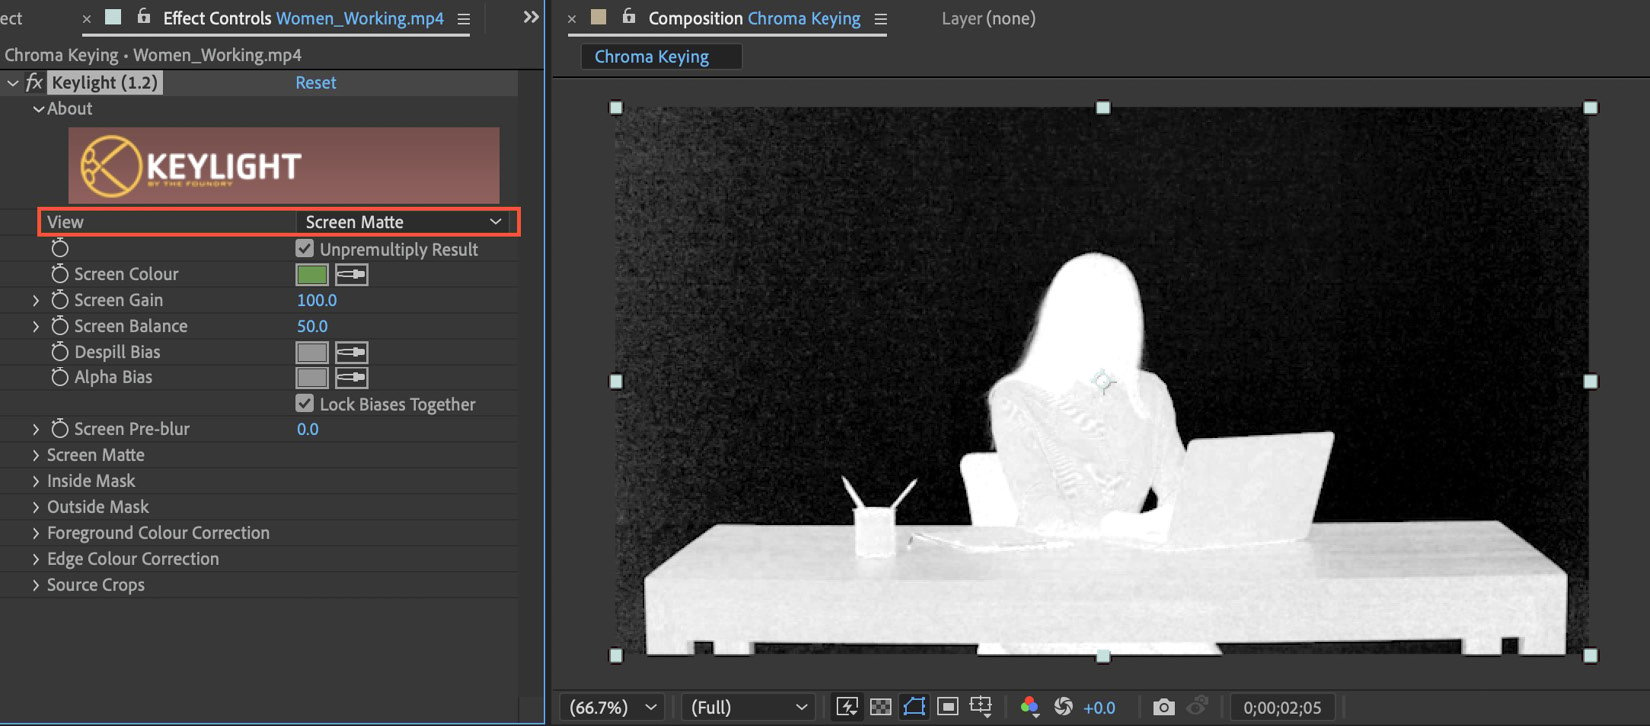
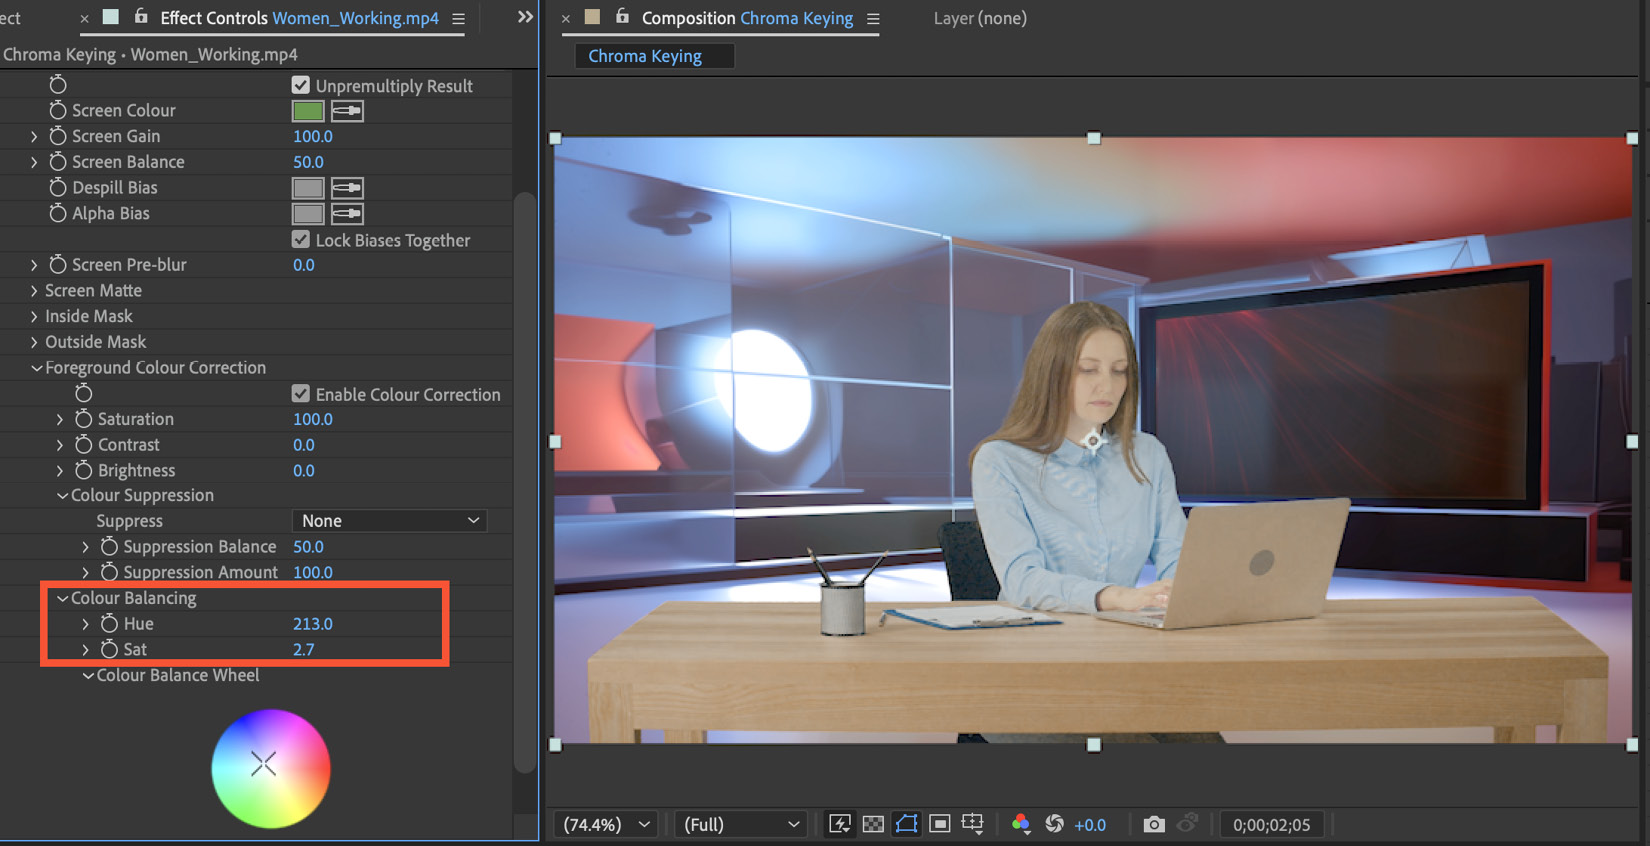
For chroma keying, we will use the Keylight (1.2) effect in Adobe After Effects, which is a powerful tool for green screen or blue screen (chroma key) compositing. However, remember that successful chroma keying requires proper lighting and clean footage when shooting, as well as careful adjustment of the Keylight (1.2) effect settings in After Effects to achieve a seamless and realistic composite.

By the end of this chapter, you will understand how to use the Keylight (1.2) effect for chroma removal and how to seamlessly blend the composite of new backgrounds by using compositing techniques.

...

Technical requirements

The lesson files for this chapter can be found in the Chapter 9 folder at https://packt.link/gbz/9781804617281.

Before starting the chapter, it is beneficial to preview the final output and end project file provided with the Chapter 9 | lesson 9 exercise files. By doing so, you can gain a clear understanding of the desired outcome and have a visual representation of what you will be working toward throughout the chapter.

Previewing the final output allows you to see the completed project, demonstrating how the various elements, effects, and animations come together. You can observe the overall look and feel, the arrangement of different components, and how they interact with each other. This preview serves as a reference point, giving you a target to aim for as you progress through the chapter.

Opening up the project

For this chapter, open the given project in the exercise files as follows:

  1. Open After Effects.
  2. To open the project, click on Open Project in the After Effects startup window. Alternatively, you can go to File | Open Project... in the menu bar.
  3. In the file browser, locate the Lesson9_start.aep project file in the Chapter 9 folder of the exercise file.

The project has one composition, which we will be using to learn about chroma keying.

Figure 9.1: Lesson 9 start project with default workspace

Figure 9.1: Lesson 9 start project with default workspace

Keep the project open for all of the topics in this chapter.

Using the Keylight (1.2) effect for chroma keying

The Keylight (1.2) 1.2 effect in After Effects stands out as a robust keying tool, essential for professional compositing tasks. Its advanced features enable the accurate removal of backgrounds, allowing seamless integration of subjects into diverse environments, making it a crucial effect for VFX artists and filmmakers.

We will be using the Keylight (1.2) effect to extract the background of the Women_Working.mp4 layer in the Chroma Keying composition. This will allow us to composite Women_Working.mp4 over the Background layer.

Follow these steps to use the Keylight (1.2) effect:

  1. Locate the Chroma Keying composition in the Project panel and double-click to open it in the timeline.
  2. Select the Women_Working.mp4 layer in the Chroma Keying composition.
  3. Go to the Effect menu at the top of the screen.
  4. Navigate to Keying and select Keylight (1.2).
  5. In the Effect Controls panel, you will find the Keylight (1.2)...

Why do we use a green or blue color for chroma keying?

Green and blue are commonly used for chroma keying because they have several characteristics that make them suitable for this purpose:

  • Low likelihood of conflicts: Green and blue are colors that are less likely to be found in skin tones or objects used in video production. This reduces the risk of unintentionally keying out parts of the subject.
  • Contrast with human skin: Green and blue are quite different from the most common human skin tones, which tend to fall within the reddish spectrum. This contrast makes it easier to separate the subject from the background.
  • Luminance values: Green and blue have relatively consistent luminance values, which means they are easy to light evenly. This uniformity in lighting is crucial for achieving a clean key.
  • Digital sensors and cameras: Many digital cameras and sensors are more sensitive to green and blue colors, making it easier to capture clean and detailed footage with...

Fine-tuning the screen matte

The Screen Matte view displays the black-and-white matte that represents the transparency of the keyed-out background. In this view, the subject appears as white, the transparent areas appear as black, and the partially transparent areas appear as shades of gray. You can adjust the matte settings to refine the key.

Now, we will fine-tune the settings of the Keylight (1.2) effect to get the best results. This can include adjusting the settings of Screen Matte to refine the look of the composition.

Follow these steps to refine the matte:

  1. Change the View option in the dropdown from Final Result to Screen Matte:
Figure 9.4: Changing the View setting from Final Result to Screen Matte

Figure 9.4: Changing the View setting from Final Result to Screen Matte

  1. Locate the Screen Matte option further down in Keylight (1.2) and open the dropdown to reveal the Screen Matte settings. Change these settings as follows:
    • Clip Black to 15.0
    • Clip White to 60.0
    • Screen Shrink/Grow to -1.0

    Figure 9.5...

Foreground color correction

Now, we will perform foreground color correction to make adjustments to the color and lighting of the Women_Working.mp4 layer. This is important to ensure that the composite looks natural and properly integrated into the new background.

Follow the steps to do the foreground color correction:

  1. Locate the Foreground Color Correction option in Keylight (1.2).
  2. Open the dropdown to reveal the Foreground Color Correction settings.
  3. Now, open the dropdown of Colour Balancing and change the settings as follows:
    • Hue to 213.0
    • Sat to 2.7

    Figure 9.7 shows the modified settings:

Figure 9.7: Colour Balancing settings changed to color-correct the footage

Figure 9.7: Colour Balancing settings changed to color-correct the footage

The foreground color correction adds a little correction in the layer to composite with the background. But to further improve the composite, we will create overlay layers with the CC Light Rays and 4-Color Gradient effects.

Changing the background

Now, we will improve the composition using the CC Light Rays and 4-Color Gradient effects.

Improving the composite by using CC Light Rays

CC Light Rays is an After Effects plugin that creates stunning light ray effects, simulating the natural interplay of light in a scene. It will enhance visual impact by adding dynamic and realistic light beams and cinematic visuals to our composite.

Follow these steps to improve the composite by using the CC Light Rays effect:

  1. Duplicate the Background.mp4 layer in the Chroma Keying composition using the shortcut Ctrl + D or Cmd + D.
  2. Rename the duplicated Background.mp4 layer to Background_Light.mp4 by right-clicking on the layer and selecting Rename.
  3. Move Background_Light.mp4 to the layer above the Women_Working.mp4 layer.
Figure 9.8: The Background_Light.mp4 layer moved above the Women_Working.mp4 layer

Figure 9.8: The Background_Light.mp4 layer moved above the Women_Working.mp4 layer

  1. Select the Background_Light.mp4 layer.
  2. Go to the Effect...

Summary

In this chapter, we learned how to use chroma keying in After Effects. We looked at the Keylight (1.2) effect, which is widely used for high-quality green and blue screen compositing. It provides precise control over color and transparency, making it essential for creating seamless visual effects.

Additionally, we covered the techniques of realistic compositing using the overlay layers with effects of CC Light Rays and 4-Color Gradient effects, which helped create a seamless composite of the new background behind the Women_Working.mp4 layer.

In the next chapter, we will learn how to create particle simulations, which allow us to create various effects such as rain, fire, and smoke in After Effects. We will mainly look at the Form, CC Particle System II, and CC Rain effects.

lock icon The rest of the chapter is locked
You have been reading a chapter from
Creative Motion Mastery with Adobe After Effects
Published in: Feb 2024 Publisher: Packt ISBN-13: 9781804617281
Register for a free Packt account to unlock a world of extra content!
A free Packt account unlocks extra newsletters, articles, discounted offers, and much more. Start advancing your knowledge today.
Unlock this book and the full library FREE for 7 days
Get unlimited access to 7000+ expert-authored eBooks and videos courses covering every tech area you can think of
Renews at $15.99/month. Cancel anytime}