The active geo-replication feature allows you to create up to four readable secondaries of a primary Azure SQL database. Active geo-replication uses SQL Server AlwaysOn to asynchronously replicate transactions to the secondary databases. The secondary database can be in the same or a different region than the primary database.
Active geo-replication can be used for the following cases:
- To provide business continuity by failing over to the secondary database in case of a disaster. The failover is manual.
- To offload reads to the readable secondary.
- To migrate a database to a different server in another region.
In this recipe, we'll configure active geo-replication for an Azure SQL database and perform a manual failover.
Getting ready
In a new PowerShell window, execute the Connect-AzAccount command and follow the steps to log in to your Azure account.
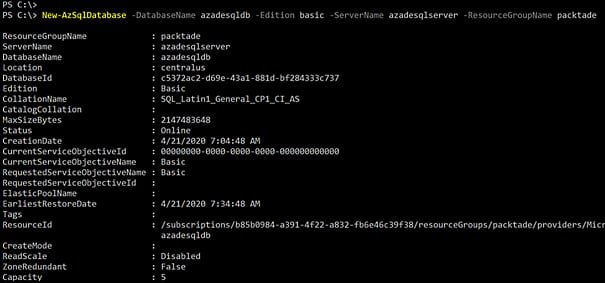
You need an existing Azure SQL database for this recipe. If you don't have one, create an Azure SQL database by following the steps mentioned in the Provisioning and connecting to an Azure SQL database using PowerShell recipe.
How to do it…
First, let's create a readable secondary.
Creating a readable secondary
The steps are as follows:
- Execute the following command to provision a new Azure SQL server to host the secondary replica:
#create credential object for the Azure SQL Server admin credential
$sqladminpassword = ConvertTo-SecureString 'Sql@Server@1234' -AsPlainText -Force
$sqladmincredential = New-Object System.Management.Automation.PSCredential ('sqladmin', $sqladminpassword)
New-AzSQLServer -ServerName azadesqlsecondary -SqlAdministratorCredentials $sqladmincredential -Location westus -ResourceGroupName packtade
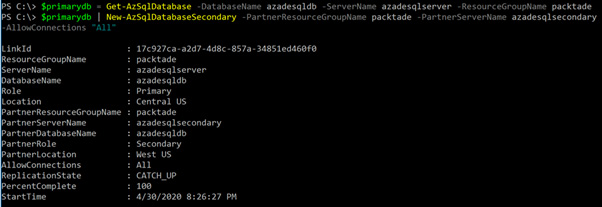
- Execute the following command to configure the geo-replication from the primary server to the secondary server:
$primarydb = Get-AzSqlDatabase -DatabaseName azadesqldb -ServerName azadesqlserver -ResourceGroupName packtade
$primarydb | New-AzSqlDatabaseSecondary -PartnerResourceGroupName packtade -PartnerServerName azadesqlsecondary -AllowConnections "All"
You should get an output as shown in the following screenshot:
Figure 2.9 – Configuring geo-replication
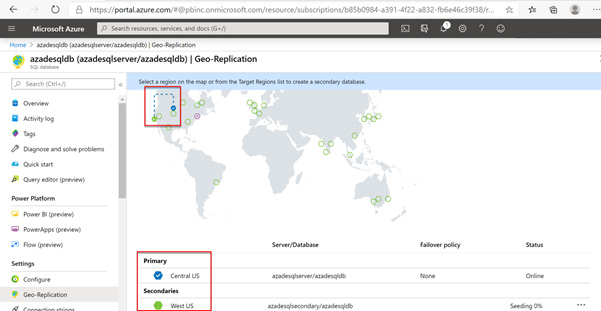
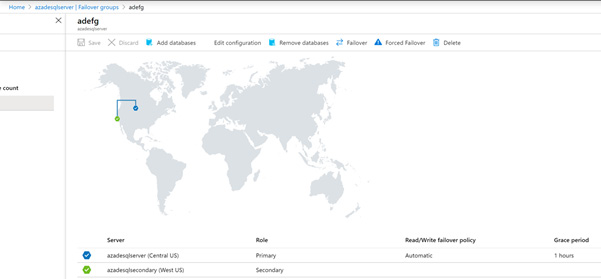
Moreover, we can also check this on the Azure portal, as shown in the following screenshot:
Figure 2.10 – Verifying geo-replication in the Azure portal
Performing manual failover to the secondary
The steps are as follows:
- Execute the following command to manually failover to the secondary database:
$secondarydb = Get-AzSqlDatabase -DatabaseName azadesqldb -ServerName azadesqlsecondary -ResourceGroupName packtade
$secondarydb | Set-AzSqlDatabaseSecondary -PartnerResourceGroupName packtade -Failover
The preceding command performs a planned failover without data loss. To perform a manual failover with data loss, use the Allowdataloss switch.
If we check the Azure portal, we'll see that azadesqlsecondary/azadesqldb in West US is the primary database:
Figure 2.11 – Failing over to the secondary server
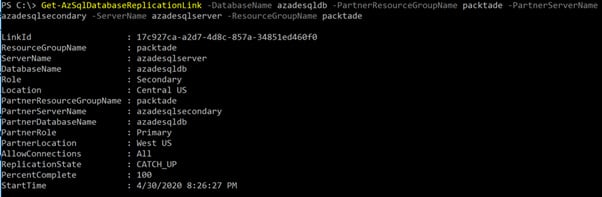
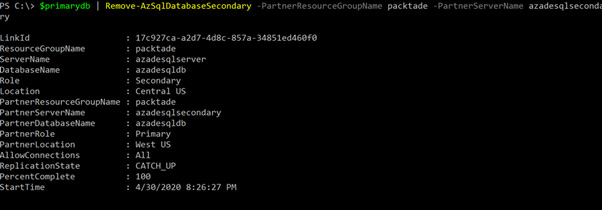
- We can also get the active geo-replication information by executing the following command:
Get-AzSqlDatabaseReplicationLink -DatabaseName azadesqldb -PartnerResourceGroupName packtade -PartnerServerName azadesqlsecondary -ServerName azadesqlserver -ResourceGroupName packtade
You should get an output as shown in the following screenshot:
Figure 2.12 – Getting the geo-replication status
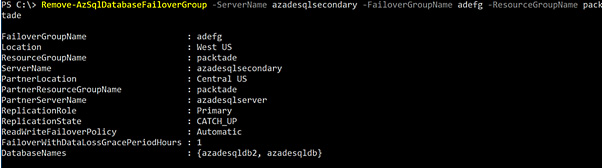
Removing active geo-replication
Execute the following command to remove the active geo-replication link between the primary and the secondary databases:
$primarydb = Get-AzSqlDatabase -DatabaseName azadesqldb -ServerName azadesqlserver -ResourceGroupName packtade
$primarydb | Remove-AzSqlDatabaseSecondary -PartnerResourceGroupName packtade -PartnerServerName azadesqlsecondary
You should get an output as shown in the following screenshot:
Figure 2.13 – Removing active geo-replication
How it works…
To configure active geo-replication, we use the New-AzSqlDatabaseSecondary command. This command expects the primary database name, server name, and resource group name, and the secondary resource group name, server name, and the Allow connections parameter. If we want a readable secondary, then we set Allow connections to All; otherwise, we set it to No.
The active geo-replication provides manual failover with and without data loss. To perform a manual failover, we use the Set-AzSqlDatabaseSecondary command. This command expects the secondary server name, database name, resource group name, a failover switch, and the Allowdataloss switch in case of failover with data loss.
To remove active geo-replication, we use the Remove-AzSqlDatabaseSecondary command. This command expects the secondary server name, secondary database name, and resource name to remove the replication link between the primary and the secondary database.
Removing active geo-replication doesn't remove the secondary database.
 Argentina
 Australia
 Austria
 Belgium
 Brazil
 Bulgaria
 Canada
 Chile
Chile
 Colombia
 Cyprus
 Czechia
 Denmark
 Ecuador
 Egypt
Egypt
 Estonia
 Finland
 France
 Germany
 Great Britain
 Greece
 Hungary
 India
India
 Indonesia
 Ireland
 Italy
Italy
 Japan
Japan
 Latvia
 Lithuania
 Luxembourg
 Malaysia
 Malta
Malta
 Mexico
 Netherlands
 New Zealand
 Norway
 Philippines
 Poland
 Portugal
 Romania
 Russia
 Singapore
 Slovakia
 Slovenia
 South Africa
 South Korea
 Spain
Spain
 Sweden
 Switzerland
 Taiwan
 Thailand
 Turkey
 Ukraine
 United States