Implementing an auto-failover group for an Azure SQL database using PowerShell
An auto-failover group allows a group of databases to fail to a secondary server in another region in case the SQL database service in the primary region fails. Unlike active geo-replication, the secondary server should be in a different region than the primary. The secondary databases can be used to offload read workloads.
The failover can be manual or automatic.
In this recipe, we'll create an auto-failover group, add databases to the auto-failover group, and perform a manual failover to the secondary server.
Getting ready
In a new PowerShell window, execute the Connect-AzAccount command and follow the steps to log in to your Azure account.
You will need an existing Azure SQL database for this recipe. If you don't have one, create an Azure SQL database by following the steps mentioned in the Provisioning and connecting to an Azure SQL database using PowerShell recipe.
How to do it…
First, let's create an auto-failover group.
Creating an auto-failover group
- Execute the following PowerShell command to create a secondary server. The server should be in a different region than the primary server:
$sqladminpassword = ConvertTo-SecureString 'Sql@Server@1234' -AsPlainText -Force $sqladmincredential = New-Object System.Management.Automation.PSCredential ('sqladmin', $sqladminpassword) New-AzSQLServer -ServerName azadesqlsecondary -SqlAdministratorCredentials $sqladmincredential -Location westus -ResourceGroupName packtade - Execute the following command to create the auto-failover group:
New-AzSqlDatabaseFailoverGroup -ServerName azadesqlserver -FailoverGroupName adefg -PartnerResourceGroupName packtade -PartnerServerName azadesqlsecondary -FailoverPolicy Automatic -ResourceGroupName packtade
You should get an output as shown in the following screenshot:

Figure 2.14 – Creating an auto-failover group
- Execute the following command to add an existing database in the auto-failover group:
$db = Get-AzSqlDatabase -DatabaseName azadesqldb -ServerName azadesqlserver -ResourceGroupName packtade
$db | Add-AzSqlDatabaseToFailoverGroup -FailoverGroupName adefg
- Execute the following command to add a new Azure SQL database to the auto-failover group:
$db = New-AzSqlDatabase -DatabaseName azadesqldb2 -Edition basic -ServerName azadesqlserver -ResourceGroupName packtade
$db | Add-AzSqlDatabaseToFailoverGroup -FailoverGroupName adefg
- Execute the following PowerShell command to get the details about the auto-failover group:
Get-AzSqlDatabaseFailoverGroup -ServerName azadesqlserver -FailoverGroupName adefg -ResourceGroupName packtade
You should get an output as shown in the following screenshot:

Figure 2.15 – Getting the auto-failover group details
The endpoint used to connect to the primary server of an auto-failover group is of the form
<auto-failover group name>.database.windows.net. In our case, this will beadefg.database.windows.net.To connect to a readable secondary in an auto-failover group, the endpoint used is of the form
<auto-failover group name>.secondary.database.windows.net. In our case, the endpoint will beadefg.secondary.database.windows.net. In addition to this, we need to specifyApplicationIntentasreadonlyin the connection string when connecting to the readable secondary. - In an Azure portal, the failover groups can be found on the Azure SQL server page, as shown in the following screenshot:

Figure 2.16 – Viewing an auto-failover group in the Azure portal
- To open the failover group details, click the failover group name, adefg:
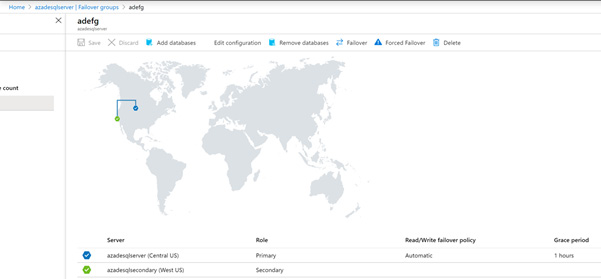
Figure 2.17 – Viewing the auto-failover group details in the Azure portal
Performing a manual failover to the secondary server
- Execute the following command to manually failover to the secondary server:
$secondarysqlserver = Get-AzSqlServer -ResourceGroupName packtade -ServerName azadesqlsecondary
$secondarysqlserver | Switch-AzSqlDatabaseFailoverGroup -FailoverGroupName adefg
If we check in the Azure portal, the primary server is now
azadesqlsecondaryand the secondary server isazadesqlserver, as shown in the following screenshot:
Figure 2.18 – Manual failover to the secondary server
- Execute the following command to remove the auto-failover group. Removing the auto-failover group doesn't remove the secondary or primary SQL databases:
Remove-AzSqlDatabaseFailoverGroup -ServerName azadesqlsecondary -FailoverGroupName adefg -ResourceGroupName packtade
You should get an output as shown in the following screenshot:
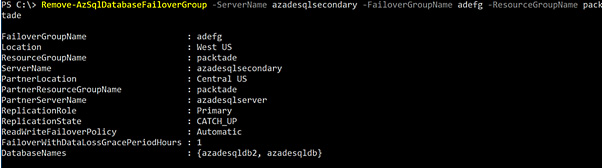
Figure 2.19 – Removing the auto-failover group
How it works…
The New-AzSqlDatabaseFailoverGroup command is used to create an auto-failover group. We need to specify the auto-failover group name, the primary and secondary server names, the resource group name, and the failover policy (automatic/manual). In addition to this, we can also specify GracePeriodWithDataLossHours. As the replication between the primary and secondary is synchronous, the failover may result in data loss. The GracePeriodwithDataLossHours value specifies how many hours the system should wait before initiating the automatic failover. This can, therefore, limit the data loss that can happen because of a failover.
After the auto-failover group creation, we can add the databases to the auto-failover group by using the Add-AzSqlDatabaseToFailoverGroup command. The database to be added should exist on the primary server and not on the secondary server.
We can perform a manual failover by executing the Switch-AzSqlDatabaseFailoverGroup command. We need to provide the primary server name, the auto-failover group name, and the primary server resource group name.
To remove an auto-failover group, execute the Remove-AzSqlDatabaseFailoverGroup command by specifying the primary server name and resource group and the auto-failover group name.