


 Download code from GitHub
Chapter 2: Orchestration and Control Flow
Azure Data Factory is an excellent tool for designing and orchestrating your Extract, Transform, Load (ETL) processes. In this chapter, we introduce several fundamental data factory concepts and guide you through the creation and scheduling of increasingly complex data-driven workflows. All the work in this chapter is done using the Microsoft data factory online portal. You'll learn how to create and configure Linked Services and datasets, take advantage of built-in expressions and functions, and, most importantly, learn how and when to use the most popular Data Factory activities.
This chapter covers the following topics:
- Using parameters and built-in functions
- Using the Metadata and Stored Procedure activities
- Using the ForEach and Filter activities
- Chaining and branching activities within a pipeline
- Using the Lookup, Web, and Execute Pipeline activities
- Creating event-based pipeline triggers
Technical requirements
Note
To fully understand the recipes, we make naming suggestions for the accounts, pipelines, and so on throughout the chapter. Many services, such as Azure Storage and SQL Server, require that the names you assign are unique. Follow your own preferred naming conventions, making appropriate substitutions as you follow the recipes. For the Azure resource naming rules, refer to the documentation at https://docs.microsoft.com/azure/azure-resource-manager/management/resource-name-rules.
In addition to Azure Data Factory, we shall be using three other Azure Services: Logic Apps, Blob Storage, and Azure SQL Database. You will need to have Azure Blob Storage and Azure SQL Database accounts set up to follow the recipes. The following steps describe the necessary preparation:
- Create an Azure Blob Storage account and name it
adforchestrationstorage. When creating the storage account, select the same region (that is, East US) as you selected when you created the Data Factory instance. This will save us costs when moving data. - Create a container named
datawithin this storage account, and upload two CSV files to the folder:airlines.csvandcountries.csv(the files can be found on GitHub: https://github.com/PacktPublishing/Azure-Data-Factory-Cookbook/tree/master/data). - Create an Azure SQL Database instance and name it
AzureSQLDatabase. When you create the Azure SQL Database instance, you will have the option of creating a server on which the SQL database will be hosted. Create that server, and take note of the credentials you entered. You will need these credentials later when you log in to your database.Choose the basic configuration for your SQL server to save on costs. Once your instance is up and running, configure the firewall and network settings for the SQL server: make sure that you set the Allow Azure services and resources to access this database option to Yes. You may also need to create a rule to allow your IP to access the database:

Figure 2.1 – Firewall configuration
Download the SQL scripts from GitHub at https://github.com/PacktPublishing/Azure-Data-Factory-Cookbook/tree/master/Chapter02/sql-scripts:
CreateAirlineTable.sqlandCreateCountryTable.sql: These scripts will add two tables,CountryandAirline, which are used in several recipes, including the first one.CreateMetadataTable.sql: This will create theFileMetadatatable and a stored procedure to insert data into that table. This table is necessary for the Using Metadata and Stored Procedure activities and Filtering your data and looping through your files recipes.CreateActivityLogsTable.sql: This will create thePipelineLogtable and a stored procedure to insert data into that table. This table is necessary for the Chaining and branching activities within your pipeline recipe.CreateEmailRecipients.sql: This script will create theEmailRecipientstable and populate it with a record. This table is used in the Using the Lookup, Web, and Execute Pipeline activities recipe. You will need to edit it to enter email recipient information.
Using parameters and built-in functions
In this recipe, we shall demonstrate the power and versatility of ADF by performing a common task: importing data from several files (blobs) from a storage container into tables in Azure SQL Database. We shall create a pipeline, define datasets, and use a Copy activity to tie all the pieces together and transfer the data. We shall also see how easy it is to back up data with a quick modification to the pipeline.
Getting ready
In this recipe, we shall be using most of the services that were mentioned in the Technical requirements section of this chapter. Make sure that you have access to Azure SQL Database (with the AzureSQLDatabase instance we created) and the Azure storage account with the necessary .csv files already uploaded.
How to do it…
First, open your Azure Data Factory instance in the Azure portal and go to the Author and Monitor interface. Here, we shall define the datasets for input files and database tables, and the linked services (for Azure Blob Storage and Azure SQL Database):
- Start by creating linked services for the Azure storage account and
AzureSQLDatabase. - Create the linked service for the
adforchestrationstoragestorage account:(a) In the Manage tab, select Linked Services and click on the New button. On the New linked service blade, select Azure Blob Storage:

Figure 2.2 – The New linked service blade
(b) On the next screen, configure the linked service connection properties as shown in the following screenshot:

Figure 2.3 – Connection configurations for Azure Blob Storage
Name your linked service according to your naming convention (in our example, we named it
OrchestrationAzureBlobStorage1).Select the appropriate subscription and enter the name of your storage account (where you store the
.csvfiles).For Integration Runtime, select AutoResolveIntegrationRuntime.
For Authentication method, select Account Key.
Note:
In this recipe, we are using Account Key authentication to access our storage account. However, in your work environment, it is recommended to authenticate using Managed Identity, taking advantage of the Azure Active Directory service. This is more secure and allows you to avoid using credentials in your code. Find the references for more information about using Managed Identity with Azure Data Factory in the See also section of this recipe.
(c) Click the Test Connection button at the bottom and verify that you can connect to the storage account.
(d) Finally, click on the Create button and wait for the linked service to be created.
- Create the second linked service for
AzureSQLDatabase:
Figure 2.4 – Connection properties for Azure SQL Database
(a) In the Manage tab, create a new linked service, but this time select Azure SQL from choices in the New linked service blade. You can enter
Azure SQLinto the search field to find it easily.(b) Select the subscription information and the SQL server name (the dropdown will present you with choices). Once you have selected the SQL server name, you can select your database (
AzureSQLDatabase) from the dropdown in the Database Name section.(c) Select SQL Authentication for Authentication Type. Enter the username and password for your database.
(d) Make sure to test the connection. If the connection fails, ensure that you configured access correctly in Firewall and Network Settings. Once you have successfully tested the connection, click on Create to save your linked service.
Now, we shall create two datasets, one for each linked service.
- In the Author tab, define the dataset for Azure Storage as shown in the following screenshot:

Figure 2.5 – Create a new dataset
(a) Go to Datasets and click on New dataset. Select Azure Blob Storage from the choices and click Continue.
(b) In the Select Format blade, select Delimited Text and hit Continue.
(c) Call your new dataset
CsvDataand select OrchestrationAzureBlobStorage in the Linked Service dropdown.(d) With the help of the folder button, navigate to your Azure folder and select any file from there to specify the file path:

Figure 2.6 – Dataset properties
(e) Check the First Row as Header checkbox and click on Create.
- In the same Author tab, create a dataset for the Azure SQL table:
(a) Go to Datasets and click on New dataset.
(b) Select Azure SQL from the choices in the New Dataset blade.
(c) Name your dataset
AzureSQLTables.(d) In the Linked Service dropdown, select AzureSQLDatabase. For the table name, select Country from the dropdown.
(e) Click on Create.
- Parameterize the
AzureSQLTablesdataset:(a) In the Parameters tab, enter the name of your new parameter,
tableName:
Figure 2.7 – Parameterizing the dataset
(b) Next, in the Connection tab, click on the Edit checkbox and enter
dboas schema and@dataset().tableNamein the table text field, as shown in the following screenshot:
Figure 2.8 – Specifying a value for the dataset parameter
- In the same way, parameterize and add dynamic content in the Connection tab for the
CsvDatadataset:(a) Select your dataset, open the Parameters tab, and create a parameter named
filename.(b) In the Connections tab, in the File Path section, click inside the File text box, then click on the Add Dynamic Content link. This will bring up the Dynamic Content interface. In that interface, find the Parameters section and click on
filename. This will generate the correct code to refer to the dataset'sfilenameparameter in the dynamic content text box:
Figure 2.9 – Dynamic content interface
Click on the Finish button to finalize your choice.
Verify that you can see both datasets under the Datasets tab:

Figure 2.10 – Datasets in the Author tab
- We are now ready to design the pipeline.
In the Author tab, create a new pipeline. Change its name to
pl_orchestration_recipe_1. - From the Move and Transform menu in the Activities pane (on the left), drag a Copy activity onto the canvas:

Figure 2.11 – Pipeline canvas with a Copy activity
On the bottom of the canvas, you will see some tabs: General, Source, Sink, and so on. Configure your Copy activity.
In the General tab, you can configure the name for your activity. Call it
Copy From Blob to Azure SQL.In the Source tab, select the
CsvDatadataset and specifycountries.csvin the filename textbox.In the Sink tab, select the
AzureSQLTablesdataset and specifyCountryin the tableName text field. - We are ready to run the pipeline in Debug mode:
Note
You will learn more about using the debug capabilities of Azure Data Factory in Chapter 10, Monitoring and Troubleshooting Data Pipelines. In this recipe, we introduce you to the Output pane, which will help you understand the design and function of this pipeline.
(a) Click the Debug button in the top panel. This will run your pipeline.
(b) Put your cursor anywhere on the pipeline canvas. You will see the report with the status of the activities in the bottom panel in the Output tab:

Figure 2.12 – Debug output
Hover your cursor over the row representing the activity to see the inputs and outputs buttons. We shall make use of these in later chapters.
After your pipeline has run, you should see that the
dbo.Countrytable in your Azure SQL database has been populated with the countries data:
Figure 2.13 – Contents of the Country table in Azure SQL Database
We have copied the contents of the
Countries.csvfile into the database. In the next steps, we shall demonstrate how parameterizing the datasets gives us the flexibility to define which file we want to copy and which SQL table we want as the destination without redesigning the pipeline. - Edit the pipeline: click on the Copy from Blob To Azure SQL activity to select it, and specify
airlines.csvfor the filename in the Source tab andAirlinefor the table name in the Sink tab. Run your pipeline again (in Debug mode), and you should see that the second table is populated with the data – using the same pipeline! - Now, let's say we want to back up the contents of the tables in an Azure SQL database before overwriting them with data from
.csvfiles. We can easily enhance the existing pipeline to accomplish this. - Drag another instance of the Copy activity from the Activities pane, name it
Backup Copy Activity, and configure it in the following way:(a) For the source, select AzureSQLDatabase for the linked service, and add
Airlinein the text box for the table name.(b) In Sink, specify
CsvDataas the linked service, and enter the following formula into the filename textbox:@concat('Airlines-', utcnow(), '.backup' ).(c) Connect Backup Copy Activity to the Copy from Blob to AzureSQL copy activity:

Figure 2.14 – Adding backup functionality to the pipeline
- Run the pipeline in debug mode. After the run is complete, you should see the backup file in your storage account.
- We have created two linked services and two datasets, and we have a functioning pipeline. Click on the Publish All button at the top to save your work.
Let's look at how this works!
How it works…
In this recipe, we became familiar with all the major components of an Azure Data Factory pipeline: linked services, datasets, and activities:
- Linked services represent configured connections between your Data Factory instance and the service that you want to use.
- Datasets are more granular: they represent the specific view of the data that your activities will use as input and output.
- Activities represent the actions that are performed on the data. Many activities require you to specify where the data is extracted from and where it is loaded to. The ADF terms for these entities are source and sink.
Every pipeline that you design will have those components.
In step 1 and step 2, we created the linked services to connect to Azure Blob Storage and Azure SQL Database. Then, in step 3 and step 4, we created datasets that connected to those linked services and referred to specific files or tables. We created parameters that represented the data we referred to in step 5 and step 6, and this allowed us to change which files we wanted to load into tables without creating additional pipelines. In the remaining steps, we worked with instances of the Copy activity, specifying the inputs and outputs (sources and sinks) for the data.
There's more…
We used a built-in function for generating UTC timestamps in step 12. Data Factory provides many convenient built-in functions and expressions, as well as system variables, for your use. To see them, click on Backup SQL Data activity in your pipeline and go to the Source tab below it. Put your cursor inside the tableName text field. You will see an Add dynamic content link appear underneath. Click on it, and you will see the Add dynamic content blade:
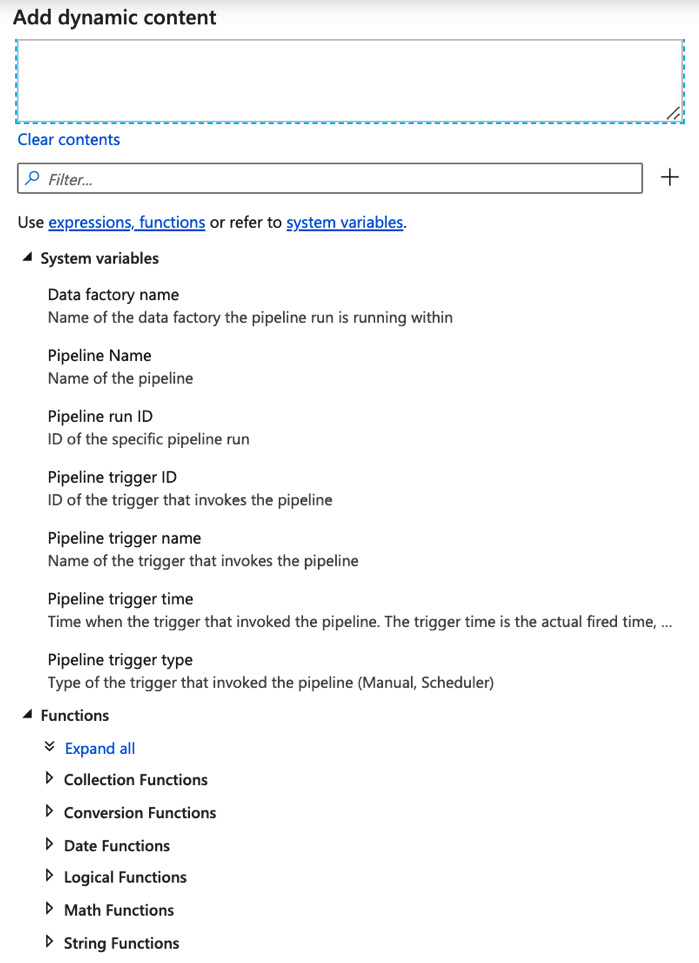
Figure 2.15 – Data Factory functions and system variables
This blade lists many useful functions and system variables to explore. We will use some of them in later recipes.
See also
Microsoft keeps extensive documentation on Data Factory. For a more detailed explanation of the concepts used in this recipe, refer to the following pages:
- Linked services in Azure Data Factory:
https://docs.microsoft.com/azure/data-factory/concepts-linked-services
- Pipelines and activities in Azure Data Factory:
https://docs.microsoft.com/azure/data-factory/concepts-pipelines-activities
- Setting up and using Managed Identity with Azure Data Factory:
https://docs.microsoft.com/azure/data-factory/data-factory-service-identity
Using Metadata and Stored Procedure activities
In this recipe, we shall create a pipeline that fetches some metadata from an Azure storage container and stores it in an Azure SQL database table. You will work with two frequently used activities, the Metadata activity and the Stored Procedure activity.
Getting ready
- In the first recipe, we created two datasets and two linked services. We shall be using the
AzureSqlDatabaseandOrchestrationAzureBlobStoragelinked services in this recipe as well, so if you did not create them before, please go through the necessary steps in the previous recipe. - We shall be using
AzureSQLDatabase. If you haven't done so already, create theFileMetadatatable and the stored procedure to insert the data as described in the Technical requirements section of this chapter.
How to do it…
- Create a new pipeline in the Author tab, and call it
pl_orchestration_recipe_2. - Create a new dataset named
CsvDataFolder, pointing to the Azure Storage container (adforchestrationstorage) we specified in the Technical requirements section. Use the delimited text file format. This time, do not specify the filename; leave it pointing to the data container itself. Use the same linked service for Azure Blob Storage as we used in the previous recipe. - From the Activities pane on the left, find the Get Metadata activity (under the General Tab) and drag it onto the pipeline canvas. Using the configuration tabs at the bottom, configure it in the following way:
(a) In the General tab, rename this Metadata activity
CsvDataFolder Metadata.(b) In the Source tab, pick the
CsvDataFolderdataset. In the same tab, under Field list, use the New button to add two fields, and select Item Name and Last Modified as the values for those fields:
Figure 2.16 – Get Metadata activity configuration
- In the Activities pane, find the Stored Procedure activity (under the General tab), and drag it onto the canvas. In the pipeline canvas, connect the CsvDataFolder Metadata activity to the Stored Procedure activity.
- Configure the Stored Procedure activity in the following way:
(a) In the General tab, change the activity name to
Insert Metadata.(b) In the Settings tab, specify the linked service (
AzureSqlDatabase) and the name of the stored procedure:[dbo].[InsertFileMetadata].(c) In the same Settings tab, click on Import Parameters to display the text fields to specify the parameters for the Stored Procedure activity. Use the following values:
FileName:
@activity('CsvDataFolder Metadata').output.itemNameModifiedAt:
@convertFromUtc(activity('CsvDataFolder Metadata').output.lastModified, 'Pacific Standard Time')UpdatedAt:
@convertFromUtc(utcnow(), Pacific Standard Time'):
Figure 2.17 – Stored Procedure activity configuration
- Run your pipeline in Debug mode. After the run is done, go to AzureSqlDatabase and verify that the FileMetadata table is populated with one record: the last modified date of the folder where we keep the
.csvfiles. - Do not forget to publish your pipeline in order to save your changes.
How it works…
In this simple recipe, we introduced two new activities. In step 2, we have used the Metadata activity, with the dataset representing a folder in our container. In this step, we were only interested in the item name and the last modified date of the folder. In step 3, we added a Stored Procedure activity, which allows us to directly invoke a stored procedure in the remote database. In order to configure the Stored Procedure activity, we needed to obtain the parameters (itemName, lastModified, and UpdatedAt). The formulas used in step 5 (such as @activity('CsvDataFolder Metadata').output.itemName) define which activity the value is coming from (the CsvDataFolder Metadata activity) and which parts of the output are required (output.itemName). We have used the built-in conversion function convertFromUtc in order to present the time in a specific time zone (Pacific Standard Time, in our case).
There's more…
In this recipe, we only specified the itemName and lastModified fields as the metadata outputs. However, the Metadata activity supports many more options. Here is the list of currently supported options from the Data Factory documentation at https://docs.microsoft.com/azure/data-factory/control-flow-get-metadata-activity#capabilities:
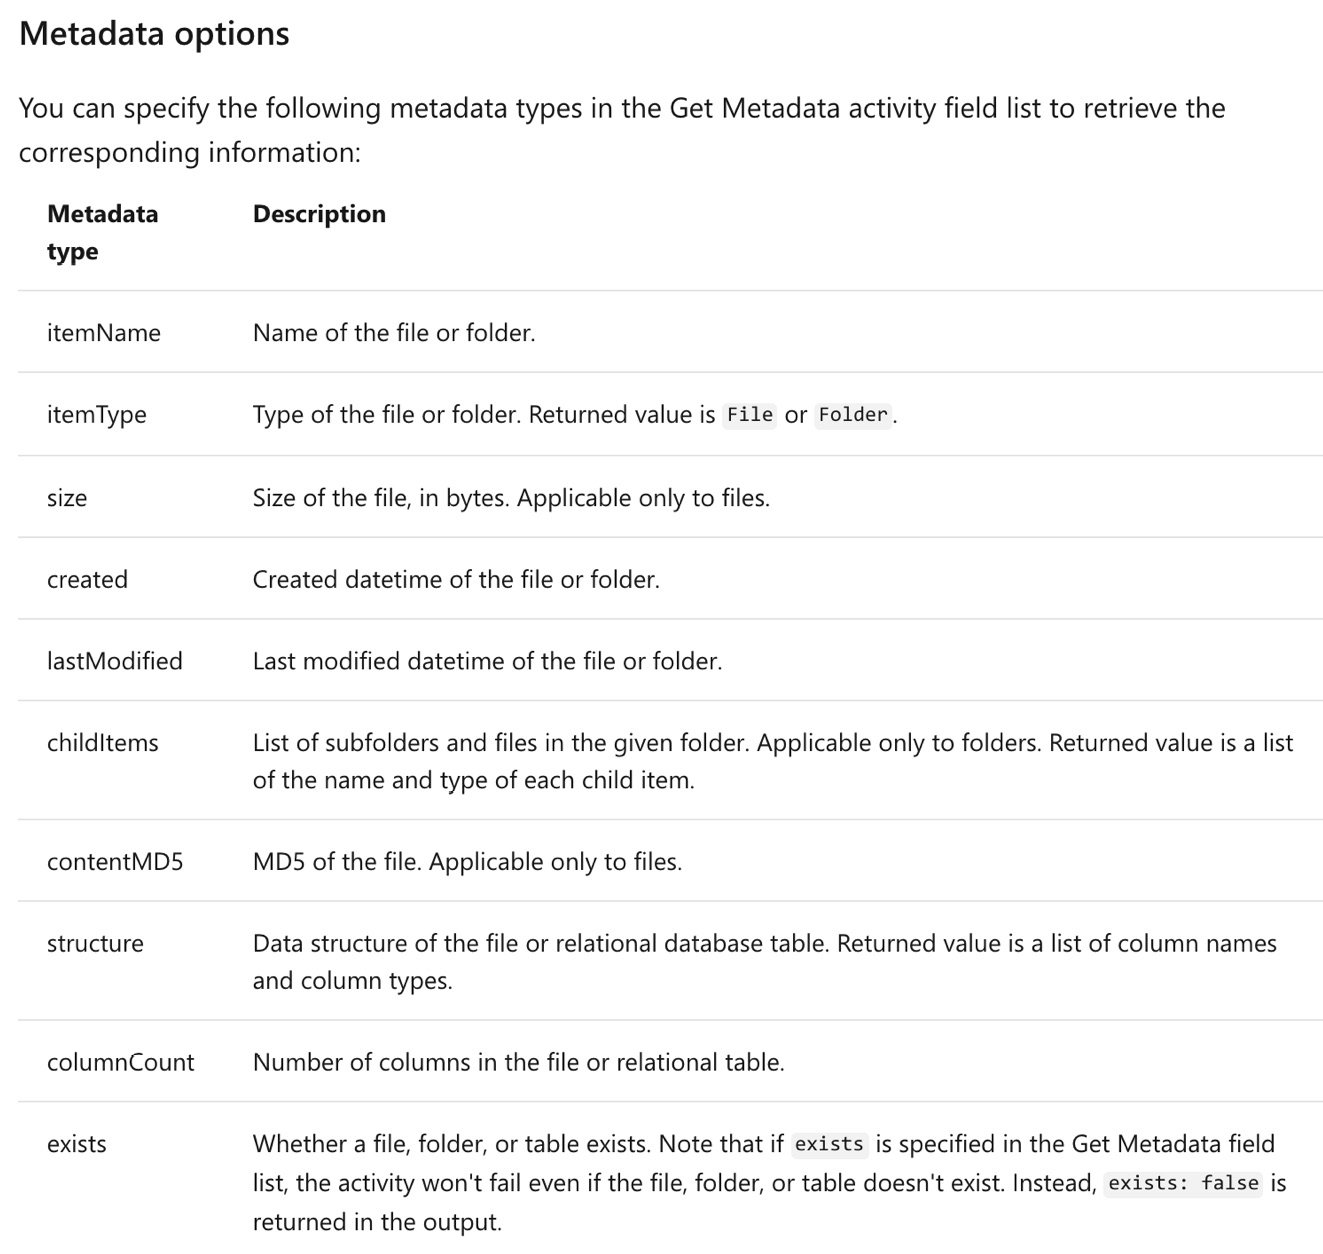
Figure 2.18 – Metadata activity options
The Metadata type options that are available to you will depend on the dataset: for example, the contentMD5 option is only available for files, while childItems is only available for folders.
Using the ForEach and Filter activities
In this recipe, we introduce you to the Filter and ForEach activities. We shall enhance the pipeline from the previous recipe to not just examine the data in the Azure Storage container, but filter it based on the file type and then record the last modified date for every .csv file in the folder.
Getting ready
The preparation steps are the same as for the previous recipe. We shall be reusing the pipeline from the Using Metadata and Stored Procedure activities recipe, so if you did not go through the steps then, do so now.
How to do it…
- Clone the pipeline from the previous recipe and rename it
pl_orchestration_recipe_3. - Delete the Stored Procedure activity.
- Select the Metadata activity and configure it in the following way:
(a) In the Dataset tab, verify that
CsvDataFolderis selected as the dataset.(b) Verify that the Item Name and Last Modified fields are added as arguments. Add one more field, Child Items.
- Now, select a Filter activity from the Activities pane on the left (find it in the Iteration and Conditionals section) and drop it in the pipeline canvas to the right of the Metadata activity.
- Connect the Metadata activity to the Filter activity.
- Configure the Filter Activity in the following way:
(a) In the General tab, change the name to
FilterOnCsv.(b) In the Settings tab, fill in the values as follows:
Items:
@activity('CsvDataFolder Metadata').output.childItemsCondition:
@endswith(item().name, '.csv'):
Figure 2.19 – Filter activity settings
- Run this pipeline in Debug mode:

Figure 2.20 – Pipeline status overview in Debug mode
After the pipeline is finished running, hover over the row representing the Get Metadata activity run in the Output pane and examine the activity's output. You should see that the Get Metadata activity fetched the metadata for all the files in the folder, as follows:

Figure 2.21 – Get Metadata activity output
Do the same for the FilterOnCSV activity and verify that the outputs were filtered to only the
csvfiles. - From the Activities pane, add an instance of the ForEach activity on the canvas, connect it to the FilterOnCsv activity, and configure it in the following way:
(a) In the Settings tab, enter the following value in the Items textbox:
@activity('FilterOnCSV').output.Value.(b) Within the ForEach activity square, click on the pencil image. This will open another canvas. We shall configure the actions for the ForEach activity within this canvas.
- Add an instance of Get Metadata Activity onto the ForEach Activity canvas, and configure it in the following way:
(a) In the General tab, change the name to
ForEach Metadata.(b) In the Dataset tab, specify
CsvData(the parameterized dataset we created in the Using parameters and built-in functions recipe) as the dataset for this activity. If you do not have this dataset, please refer to the Using parameters and built-in functions recipe to see how to create a parameterized dataset.(c) For the filename parameter, enter
@item().name.(d) In the same Dataset tab, in the Field List section, add two arguments: Item Name and Last Modified Date, as shown in the following screenshot:

Figure 2.22 – Adding arguments in the Field List section
- Add an instance of Stored Procedure Activity onto the ForEach Activity canvas. Connect ForEach Metadata to Stored Procedure Activity and configure Stored Procedure Activity:
(a) In the Settings tab at the bottom, select AzureSQLDatabase as the linked service and [dbo][InsertFileMetadata] as the stored procedure name.
(b) Click on Import under Stored Procedure Parameters and enter the following values:
FileName:
@{item().name}ModifiedAt:
@convertFromUtc(activity('ForEach Metadata').output.lastModified,'Pacific Standard Time')UpdatedAt:
@convertFromUtc(utcnow(), 'Pacific Standard Time')(you can use your own time zone here, as well):
Figure 2.23 – Stored Procedure activity configuration
Run your whole pipeline in Debug mode. When it is finished, you should see the two additional rows in your FileMetadata table (in Azure SQL Database) for the last modified date for
airlines.csvandcountries.csv. - Publish your pipeline to save the changes.
How it works…
In this recipe, we used the Metadata activity again and took advantage of the childItems option to retrieve information about the folder. After this, we filtered the output to restrict processing to CSV files only with the help of the Filter activity.
Next, we needed to select only the CSV files from the folder for further processing. For this, we added a Filter activity. Using @activity('Get Metadata').output.childItems, we specified that the Filter activity's input is the metadata of all the files inside the folder. We configured the Filter activity's condition to only keep files whose name ends with csv (the built-in endswith function gave us a convenient way to do this).
Finally, in order to process each file separately, we used the ForEach activity, which we used in step 6. ForEach is what is called a compound activity, because it contains a group of activities that are performed on each of the items in a loop. We configured the Filter activity to take as input the filtered file list (the output of the Filter activity), and in steps 7 and 8, we designed the sequence of actions that we want to have performed on each of the files. We used a second instance of the Metadata activity for this sub-pipeline and configured it to retrieve information about a particular file. To accomplish this, we configured it with the parameterized CsvData dataset and specified the filename. In order to refer to the file, we used the built-in formula @item (which provides a reference to the current file in the ForEach loop) and indicated that we need the name property of that object.
The configuration of the Stored Procedure activity is similar to the previous step. In order to provide the filename for the Stored Procedure parameters, we again referred to the provided current object reference, @item. We could have also used @activity('ForEach Metadata').output.itemName, as we did in the previous recipe.
Chaining and branching activities within a pipeline
In this recipe, we shall build a pipeline that will extract the data from the CSV files in Azure Blob Storage, load this data into the Azure SQL table, and record a log message with the status of this job. The status message will depend on whether the extract and load succeeded or failed.
Getting ready
We shall be using all the Azure services that are mentioned in the Technical requirements section at the beginning of the chapter. We shall be using the PipelineLog table and the InsertLogRecord stored procedure. If you have not created the table and the stored procedure in your Azure SQL database yet, please do so.
How to do it…
- In this recipe, we shall reuse portions of the pipeline from the Using parameters and built-in functions recipe. If you completed that recipe, just create a clone of it and save it as
pl_orchestration_recipe_4. If you did not, go through steps 1-10 and create a parameterized pipeline. - Observe that each activity by default has a little green square on the right. This denotes a successful outcome of the activity. However, sometimes activities fail. We want to add an action on the failure of the Copy from Blob to Azure SQL activity. To denote failure, click on the Add output button inside the activity and select Failure:

Figure 2.24 – Possible activity outcomes
- From the Activities pane on the left, drag two Stored Procedure activities onto the canvas. Connect one of them to the green square of the Copy From Blob to Azure SQL activity and another one to the red square.
- First, configure the Stored Procedure activity that is connected to the green square in the following way:
(a) In the General tab, rename it
On Success.(b) In the Settings tab, specify AzureSQLTables as the linked service and [dbo].[InsertPipelineLog] as the Stored Procedure name. Click on Test Connection to verify that you can connect to the Azure SQL database.
(c) Click on the Import Parameters button and fill in the values in the following way:
PipelineID:
@pipeline().PipelineRunID:
@pipeline().RunIdStatus:
SuccessUpdatedAt:
@utcnow()Note
You can also use the Add dynamic content functionality to fill in the values. For each field, put your cursor into the field and then click on the little blue Add dynamic content link that appears underneath the field. You will see a blade that gives you a selection of system variables, functions, and activity outputs to choose from.
- Now, select the stored procedure that is connected to the red square in the Copy Data activity. Configure it in a similar way to the previous step, but give it the name
On Failure, and for the Status parameter, enterFailure:
Figure 2.25 – A full pipeline with On Success and On Failure branches
- It is time to test the pipeline. Run it in Debug mode and verify that, when your pipeline succeeds, you have a corresponding entry in the PipelineLog table.
- Now, in order to see the branching in action, let's imitate the failure of our pipeline. Edit your Copy From Blob To Azure SQL activity: in the Sink tab below the canvas, put any string into the tableName textbox.
- Run your pipeline in debug mode. You will see that now the Copy From Blob To Azure SQL activity failed, and the On Failure stored procedure was invoked. Verify that the PipelineLog table in the Azure SQL database has a new record:

Figure 2.26 – Entries in PipelineLog after successful and failed pipeline runs
- Publish your changes to save them.
There's more…
ADF offers another option for branching out on a condition during pipeline execution: the If Condition activity. This activity is another example of a compound activity (like the ForEach activity in the previous recipe): it contains two activity subgroups and a condition. Only one of the activity subgroups is executed, based on whether the condition is true or false.
The use case for the If Condition activity is different than the approach we illustrated in this recipe. While the recipe branches out on the outcome (success or failure) of the previous activity, you design the condition in the If Condition activity to branch out on the inputs from the previous activity. For example, let's suppose that we want to retrieve metadata about a file, and perform one stored procedure if the file is a CSV and another stored procedure if the file is of a different type. Here is how we would configure an If Condition activity to accomplish this:
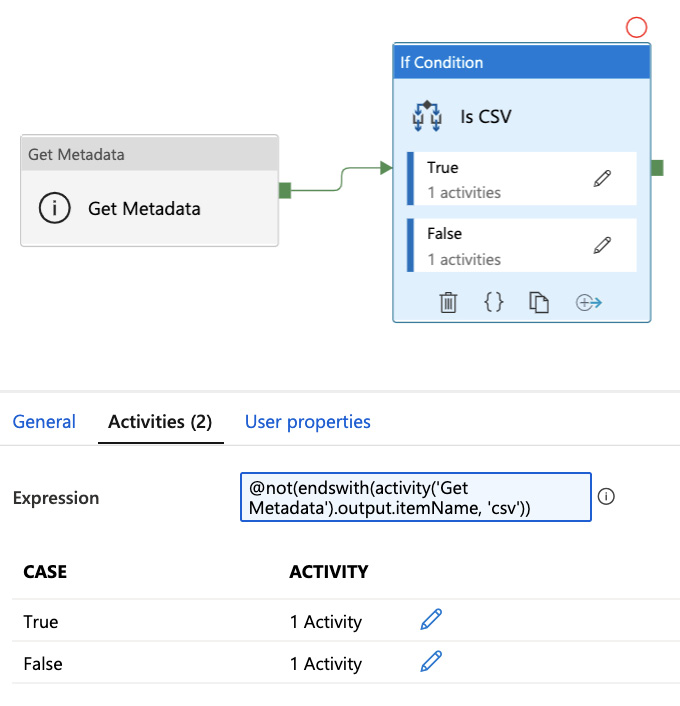
Figure 2.27 – Configuring the If Condition activity
Using the Lookup, Web, and Execute Pipeline activities
In this recipe, we shall implement error handling logic for our pipeline – similar to the previous recipe, but with a more sophisticated design: we shall isolate the error handling flow in its own pipeline. Our main parent pipeline will then call the child pipeline. This recipe also introduces three very useful activities to the user: Lookup, Web, and Execute Pipeline. The recipe will illustrate how to retrieve information from an Azure SQL table and how to invoke other Azure services from the pipeline.
Getting ready
We shall be using all the Azure services that are mentioned in the Technical requirements section at the beginning of the chapter. In addition, this recipe requires a table to store the email addresses of the status email recipients. Please refer to the Technical requirements section for the table creation scripts and instructions.
We shall be building a pipeline that sends an email in the case of failure. There is no activity in ADF capable of sending emails, so we shall be using the Azure Logic Apps service. Follow these steps to create an instance of this service:
- In the Azure portal, look for Logic Apps in Azure services. Then, use the Add button to create a new logic app.
- Name your logic app
ADF-Email-LogicAppand fill in the Subscription, Resource Group, and Region information fields. Click on Create and wait until your logic app is deployed. Then, click on Go to Resource. - In the Logic App Designer, select the When a HTTP request is received trigger:

Figure 2.28 – HTTP trigger
- In the displayed tile, click on Use sample payload to generate schema, and use the following code block:
{
"subject": "<subject of the email message>",
"messageBody": "<body of the email message >",
"emailAddress": "<email-address>"
}
Enter the text in the textbox as shown in the following figure:

Figure 2.29 – Configuring a logic app – the capture message body
- Click on the Next Step button and choose the email service that you want to use to send the notification emails. For the purposes of this tutorial, we shall use Gmail.
Note:
Even though we use Gmail for the purposes of this tutorial, you can also send emails using Office 365 Outlook or Outlook.com. In the See also section of this recipe, we included a link to a tutorial on how to send emails using those providers.
- Select Gmail from the list of services and Send Email from Actions. Log in with your account credentials:

Figure 2.30 – Configuring a logic app – specifying an email service
- From the Add new parameter dropdown, check the Subject and Body checkboxes:

Figure 2.31 – Configuring a logic app – specifying the Body, Subject, and Recipient fields
- Place your cursor inside the To text field and enter
@{triggerBody()['emailAddress']}. - In a similar way, enter
@{triggerBody()['subject']}in the Subject text field. - Finally, in the Body text box, enter
@{triggerBody()['messageBody']}:
Figure 2.32 – Configuring a logic app – specifying the To, Subject, and Body values
- Save your logic app. In the first tile, you should see that HTTP POST URL was populated. This is the URL we'll use to invoke this logic app from the Data Factory pipeline.
How to do it…
First, we shall create the child pipeline to retrieve the email addresses of the email recipients and send the status email:
- Create a new pipeline and name it
pl_orchestration_recipe_5_child. - From the Activities pane, select a Lookup activity and add it to the pipeline canvas. Configure it in the following way:
(a) In the General tab, change the activity name to
Get Email Recipients.(b) In the Settings tab, select AzureSQLTables as the value for Source dataset, and specify EmailRecipients for tableName.
(c) Also, in the Settings tab, select the Use Query radio button and enter
SELECT * FROM EmailRecipientsinto the text box. Make sure to uncheck the First row only checkbox at the bottom. Your Settings tab should look similar to the following figure:
Figure 2.33 – The Get Email Recipients activity settings
- Next, add a ForEach activity to the canvas and configure it in the following way:
In the Settings tab, enter
@activity('Get Email Recipients').output.valueinto the Items textbox. - Click on the pencil icon within the ForEach activity. This will open a new canvas. Add a Web activity onto this canvas.
We shall now configure the Web activity. First, go to the General tab, and rename it
Send Email. Then, in the URL text field, paste the URL for the logic app (which you created in the Getting ready section).In the Method textbox, select POST.
In the Headers section, click on the New button to add a header. Enter
Content-Typeinto the Name text box andapplication/jsoninto the Value textbox.In the Body text box, enter the following text (be sure to copy the quotes accurately):
@json(concat('{"emailAddress": "', item().emailAddress, '", "subject": "ADF Pipeline Failure", "messageBody": "ADF Pipeline Failed"}'))Your Settings tab should look similar to Figure 2.34:

Figure 2.34 – The Send Email activity settings
- Run this pipeline in Debug mode and verify that it works. You should have some test email addresses in the
EmailRecipientstable in order to test your pipeline. You can also verify that the email was sent out by going to the ADF-Email-LogicApp UI in the Azure portal and examining the run in the Overview pane:
Figure 2.35 – Logic Apps portal view
- We are ready to design the parent pipeline, which will invoke the child pipeline we just tested. For this, clone the pipeline we designed in the Chaining and branching activities within your pipeline recipe. Rename your clone
pl_orchestration_recipe_5_parent. - In this pipeline, delete the On Failure Stored Procedure activity, and instead add an Execute Pipeline activity to the canvas. Connect it to the red square in the Copy From Blob to Azure SQL activity.
- Configure the Execute Pipeline activity:
In the General tab, change the name to Send Email On Failure.
In the Settings tab, specify the name of the invoked pipeline as
pl_orchestration_recipe_5_child. - The parent pipeline should already be configured with the incorrect table name in the Copy activity sink (we deliberately misconfigured it in order to test the On Failure flow). Verify that this is still the case and run the pipeline in Debug mode:

Figure 2.36 – Parent pipeline after execution with an incorrect tableName value
- Verify that the email was sent to the recipients.
- Publish your changes to save them.
How it works…
In this recipe, we introduced the concept of parent and child pipelines and used the pipeline hierarchy to incorporate error handling functionality. This technique offers several benefits:
- It allows us to reuse existing pipelines.
- It makes it easier to design/debug parts of the pipeline separately.
- Finally, it allows users to design pipelines that contain more than 40 activities (Microsoft limits the number of activities per pipeline).
To craft the child pipeline, we started by adding a Lookup activity to retrieve a list of email recipients from the database table. This is a very common use for the Lookup activity: fetching a dataset for subsequent processing. In the configuration, we specified a query for the dataset retrieval: SELECT * from EmailRecipients. We can also use a more sophisticated query to filter the email recipients, or we can retrieve all the data by selecting the Table radio button. The ability to specify a query gives users a lot of choice and flexibility in filtering a dataset or using field projections with very little effort.
The list of email recipients was processed by the ForEach activity. We encountered the ForEach activity in the previous recipe. However, inside the ForEach activity, we introduced a new kind of activity: the Web activity, which we configured to invoke a simple logic app. This illustrates the power of the Web activity: it enables the user to invoke external REST APIs without leaving the Data Factory pipeline.
There's more…
There is another ADF activity that offers the user an option to integrate external APIs into a pipeline: the Webhook activity. It has a lot of similarities to the Web activity, with two major differences:
- The Webhook activity always passes an implicit
callBackUriproperty to the external service, along with the other parameters you specify in the request body. It expects to receive a response from the invoked web application. If the response is not received within the configurable timeout period, the Webhook activity fails. The Web activity does not have acallBackUriproperty, and, while it does have a timeout period, it is not configurable but limited to 1 minute.This feature of the Webhook activity can be used to control the execution flow of the pipeline – for example, to wait for user input into a web form before proceeding with further steps.
- The Web activity allows users to pass linked services and datasets. This can be used for data movement to a remote endpoint. The Webhook activity does not offer this capability.
See also
For more information about the Webhook activity, refer to the Microsoft documentation:
https://docs.microsoft.com/azure/data-factory/control-flow-webhook-activity
If you want to learn how to configure a logic app to send emails using providers other than Gmail, follow this tutorial:
https://docs.microsoft.com/azure/logic-apps/tutorial-process-email-attachments-workflow
Creating event-based triggers
Often, it is convenient to run a data movement pipeline in response to an event. One of the most common scenarios is triggering a pipeline run in response to the addition or deletion of blobs in a monitored storage account. Azure Data Factory supports this functionality.
In this recipe, we shall create an event-based trigger that will invoke a pipeline whenever new backup files are added to a monitored folder. The pipeline will move backup files to another folder.
Getting ready
- To illustrate the trigger in action, we shall use the pipeline in the Using parameters and built-in functions recipe. If you did not follow the recipe, do so now.
- We shall be creating a pipeline that is similar to the pipeline in Using the ForEach and Filter activities recipe. If you did not follow that recipe, do so now.
- In the storage account (see the Technical requirements section), create another folder called
Backups. - Following steps 1 to 3 from the Using the Copy activity with parameterized datasets recipe, create a new dataset and point it to the
Backupsfolder. Call itBackups. - Register
Event.Grid Providerwith your subscription:a. Go to the portal and look for Subscription. Click on your subscription name.
b. In the Subscription blade, look for Resource Provider.
c. Find Microsoft.EventGrid in the list and hit the Register button. Wait until the button turns green (an indication that the registration succeeded).
How to do it…
First, we create the pipeline that will be triggered when a new blob is created:
- Clone the pipeline from the Using the ForEach and Filter activities recipe. Rename the clone
pl_orchestration_recipe_7_trigger. - Rename the FilterOnCSV activity
Filter for Backup. In the Settings tab, change Condition to@endswith(item().name, '.backup'):
Figure 2.37 – Configuring the Filter for Backup activity
- In the ForEach Activity, change the Items value to
@activity('Filter For Backup').output.Valuein the Settings tab:
Figure 2.38 – Updating the ForEach activity
- In the ForEach activity canvas, remove the Metadata and Stored Procedure activities. Add a Copy activity to the ForEach canvas and configure it the following way:
Name:
Copy from Data to BackupSource Dataset:
CsvData(the parameterized dataset created in the first recipe)Filename:
@item().nameSink Dataset: The
Backupdataset - In the same ForEach canvas, add a Delete activity. Leave the default name (
Delete1). Configure it in the following way:In the Source tab, specify Source Dataset as
CsvData. In the Filename field, enter@item().name.In the Logging Settings tab, uncheck the Enable Logging checkbox.
Note:
In this tutorial, we do not need to keep track of the files we deleted. However, in a production environment, you will want to evaluate your requirements very carefully: it might be necessary to set up a logging store and enable logging for your Delete activity.
- Connect the Copy from Data to Backup activity to the Delete1 activity:

Figure 2.39 – The ForEach activity canvas and configurations for the Delete activity
- Configure the event trigger. In the Manage tab, select Triggers and click on the New button to create a new trigger. In the New trigger blade, configure it as shown in Figure 2.39. Make sure to select the Yes radio button in the Activated section:

Figure 2.40 – Trigger configuration
After you select Continue, you will see the Data Preview blade. Click OK to finish creating the trigger.
We have created a pipeline and a trigger, but we did not assign the trigger to the pipeline. Let's do so now.
- In the Author tab, select the pipeline we created in step 1 (
pl_orchestration_recipe_7). Click the Add Trigger button, and select the New/Edit option.In the Add trigger blade, select the newly created trigger_blob_added trigger. Review the configurations in the Edit trigger and Data preview blades, and hit OK to assign the trigger to the pipeline:

Figure 2.41 – Assigning a trigger to the pipeline
- Publish all your changes.
- Run the
pl_orchestration_recipe_1pipeline. That should create the backup files in the data folder. The trigger we designed will invoke thepl_orchestration_recipe_7pipeline and move the files from thedatafolder to thebackupsfolder.
How it works…
Under the hood, Azure Data Factory uses a service called Event Grid to detect changes in the blob (that is why we had to register the Microsoft.EventGrid provider before starting with the recipe). Event Grid is a Microsoft service that allows you to send events from a source to a destination. Right now, only blob addition and deletion events are integrated.
The trigger configuration options offer us fine-grained control over what files we want to monitor. In the recipe, we specified that the pipeline should be triggered when a new file with the extension .backup is created in the data container in our storage account. We can monitor the following, for example:
- Subfolders within a container: The trigger will be invoked whenever a file is created within a subfolder. To do this, specify a particular folder within the container by providing values for the container (that is, data) and the folder path(s) in the blob name begins with field (that is,
airlines/). .backupfiles within any container: To accomplish this, select all containers in the container field and leave.backupin the blob name ends with field.
To find out other ways to configure the trigger to monitor files in a way that fulfills your business needs, please refer to the documentation listed in the See also section.
There's more…
In the recipe, we worked with event triggers. The types of events that ADF supports are currently limited blob creation and deletion; however, this selection may be expanded in the future. If you need to have your pipeline triggered by another type of event, the way to do it is by creating and configuring another Azure service (for example, a function app) to monitor your events and start a pipeline run when an event of interest happens. You will learn more about ADF integration with other services in Chapter 8, Working with Azure Services Integration.
ADF also offers two other kinds of triggers: a scheduled trigger and a tumbling window trigger.
A scheduled trigger invokes the pipeline at regular intervals. ADF offers rich configuration options: apart from recurrence (number of times a minute, a day, a week, and so on), you can configure start and end dates and more granular controls, for the hour and minute of the run for a daily trigger, the day of the week for weekly triggers, and the day(s) of the month for monthly triggers.
A tumbling window trigger bears many similarities to the scheduled trigger (it will invoke the pipeline at regular intervals), but it has several features that make it well suited to collecting and processing historical data:
- A tumbling window trigger can have a start date in the past.
- A tumbling window trigger allows pipelines to run concurrently (in parallel), which considerably speeds up historical data processing.
- A tumbling window trigger provides access to two variables:
trigger().outputs.WindowStartTime
trigger().outputs.WindowEndTime
- Those may be used to easily filter the range of the data it is processing, for both past and current data.
A tumbling window trigger also offers the ability to specify a dependency between pipelines. This feature allows users to design complex workflows reusing existing pipelines.
Both event-based and scheduled triggers have a many-to-many relationship with pipelines: one trigger may be assigned to many pipelines, and a pipeline may have more than one trigger. A tumbling window trigger is pipeline-specific: it may only be assigned to one pipeline, and a pipeline may only have one tumbling window trigger.
See also
To learn more about all three types of ADF triggers, start here:
- https://docs.microsoft.com/azure/data-factory/concepts-pipeline-execution-triggers#trigger-execution
- https://docs.microsoft.com/azure/data-factory/how-to-create-event-trigger
- https://docs.microsoft.com/azure/data-factory/how-to-create-schedule-trigger
- https://docs.microsoft.com/azure/data-factory/how-to-create-tumbling-window-trigger


