Home Cloud & Networking Learn Azure Administration

Learn Azure Administration

By Kamil Mrzygłód
books-svg-icon Book
eBook $35.99 $24.99
Print $48.99
Subscription $15.99 $10 p/m for three months
$10 p/m for first 3 months. $15.99 p/m after that. Cancel Anytime!
What do you get with a Packt Subscription?
This book & 7000+ ebooks & video courses on 1000+ technologies
60+ curated reading lists for various learning paths
50+ new titles added every month on new and emerging tech
Early Access to eBooks as they are being written
Personalised content suggestions
Customised display settings for better reading experience
50+ new titles added every month on new and emerging tech
Playlists, Notes and Bookmarks to easily manage your learning
Mobile App with offline access
What do you get with a Packt Subscription?
This book & 6500+ ebooks & video courses on 1000+ technologies
60+ curated reading lists for various learning paths
50+ new titles added every month on new and emerging tech
Early Access to eBooks as they are being written
Personalised content suggestions
Customised display settings for better reading experience
50+ new titles added every month on new and emerging tech
Playlists, Notes and Bookmarks to easily manage your learning
Mobile App with offline access
What do you get with eBook + Subscription?
Download this book in EPUB and PDF formats, plus a monthly download credit
This book & 6500+ ebooks & video courses on 1000+ technologies
60+ curated reading lists for various learning paths
50+ new titles added every month on new and emerging tech
Early Access to eBooks as they are being written
Personalised content suggestions
Customised display settings for better reading experience
50+ new titles added every month on new and emerging tech
Playlists, Notes and Bookmarks to easily manage your learning
Mobile App with offline access
What do you get with a Packt Subscription?
This book & 6500+ ebooks & video courses on 1000+ technologies
60+ curated reading lists for various learning paths
50+ new titles added every month on new and emerging tech
Early Access to eBooks as they are being written
Personalised content suggestions
Customised display settings for better reading experience
50+ new titles added every month on new and emerging tech
Playlists, Notes and Bookmarks to easily manage your learning
Mobile App with offline access
What do you get with eBook?
Download this book in EPUB and PDF formats
Access this title in our online reader
DRM FREE - Read whenever, wherever and however you want
Online reader with customised display settings for better reading experience
What do you get with video?
Download this video in MP4 format
Access this title in our online reader
DRM FREE - Watch whenever, wherever and however you want
Online reader with customised display settings for better learning experience
What do you get with video?
Stream this video
Access this title in our online reader
DRM FREE - Watch whenever, wherever and however you want
Online reader with customised display settings for better learning experience
What do you get with Audiobook?
Download a zip folder consisting of audio files (in MP3 Format) along with supplementary PDF
What do you get with Exam Trainer?
Flashcards, Mock exams, Exam Tips, Practice Questions
Access these resources with our interactive certification platform
Mobile compatible-Practice whenever, wherever, however you want
BUY NOW $10 p/m for first 3 months. $15.99 p/m after that. Cancel Anytime!
eBook $35.99 $24.99
Print $48.99
Subscription $15.99 $10 p/m for three months
What do you get with a Packt Subscription?
This book & 7000+ ebooks & video courses on 1000+ technologies
60+ curated reading lists for various learning paths
50+ new titles added every month on new and emerging tech
Early Access to eBooks as they are being written
Personalised content suggestions
Customised display settings for better reading experience
50+ new titles added every month on new and emerging tech
Playlists, Notes and Bookmarks to easily manage your learning
Mobile App with offline access
What do you get with a Packt Subscription?
This book & 6500+ ebooks & video courses on 1000+ technologies
60+ curated reading lists for various learning paths
50+ new titles added every month on new and emerging tech
Early Access to eBooks as they are being written
Personalised content suggestions
Customised display settings for better reading experience
50+ new titles added every month on new and emerging tech
Playlists, Notes and Bookmarks to easily manage your learning
Mobile App with offline access
What do you get with eBook + Subscription?
Download this book in EPUB and PDF formats, plus a monthly download credit
This book & 6500+ ebooks & video courses on 1000+ technologies
60+ curated reading lists for various learning paths
50+ new titles added every month on new and emerging tech
Early Access to eBooks as they are being written
Personalised content suggestions
Customised display settings for better reading experience
50+ new titles added every month on new and emerging tech
Playlists, Notes and Bookmarks to easily manage your learning
Mobile App with offline access
What do you get with a Packt Subscription?
This book & 6500+ ebooks & video courses on 1000+ technologies
60+ curated reading lists for various learning paths
50+ new titles added every month on new and emerging tech
Early Access to eBooks as they are being written
Personalised content suggestions
Customised display settings for better reading experience
50+ new titles added every month on new and emerging tech
Playlists, Notes and Bookmarks to easily manage your learning
Mobile App with offline access
What do you get with eBook?
Download this book in EPUB and PDF formats
Access this title in our online reader
DRM FREE - Read whenever, wherever and however you want
Online reader with customised display settings for better reading experience
What do you get with video?
Download this video in MP4 format
Access this title in our online reader
DRM FREE - Watch whenever, wherever and however you want
Online reader with customised display settings for better learning experience
What do you get with video?
Stream this video
Access this title in our online reader
DRM FREE - Watch whenever, wherever and however you want
Online reader with customised display settings for better learning experience
What do you get with Audiobook?
Download a zip folder consisting of audio files (in MP3 Format) along with supplementary PDF
What do you get with Exam Trainer?
Flashcards, Mock exams, Exam Tips, Practice Questions
Access these resources with our interactive certification platform
Mobile compatible-Practice whenever, wherever, however you want
  1. Free Chapter
    Getting Started with Azure Subscriptions
About this book
Microsoft Azure is one of the upcoming cloud platforms that provide cost-effective solutions and services to help businesses overcome complex infrastructure-related challenges. This book will help you scale your cloud administration skills with Microsoft Azure. Learn Azure Administration starts with an introduction to the management of Azure subscriptions, and then takes you through Azure resource management. Next, you'll configure and manage virtual networks and find out how to integrate them with a set of Azure services. You'll then handle the identity and security for users with the help of Azure Active Directory, and manage access from a single place using policies and defined roles. As you advance, you'll get to grips with receipts to manage a virtual machine. The next set of chapters will teach you how to solve advanced problems such as DDoS protection, load balancing, and networking for containers. You'll also learn how to set up file servers, along with managing and storing backups. Later, you'll review monitoring solutions and backup plans for a host of services. The last set of chapters will help you to integrate different services with Azure Event Grid, Azure Automation, and Azure Logic Apps, and teach you how to manage Azure DevOps. By the end of this Azure book, you'll be proficient enough to easily administer your Azure-based cloud environment.
Publication date:
September 2020
Publisher
Packt
Pages
452
ISBN
9781838551452

 
Getting Started with Azure Subscriptions

With the recent growth of cloud usage, more and more companies are searching for skilled individuals who understand how the cloud works and how it enhances a company's processes and products. One of the roles needed is an Azure administrator (operator), who is responsible for configuring various aspects of that cloud solution and keeping an eye on users, usage, and configuration.

The first and the most important element when managing systems in Azure is a subscription. You will not be able to get started with Azure without a subscription as this is the main element of that cloud solution. In this chapter, you will learn how to get an Azure subscription and configure it. We will also cover typical management tasks such as managing cost, monitoring usage, and defining quotas for services. For the more advanced topics, we will take a look at Azure Blueprints and management automation using Azure Event Grid. This chapter should give you a better understanding of how to get started with Azure from an administrator's point of view and introduce you to the most basic concepts of this cloud solution without diving into more detailed topics (which are to be described later).

The following main topics will be covered in this chapter:

  • Getting an Azure subscription
  • Implementing subscription policies
  • Using Azure Blueprints for repeatable deploy and update operations
  • Checking usage and managing quotas
  • Cost monitoring and analysis
  • Implementing management automation
 

Technical requirements

To perform exercises from this chapter, you will need the following:


Getting an Azure subscription

A subscription is a logical container for your resources and users, which you have to manage while using the Microsoft Azure cloud solution.

Getting a subscription differs depending on the option you choose. By default, you have two types of subscription available—open subscriptions, where you pay for usage, and prepaid ones, which guarantee a certain level of available resources and confidence when it comes to cloud costs.

In general, we have the following open subscriptions (usage-based):

  • Pay-As-You-Go (PAYG)
  • Cloud Solution Provider (CSP)

Then there's a subscription with an agreed minimum spend:

  • Enterprise Agreement (EA)

Depending on the subscription type, once you reach its spending limit (if there is any), you may either end up with blocked resources or your subscription may automatically convert to PAYG. To obtain most subscriptions, all you need is access to a browser and possibly a credit card. The process may differ for more advanced subscriptions (such as CSP or EA), which will require coming to an agreement with a vendor. All of the required steps will be described in this chapter in the following sections.

There is also one more difference regarding the three mentioned subscription types when it comes to payments. In general, your choice may reflect a legal requirement or your company's business model:

  • With PAYG, you are billed monthly for all of the resources you used during the billing period (which is one month). Once the billing period ends, an invoice is generated for you with a summary. This summary may help you to understand the bill and analyze the cost. Note that an invoice is usually not issued from the country you live in or where your company is registered. 
  • With EA, you are committed to spending on Azure a minimum value that you agreed upon. If you spend less, there is no way to restore lost credits.
  • With CSP, you will be able to contact a local reseller to be charged by their company. It is a much easier way to pay for cloud resources from a financial and legal point as you are working with a company that is co-located with yours and they are responsible for charging you, not Microsoft directly. 

Getting started directly relies on the option you have selected as the processes are quite different. The easiest option requires you only to provide a debit or credit card number, and the most complicated will require you to come to an agreement with Microsoft, so you have agreed on the monetary commitments and your benefits. 


PAYG

This is the most simple option, where the cost is simply calculated based on your monthly usage of Azure resources. Such subscriptions can be canceled anytime and the accepted payment type is s credit or debit card attached to the subscription. The currency you will be billed in depends on the region where you are currently located—for example, for Canada, it will be in Canadian dollars while for the Netherlands, it will be in euros. The most common currencies are indeed dollars and euros, but for some particular countries (such as Norway, Brazil, or Mexico), local currencies are accepted.

Let's follow these steps to get a PAYG subscription:

  1. Go to https://azure.microsoft.com/en-us/offers/pay-as-you-go/ and click on the Purchase now button, as shown in the following screenshot:
Figure 1.1 - Purchase a PAYG subscription
If you are not currently signed in to Azure, you will be redirected to the login screen, where you have to enter your Microsoft Account credentials. If you do not have an account, you can create one from the login screen. It is not possible to get a subscription without having a Microsoft Account.
  1. Sign in if you are not signed in already.
  2. Fill in the form to finish the process of obtaining a subscription:
Figure 1.2 - Subscription purchase form
  1. Click on the Sign up button to start the process of creating a subscription:
Figure 1.3 - Finishing the subscription purchase

Once all of the data and your card are validated, you are ready to go—you can sign in with your Microsoft Account at https://portal.azure.com, where you will be able to start provisioning resources in your brand new Azure subscription.

Now, let's look at how we can get a CSP subscription.


CSP

Another option to obtain a subscription is to collaborate with Microsoft's partner, which offers Azure indirectly and supports you in the process of obtaining access to the cloud, services, and deployments. All providers are certified by Microsoft, so you can be sure that you are working with competent specialists who will help you in case of technical issues and questions. This is the best solution when you seek expertise and do not have resources, which will take care of managing the more formal aspects of having cloud solutions in connection with your business.

Let's follow these steps to get a CSP subscription:

  1. Go to https://www.microsoft.com/en-us/solution-providers/home and enter your city or address, as shown in the following screenshot:

Figure 1.4 - CSP search form
  1. Click the GO > button and you will see multiple search results categorized depending on criteria such as distance and responsiveness
  2. Click on the selected provider to get a better picture of what is offered and on what terms.
  3. Click on the SELECT PROVIDER + button to add it to the contact form:
Figure 1.5 - Choosing a provider
  1. Click on the Contact selected providers button to get a form that will allow you to enter everything a provider needs to know before starting cooperation:
Figure 1.6 - Contacting a selected provider
  1. Wait for an answer from the provider.

Next, let's take a look at EAs.


Enterprise Agreement

This is a special type of subscription intended for big players. In general, when your monthly bill is more than only a few hundred dollars, a PAYG subscription does not offer anything more than simplicity. When this is the case, you can get an Azure subscription by signing an Enterprise Agreement. The way this particular option works is that you have to make an upfront monetary commitment. The specific use case of an EA is the possibility to create multiple subscriptions on your own—something PAYG does not offer. The benefits of this offering are really rich—you will be able to find more details in the Further reading section of this chapter.

The process of getting an EA is much more complicated than the other ones—you need to contact Microsoft directly to come to an understanding of aspects of the agreement such as monetary commitment, your company's requirements, and enrollments. The basic process is as follows:

  1. Prepare your company's requirements regarding infrastructure and services needed.
  2. Simulate the monetary commitment and how you can leverage the assigned resources.
  3. Contact Microsoft to negotiate terms and sign the agreement.

Next, let's get a deeper understanding of the subscription models.


Understanding different subscription models

In general, depending on the option selected, the outcome will be a little bit different:

  • If your choice was PAYG, a subscription is created immediately after your credit/debit card is validated. You can start work with it without any limits. By performing the steps from the PAYG section, you have connected your credit/debit card with an Azure subscription. This means that any resource that you provide from now will result in your card being charged the appropriate cost. On the other hand, your subscription has no spending limit by default—take that into account when deploying complex infrastructures containing multiple virtual machines and databases.
  • If you have selected an EA, you will have to contact Microsoft and agree on specific agreement requirements and assumptions. Once you both agree on the common terms, a subscription will be created and you will able to manage it and extra subscriptions under it.
  • If you decided to cooperate with a CSP, you will have to wait for an answer and then come to an agreement on payments, technical support, and your requirements. Once it is established, your CSP is your first line of support and direct contact when considering Azure. The most important thing is to select a proper provider by carefully reading their offer, which is described in step 3 of the CSP section.

For a PAYG subscription, three sections need to be filled:

  • Payment Information: As mentioned earlier, you need a credit or debit card to obtain a PAYG subscription. You will have to fill in information here such as the card number, the name on the card, and your address.
  • Add technical support: Optionally, you can select a support service for your subscription. While this may be obsolete for a Dev/Test subscription, I strongly advise you to buy a support plan for your production subscriptions. There are three different options available: Getting started, Production, and Business-critical. They all are different in many aspects (such as support availability or response time) and, of course, give you a different level of confidence. 
Note that if you are covered by Microsoft Premier support, you do not have to buy a support plan here as your subscription will be covered by it.
  • Agreement: This includes your agreements to subscription, offer details, and privacy statement.

Remember that an empty subscription is free of charge. As long as you do not have resources provisioned (or you have provisioned only free ones), your card will not be charged.

An Enterprise Agreement is quite different as you have three different kinds of enrollments:

  • Enterprise Enrollment: This is designed for purchasing end user technologies on a per-user, per-device, or hybrid basis.

  • Server and Cloud Enrollment: You can receive better pricing and cloud-optimized licensing options by committing to one or more cloud technologies from Microsoft.

  • Subscription Enrollment: This allows you to subscribe to Microsoft product licenses.

As we are talking about Azure administration, the most interesting option for you will be Server and Cloud Enrollment (SCE). There are four different SCE components:

  • Core Infrastructure: It includes products such as Windows Server and the requirement of Core Infrastructure Suite (CIS) coverage for all of them.

  • Application Platform: It offers SQL Server with the requirement of Full Software Assurance coverage.

  • Developer Platform: It contains Visual Studio Enterprise and MSDN platforms with the requirement of Full Software Assurance coverage.

  • Microsoft Azure: This includes all Microsoft Azure services.

Depending on the selected option, you will have different requirements to fulfill—this is why EA is designed for bigger companies that nonetheless require hundreds of licenses and manage hundreds of subscriptions.

It is impossible to cover all EA aspects in such a short section. If you are searching for the most flexible and advanced Azure offer for your company, take a look at the links available in the Further reading section to get the full picture.

Once you have your subscription, you can start managing it—setting up policies for resources, monitoring expenses, and managing access. This chapter will show you multiple ideas regarding administering subscriptions and what falls under them, so you can focus on getting the most from your subscription instead of fighting with unclear documentation and settings.

Besides the business subscriptions presented in this chapter, you may have access to slightly different subscription types:

  • Visual Studio subscriptions: If you are a .NET platform developer, you may already have access to Azure by leveraging your free grant offered as a part of the Visual Studio subscription. Depending on the level, you may have from 50 USD to 150 USD per month to spend on Azure services.
  • Microsoft sponsorship subscriptions: Some subscriptions are sponsored by Microsoft itself. This includes agreements on delivering proofs-of-concept of technologies, academic use, or specific individuals such as MVPs, who use those for training and various projects.

When you have your subscription ready, you can proceed to the next sections of this chapter. The next one will describe in detail how you can implement various policies, which can help to manage your account on a subscription level.


Implementing subscription policies

A subscription allows you to manage and control the cost of your Azure resources. Besides the financial aspect, it is also the main control point, where you can store policies that determine what resources can be provisioned and which features can be used. Managing such elements would be cumbersome without proper support in Azure. Fortunately, there are many built-in definitions that will help you to control things such as resource locations or proper security configuration.

You do not have to go to the portal to get information regarding compliant/non-compliant resources—there is a detailed guide, which describes other methods (PowerShell and RESTful APIs) and that can be exceptionally helpful when automating governance over resources. To read it, check out https://docs.microsoft.com/en-us/azure/governance/policy/how-to/get-compliance-data.
 

Getting started with Azure Policy

To get started, we will have to actually create a policy. The process of assigning a policy is quite simple and can be covered by the following steps:

  1. Search for the Subscriptions blade—the easiest way to do so is to use the search field at the top of the Azure portal, as shown in the following screenshot:
Figure 1.7 - Searching for the Subscriptions blade
  1. Select the subscription you are interested in. The last thing you need to do is to click on the Policies blade:
FIgure 1.8 - The Policies blade 
  1. Click on the Assign policy button, which will display a form where you can define how the policy should work:

Figure 1.9 - The Assign policy button
  1. Assign a policy and configure the appropriate fields as follow: set the Scope of your subscription (in my case, it is Pay-As-You-Go) and leave the exclusions empty and the policy definition as Not allowed resource types. Remember that you can select either a built-in or a custom policy (if you have one).
  2. Initially, the compliance state may be displayed as Not registered as in the following screenshot. Wait a few minutes before proceeding:

Figure 1.10 - Created policies view
  1. If this status is diplayed longer than a few minutes, make sure a proper resource provider for the policies is registered. To do so, go to the Resource providers blade and check the status of the provider:

Figure 1.11 - Subscription resource providers
  1. Once the status is displayed as Registered, you can test the results. Try to perform a forbidden action (such as creating a forbidden resource type). If you do so, you will see a result similar to the following:

Figure 1.12 - Validation error

When a policy is enabled and working, it constantly monitors your resources against configured parameters. Depending on its configuration, it may either block deploying particular services or enforce a specific naming convention. An audit policy can report on non-compliant resources and, with enforcement mode enabled, can deny the creation of resources that don't comply with the policy.

Let's now check what a policy validation result may look like.


Policy validation results

Each policy constantly monitors your resources and validates them against defined rules. When there is a validation error generated by a policy, you can click on it to reveal the details, which confirm that the action was blocked by the policy (see Figure 1.13):

Figure 1.13 - Policy validation error details

The results of the working policy may differ depending on its type. However, they mostly focus on enforcing or forbidding an action, which will result in an error displayed in either a portal or a command line. When you want to assign a policy, you must configure it using various available options. Here, you can find the description of the fields displayed:

  • Scope: This field defines what resources the policy is assigned to. There is a possibility to select either a subscription or a resource group.
  • Exclusions: If you find the scope a little bit too generic, you can add excluded resources that will not be covered by a policy.
  • Policy definition: There are two types of supported policies—built-in and custom. Unfortunately, custom policies are out of the scope of this book (but if you find this topic interesting, you can find a link in the Further reading section to read more about it). A policy is a definition that includes a rule and an effect and is triggered when a rule is not satisfied.
  • Assignment name: It is the display name of an assigned policy.
  • Description and Assigned by: These are optional fields that gather extra information about a policy.

Let's look at some examples of Azure policies that are available.


Examples of Azure policies

To give you a better understanding of the topic, we can take a look at various examples of policies you may use. There are many different kinds of available policies—let's try to describe the most interesting ones:

  • Audit CORS resource access restrictions for a function app: When using Azure Functions, you may want to force developers to assign proper Cross-Origin Resource Sharing (CORS) configuration to function apps, so they are not accessible from all domains. A very simple and helpful policy that addresses a common security issue when hosting web applications.
  • Audit resource location matches resource group location: To avoid confusion, you can ensure that resource groups and their resources are always provisioned in the same location.
  • Audit unrestricted network access to storage accounts: If your storage accounts should not be available from the internet, you can enforce their owners to configure network rules so they are only accessible from configured networks.
  • Not allowed resource types: Sometimes, your organization just cannot deploy some of the resources (for example, you need to audit the whole code base, so you cannot use Azure Functions). This policy is something you want when forbidding the use of a particular resource is essential.

When you assign any of the policies, it will immediately start to watch for your resources and check whether they are compliant with that policy.

Some of the policies require you to set some parameters before they can be added. Carefully check the Parameters section to configure them exactly as you want.

Of course, the error displayed previously (see Figure 1.13) is in fact returned by an API powering Azure resources. That means that it will be returned also for other operations (such as using the command line or PowerShell).

The policy I described previously was executed during the creation of a resource, but of course, it also works for the resources created previously. Subscription policies are really powerful tools for an Azure administrator, allowing for setting strong fundamentals for further management activities such as automation and building an organization-wide mindset of what is allowed and what is not. The more resources your subscription has, the more difficult it is to manage and keep everything up to the defined rules. This is especially true for all companies for which compliance is crucial to work effectively—if you have thousands of VMs, app services, and storage accounts, you just cannot rely only on telling everyone that this one particular feature isn't allowed. For those scenarios, use properly set up policies, which can cover many different scenarios, especially if you create a custom one.

Check out the next section to learn more about ensuring proper policies are assigned to Azure resources using Azure Blueprints.


Using Azure Blueprints for repeatable deploy and update operations

Sometimes, using policies is just not enough. Reasons may vary—the number of projects is too big to govern via policies, they become obstacles because you cannot enforce a particular rule, or you find complex designs with them to be just too complicated. For all of those scenarios, Microsoft has prepared an additional tool for Azure administrators called Azure Blueprints. They are like sketches for buildings—you can set collect all required artifacts in one place and use it for multiple deployments. With this feature, you can orchestrate multiple deployments and shorten the time needed to achieve a coherent architecture. If you are familiar with ARM templates, you may find Azure Blueprints much easier to understand as they offer similar functionalities to Resource Manager. On the other hand, it is a great tool for preserving a connection between a blueprint and a deployment or manage multiple subscriptions at once.

Note that, at the time of writing this chapter, Blueprints were marked as in Preview. That means that this feature has not reached General Availability (GA) and is not offered full support when used in production. 
 

Getting started with Blueprint assignment

Blueprint definition assignment is similar to a policy assignment and is covered by the following steps:

  1. Use the search box at the top of the portal and search for Blueprints:
Figure 1.14 - Searching for the Blueprints blade
  1. Then, you will see a welcome screen, where you can get started with the service:

Figure 1.15 - The Blueprints blade
  1. Click on the Create button under the Create a blueprint section.
  2. You will see a new screen where you can see various samples. For now, click on the Start with blank blueprint button:

Figure 1.16 - Starting with a blank blueprint
  1. Provide values for the blueprint name, description, and definition location.
  2. Add artifacts (roles that will be assigned to resources and resources that will be deployed—in general, side effects of a blueprint assignment) by going to the artifacts tab.
  3. Save the blueprint definition.
  4. Click on Publish blueprint, so it will become available for assignment.
  5. To assign a blueprint, you have to click on the Assign blueprint menu item:

Figure 1.17 - Assigning a blueprint
  1. Decide whether Lock Assignment should be enabled or not
  2. Provide all of the mandatory parameters, such as the name of a resource group a blueprint will be assigned to or the configuration of a resource (if you did not provide them when defining the blueprint). 

When creating a blueprint definition, you will see a form where you can define your blueprint. The very first thing needed is to provide the following:

  • Blueprint name: This field is required to give a blueprint a unique name that will help you to understand what it is about.
  • Blueprint description: If you need to add extra information, you can type it here.
  • Definition location: This is a place for storing your blueprint.

The form described previously can be seen in the following screenshot:

Figure 1.18 - The Create blueprint form
Under the hood, Azure Blueprints is stored with Azure Cosmos DB for resiliency, low latency, and geo-replication. This gives you the best performance, no matter where your resources are being deployed.

Once you are satisfied with the definition, you can save it. Initially, blueprint's status will be displayed as Draft—as long as it is not published, you can easily modify and adjust it to your needs. To assign it, you will have to click on Publish blueprint so it will become available for assignment:

Figure 1.19 - Publishing a blueprint
Note that publishing a blueprint requires providing a version—this is to allow the versioning of definitions so you can introduce breaking changes without breaking existing setups.

Now, we will learn how to assign an Azure blueprint.


Assigning an Azure blueprint

When making an assignment, you will see a screen where you will have to provide the following:

  • Subscription(s): This means which subscriptions this particular blueprint should be assigned to.
  • Assignment name: As the same blueprint can be assigned to multiple subscriptions, you have to give the assignment a unique name to avoid confusion.
  • Location: When deploying resources, a blueprint requires a Managed Identity to authenticate the operation. This field allows you to set the location where credentials will be stored.
  • Blueprint definition version: If your blueprint has more than only one version, here, you can select the one you are interested in.

Besides the preceding settings, you will have to also decide whether Lock Assignment should be enabled or not. Locking artifacts created via Azure Blueprints makes much sense when you consider that they are governed by an administrator, not the resource owner. To make a long story short, the scenarios are as follows:

  • When a lock is assigned, even a subscription owner cannot change/delete a resource. This ensures that it works exactly as assumed and planned.
  • The lock cannot be removed without removing a blueprint assignment.

An example setup for a blueprint assignment could look like this:

Figure 1.20 - Assign blueprint form

As Azure Blueprints is quite a new service, it is constantly enhanced to provide functionality expected in the market. It is a great tool for ensuring a certain level of compliance and will be used mostly in heavily regulated environments. When adding artifacts to a blueprint definition, you have four different artifacts available:

  • Policy assignment
  • Role assignment 
  • Azure Resource Manager template
  • Resource group

By using each artifact, you can create a complex definition that will ease the process of deployment and setting up resources. Let's think about the following scenario—I would like to make sure that both Azure App Services and Azure Functions are deployed with HTTPS Only enabled. Additionally, I want to assign a specific user with a specific role to each deployment. Last but not least, I want to deploy a resource group with an ARM template, which creates a storage account. My current setup looks like this:

Figure 1.21 - Blueprint artifact parameters

Note the following:

  • You do not have to enter all parameters during the process of creating a blueprint—they can be evaluated while creating a deployment.
  • When using the resource group artifact type, each deployment covered by a blueprint will create additional resources defined by it. Using it makes the most sense when attaching an ARM template with extra resources (such as a custom monitoring solution, shared storage, or other similar elements).

To test an assigned blueprint, you can do the following:

  1. Deploy a new function app called azureblueprint inside a resource group called blueprint-euw-rg. You should see a similar result to mine, shown in the following screenshot:

Figure 1.22 - The result of running a blueprint with an additional resource group created
  1. Besides the declared resource group, Azure Blueprint created an additional group called azureadministration-euw-rg (the name is the result of the passed parameter to a definition, which creates a resource group). This extra resource group contains a storage account with a generated unique name, which I can use for any purpose:

Figure 1.23 - The storage account automatically created by a blueprint
  1. Let's check other resource assignments. One of the rules of my blueprint was to assign a user with a particular role (check the role assignment artifact in Figure 1.24). A quick look at the IAM blade gives the expected result:

Figure 1.24 - Role assignment automatically created by a blueprint
  1. The last thing to check is that the extra two policies were created. To do so, I go to the Policies blade in my subscription:

Figure 1.25 - Policies blade

From that, you can clearly see that I have additional policies added to the previous ones (Audit HTTPS only access for a Function / Web App):

Figure 1.26 - Azure policies with compliance status

Policies allow for a certain level of inertia—even if somebody managed to create a resource, which was forbidden, very often you do not have to act immediately. The preceding screen (Figure 1.26), however, gives you the possibility to quickly check whether the compliance level is not below the assumed level. 

With the preceding information, you should be able to enhance your current administration tasks and be able to automate many activities such as user assignments or mandatory resources provisioning. When working with Azure Blueprints, remember the following rules:

  • Name the assignments uniquely to avoid collisions.
  • Use the versioning feature of Azure Blueprints to introduce breaking changes without breaking current assignments.
  • Use Lock Assignments to ensure that no one can mess with artifacts deployed by a blueprint. The only thing to remember is the feature inertia—Resource Manager may need up to 30 minutes to finish propagating locks for the artifacts.

Azure Blueprints is one of the best tools when it comes to managing subscriptions and resources at an enterprise level. The next topic we will cover will guide you through the process of usage and quotas management.


Checking usage and managing quotas

When working as an Azure administrator, it is crucial to effectively manage current usage for your subscription and assigned quotas for different resources. As you are probably aware, Azure offers various limits for most of the available services, with some of them being a soft limit that can be extended after contacting support.

When getting your very first subscription, you may realize that soft limits are much lower than you would expect. This is especially true for all non-commercial/test subscriptions, which are meant for educational purposes or creating a proof-of-concept solution. In fact, Microsoft aims at helping their customers to not hurt themselves, so some default quotas are lowered to limit spending capabilities.

Each Azure service offers different limits depending on the resource type and region availability. While, in most scenarios, it will not be the case, if you are about to deploy a complex system containing, for example, hundreds of virtual machines, you may be affected by a quota that will prevent you from completing a deployment. When in doubt, always check https://docs.microsoft.com/en-us/azure/azure-resource-manager/management/azure-subscription-service-limits—it contains limits for all Azure services and storage.

Remember that quotas are assigned to each region separately—if you change the soft limit in one region, you will not get an increase in other ones!

As you can see, the maximum request rate is set to 20,000 requests per second. However, if you read the documentation closely, you will figure out that this particular limit can be extended after contacting Azure support. Other examples of soft limits are as follows:

  • Throughput units in Azure Event Hub
  • IoT Hub units
  • IoT Hubs in a subscription
  • Container operations for Azure Container Instances
  • Load balancer limits

The question is—how can you check the current usage and limits for your subscription? To check usage and manage a subscription quota, you will need to perform the following steps:

  1. Go to the subscription you are interested in.
  2. Click on the Usage + quotas blade. To do so, you can search for Subscriptions in the search box at the top of the Azure portal:

Figure 1.27 - Searching for the Subscriptions blade
  1. Search for the blade in the Settings section:

Figure 1.28 - The Usage + quotas blade

You will see a list of the current usage depending on the provider and location.

If you do not see any usage information, make sure you have selected all providers and locations available.
  1. Click on the Request Increase button on the upper right of the screen. This is the quickest way to request an increase for a specific quota.

You will be redirected to the support ticket, where you can provide all of the necessary details:

Figure 1.29 - Creating a new quota increase ticket

Once you send a ticket, you will have to wait for the support to review it and decide whether it is possible to fulfill your requirements. Here, you can find the usage data available for my subscription:

Figure 1.30 - Current quotas status

Let's assume that you are approaching the maximum number of 250 accounts—this could be the moment to send a request ticket to the support. After sending a ticket requesting changing the assigned limits, Azure support will review what is required and what your particular use case is. In fact, whether additional resources will be assigned to your subscription may rely on the business use case you provided—if you are buying many services from Microsoft, it is more likely that your request will be accepted. Depending on the type of your subscription (PAYG, CSP, or EA) it may or may not be easy—the easiest way to getting your limits changed is becoming a close partner to Microsoft with common goals. This, of course, does not mean that if you are not a Fortune 500 company, your request will be rejected—as mentioned earlier, it all depends on the use case.

Remember to actively monitor your subscription against quotas, especially if you are building a complex system with multiple resources. In some cases, you may find it especially helpful to divide your projects into multiple subscriptions—in such a setup, each project will have its own limits. This will be the easiest to achieve with EA, but of course, it is also possible for PAYG subscriptions (although it is much more complicated when it comes to managing things). Also, when having several systems under your command, make sure you are familiar with Azure resource limits, which you can find in the Further reading section—it will help you to govern them and plan further actions.

With proper cost and usage management, you can be certain your spending is under control. To dive into this topic further, take a look at the next section, which will describe how to monitor and analyze them.


Cost monitoring and analysis

If you are an Azure administrator, you are probably responsible for monitoring and managing the cost of all services hosted in the cloud. There are many factors related to this particular case—the types of used resources, the scale of your projects, or different discounts that you may apply, depending on the contract you have with Microsoft. Azure offers different options to make your life easier—starting from easy-to-read dashboards to cost alerts, which help you to monitor the current usage. In this section, you will learn how to use those tools and understand their outcome.

Before you really get started with hosted services, you can estimate the cost of the architecture using the following calculators:

  • Pricing calculator: An Azure cost calculator, which can be found at https://azure.microsoft.com/en-us/pricing/calculator/, it is a tool that you can use to estimate how much each Azure service will cost. Of course, these calculations are only estimates as it is really hard to plan everything upfront. Nonetheless, treat it as the first step in planning funds for your architecture.
  • Total Cost of Ownership (TCO) calculator: This is another Azure calculator, which is available at https://azure.microsoft.com/en-us/pricing/tco/calculator/. Using the cloud is not only about using cloud services, but also about changing the responsibilities and moving expenses from one place to another. This calculator helps you to understand the total cost of your architecture including managing server infrastructure, updates, licenses, and many more. 

The preceding tools are great to understand the expected cost of the whole cloud architecture that we are about to manage. However, they require that you know how each service is configured and what features will be enabled. Doing this upfront may be tricky, so they are not always an ideal solution for managing the cost. This is why we will have to take a look at the real usage and calculated cost to be able to control it.

To work with cost analysis, you will need a working Azure subscription. The important thing here is also correct permission assigned to your account—you have to be able to read subscription cost data (by being, for example, the owner of a subscription).

Cost management is enabled by default on all subscriptionsall you need here is to access the correct section in the Azure portal:

  1. To access the cost management option, search for it in the search field at the top of the portal:
Figure 1.31 - Searching for the Cost Management blade

From this point, you can access different blades such as Cost analysis, Budgets, and CloudynWhen you enter the subscription screen, you should be able to see a screen similar to mine:

Figure 1.32 - Current cost charts

Let's focus quickly on the information displayed here. We have two categories, which inform us about the current cost of the subscription:

  • Cost by resource: This chart displays the total cost of the subscription divided by the resources. As you can see, in my case, almost 90% of the cost is generated by a resource named kamzcosmos (which is probably an Azure Cosmos DB instance).
  • Spending rate and forecast: This is an interesting chart that gives you an insight into the forecast of your spending. It also allows you to see how dynamically the cost changes.
The Spending rate and forecast chart may look a little bit different depending on the type of your subscription. In the preceding example, I presented a subscription that has a fixed limit of 130 EUR allowed for each month. When using, for example, a PAYG subscription, starting credit will not be displayed.

When you go to the Cost Management, you will see a new blade where multiple features are available:

Figure 1.33 - The Cost analysis blade

The available options will be briefly described in the following.


Cost analysis

To get a better overview of how much each resource costs (or a resource group or a location), you can use Cost analysis to get a personalized view of different spending categories. Besides the main chart representing the accumulated view, you will have access to three additional charts, which you can alter to get a different categorization of resources:

Figure 1.34 - Cost analysis per service name, location, and resource group name

There are many interesting categories that you can use to understand the cost—you can divide services using tags, their tiers, invoice number, or even their GUIDs. If you have many resources, this becomes especially helpful as it allows you to use advanced filtering and better distinction.


Budgets

Microsoft Azure allows you to create budgets, which you can use to control the cost of the cloud services. To use this feature, you have to go to the Budgets blade and click on the + Add button. Doing so will display a form that you can use to set a budget with an alert, which will trigger if the current cost of your subscription exceeds the threshold:

Figure 1.35 - Creating a budget

In the preceding example (Figure 1.35), I have created a budget of 90 USD with an alert that will trigger if I spent at least 90 USD.

Note that the Amount field of the budget relates to the currency set for the subscription.

There is an additional feature of budgets that, from your perspective, should be very interesting. As you have probably noticed, you can divide your budget into many categories, each triggering another kind of action group. Action groups can be managed by clicking on the Manage action groups button:

Figure 1.36 - Setting the alert of a budget

They allow you to enhance your budget with an additional level of automation using services such as Azure Functions, Azure Logic Apps, or Azure Automation to take a specific action in addition to sending an alert. Here, you can find an example with a runbook, which will stop all virtual machines in a resource group:

Figure 1.37 - Creating an action for a budget

Once a budget is created, you can see it in the main window of the feature:

Figure 1.38 - Budget status

Here, you can find an example mail triggered by defined alert rules. Note that it contains all of the necessary details you need to understand what is happening—when the budget started, what is its maximal value, and the current state:

Figure 1.39 - Budget alert email result

Such an email can be really valuable, especially when limiting expenses is crucial for a business to run smoothly. The important thing here is that you should not rely on a single channel of communication only—the email message could get lost or your mailbox might have gone down—if the budget alert is really important, always implement a backup plan for it.


Azure Advisor

In most cases, the Azure portal features should fit most of your needs. One more thing worth mentioning is Azure Advisor, which you can find in the Cost Management blade:

Figure 1.40 - Advisor recommendations blade

By clicking on it, you may find helpful tips related to the cost optimization for your subscription. If you have many different resources, it may be worth checking once in a while whether you have missed some occasions for saving extra money by tweaking provisioned resources.

When you set alerts via budgets in the cost management of your subscription, you will get an email each time you reach the threshold. As in most cases, you will not be the only administrator; a group of people will be notified to take a look and check which resources are utilizing the budget the most. You will find this feature really helpful, especially if you have a strict requirement when it comes to cloud cost. By adding action groups, you can plan automated saving based on the rules you define. We can think of an example here:

  • When you reach 75%, you send an email to all administrators.
  • When you reach 85%, you can run a script that will scale down Dev/Test environments.
  • When you reach 90%, you send an SMS to all administrators, send an email to all engineers, and shut down Dev/Test environments.

With such flexibility, you can think of several scenarios that will be appropriate to your current workloads and the characteristics of your systems.

You just learned about budgets and how to configure them to monitor your resources. Let's now continue with other automation solutions that may help you to keep an eye on the Azure services and applications you manage.


Implementing management automation

Using all of the preceding knowledge should help you to better manage your subscriptions, their cost, and the policies assigned to them. There is one more thing that comes to mind when thinking about such complex tasks—automation. Fortunately, Azure offers full integration with its services, so you can build your own pipelines for handling additional tasks and monitoring actions.

Understanding the basics of the mentioned services is crucial to be able to get started with this topic. Once you are familiar with them, go to the subscription you want to automate.

To finish the integration, we need a service that will take the JSON string and push it further or trigger an action. For this example, I selected Azure Logic Apps, which seems like a better match for an administrator than Azure Event Hub and can help you to build a complex solution quickly.

We will not cover the process of creating an Azure Logic App in this book—if you need guidance, check https://docs.microsoft.com/en-us/azure/logic-apps/quickstart-create-first-logic-app-workflow in the documentation.

Now we are ready to integrate the subscription with the service. To perform this exercise, you will need the following:

  • A working Azure subscription
  • Azure Logic Apps instance, which you can integrate with Azure Event Grid

Implementing automation will require deploying Azure Event Grid and connecting the gathered data with Azure Logic Apps. All of the steps are described here:

  1. Use the search box at the top of the Azure portal and type your subscription name (or just use it to go to the Subscriptions blade):

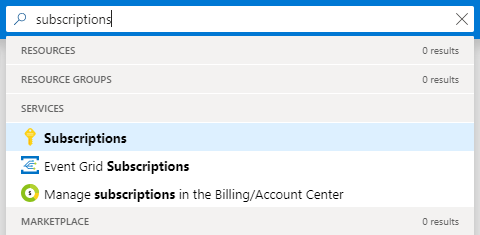
Figure 1.41 - Searching for the Subscriptions blade
  1. Click on the Events blade, which is the starting point to create an Azure Event Grid subscription:

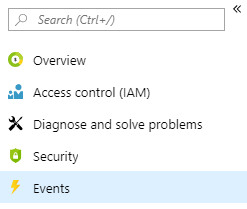
Figure 1.42 - Events blade
  1. Click on the + Event subscription button. You will see a new screen where you can enter details of a new subscription as shown in the following screenshot (Figure 1.43):

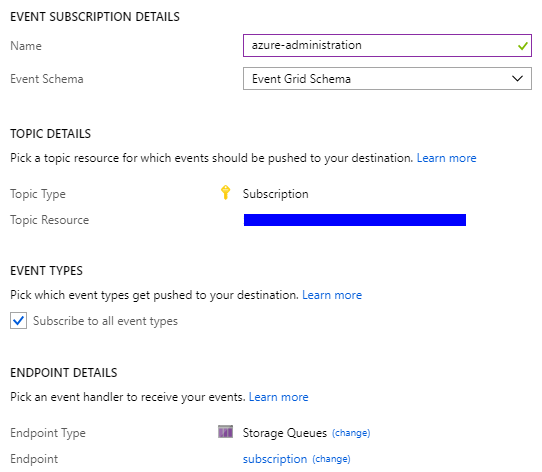
Figure 1.43 - Creating an event subscription
  1. When you click on the Create button, the process of creating a subscription will start. After a moment, you should be able to see a screen similar to mine:
Figure 1.44 - Current event subscription
  1. Go to your Azure Logic Apps instance and click on the Logic app designer blade:
Figure 1.45 - Logic app designer blade
  1. Search for Azure Queues, which is also available as a part of the recommended services:

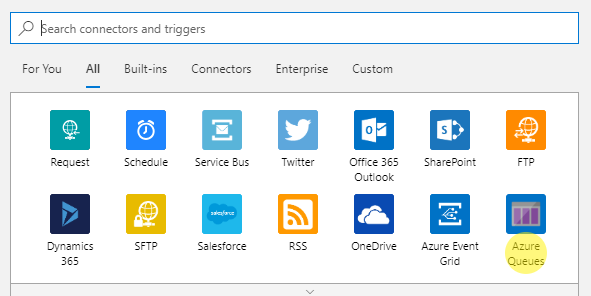
Figure 1.46 - Recommended connectors with Azure Queues visible in the bottom-right corner
  1. Click on the Azure Queues connector.
  2. Provide a name for the connection and select the storage account where messages are stored.
  3. Set the queue name and the check frequency.
  4. Save the application.

Before a subscription is created, you have to provide additional details:

  • Name: This is a unique name for your subscription that will help you to distinguish it from the others.
  • Event Schema: You have three different schemas available here. As this section is not about digging deeper into Azure Event Grid, you should select the Event Grid Schema option. Other ones (Cloud Event/Custom) would also be correct here as the choice changes the schema without affecting the payload.
  • Subscribe to all event types: By deselecting this checkbox, you will have the opportunity to explicitly select event types you are interested in. In general, it is a good idea to subscribe to all nine events, but maybe your particular case will have different requirements so feel free to choose anything you want.
  • Endpoint details: You have four different options available here: WebHook, Storage Queue, Event Hubs, and Hybrid Connections. For the purpose of this exercise, I selected Storage Queue, but again, you can create a connection using any connector you like. The WebHooks and Storage Queues options are the most straightforward ones and suit the most needs in most of the integrations made with Azure Logic Apps.
Note that you will have to create a new instance of a queue or Azure Event Hub if you do not have one when creating a connection.

At this moment, there is no event sent to the queue or generated by a subscription. To test the functionality, let's create a new resource, which should generate an event. For this exercise, I added an additional storage account named azureadministratortest

Monitoring events via the Azure portal may be cumbersome as the chart is refreshed only once in a while. For a better understanding of what is going on, use the connector you defined during a subscription creation.

As I used a storage account as my endpoint, I can check the queue whether there are any events related to the resources in my subscription. To do so, I used Microsoft Azure Storage Explorer (https://azure.microsoft.com/en-us/features/storage-explorer/), which is a free tool you can download and install on any operating system:

Figure 1.47 - Generated events stored within Azure Storage Queue

As you can see, I already have plenty of different messages generated by resources. Some of them are related to security events and some of them tell me details about services provisioned. One of the events is specifically related to my new storage account:

{
"subject": "/subscriptions/.../resourceGroups/azureadministrator-euw-rg/providers/Microsoft.Storage/storageAccounts/azureadministratortest",
"eventType": "Microsoft.Resources.ResourceActionSuccess",
"eventTime": "2019-02-09T17:36:55.8588074Z",
"id": "c1950090-61e0-4627-9b77-776890ffb710",
"data": {
"correlationId": "c1950090-61e0-4627-9b77-776890ffb710",
"httpRequest": {
"resourceProvider": "Microsoft.Storage",
"resourceUri": "/subscriptions/.../resourceGroups/azureadministrator-euw-rg/providers/Microsoft.Storage/storageAccounts/azureadministratortest",
"operationName": "Microsoft.Storage/storageAccounts/listKeys/action",
"status": "Succeeded",
},
"dataVersion": "2",
"metadataVersion": "1",
"topic": "/subscriptions/..."
}

As you can see, such an event contains a massive amount of detail, such as the following:

  • data, an object containing the event payload (all information related to an event)
  • eventType, which may help you to decide how to react to such an event
  • subjecta resource to which an event is related to

You, as an Azure administrator, can use this for multiple purposes:

  • Building a custom monitoring solution
  • Auditing changes made to resources
  • Creating your own alerts based on the provided payloads

For now, we only have a complex JSON, which gives us some information—the question is how to use it in a real scenario.

We need to connect to a Storage Account—with Azure Logic Apps, it is easy; you have to either search for the service you are interested in or just use the most popular ones. In my case, I found Azure Queues, which happened to be available without searching for it:

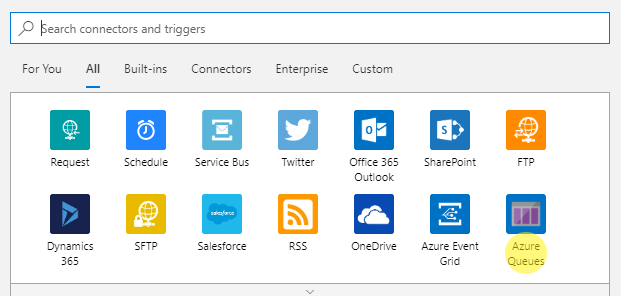
Figure 1.48 - Recommended connectors with Azure Queues visible in the bottom-right corner

When you click on the connector, you will see options available for it—for our case, we have two scenarios:

  • When a specific number of messages are in a given queue
  • When there are messages in a queue

I want to start my app anytime there is a message, so I use the latter. You will have to provide a name for the connection and select the storage account where messages are stored. Here, you can find my configuration:

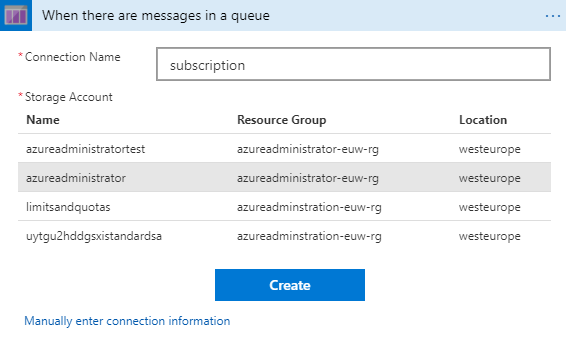
Figure 1.49 - Available storage accounts
If you do not see your storage account, use the Manually enter connection information option for the advanced configuration. You can also take a look at an in-depth article describing Azure Storage connector configuration, the link to which can be found in the Further reading section.

The last thing needed here will be the queue name and the check frequency. Once you are done, you can save your application. Congratulations—now events from a subscription can be read by your Logic App! Here, you can find the result of running it—as you can see, the event payload is available for further integrations by using the MessageText property of the JSON string:

Figure 1.50 - Azure Logic App run debugging

The debug view for Azure Logic Apps is really helpful when you are in a need of investigating an issue with your application. In this particular example, you can also see what are the available fields, which you can take control of. As there is no way to attach a debugger to Azure Logic Apps, use it frequently when developing your apps, so you can be sure that everything works exactly as you designed.

Now, your possibilities are almost limitless—any message generated by the resources in your subscription will be sent to a queue, which is read by Azure Logic Apps. As this service offers over 200 different connectors that can be used in your application, you can do whatever you want with the data aggregated—starting from parsing the JSON string to advanced integrations with Office 365, Azure Functions, or even SAP or IBM MQ. The most important thing is to leverage Azure capabilities in terms of flexibility and automation—as an administrator, you will be able to quickly develop a tool that you can use for better control over resources and subscriptions.


Summary

This chapter should help you to understand the basic concepts of Azure administration regarding subscriptions and resources. We covered the most important topics such as getting a subscription and implementing the very first policies and learned about cost monitoring and usage analysis. While they seem to be simple, a good understanding of these is crucial for getting better with Azure cloud solutions. Things such as policies or blueprints are also one of the most common tasks of Azure administrators and operators—they are required to keep things consistent and compliant with your company rule set. You should now be able to control your spending limits, ensure various security rules are enforced, and analyze cloud services cost.

The next chapters will cover more detailed topics such as virtual machines, networking, or storage so you can learn different concepts related to managing cloud services.


Further reading

The following are about getting an Azure subscription:

For details on implementing subscription policies, see the following:

The following is about using Azure Blueprints for repeatable deploy and update operations:

Check out the following for more on implementing management automation:

Latest Reviews (3 reviews total)
Pubblicazioni interessanti scritti con il giusto livello tecnico ma soprattutto in modo chiaro.
Excellent
Great information source to admin azure.
Learn Azure Administration
Unlock this book and the full library FREE for 7 days
Start now