The Music Producer's Ultimate Guide to FL Studio 21 - Second Edition
Getting Started with FL Studio
Think about your favorite songs. What makes you like them? Is it the melody, the chords, the catchy rhythm? Maybe a combination of a whole bunch of things that fit together perfectly. Perhaps you’ve tried making songs at home and realized there’s a big difference between the sound you’re making and the level of professionalism you hear from your favorite musicians.
In the pages ahead, you’ll learn the ins and outs of music production and be well on your way to making music similar to your favorite songs. You’ll learn about tools used for composing, mixing, mastering, and publishing your music. By the time you’ve finished reading this book, you’ll have all the tools you need to create music at a professional level.
In this chapter, you’ll be introduced to music production and FL Studio. Here, you’ll create your first song and export it out of FL Studio.
This chapter comprises the following topics:
Exploring the music production landscape
A musician’s career path
Steps of composing a song
What is FL Studio?
Making your first song
Exporting music from FL Studio
We’ll start with a general overview of what FL Studio is and what it can do for you.
Technical requirements
In this chapter, we’ll be using FL Studio. You can download a free trial version or a paid version of FL Studio from https://www.image-line.com/. So if you’re hesitant about paying, you can download and try out all of FL Studio’s features before buying. The difference is you won’t be able to open saved projects until you obtain a paid version, but you can still try out all the plugins.
Exploring the music production landscape
Music production has changed significantly in the last two decades. Before, a musician required the assistance of a music producer. You’d go to a studio to meet with a series of technicians who’d play around with mixing equipment that cost as much as your car or house. Then, you’d sign a deal locking you into a music contract for the foreseeable future. The studio would control how your album got released and what royalties you got paid. You had very little negotiating power.
Digital Audio Workstations (known as DAWs) changed everything. Software came out that revolutionized the music playing field. It became possible to be a music producer in your bedroom using just your computer. Nowadays, most music producers create music on their own long before they venture into a recording studio (if they do at all).
Studios started to decrease their investment in developing artists from scratch. They preferred artists that already had success and popularity with fans before considering them. ITunes appeared, along with iPods and smartphones that could hold an entire music catalog in your pocket. Consumers wanted to get their music online instead of from physical stores so that they could download music directly onto their phones. Independent artists gained the ability to sell their music online on their own. Artists could now release their own music and collect their own royalties.
Music streaming platforms such as Spotify, Apple Music, Amazon Music, and YouTube became mainstream. Why buy individual songs when you can access all of them, all the time, anywhere you go? Consumers now have their own personalized playlist recommendations, filled with songs that suit their own personal taste. New artists can find their way onto a playlist by accident, subject to the whims of mystical algorithms behind the scenes.
All of this poses a powerful opportunity for the independent artist. You can promote yourself using tools equivalent to what record companies use. You can produce a song on your own, get your music into households around the world, and market your own brand. That’s what this book is about. It’s a handbook to show you the ins and outs of music production and jump-start your musical career. By the end of this book, you will know how to compose, record vocals, mix, master, market your music, and sell it online. This can all be done from home on a minimal budget.
The DAW we’ll use in this book is FL Studio. FL Studio is a music software suite that contains all the tools you’ll need to produce music. It’s one of the, if not the, leading music production workstation software currently on the market and is used by professional musicians all around the world.
The musician’s career path
Many of you reading this book will be looking for guidance on how to begin your music career. You’ve come to the right place. Whether you are a musician, DJ, composer, or music producer, this book will provide you with a how-to guide to making music.
Let’s briefly look at your career path ahead. First, you’ll spend some time getting familiar with your DAW. You’ll come up with song ideas, record, and learn mixing techniques. You might invest in music plugins, synthesizers, hardware, and samples to play with.
At a certain point, you’ll feel comfortable with your tools. It’s here you’ll realize that knowing how to use your tools is only one part of coming up with music. You need to develop a unique sound for yourself. To do this, you’ll go out and listen to lots of music you like. You’ll watch successful musicians and learn how to create similar sounds. You’ll experiment with genres to find one or a combination that resonates with you. You’ll begin to come up with ideas of your own that combine many influences.
You’ll share your music with friends and colleagues. Likely, you’ll want feedback from people who have some experience in the music business. You’ll reach out to local musician groups in your community and attend their meetings. If you stay on course, this cycle of inventing and feedback will shift your music from amateurish to something that other people will enjoy listening to.
You’ll get a few songs under your belt, and perhaps have an album ready to go. You’ll post your music online and come to the realization that even though your music is amazing, you don’t have many fans yet. How come? People don’t know about you yet. You’ll need to cultivate a brand identity that fans can relate to and get excited about. You’ll need to spend time thinking about the type of brand persona that you want to be recognized for. You’ll look into artwork and visuals. You might make them yourself or outsource the art creation to a third party. You’ll spend time on social media and websites, researching what other musicians are doing, and trying out their marketing techniques yourself.
You’ll have to figure out what kind of equipment you need to perform live. You’ll also need to come up with something visually impressive to entertain audiences. This could include costumes or some sort of game or gimmick that can be repeated with different crowds.
You’ll spend time thinking about banter and jokes that you can use to tie the gap between your songs while performing. Once again, you’ll research what other musicians have done on stage and try out their techniques yourself. You’ll discover that in order to have success getting booked at venues, it helps to have associated acts with you. You’ll team up with other bands to create a whole packaged performance that you can present to a venue. Congratulations, you now have a show that you can take on the road! You’re now a working musician. We’ve seen the big picture. It might seem like a lot now, but the good news is that most of the steps along the way are small and easy to do.
Steps of composing a song
Here’s a roadmap that you can keep in the back of your mind as you journey through making your songs. Rest assured, it’s easier than it sounds and is actually a lot of fun.
First, decide the parameters of the song. What mood, genre, and emotion do you want? Once your criteria are decided, come up with a melody and accompanying chords. Usually, the melody is experimented on with an instrument such as a keyboard or a guitar. You will likely go through a few iterations and drafts until you find a combination you like.
Now we have a melody and some accompanying chords. The melody notes are fed into a DAW as MIDI notes. From there, we select an instrument plugin to play the notes. This usually involves experimenting with different instrument plugins and possibly some sound design.
We add accompanying melodies and additional verses. We layer our instruments to thicken the sound. We add drums and percussion instruments to complement our melody. We add sound effects. This is a mix of single sound samples that could include percussion, rising and falling sounds, glitch effects, impacts, and drum fills.
If the song requires it, we record vocals. A vocalist is sought out and the song instrumental is sent to the singer to work on. Lyrics are written, and several vocal melody combinations are experimented with. The vocalist records the vocals. The singer and the music producer make adjustments to the song and go back and forth a few times, providing feedback to each other. The vocals are processed, usually separately from the instrumental at first, before adding the finished vocals back into the mix. Effects are applied to enhance the vocals.
We have our melodies, instruments, percussion, sound effects, and vocals. Now it’s time to begin mixing. Mixing is a process you take to polish your music and give it a professional feel. It requires understanding how instruments and sounds complement each other in a song and knowing how effects can enhance them.
This part gets very technical. This book will give you lots of tips and tricks to help you with mixing.
Our song is exported and shared with all parties involved. We give feedback to and collect feedback from each other and make adjustments.
Now it’s time for mastering. Mastering is what you do after you have a song that has been mixed. The goal is to make the song sound consistent regardless of what device you use to play the song. A song benefits from mastering in several aspects. It allows you to form a second opinion when listening to your song. It forces you to take a step back and re-evaluate your music from a distance from an audience’s perspective. Instead of tweaking individual notes and instruments, you’re now forced to think about how the song sounds as a whole package. What is the overall effect of the song on a listener? One way to think about mastering is that you’re thinking from a sales perspective. What will make this song have the widest appeal to listeners? This book will give you mastering tips and techniques.
Congratulations, you have a production-ready song! You register your music with the necessary organizations for your territory to prove your copyright ownership and that any rights and royalties belong to you.
You create music videos and cover art to give your audience something to look at while listening. Often, a song’s success is made or broken by the choice of visuals used.
You upload your music to an online distributor to sell your music on online stores and streaming platforms such as Spotify, Amazon, and so on. You upload your music videos to YouTube.
You leverage your social media and the existing fanbase you’ve curated ahead of time (hopefully). You self-promote your upcoming music release, tell everyone you know, and reach out to local outlets to play your music. Congratulations, you’ve published a song!
Composing a full song may seem like a lot of steps and quite technical, but rest assured, by the time you’ve finished this book, you’ll have a solid grasp of how to execute each of these steps. Hopefully, after going through this process, you’ll find it intuitive, fulfilling, and profitable.
So far, we’ve learned about music production from a high-level perspective. Now it’s time to get our hands dirty and start making music with FL Studio.
What is FL Studio?
FL Studio is a music production software. It’s a DAW consisting of tools, effects, and synthesizers designed to compose, mix, and master music.
It’s a software application used to record, edit, and produce audio with a collection of software plugins that can handle all your audio production needs, whether you are a musician, a film/video game composer, or a music producer. It has been designed to be quick to pick up and provides enough features to satisfy sound designers. Once you get comfortable with the main workflow, you’ll find it intuitive and easy to use. Most importantly, in my opinion, using FL Studio is fun and a delight to play with. I frequently find myself losing track of time while having fun with it.
You can download a free trial version of FL Studio, which allows you to try out all the features of the software; however, it won’t let you reopen your saved projects until you purchase a paid version.
FL Studio comes with several paid, tiered versions with more features for the higher tiers. A user can upgrade from a cheaper tier to a higher tier to unlock more features at any time. If you are unsure of what version you need, you can start with the cheapest tier and upgrade later to a higher tier. There is a $10 additional charge for upgrading. Here are the different editions:
The Fruity Edition is the cheapest. It includes all the basic features, such as access to the playlist, channel rack, and piano roll. It includes the Autogun, BassDrum, BeepMap, Drumpad, FLEX, Fruity Kick, Fruity DX10, Groove Machine Synth, VFX Sequencer, Fruity Granulizer, Frequency Splitter, Distructor, and MiniSynth plugins. It does not include audio recording.
The Producer Edition includes all features in the Fruity Edition plus audio recording and post-production tools. It includes the Edison, Slicex (loop slicer and re-arranger), Sytrus, Maximus, Vocodex, Frequency Shifter, Multiband Delay, Newtime, and SynthMaker plugins. In this book, we include an introduction to the Edison, Slicex, Maximus, and Vocodex plugins.
The Signature Bundle includes everything in the Producer Edition plus Fruity Video Player, the DirectWave sampler, Harmless, NewTone, Pitcher, Gross Beat, Vintage Chorus, Vintage Phaser, Pitch Shifter, and the Hardcore guitar effects suite. Fruity Video Player allows you to see videos in sync with your music, which is handy for film composers. In this book, we include an introduction to the DirectWave, NewTone, Pitcher, and Gross Beat plugins.
The All Plugins Bundle includes all possible plugins and features, including a large selection of synthesizers.
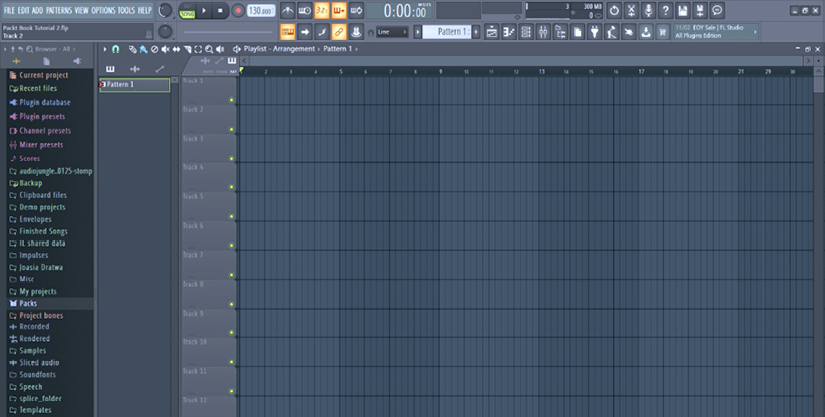
FL Studio is a software work environment. It comes equipped with tons of tools to assist you with your music creation. In order to create a song, you need to understand the basic workflow. When you first open FL Studio, you will be greeted with a workspace similar to the following screenshot:
Figure 1.1 - FL Studio workspace
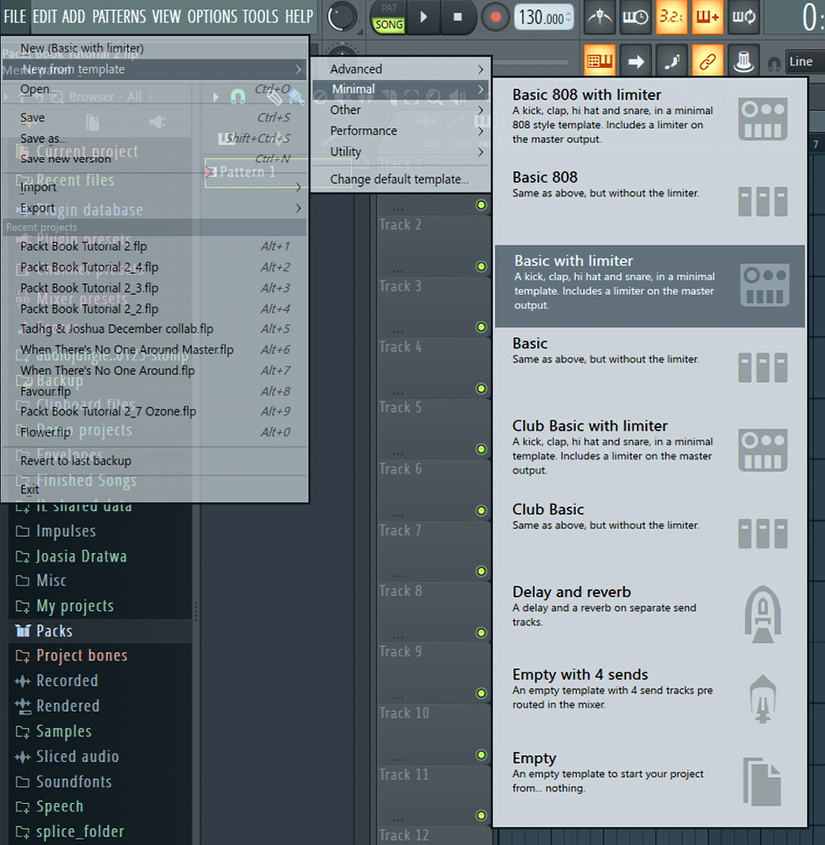
It’s possible that you may see a slightly different landing screen depending on what version of FL Studio you are using. To ensure that we are all seeing the exact same workspace, open a new template using Basic with limiter, as shown in the following screenshot. The reason we’re using this template is to create a nice simple introductory setup with a few drum samples preloaded into our project.
This will help you follow the simple examples in this chapter.
Figure 1.2 - Basic with limiter
You’ll notice that there are lots of other templates to get you up and running quickly. I encourage you to explore the other available templates as well if you’re curious. Each template offers an initial starting setup with preloaded plugins to save you some time. The template is just a suggestion to begin with though; you can always add the plugins yourself regardless of whether you use a template or not.
The FL Studio workbench is divided up into five panel sections:
Figure 1.3 - Workbench
These panels can be opened or hidden by left-clicking the icons in the toolbar. The first five buttons on the toolbar open up the main sections of FL Studio. They can be opened or hidden by clicking on the tool symbol.
Here are the buttons in the order they appear from left to right:
Playlist: Used to arrange your song compositions.
Piano roll: Used to compose melodies. Here is where you will add and edit MIDI notes. We’ll discuss this in detail in Chapter 3, Composing with the Piano Roll.
Channel rack: Used to load your instruments and compose percussive rhythms.
Mixer: Used to connect our instruments together and apply effects for mixing and mastering.
Browser: Contains all your files. It’s an organizer used to navigate through your samples.
The playlist, piano roll, channel rack, mixer, and browser are the foundational building blocks of FL Studio. Using these five tools, you’ll be able to create, organize, and apply effects to your music.
Making your first song
FL Studio is a tool and the best way to learn it is to just jump in and make something with it. Some topics, such as composing melodies, are more complex and better left for later chapters. For now, let’s work on something basic. To make our first song, we’ll do the following:
Create a drum beat with the channel rack.
Add an accompanying instrument.
Route the drum beat and instrument to the mixer.
Export the song.
Let’s get started.
Creating a drum beat with the channel rack
One of the key features of the channel rack is that it allows you to create percussive patterns with ease.
To create a drum pattern in the channel rack, you need drum sound samples and notes to indicate when to play the sound samples. To do this, perform the following steps:
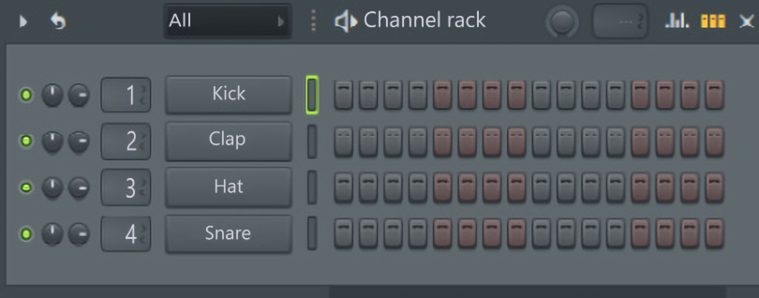
Open the channel rack by selecting the channel rack icon:
Figure 1.4 - Toolbar, including the channel rack
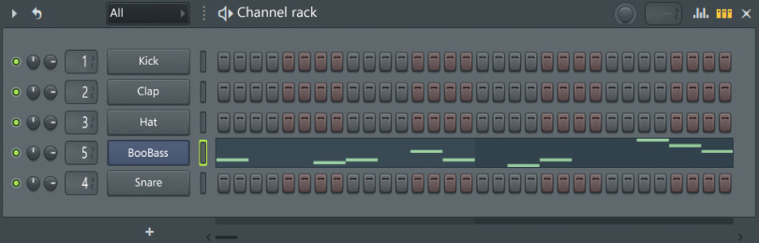
Here, you’ll see the following window. Since we used a template, we already have four sound samples preloaded into the channel rack for us:
Figure 1.5 - Channel rack opened
Extend the window by clicking the right edge of it to make it longer.
The channel rack allows you to view and load up all of your instruments and samples. Here, we can see that four instruments have been preloaded for us. In this case, they are single percussive sound samples.
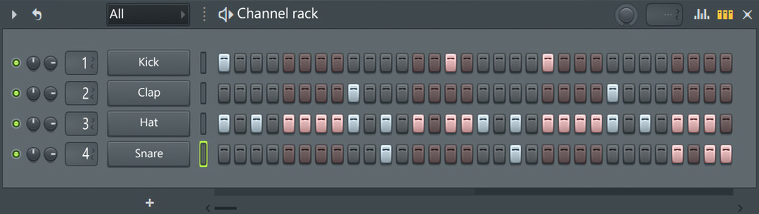
Add notes by left-clicking on any of the gray and reddish buttons to the right of the instrument, so your channel rack looks like the following screenshot. If at any point you want to delete notes, you can right-click on the notes you want to remove:
Figure 1.6 - Channel rack
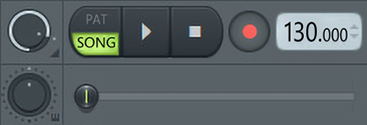
Select PAT (short for pattern) and press play (the triangle symbol) or hit the spacebar so that you can listen to your drum beat:
Figure 1.7 - Player menu
So far, we have created a drum beat by adding notes for our percussion samples to play. In a real-life scenario, you’ll want to swap out the samples used (for example, Kick, Clap, Hat, or Snare) with other samples. A drum beat on its own is pretty boring though, so let’s look into adding an accompanying instrument.
Adding an instrument to the channel rack
We’ve created our first drum beat pattern. A drum beat isn’t very interesting on its own. Music in general always needs a melody to give the song a sense of progression. To create a melody, we need an instrument that can play notes of different pitches. FL Studio has lots of instruments available. Let’s add a simple bass guitar instrument to our composition:
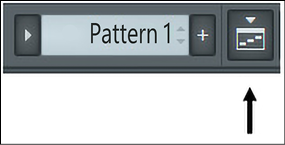
To create a new pattern, left-click on the plus icon next to the words Pattern 1 in the top toolbar:
Figure 1.8 - New pattern
A pattern is the name that FL Studio uses to refer to a sequence of notes. Give it a name such as Bass melody and press Enter.
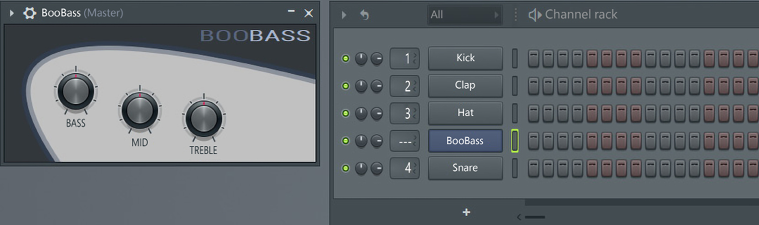
Back in the channel rack, hover your cursor over one of the instruments (Kick, Clap, Hat, or Snare) and right-click, or select the plus symbol at the bottom of the channel rack. A list of instruments will open up. Insert the one called BooBass. The reason we’re using BooBass is just because it’s simple. We don’t want to overload you with features all at once.
Figure 1.9 - Inserting an instrument
The BooBass instrument will load up and you’ll see the following:
Figure 1.10 - BooBass
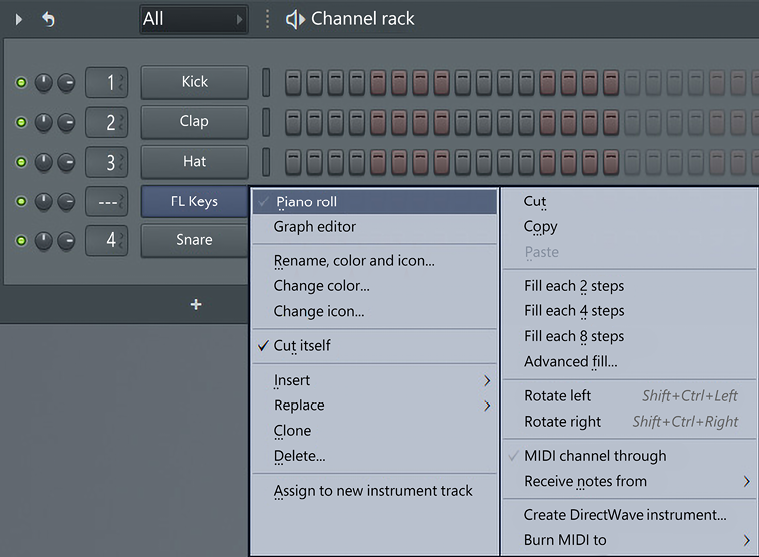
Let’s add some notes for our BooBass instrument to play. Right-click on BooBass and select Piano roll:
Figure 1.11 - Opening the piano roll
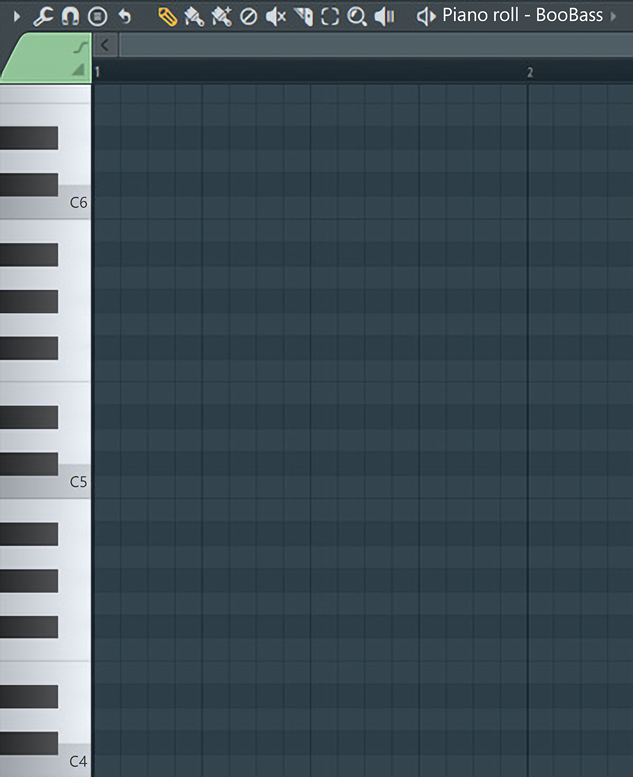
The piano roll will open, and you’ll see the following window:
Figure 1.12 - Empty piano roll
The piano roll is designed to combine a piano with a timeline from left to right. On the left, you’ll see black and white rectangular boxes to represent piano keys. If you know how to play the piano, this will feel very intuitive to you. To the right of it, you’ll see a series of blue boxes in what resembles a spreadsheet table. These boxes indicate a position in time. By adding notes, you are telling the instrument to play a certain pitch at a certain time.
You’ll notice that at the top of the piano roll in the preceding screenshot, there is a little pencil icon near the top left. Make sure that this is selected. It will allow you to add and delete notes, which will be important in the following pages.
Creating a melody with the piano roll
So far, we’ve loaded up an instrument. It’s time to give the instrument some notes to play.
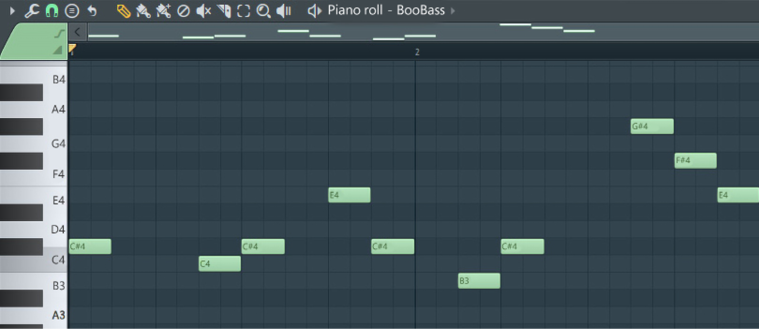
You can add notes by left-clicking in the blue boxes. Add notes to the piano roll to create a melody similar to the following:
Figure 1.13 - Added notes to the piano roll instrument
Great, we’ve now created a simple bass melody.
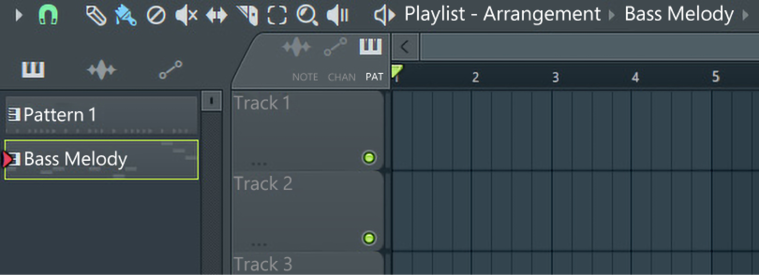
Let’s add the drum beat and our bass melody to our playlist. The playlist is where you can arrange the timing of your music patterns. Open the playlist (usually in the top center of FL Studio) by selecting the playlist icon:
Figure 1.14 - Playlist icon
The playlist will now open and you’ll see a window similar to the following:
Figure 1.15 - Playlist
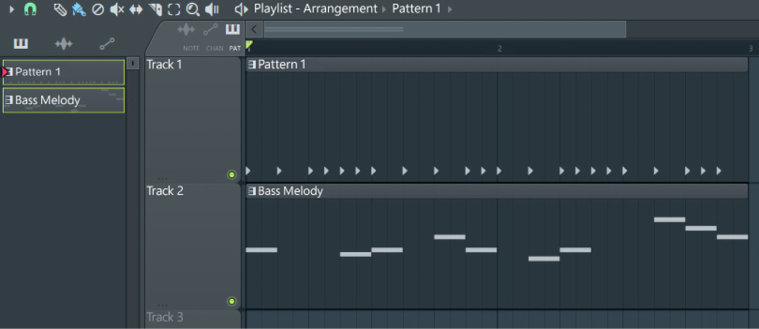
On the left side, you’ll see Pattern 1 and Bass Melody. Pattern 1 is our drum beat. Bass Melody is the melody that we just created. You can add the patterns to the playlist by left-clicking the patterns on the left and dragging them onto the blue grid on the right. Once done, it will look like the following:
Figure 1.16 - Added patterns to the playlist
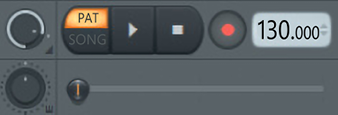
Let’s play our entire arrangement and see how the patterns sound when played at the same time. Ensure that the setting is set to SONG instead of PAT and press the play symbol (triangle symbol) at the top of the screen. You will now be able to hear both of your music patterns being played at the same time:
Figure 1.17 - Player menu
So far, we have created a drum pattern, added an accompanying instrument, and added both patterns to the playlist. Now we need to route these instruments to the mixer.
Routing channels to the mixer
It’s time to think about mixing our music. Mixing is where we can add effects to our music to enhance it. We need to send our sounds to the mixer in order to apply effects to them. This is known as routing to the mixer. We will go into lots of detail about what is and how to do mixing throughout this book.
Let’s route our instruments and samples to the mixer:
Open up the channel rack:
Figure 1.18 - Selecting channels in the channel rack
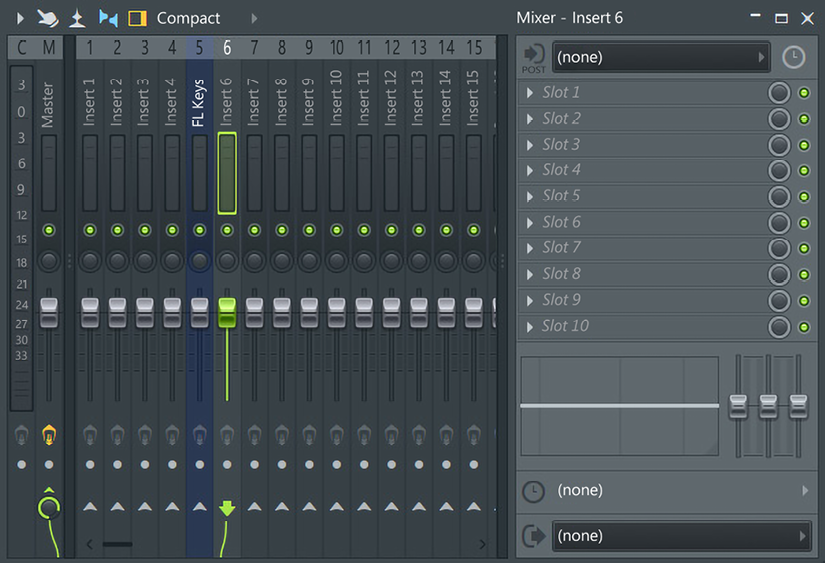
In the preceding screenshot, we can see that Kick has the number 1 beside it by default. This means that it is currently routed to mixer track channel 1. Clap is routed to track 2 and Hat is routed to track 3.
Our BooBass instrument has no mixer channel number assigned. Let’s route it to the mixer. Double-left-click the rectangle buttons directly to the right of the instruments. This will highlight all of the available instruments with a green outline, as in the preceding screenshot. This indicates that they are selected.
Next, press Ctrl + L. This will automatically assign BooBass and all other selected instruments to the mixer, as well as any color properties given to them. Alternatively, you can manually change the mixer number by clicking on the number and dragging it up or down to increase or decrease the value. You’ll see that BooBass now has the number 5 assigned to it. This means it has been assigned to mixer track 5:
Figure 1.19 - Routing BooBass to the mixer
Let’s see our routed instrument in the mixer. Select the mixer icon from the toolbar to open up the mixer:
Figure 1.20 - Mixer icon in the toolbar
In the mixer, we can now see that our instruments from the channel rack have been assigned channels in the mixer. Notice how the numbers on the channel rack correspond to the numbers on the mixer. The mixer channel track numbers can also be changed by selecting a mixer channel, holding down Shift, and scrolling with your mouse wheel:
Figure 1.21 - Mixer
We have routed our instruments to the mixer. In future chapters, we’ll learn how to apply effects to our instruments. Next, let’s learn how to export our song out of FL Studio.
Exporting the song
Let’s export our song out of FL Studio so that we can listen to it anywhere. Songs, when played on your phone or streamed online, are stored in the format of an MP3 or WAV file, so we need to convert it in to one of those. To do this, follow these instructions:
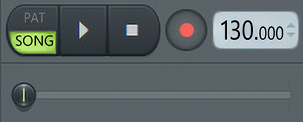
First, check that the SONG setting is selected so we export our entire composition, rather than just a single pattern. The SONG button is at the top of FL Studio, as shown in the following screenshot:
Figure 1.22 - Player menu
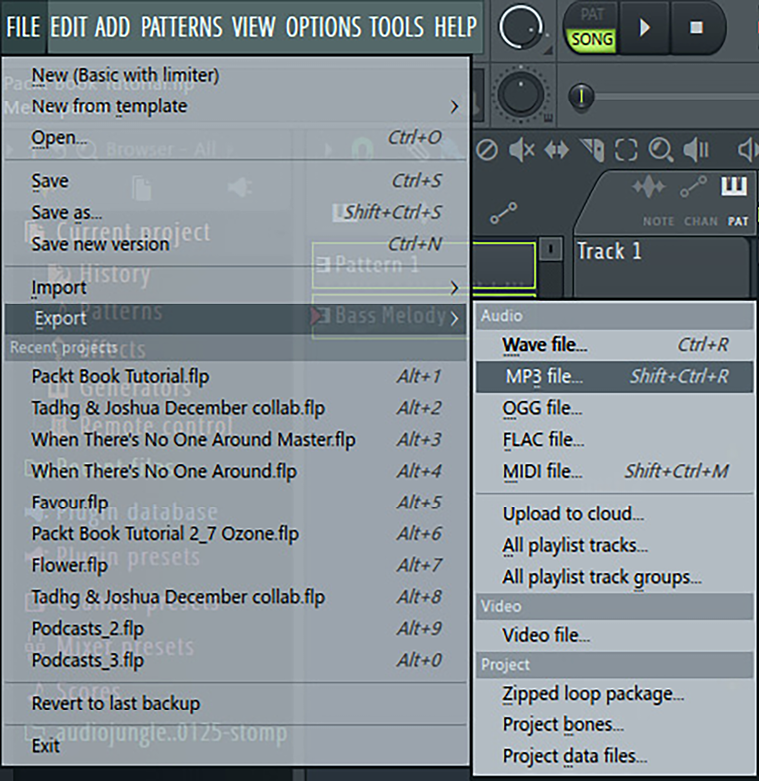
Next, go to FILE | Export | MP3 file…, as seen in the following screenshot:
Figure 1.23 - Exporting the song
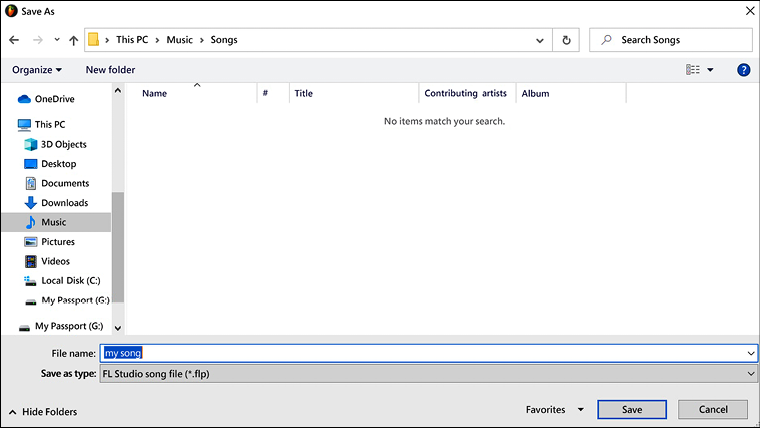
Choose a location on your computer (somewhere easy to find) to save your song:
Figure 1.24 - Saving the song
Once you select Save, a window will pop up with information on rendering. This window gives you options on how to export your song. If you want to export quickly with the default settings, you can choose WAV or MP3 and select Start to export your song.
We’ll discuss the difference between WAV and MP3 in the next section.
Figure 1.25 - Song render
Congratulations, you have successfully created your first song!
Song exporting options
If you’re curious about the exporting features, here’s a breakdown of the export settings. In the Project type options, you can choose to export your full song or just a single pattern.
The Tail option has three choices to pick from:
Cut remainder abruptly ends the song the moment the sound and samples stop playing.
Leave remainder allows synthesizers to naturally decay to silence at the end of your song. This is usually the choice you’ll want in most scenarios.
Wrap remainder takes any decay that would appear at the end of your song and places it at the start of your song. This is useful in circumstances where you are creating a loop and want the sound to repeat.
Underneath, you can see the song length in bars, the total elapsed time of the song, and the size of the file the exported song will create.
You can choose between several outputted format types. You can choose to export as WAV or FLAC, which are lossless formats, which means you will not lose any audio quality. Bit depth is the resolution you can choose to output. The options available are as follows:
16Bit, the standard for CD quality
24Bit, recommended for streaming
32Bit, for sound archive size
You can usually select 16Bit as you likely won’t be able to tell the difference in most cases.
FLAC uses data compression to reduce the file size; however, the sound will be identical to a WAV file. You can then increase the FLAC compression, which will make the file size smaller, but it still won’t affect the sound quality; it will just take a little longer to export.
MP3 and OGG are formats that will lose audio quality when exporting. They throw away data while maintaining audio sound. MP3 bitrate determines the audio quality. A higher bitrate allows a higher-quality sound.
The MID format allows you to export your project as MIDI data, assuming that you created MIDI data in your project.
You also have the option of selecting to output in Stereo or Mono. This refers to whether you allow different sounds to come out of the left versus the right speaker. You’ll usually want to leave this as Stereo.
We’ll discuss mono and stereo in detail in Chapter 7, Stereo Width (Panning, Reverb, Delay, Chorus, and Flangers) and Distortion.
The Quality section refers to dithering, which is a highly technical topic, but as a general rule, leave it on as it improves audio quality.
Under Miscellaneous, you’ll want to make sure that the Enable insert effects and Enable master effects options are selected so that your mixer effects are applied. Leave Trim PDC silence on. This adds any necessary silence at the beginning of your track to ensure that the sounds are in sync. Split mixer tracks is what you’ll use if you want to export a different sound file for each mixer track. You do this if you want to send your song to a third party for mixing or mastering.
Congratulations, you’ve just created your first song in FL Studio! That was quick and easy, wasn’t it? In just a few minutes, you were able to create a drum beat, add an accompanying instrument, compose a melody, and export your music.
Summary
You’ve had a glimpse of the journey ahead on your way to producing your own music. In this chapter, we created our first song in FL Studio. We made a simple drum pattern, added an accompanying instrument and melody, routed the instruments to the playlist and the mixer, and exported the song. All songs you make will use these steps.
In the next chapter, we will explore some key FL Studio workbench tools in detail, including the browser, channel rack, and playlist.
Key benefits
Comprehensive coverage of FL Studio 21's tools and features
Step-by-step explanations of music production techniques
Insights into best practices for promoting and selling music
Description
The Music Producer's Ultimate Guide to FL Studio 21 is the essential handbook for any aspiring or professional music producer looking to take their craft to the next level.
This comprehensive guide covers everything you need to make the most of FL Studio 21's powerful tools and features. You will learn the secrets to creating professional-sounding music, from creating chord progressions to tailoring your sounds to perfection with compression, equalization, and stereo width effects.
You'll begin by getting up-and-running with FL Studio 21, creating a beat, and composing a melody. Once you're familiar with the piano roll and mixer console you'll learn how to use plugins to create your own instruments, explore audio width effects, and engage in sound design. You'll get insights into mixing and mastering, as well as promoting and selling your music.
This new edition covers some of the most popular features and plugins in FL Studio 21, including FLEX, Luxeverb, Vintage Chorus, Vintage Phaser, Distructor, Fruity Newtime, VFX Sequencer, Pitch Shifter, Frequency Shifter, Fruity Granulizer, Multiband Delay, and Frequency Splitter.
What you will learn
Get up and running with FL Studio 21
Compose melodies and chord progressions on the piano roll
Mix your music effectively with mixing techniques and plugins, such as compressors and equalizers
Record into FL Studio, pitch-correct and retime samples, and follow advice for applying effects to vocals
Create vocal harmonies and learn how to use vocoders to modulate your vocals with an instrument
Create glitch effects, transform audio samples into playable instruments, and sound design with cutting-edge effects
Develop your brand to promote your music effectively
Publish your music online and collect royalty revenues
What do you get with eBook?
Instant access to your Digital eBook purchase
Download this book in EPUB and PDF formats
Access this title in our online reader with advanced features
DRM FREE - Read whenever, wherever and however you want
Recording into the piano roll with MIDI instruments
Exporting sheet music
Using and exporting MIDI scores
Summary
Routing to the Mixer and Applying Automation
Routing to the Mixer and Applying Automation
What is mixing?
Routing audio to the mixer
Navigating the mixer console
Applying automation
Editing automation clips
Applying automation to external third-party plugins
Freezing audio clips
Summary
Section II: Music Production Fundamentals
Section II: Music Production Fundamentals
Sound Design and Audio Envelopes
Sound Design and Audio Envelopes
What is sound?
What causes a note’s pitch?
How do we hear things?
How do instruments create sound with different pitches?
Why do different instruments playing the same pitch sound different?
Modifying sound envelopes
Using Mod X and Mod Y for automation
Summary
Compression, Sidechaining, Limiting, and Equalization
Compression, Sidechaining, Limiting, and Equalization
Understanding compression
Applying gates and expanders
Applying sidechaining
Using limiters
Applying equalization
Summary
Stereo Width (Panning, Reverb, Delay, Chorus, and Flangers) and Distortion
Stereo Width (Panning, Reverb, Delay, Chorus, and Flangers) and Distortion
Panning audio
Using reverb
Using LuxeVerb
Using delay effects
Using chorus effects
Using Vintage Chorus
Using flanger effects
Using phaser effects
Using Vintage Phaser
Understanding distortion effects
Understanding mix buses
Summary
Recording Live Audio and Vocal Processing
Recording Live Audio and Vocal Processing
Technical requirements
Understanding microphones
Setting up your recording environment
Recording audio into FL Studio
Using pitch correction with Newtone
Retiming audio samples with Newtime
Vocals effect processing best practices
Summary
Vocoders and Vocal Chops
Vocoders and Vocal Chops
Understanding vocoders
Understanding MIDI
Using vocoders
Using Vocodex
Creating vocal chops
Summary
Creating Your Own Instruments and Effects
Creating Your Own Instruments and Effects
Understanding glitch effects
Creating glitch effects with Gross Beat
Creating instruments with DirectWave
Creating effects with Patcher
Send any instrument to Patcher
Exploring Patcher presets
Using VFX Sequencer
Summary
Intermediate Mixing Topics and Sound Design Plugin Effects
Intermediate Mixing Topics and Sound Design Plugin Effects
Using Pitch Shifter
Using Frequency Shifter
Creating granular synthesis with Fruity Granulizer
Creating delay effects with Multiband Delay
Multiband processing with Frequency Splitter
Summary
Section III: Postproduction and Publishing Your Music
Section III: Postproduction and Publishing Your Music
Mastering Fundamentals
Mastering Fundamentals
What is mastering?
Equalization in mastering
Using multiband compressors
What are saturators/harmonic exciters?
Understanding limiters
Understanding stereo imaging with vectorscopes
Exporting audio for third-party mixing and mastering
Summary
Marketing, Content Creation, Getting Fans, and Going Viral
Marketing, Content Creation, Getting Fans, and Going Viral
Marketing essentials
Creating a brand
Making the most of your live performances
Collaborating with others to promote yourself
Creating music visuals with ZGameEditor Visualizer
Summary
Publishing and Selling Music Online
Publishing and Selling Music Online
Registering your music
Tagging your music in preparation for distribution
Selling music on online stores and streaming services
Claiming revenue from songs on YouTube using AdRev
Summary
Share your music
Conclusion
More from the author
Further reading
Other Books You May Enjoy
Other Books You May Enjoy
Index
Index
Recommendations for you
10 Items
Causal Inference and Discovery in Python: Unlock the secrets of modern causal machine learning with DoWhy, EconML, PyTorch and more
May 2023456
Machine Learning with PyTorch and Scikit-Learn: Develop machine learning and deep learning models with Python
Feb 2022774
Machine Learning for Algorithmic Trading: Predictive models to extract signals from market and alternative data for systematic trading strategies with Python, Second Edition
Jul 2020822
Mastering Microsoft Power BI – Second Edition: Expert techniques to create interactive insights for effective data analytics and business intelligence, Second Edition
Jun 2022712
Microsoft Power BI Quick Start Guide: The ultimate beginner's guide to data modeling, visualization, digital storytelling, and more, Third Edition
Nov 2022330
Machine Learning Engineering with Python: Manage the lifecycle of machine learning models using MLOps with practical examples, Second Edition
Aug 2023462
The AI Product Manager's Handbook: Develop a product that takes advantage of machine learning to solve AI problems
Feb 2023250
Et al.: Because not all research deserves a Nobel Prize
Aug 2023230
Python Machine Learning: Machine Learning and Deep Learning with Python, scikit-learn, and TensorFlow 2, Third Edition
Dec 2019772
Data Modeling with Snowflake: A practical guide to accelerating Snowflake development using universal data modeling techniques
May 2023324
People who bought this also bought
5 Items
Mastering Ubuntu Server: Explore the versatile, powerful Linux Server distribution Ubuntu 22.04 with this comprehensive guide, Fourth Edition
Sep 2022584
Mastering Ansible, 4th Edition: Automate configuration management and overcome deployment challenges with Ansible, Fourth Edition
Dec 2021540
Enterprise DevOps for Architects: Leverage AIOps and DevSecOps for secure digital transformation
Nov 2021288
Ansible for Real-Life Automation: A complete Ansible handbook filled with practical IT automation use cases
Sep 2022480
Kubernetes – An Enterprise Guide: Effectively containerize applications, integrate enterprise systems, and scale applications in your enterprise, Second Edition
Dec 2021578
Authors (1)
Mr. Joshua Au-Yeung
Joshua Au-Yeung (professionally known as Chester Sky) is a music producer, composer, director, and software developer. He's published 10+ music albums, directed and composed for films, created board games and dozens of art pieces, and hosts a podcast. He's an instructor of online courses, including best-selling courses on music production and composing for films and video games. His previous book, The Music Producer's Ultimate Guide to FL Studio 20, reached #1 on Amazon in the Digital Audio Production category.
Where there is an eBook version of a title available, you can buy it from the book details for that title. Add either the standalone eBook or the eBook and print book bundle to your shopping cart. Your eBook will show in your cart as a product on its own. After completing checkout and payment in the normal way, you will receive your receipt on the screen containing a link to a personalised PDF download file. This link will remain active for 30 days. You can download backup copies of the file by logging in to your account at any time.
If you already have Adobe reader installed, then clicking on the link will download and open the PDF file directly. If you don't, then save the PDF file on your machine and download the Reader to view it.
Please Note: Packt eBooks are non-returnable and non-refundable.
Packt eBook and Licensing When you buy an eBook from Packt Publishing, completing your purchase means you accept the terms of our licence agreement. Please read the full text of the agreement. In it we have tried to balance the need for the ebook to be usable for you the reader with our needs to protect the rights of us as Publishers and of our authors. In summary, the agreement says:
You may make copies of your eBook for your own use onto any machine
You may not pass copies of the eBook on to anyone else
How can I make a purchase on your website?
If you want to purchase a video course, eBook or Bundle (Print+eBook) please follow below steps:
Register on our website using your email address and the password.
Search for the title by name or ISBN using the search option.
Select the title you want to purchase.
Choose the format you wish to purchase the title in; if you order the Print Book, you get a free eBook copy of the same title.
Proceed with the checkout process (payment to be made using Credit Card, Debit Cart, or PayPal)
Where can I access support around an eBook?
If you experience a problem with using or installing Adobe Reader, the contact Adobe directly.
To view the errata for the book, see www.packtpub.com/support and view the pages for the title you have.
To view your account details or to download a new copy of the book go to www.packtpub.com/account
Our eBooks are currently available in a variety of formats such as PDF and ePubs. In the future, this may well change with trends and development in technology, but please note that our PDFs are not Adobe eBook Reader format, which has greater restrictions on security.
You will need to use Adobe Reader v9 or later in order to read Packt's PDF eBooks.
What are the benefits of eBooks?
You can get the information you need immediately
You can easily take them with you on a laptop
You can download them an unlimited number of times
You can print them out
They are copy-paste enabled
They are searchable
There is no password protection
They are lower price than print
They save resources and space
What is an eBook?
Packt eBooks are a complete electronic version of the print edition, available in PDF and ePub formats. Every piece of content down to the page numbering is the same. Because we save the costs of printing and shipping the book to you, we are able to offer eBooks at a lower cost than print editions.
When you have purchased an eBook, simply login to your account and click on the link in Your Download Area. We recommend you saving the file to your hard drive before opening it.
For optimal viewing of our eBooks, we recommend you download and install the free Adobe Reader version 9.
 Argentina
 Australia
 Austria
 Belgium
 Brazil
 Bulgaria
 Canada
 Chile
Chile
 Colombia
 Cyprus
 Czechia
 Denmark
 Ecuador
 Egypt
Egypt
 Estonia
 Finland
 France
 Germany
 Great Britain
 Greece
 Hungary
 India
India
 Indonesia
 Ireland
 Italy
Italy
 Japan
Japan
 Latvia
 Lithuania
 Luxembourg
 Malaysia
 Malta
Malta
 Mexico
 Netherlands
 New Zealand
 Norway
 Philippines
 Poland
 Portugal
 Romania
 Russia
 Singapore
 Slovakia
 Slovenia
 South Africa
 South Korea
 Spain
Spain
 Sweden
 Switzerland
 Taiwan
 Thailand
 Turkey
 Ukraine
 United States