


In this section, we will wire up a simple push button, LEDs, resistors to our Pi Zero, and then write some simple Python code that will respond to a user pushing the button and making our LEDs flash.
Basic electronics
Wiring up the electronics
We need to wire up our electronic parts, as shown in the following image:
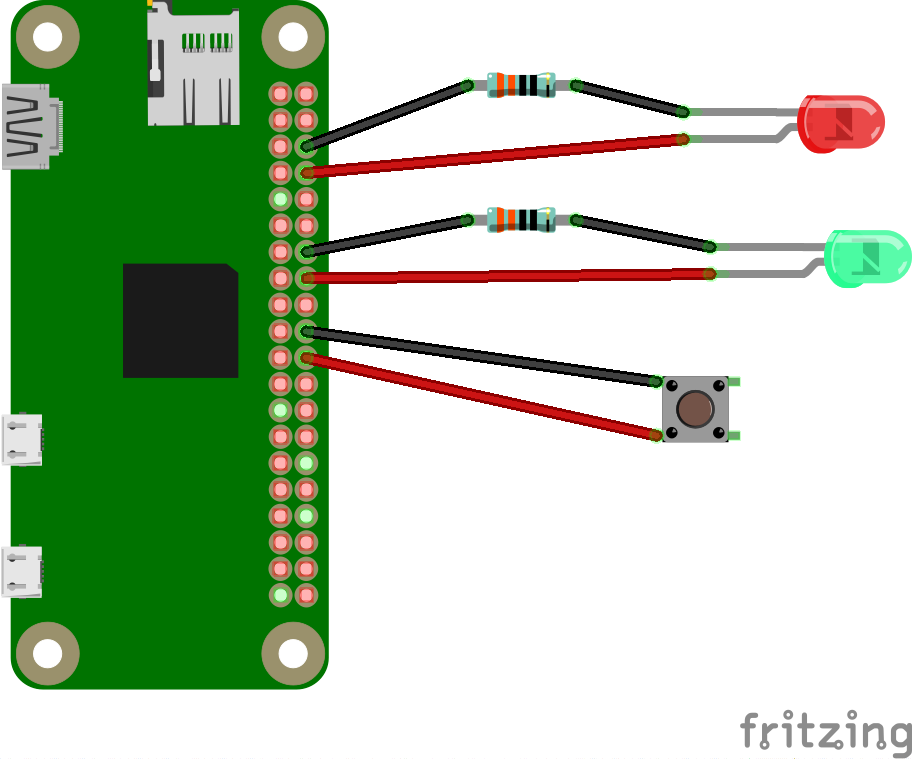
Make sure that your Pi Zero is switched off when you are soldering the cables to the Pi or the header pins! You will also need to take care when wiring your LEDs, as we must get the correct legs attached to the positive and negative wires in our circuit, or they will not work. The positive leg of an LED is usually longer, and there is often a flat edge on the LED to indicate which is the negative leg. We are also going to introduce a 330 Ω resistor between the LED and the ground of the Pi; this is done to stop the LED drawing too much current from the Pi and damaging it.
You may want to introduce a little electrical insulating tape around one leg of each LED to ensure that they do not short circuit by touching the other leg. Once you have soldered your components together, give them a final check over to make sure they are in the correct GPIO holes on the Pi and that you have a good connection at each joint.
Now that we have completed the wiring of our electronics, we can move on to writing the code to control it all. Plug in your Pi and establish a SSH connection to it.
Writing the Python program
We will make use of the Nano text editor to write our Python files. First, we will create a directory to save all of our programs into. Type the following two commands:
mkdir ~/WearableTech
cd ~/WearableTech
We should now be inside our new WearableTech directory. Type the following command to open Nano, and create a new file called ledflash.py:
nano ledflash.py
We are now in the Nano text editor. Type in the following code to create a simple program, which will make the LEDs flash on and off when you press the button, and then stop the LEDs flashing when you press the button again:
#!/usr/bin/python3
from gpiozero import LED, Button

btn = Button(25)
green = LED(23)
red = LED(14)

while True:
    btn.wait_for_press()
    green.blink(0.5,0.5)
    red.blink(0.25,0.25)
    btn.wait_for_press()
    green.off()
    red.off()
Save the file by pressing Ctrl and O together, followed by the Enter key, and then exit Nano by pressing Ctrl and X together. We are now going to make the file executable by typing the following command:
sudo chmod +x ./ledflash.py
We can now run the file by typing this:
./ledflash.py
All being well, you should now be able to press the button wired up to your Pi and LEDs should start blinking at different rates. Press the button again (you may need to hold it for half a second) and your LEDs should switch off! If it doesn't work, check your program and double check your wiring.
If you want to stop your program from running, press Ctrl and C together.
Breaking down the program
The first line of the program is what is known as a shebang. The hash symbol followed by an exclamation mark (#!) tells the computer that what follows the exclamation mark is the details of what the program or interpreter should be used to run the rest of the program. In our case, this is python3, which is located inside the /usr/bin directories. Next, we import two things from the gpiozero library, Button and LED.
The next section of the code deals with setting up our devices. We create a variable, called btn, and tell Python that it is a gpiozero library's Button attached to GPIO pin number 25. We then create a variable for each LED and tell Python that they are gpiozero LEDs attached to pins 23 and 14.
Now, we enter the main part of the program. We start a while loop and just pass True as our condition to the loop; this will mean that this loop never ends (unless you close the program by pressing Ctrl and C together).
Now, we instruct Python to wait until it detects a press of the button. When it detects a press, we move on to the next line of the program. Here, we set each LED to blink on and off at different rates. The blink class of the gpiozero LED defaults to running the blink as a background thread; this means that the blink starts, and then we move onto the next line of code with the blink still running. So, with both LEDs blinking away, we wait again for a button press. When this is detected, we turn off each LED, and then return to the beginning of the loop.
Play around with the program and have a read of what else you can do using the gpiozero library on the documentation pages at https://gpiozero.readthedocs.io/en/stable/.
In the next chapter, we will get straight into a wearable-tech project using many of the things we have done in this chapter. At this point, you can shut down your Pi and desolder the six cables from it if you like; we will be using some different hardware for the next project!