Chapter 3. Configuring Objects and Apps
In
Chapter 1, Setting up Salesforce CRM and the Company Profile and
Chapter 2, Managing Users and Controlling System Access, we were introduced to the profile feature in Salesforce, which is a controlling mechanism. Profiles are used to determine the functions users can perform, what types of data they can access, and what operations they can carry out on that data.
In this chapter, we will describe the Salesforce CRM record storage features and customizable user interface in detail, such as objects, fields, and page layouts. In addition, we will see an overview of the relationship that exists between the profile and these customizable features that the profile controls.
This chapter looks at the methods for configuring and tailoring the application to suit the way your company information can be best represented within the Salesforce CRM application. We will look at the mechanisms that allow data to be grouped and presented within the application...
The relationship between a profile and the features that it controls
The following diagram describes the relationship that exists between a profile and the features that it controls:
The profile is used to:
Control access to the type of license specified for the user and any login hours or IP address restrictions that are set. This was covered in detail in
Chapter 1, Setting up Salesforce CRM and the Company profile.
Control access to objects and records using the role and sharing model. If the appropriate object-level permission is not set on the user's profile, then the user will be unable to gain access to the records of that object type in the application. This was introduced in
Chapter 2, Managing Users and Controlling System Access, and will be covered in detail in
Chapter 4, Securing Access to Data and Data Validation.
In this chapter, we will look at the configurable elements that are set in conjunction with a profile. These are used to control the structure and the user interface...
Objects are a key element in Salesforce CRM as they provide a structure for storing data and are incorporated in the interface, allowing users to interact with the data.
Similar in nature to a database table, objects have properties such as:
Fields, which are similar in concept to a database column
Records, which are similar in concept to a database row
Relationships with other objects
Optional tabs, which are user-interface components to display the object data
Salesforce provides standard objects in the Salesforce CRM platform by default. Standard objects that are available include Account, Contact, and Opportunity. Standard objects are described in more detail later in this chapter.
In addition to the standard objects, you can create custom objects and custom tabs.
Custom objects are the tables you create to store your data. You can create a custom object to store data specific to your organization. Once you have the custom objects and have created records...
Fields in Salesforce are similar in concept to a database column; they store the data for the object records. An object record is analogous to a row in a database table.
Standard fields are predefined fields that are included as standard within the Salesforce CRM application. Standard fields cannot be deleted but non-required standard fields can be removed from page layouts whenever necessary.
With standard fields, you can customize visual elements that are associated with the field, such as field labels and field-level help, as well as certain data definitions such as picklist values, the formatting of auto-number fields (which are used as unique identifiers for the records), and setting of field history tracking. Some aspects, however, such as the field name, cannot be customized and some standard fields (such as Opportunity Probability) do not allow the changing of the field label.
Custom fields are unique to your business needs and can not only be added...
Object relationships can be set on both standard and custom objects and are used to define how records in one object relate to records in another object. Accounts, for example, can have a one-to-many relationship with opportunities; these relationships are presented in the application as related lists.
An app in Salesforce is a container for all the objects, tabs, processes, and services associated with a business function.
There are standard and custom apps that are accessed using the App menu located at the top-right corner of the Salesforce page, as shown in the following screenshot:
When users select an app from the App menu, their screen changes to present the objects associated with that app. For example, when switching from an app that contains the Campaign tab to one that does not, the Campaign tab no longer appears. This feature is applied to both standard and custom apps.
Salesforce provides standard apps such as Call Center, Community, Content, Marketing, Sales, Salesforce Chatter, and Site.com.
A custom app can optionally include a custom logo. Both standard and custom apps consist of a name, a description, and an ordered list of tabs.
A Subtab app is used to specify the tabs that appear on the Chatter profile page. Subtab apps can include...
A tab is a user-interface element that, when clicked on, displays data or activates custom functionality that you can configure. Standard tabs are provided as an included feature and custom tabs allow you to extend or to build new application functionality. Standard and custom tabs are described in more detail later in this chapter.
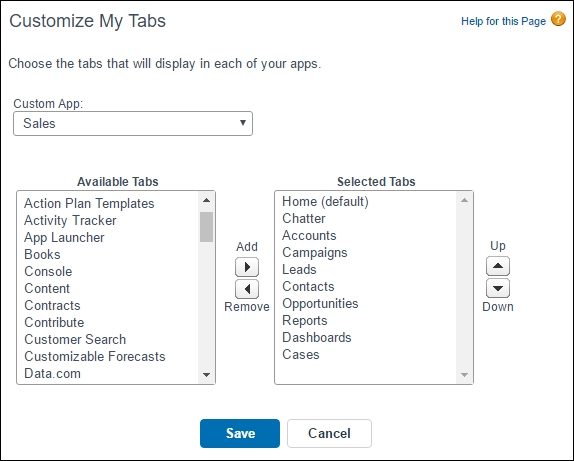
To customize your personal tab settings, navigate to Setup | My Personal Settings | Change My Display | Customize My Tabs. Now, choose the tabs that will display in each of your apps by moving the tab name between the Available Tabs and the Selected Tabs sections and. Click Save. The following screenshot shows the section of tabs for the Sales app:
To customize the tab settings of your users navigate to Setup | Manage Users | Profiles. Now, select a profile and click on Edit. Scroll down to the Tab Settings section of the page, and set the tab setting to be either Default On, Default Off, or Tab Hidden as shown in the following screenshot...
Renaming labels for standard tabs, standard objects, and standard fields
Labels generally reflect the text that is displayed and presented to your users in the user interface and in reports within the Salesforce application.
You can change the display labels of standard tabs, objects, fields, and other related user interface labels so they reflect your company's terminology and business requirements better. For example, the Accounts tab and object could be changed to Clients; similarly, Opportunities to Deals, and Leads to Prospects. Once changed, the new label is displayed on all user pages.
Note
The Setup Pages and Setup Menu sections cannot be modified and do not include any renamed labels and continue. Here, the standard tab, object, and field reference continues to use the default, original labels. Also, the standard report names and views continue to use the default labels and are not renamed.
To change standard tab, objects, and field labels, navigate to Setup | Customize | Tabs Names...
Custom objects are database tables that allow you to store data specific to your organization, in Salesforce.com. You can use custom objects to extend Salesforce functionality or to build new application functionality.
Note
You can create up to 200 custom objects in the Enterprise Edition and 2000 in the Unlimited Edition at the time of writing.
Once you have created a custom object, you can create a custom tab, custom-related lists, reports, and dashboards for users to interact with the custom object data.
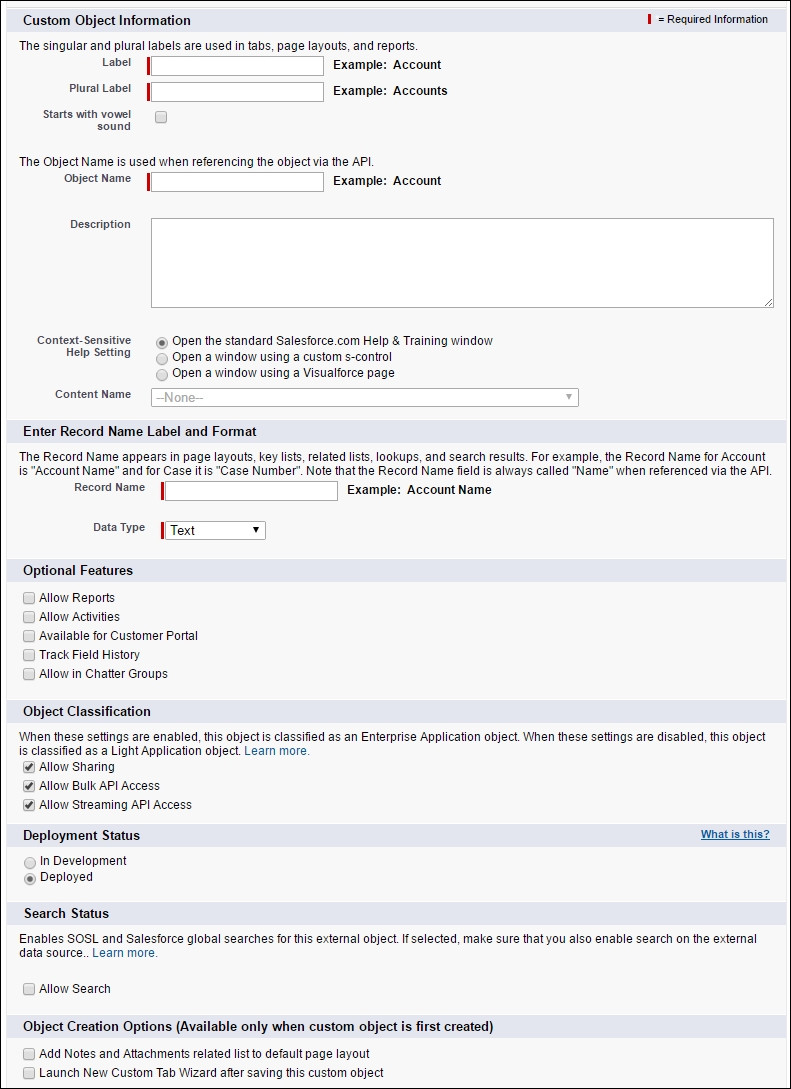
To create a custom object, navigate to Setup | Create | Objects. Now click on New Custom Object, or click on Edit to modify an existing custom object. The following screenshot shows the resulting screen:
On the Custom Object Information Edit page, you can enter the following:
Label: This is the visible name that is displayed for the object within the Salesforce CRM user interface and shown on pages, views, and reports, for example.
Plural Label: This is the plural...
You can access the Object Limits page when planning how to customize a particular object, or to monitor the current usage and limits, such as the number of custom fields or rules applied.
Object Limits for standard objects
To access the standard Object Limits page, navigate to Setup | Customize. Click on the name of the desired standard object, and then click on the limits, as shown in the following screenshot (for the Account object):
Here, you can see usage details for the following: Custom Fields, Rollup Summary Fields, Custom Relationship Fields, Active Workflow Rules, Total Workflow Rules, Approval Processes, Active Lookup Filters, Active Validation Rules, VLOOKUP Functions, Sharing Rules (Both Owner-and Criteria-based), and Sharing Rules (Criteria-based Only).
Object Limits for custom objects
To view information about the usage of various fields and rules that have been created on a custom object, you can access the Object Limits window displayed on a custom object definitions...
Creating custom object relationships
Considerations to be observed when creating object relationships are as follows:
Create the object relationships as a first step before starting to build the custom fields, page layouts, and any related list
The Related To entry cannot be modified after you have saved the object relationship
Note
Each custom object can have up to two master-detail relationships and up to 25 total relationships. Where an object has more than one master-detail relationship, the first master-detail relationship that was created, becomes the primary master-detail relationship. The owner of the record therefore is derived from the first master-detail relationship that was created.
Note
Master-detail relationships can be created on an object that contains record data by first creating a lookup relationship field, populating the lookup field...
Before you begin to create custom fields, it is worth spending some time to first plan and choose the most appropriate type of field to create. You can create many different custom field types in Salesforce CRM, including text, number, currency, as well as relationship types that enable lookup, master-detail, and hierarchical relationships.
Adding custom fields can be carried out by navigating to the field's area of the appropriate object:
For standard objects, navigate to Setup | Customize. Now, select the appropriate object from the Customize menu, click on Fields, and then click on New in the Custom Fields & Relationships section of the object page.
For custom task and event fields, navigate to Setup | Customize | Activities | Activity Custom Fields. Now, click on the New button.
For custom objects, navigate to Setup | Create | Objects. Now, select one of the custom objects in the list. Next, click on New in the Custom field dependencies and field history tracking...
Dependent picklists are picklists (including multi-select picklists) in which the values available in the picklist depend on the value of another field, which is called the controlling field.
Note
Controlling fields can be any picklist or checkbox field within the same record.
Controlling fields that are picklists are fields with at least one and fewer than 300 values. These are used to help with efficient, accurate data entry and help to achieve consistent data.
To define a dependent picklist, navigate to the field's area of the appropriate object.
For standard objects, this is carried out by navigating to Setup | Customize | (select the appropriate standard object) | Fields. Click on Field Dependencies.
For custom objects, navigate to Setup | Create | Objects | (select the appropriate custom object). Click on Field Dependencies.
Now click on New, choose a controlling field and dependent field, and then click on Continue.
Use the field-dependency matrix to specify the dependent...
Building relationship fields
When building lookup and master-detail relationship fields, there are various options and settings that you can set, which will enforce data integrity. These options and settings are covered in the next section.
Lookup relationship options
When you create a lookup field on an object, you can choose whether the lookup field is required or optional. If it is set as optional, you can choose one of the following three actions to take place if the lookup record is deleted:
Clear the value of this field:
This is a default option and is a good choice when the field does not have to contain a value from the associated lookup record.
Don't allow deletion of the lookup record that's part of a lookup relationship
This option prevents the lookup record from being deleted and is a good choice for restricting deletions if you have dependencies, such as workflow rules, based on the lookup relationship.
Delete this record also
This option works similar to the master-detail relationship and deletes the record whenever the lookup record is deleted. However, such a deletion on a lookup relationship is known as a cascade-delete and bypasses security and sharing settings. As a result, users can delete records when the...
Master-detail relationship options
When you create a master-detail field on an object, you can choose the Allow reparenting option.
By default, records in master-detail relationships cannot be reparented. However, you can allow child records in a master-detail relationship to be reparented to a different parent by selecting Allow reparenting option in the master-detail relationship definition.
Lookup filters are used to restrict the values and lookup dialog results for Lookup, Master-detail, and Hierarchical relationship fields.
You can specify the restrictions by configuring filter criteria that compare fields and values based on:
The current record
The related object (via the Lookup, Master-detail, or Hierarchical field)
The current user's record, permissions, and role
The records directly associated to the related object
As an example, you can:
Restrict the Contact Name field on an Account record to allow only those contacts that have a custom status of active, filtering out inactive contacts
Restrict the Contact Name field on a case record to allow only those contacts that are associated with the Account record specified in the Account Name field on the Case record
Restrict the Account Name field on an Opportunity record to allow only those users who have an International profile to create or edit Opportunity records, for accounts outside the United States
You can optionally...
Custom formula fields require additional settings as specified by the Salesforce CRM application, which are carried out using the following actions and steps:
Create the Formula field.
Choose the data type for the field, based on the output of the calculation.
Enter the number of decimal places for currency, number, or percent data types.
Note
The setting for the number of decimal places is ignored for currency fields in multi-currency organizations. Instead, the decimal places for your currency setting apply. Salesforce uses the round-half up, tie-breaking rule for numbers in formula fields. For example, 12.345 becomes 12.35 and -12.345 becomes -12.34.
Click on Next to display the formula creation screen.
To create a basic formula that passes specific Salesforce data, select the Simple Formula tab, choose the field type in the Select Field Type drop-down list, and choose one of the fields listed in the Insert Field drop-down list.
To insert an operator, choose the appropriate operator icon from the Insert Operator drop-down list. Here, you can select from the following operators: + Add, - Subtract, * Multiply, / Divide, ^ Exponentiation, (
(open parenthesis character), )
(close parenthesis character), & Concatenate, = Equal, <> Not Equal, < Less Than, > Greater Than, <= Less Than or Equal, >= Greater Than or Equal, && And, and || Or.
The basic formula feature is quite restricted and you will likely seek to create more complicated formulas which can be performed by selecting the Advanced Formula tab.
Within this tab, click on Insert Field, choose a field, and then click on Insert.
You can now include merge fields along with advanced operators as well as functions, which are prebuilt Salesforce CRM formulas that you can invoke and pass your input values to by performing following steps :
Tip
Function description and example usage:
Select a function and click on Help to view a description and examples of formulas using that function.
Click on Check Syntax to check your formula for errors.
Enter a description of the formula in the Description box (this is optional).
For formulas that result in either a number, a currency, or a percentage field, you can decide how to display blank fields. To display blank fields as a zero value, select the option Treat blank fields as zeros. To display these fields as blank values...
Building formulas - best practices
Some best practices and methods to improve the creation and maintenance of formula fields are as follows:
Formatting with carriage returns and spacing
Consider the following formula:
Sales Tax (Percent) =
IF(TEXT(Account.Market__c) = "US", IF(TEXT(Account.State__c) = "California", 0.0925, IF(TEXT(Account.State__c) = "Nevada", 0.081, IF(TEXT(Account.State__c) = "Utah", 0.0835, 0) )) , 0)
To improve the readability of formula fields, you can add spacing and carriage returns. The preceding formula can be made far easier to understand, simply by adding spaces and carriage returns, as in the following snippet:
Sales Tax (Percent) =
IF( TEXT(Account.Market__c) = "US",
IF(TEXT(Account.State__c) = "California", 0.0925,
IF(TEXT(Account.State__c) = "Nevada", 0.081,
IF(TEXT(Account.State__c) = "Utah", 0.0835, 0) ))
, 0)
Salesforce CRM allows you to put...
Building formula text and compiled character size limits
There is a text character and byte size limit of 3,900 characters, and a limit of 5,000 characters for the compiled characters for formulas.
When this limit is reached, you will be unable to save the formula field and will be presented with the following error:
Compiled formula is too big to execute (7,085 characters). Maximum size is 5,000 characters.
It is common to encounter these limits when building complicated formula field calculations and particularly so when building formulas that reference other formula fields. While there is no way to increase this limit, there are some methods to help avoid and workaround these limitations, listed as follows:
For formulas that use multiple branch conditions to derive the values, as in the preceding example formula, check if the market is US and the state is California, Nevada, or Utah. You can replace the nested IF statements and...
Controlling the creation of fields is necessary to avoid adding unnecessary new fields in Salesforce. Without appropriate field creation governance, there is a risk of producing an application with a complex data structure that provides a poor user experience.
This issue can often be observed due to the ease of creating new custom fields. However, there are other causes such as:
Configuring spontaneous responses to end-user field creation requests without gathering full requirements
Lack of specification or understanding of reporting requirements for field usage
Creation of fields that are too specific for common uses, thus driving the need to create ever more fields
Lack of knowledge or awareness of existing fields that could be used rather than creating new ones
As the number of unnecessary fields increases, users will find it ever more difficult to enter the correct data into the correct fields. Therefore, the amount of entered data is reduced along with user's satisfaction...
Page layouts are used to organize the display of fields, buttons, custom links, inline Visualforce pages, Report charts, and related lists on an object detail or edit page. They are used to establish unique layouts for different business scenarios.
The displayed fields within a related list are controlled by the page layout; the name of the related list is determined by the lookup/master-detail relationship on the related object.
Page layouts are comprised of sections containing the buttons, fields, related lists, and customer links which can be edited using the enhanced page layout editor as shown in the following screenshot. Here, we are showing how we can edit the properties of the Account Site field.
Within the field sections, the user interface can be used to make a field Required or Read-only, as shown in the following screenshot:
The enhanced page-layout editor showing read-only settings, as indicated with the padlock icons, is shown in the following screenshot:
In the...
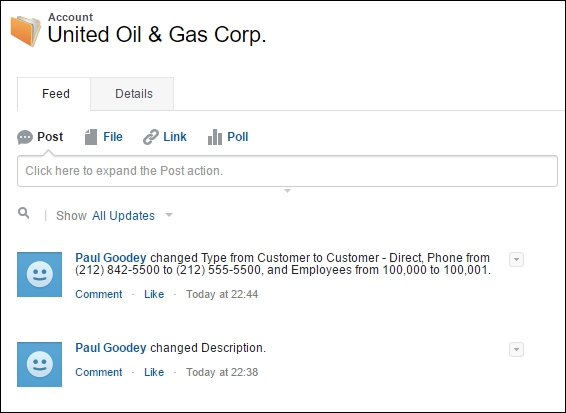
Feed-based page layouts offer a two tabbed page that allows users to switch between a Chatter feed and a detail page for the record. The tabs are marked Feed and Details as shown in the following screenshot:
A prerequisite for feed-based layouts, is the enabling of feed tracking for the object that you wish to create a feed-based layout. Feed tracking allows users to follow records which then lets them see feed updates when those fields are changed.
To enable Feed Tracking, navigate to Setup | Customize | Chatter | Feed Tracking. Here you are presented with a screen containing two panes. The left pane shows the object selection and the right pane shows the field selection as shown in the following screenshot:
To enable feed tracking, select an object in the left pane, enable the Enable Feed Tracking checkbox in the right pane, select the desired fields, and then click the Save button.
Note
Up to 20 fields can be selected for feed tracking.
Record types are a feature of Salesforce CRM that allow you to provide different sets of object picklists, different page layouts, and custom business processes to specific users, based on their profile or assigned permission set. Record types can be used in various ways, for example:
Create record types for opportunities to differentiate your internal sales deals from your field sales deals and show different fields and picklist values
Create record types for leads to display different page layouts for your tele-sales leads versus your internal sales prospecting functions
The record type, Master , is always set for every object and contains all the picklist and process options. It is not, however, listed under the record types list and it can be assigned as a record type for a profile, provided it is the only assigned as a record type for that profile.
Since each record type is assigned to one page-layout type per profile, the numbers of page assignments...
Related lists display on the lower portion of the object detail page to display the related record details. Related lists show the object records that are associated with that record.
From a related list, you can:
Click on the object record name to view detailed information
Click on Edit or Del to edit or delete the object record
Click on New to create a new object record that is associated with the record you are viewing
To define if an object can be related to another type of record, you would use either a master-detail or a lookup relationship.
Here, we show how editing a page layout for the account object enables the arrangement and configuration of any related list:
The following screenshot shows the results of changing the related lists in the page-layout editor screen when navigating to the Account detail page:
When you click on a tab, the Accounts tab for instance, you will be shown the My Accounts field in that view. This is termed as a list view and can be seen as shown in the following screenshot:
Other list views can be selected from the picklist:
You can modify existing views and define which columns and buttons (including standard and custom buttons) are to be displayed. You can click on New to create new views:
The following points apply to list views:
Every object in Salesforce CRM that is associated with a tab automatically has at least one list view. If there is no tab set up for the object, then there would be no corresponding list view.
List views can be modified by assigning filter criteria to control which records are returned for the affected object.
List views can be set up to be seen and accessed only by you, or you can set it to be accessed by certain roles and groups of individuals.
List view has a print feature that can be used by you and your users. To print from...
Questions to test your knowledge
You are now presented with questions about the key features of Salesforce CRM administration in the areas of Standard and Custom Objects which have been covered in this chapter. The answers can be found at the end of the chapter.
We present seven questions to verify your understanding of apps, tabs, objects, and fields.
Question 1 - Standard apps
Which of the following are standard Salesforce apps? (Select all that apply)
a) Site.com
b) Campaigns
c) Collaboration Community
d) Call Center
e) Service Cloud
Question 2 - Custom App Permission
What can a system administrator use to provide a group of users with access to a custom app? (Select all that apply)
a) Public groups
b) Profiles
c) Sharing rules
d) Page layouts
When a custom object is created, a custom tab is created in which of the following scenarios? (Select one)
a) Always (tabs are automatically created)
b) Never (tabs cannot be created during the creation of an object)
c...
In this chapter, we described the ways in which the data structure and user-interface features can be configured within Salesforce CRM.
We looked at how object and records information can be accessed. We also looked at the mechanisms for managing the methods that users use to view this information using views and page layouts.
We were shown how these record structures and user interfaces are controlled by the profile and the wider picture for the way configuration of these concepts are applied for users.
We discussed some techniques to help govern the way the configuration and creation of fields can be carried out and some common pitfalls to avoid.
Finally, we posed some questions to help clarify some of the key features of Salesforce CRM administration in the areas of Standard and Custom Objects.
In the next chapter, we will look in detail at the mechanisms for controlling access to data records and the features that provide data management and record sharing.