Chapter 5. Creating a Robotic Hand with the Raspberry Pi
Now that you are becoming something of an expert at building amazing projects with the Raspberry Pi, this project will provide you with the knowledge to begin to build your own humanoid robot. You'll start with perhaps the most interesting body part; the hand.
To do this, you will learn the following things:
How to use Raspberry Pi to control servos that will control a robotic hand
How to add a USB webcam to the project to sense your hand
How to use OpenCV(Open Source Computer Vision), an open source image processing library, to determine the position of your hand, and then move the robotic hand accordingly
Creating the hardware platform
In this chapter, you'll build a human hand that has four fingers, a thumb, and a rotating wrist. There are actually several possible robotic hand configurations that you can purchase or build yourself. If you'd like to purchase an already 3D printed hand, my personal favorite is the hand that was designed by Christopher Chappelle and Easton LaChappelle available already 3D printed at http://www.shapeways.com/product/Z5CZ2RKLY/3d-printed-hand-right?li=search-results-1&optionId=42512474.
Here is an image of the hand:
If you have access to a 3D printer, you can also download and print the hand yourself. Here is the link: https://www.thingiverse.com/thing:288856. Assembling the hand is quite simple; follow the instructions at http://www.shapeways.com/product/Z5CZ2RKLY/3d-printed-hand-right in the instruction image. Once you have assembled the hand, you'll need to add the servos to control the hand and the wrist. To control the hand, you'll need to pull on five...
In order to move the servos, you can use a servo controller similar to the one introduced in Chapter 3, Building a Wall-E Robot, to control six servos that will control these fingers, thumb, and wrist. As in Chapter 3, Building a Wall-E Robot, the servo controller you are going to use for this project is a simple servo motor controller utilizing USB from Pololu. Since you only need to control five servos, you can order the six servo controller version available at http://www.pololu.com.Here is an image of the unit:
Make sure you order the assembled version. This piece of hardware will turn USB commands from the Raspberry Pi into signals that control your servo motors. There are two connections that you'll need to make to the servo controller to get started; the first to the servo motors, the second to a power source.
First, connect the servos to the controller. In order to be consistent, let's connect your six servos to the connections marked 0 through 5 on the controller...
Connecting the servo controller to the Raspberry Pi
Now that you've checked the servo motor controller and the servos, you'll need to connect the servo controller up to the Raspberry Pi and make sure you can control the servos from it. Remove the USB cable from the PC and connect it to the Raspberry Pi.
Let's now focus on the motor controller by downloading the Linux code from Pololu at www.pololu.com/docs/0J40/3.b. Here are the steps to do so:
First, log on to your Raspberry Pi by putty, then type wget.http://www.pololu.com/file/download/maestro-linux-100507.tar.gz?file_id=0J315.
Move the file using mv maestro-linux-100507.tar.gz\?file_id\=0J315 maestro-linux-100507.tar.gz.
Unpack the file by typing tar -xzfv maestro-linux-100507.tar.gz. This will create a directory called maestro_linux.
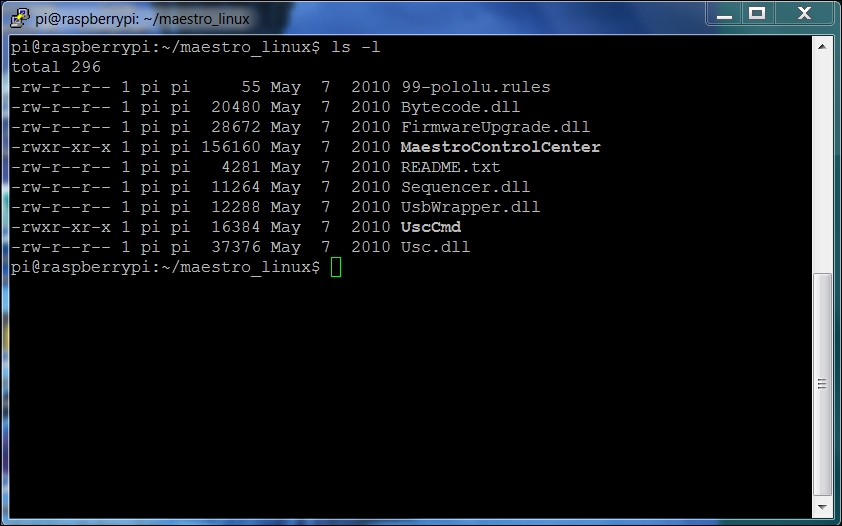
Go to that directory by typing cd maestro_linux and then ls -l; you should see something like this:
The README.txt file will give you explicit instructions on how to install the software. This is basically...
You now know that you can talk to your servo motor controller and move your servos. In this section, you'll create a Python program that will let you talk to your servos to move them to specific angles.
Let's start with a simple program that sets the servos to one end of the range (which should open the hand) and then go the other end of the range (which should close your hand). This program starts with the code you wrote in Chapter 3, Building a Wall-E Robot. Here is the basic code to control the servos:
#!/usr/bin/python
import serial
import time
def setAngle(ser, channel, angle):
    minAngle = 0.0
    maxAngle = 180.0
    minTarget = 256.0
    maxTarget = 13120.0
    scaledValue = int((angle / ((maxAngle - minAngle) / (maxTarget - minTarget))) + minTarget)
    commandByte = chr(0x84)
    channelByte = chr(channel)
    lowTargetByte = chr(scaledValue & 0x7F)
    highTargetByte = chr((scaledValue...
It is essential to be able to see if you want to follow your hand. Fortunately, adding hardware and software for vision is both easy and inexpensive. As you learned in Chapter 2, Building Your Own Futuristic Robot, connecting a USB camera is very easy.
Most importantly, OpenCV and your webcam can track your hand position. OpenCV makes this amazingly simple by providing some high-level libraries that can help us with this task. First, follow the instructions in Chapter 2, Building Your Own Futuristic Robot, to install your USB webcam and OpenCV.
Then you'll create a set of code that looks like this:
#!/usr/bin/python
import cv2
import numpy as np
import math

cap = cv2.VideoCapture(0)
cap.set(3, 360)
cap.set(4, 240)

while(cap.isOpened()):
    ret, img = cap.read()
    grey_image = cv2.cvtColor(img, cv2.COLOR_BGR2GRAY)
    blur = cv2.GaussianBlur(grey_image, (5,5), 0)
    ret, thresh1 = cv2.threshold...
You now have a hand that can move as your hand moves! By now you should have quite a few different capabilities that you can add to almost any project. In the next chapter, you'll add Raspberry Pi to a self-balancing, two-wheeled robot.