Reader small image

You're reading from  PrestaShop Module Development

Product typeBook
Published inNov 2014
Reading LevelBeginner
Publisher
ISBN-139781783280254
Edition1st Edition
Languages
Concepts
Right arrow
Author (1)
Fabien Serny
Fabien Serny
author image
Fabien Serny

Fabien Serny is a former core developer at PrestaShop. He has 10 years of experience in web development and e-commerce. He has worked for several big e-commerce companies in France, and then created his own company named 23Prod in late 2010. In 2014, along with two other former core developers from PrestaShop, he launched Froggy Commerce, a platform that sells simple and powerful modules for PrestaShop based on the needs of e-tailers. You can visit his websites http://www.23prod.com and http://www.froggy-commerce.com.
Read more about Fabien Serny

Right arrow

Chapter 8. The Payment Module

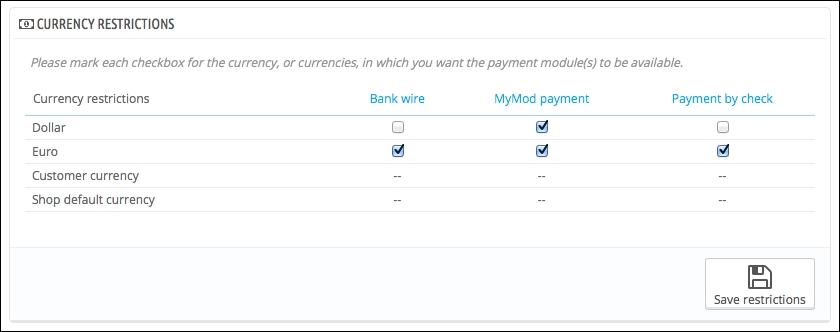
In PrestaShop, there are three types of modules: regular modules (which we developed in the first six chapters), carrier modules (which we saw in the previous chapter), and payment modules. In this chapter, you will learn about how payment modules work.

We will first create a module that will handle both check and bank wire payments. Mainly, it will transform a cart into an order (basic payment module). Then, we will add a few more complex features.

In this chapter, we will see how to:

  • Create a basic payment module

  • Use the validateOrder function to transform a cart into an order

  • Create new order states

  • Send an e-mail

  • Connect to a third-party API

Creating a payment module


Just like a conventional module, we will first create the directory and the main class of the module. We will name our new module mymodpayment. So, create a mymodpayment directory in the modules directory of PrestaShop, then create a PHP file with the same name in your new directory.

In this file (mymodpayment.php), create the class and code a constructor based on the same model as the mymodcomment module with one difference; this time, the module's main class won't extend Module, but it will extend PaymentModule:

<?php
class MyModPayment extends PaymentModule
{
  public function __construct()
  {
    $this->name = 'mymodpayment';
    $this->tab = 'payments_gateways';
    $this->version = '0.1';
    $this->author = 'Fabien Serny';
    $this->bootstrap = true;
    parent::__construct();
    $this->displayName = $this->l('MyMod payment');
    $this->description = $this->l('A simple payment module');
  }
}

Note

The PaymentModule class is an...

Creating the payment controller


We will now create a front controller named Payment. But first of all, in displayPayment.tpl, set the link to the controller on the href attribute using the getModuleLink method (which we also saw in the previous chapter):

<a href="{$link->getModuleLink('mymodpayment',
'payment')|escape:'html'}" class="mymodpayment">

Next, create the payment.php file in the controllers/front/ directory of your module and fill it with a front controller that will display the payment.tpl template:

<?php
class MyModPaymentPaymentModuleFrontController extends ModuleFrontController
{
  public $ssl = true;

  public function initContent()
  {
    // Call parent init content method
    parent::initContent();

    // Set template
    $this->setTemplate('payment.tpl');
  }
}

Note

As you might have noticed, I added the public $ssl = true; variable in the preceding code. In a front controller, when the ssl variable is set to true, the SSL option is enabled in the back office...

Checking the currency


In PrestaShop, the merchant can enable different currencies for each module payment. Go to the Payment menu under Modules in your back office; you will see a section named CURRENCY RESTRICTIONS (you also have other sections such as COUNTRY RESTRICTIONS):

The displayPayment hook won't display a payment method if the customer has chosen a currency that is not enabled for the payment method in question.

However, it's safer to add security in your payment module. In the initContent method of your module's Payment front controller, add the following lines just before assigning data to Smarty:

// Check if currency is accepted
if (!$this->checkCurrency())
Tools::redirect('index.php?controller=order');

Then, in this controller, create the checkCurrency method. We will first retrieve the currency associated with the cart (the one chosen by the customer) and get the currencies enabled for this payment module with the getCurrency method (native method of the PaymentModule abstract...

Validating a cart into an order


We will now create a module's front controller named validation (you should have created the form, whose action calls the validation controller, in the previous section of this chapter).

This controller won't display anything; it will only transform a cart into an order. First, create a file named validation.php in the controllers/front/ directory of your module, then create the corresponding class in it:

<?php
class MyModPaymentValidationModuleFrontController extends ModuleFrontController
{
}

We will create a method called postProcess (in fact, we will override it since it already exists in all the controllers). This method is called at the beginning of the controller's execution, so we will be able to perform all our operations before any display.

The first thing to do is to check whether the cart exists and is correctly filled in and whether the payment module is still enabled. If one of these conditions is incorrect, we will redirect the customer at the...

Displaying information on the order confirmation page


As you read at the beginning of this chapter, the payment module we are making should handle both check and bank wire payments. So we will now publish the check and bank wire information (address, IBAN, and so on) on the order confirmation page in order to give this information to the customer.

There is nothing new to learn here, so I will quickly describe the steps.

We first have to create a configuration form in our payment module to permit the merchant supplying his or her check and bank wire information. Since a module confirmation form is something we saw in the previous chapter, you can create your own or copy it from the code attached to the code of this chapter (see controllers/hook/getContent.php and views/templates/hook/getContent.tpl). Also, do not forget to add the getContent method in your module's main class:

public function getContent()
{
  $controller = $this->getHookController('getContent');
  return $controller->run...

Creating your own order state


You are probably asking yourself, why create your own order state when there are already order states we need in PrestaShop? Yes, you're right, but there will always be a moment when you need to create one for a specific need. And the most important of all, you can associate e-mail sending with order states.

We will start by coding a method named installOrderState in your mymodpayment module's main class. This method is very simple; we just have to instantiate an OrderState object model, fill it in, and call the add method.

Here are the different variables of an OrderState object model:

  • send_email: This is a flag that indicates whether an e-mail has to be sent (we will set it to false for now).

  • module_name: The field speaks for itself.

  • invoice: This is a flag that indicates whether an invoice has to be created by PrestaShop when the order state is attributed to the order.

  • color: The hexadecimal color code, which will be displayed for the order on the order's...

Associating an e-mail with an order state


First, we will create the e-mail templates. Create a mails directory in the views/templates/ directory of your module. Then, create a subdirectory for each language, in our case, only English. At the end, you should have this directory: views/templates/mails/en/.

In this directory, create two template files: mymodpayment.txt and mymodpayment.html (there is no naming convention, so you can change it if you want to). In PrestaShop, for each e-mail, you always have to create two templates: one without HTML (txt file) and one with HTML (html file). PrestaShop sends the two templates as one. It permits you to have something displayable even when HTML is not enabled on an e-mail reader.

In PrestaShop, e-mail templates are not Smarty templates; you can't make condition or loop in it, but you can have dynamic variables. However, unlink Smarty, in this case, a variable is between { } but without beginning with $. For example, in mymodpayment.txt, we will have...

Working with a third-party API


For most payment modules, you will have to work with a third-party API. In this section, we will build a payment method on a very simple API and we will also learn how to save the transaction ID. We will use the api.php script attached to the code of this chapter. You can open it if you want to see how it works, but in summary, we need the following variables as POST values:

  • api_credentials_id: For this, in our case, we have to send the presta string value

  • id_cart: This is the cart ID

  • total_to_pay: This is the total amount of the order

  • validation_url: This is the URL that the api.php script will call to confirm that the order has been paid

  • return_url: This is the URL that the customer will be redirected to if he or she goes back

  • cancel_url: This is the URL that the customer will be redirected to if the payment fails (in our case, there is no real transaction; a payment will be always accepted, so this URL will not be used)

  • payment_token: This corresponds to...

Summary


In this chapter, we saw how to create a fully functional payment module. You learned how to validate a cart into an order, create new order states, and send e-mails. You also learned how to work with a third-party API.

In the next chapter, we will learn how to configure multistore and make your module compliant with this feature.

lock icon
The rest of the chapter is locked
You have been reading a chapter from
PrestaShop Module Development
Published in: Nov 2014Publisher: ISBN-13: 9781783280254
Register for a free Packt account to unlock a world of extra content!
A free Packt account unlocks extra newsletters, articles, discounted offers, and much more. Start advancing your knowledge today.
undefined
Unlock this book and the full library FREE for 7 days
Get unlimited access to 7000+ expert-authored eBooks and videos courses covering every tech area you can think of
Renews at $15.99/month. Cancel anytime

Author (1)

author image
Fabien Serny

Fabien Serny is a former core developer at PrestaShop. He has 10 years of experience in web development and e-commerce. He has worked for several big e-commerce companies in France, and then created his own company named 23Prod in late 2010. In 2014, along with two other former core developers from PrestaShop, he launched Froggy Commerce, a platform that sells simple and powerful modules for PrestaShop based on the needs of e-tailers. You can visit his websites http://www.23prod.com and http://www.froggy-commerce.com.
Read more about Fabien Serny