Reader small image

You're reading from  PrestaShop Module Development

Product typeBook
Published inNov 2014
Reading LevelBeginner
Publisher
ISBN-139781783280254
Edition1st Edition
Languages
Concepts
Right arrow
Author (1)
Fabien Serny
Fabien Serny
author image
Fabien Serny

Fabien Serny is a former core developer at PrestaShop. He has 10 years of experience in web development and e-commerce. He has worked for several big e-commerce companies in France, and then created his own company named 23Prod in late 2010. In 2014, along with two other former core developers from PrestaShop, he launched Froggy Commerce, a platform that sells simple and powerful modules for PrestaShop based on the needs of e-tailers. You can visit his websites http://www.23prod.com and http://www.froggy-commerce.com.
Read more about Fabien Serny

Right arrow

Chapter 4. Building Module Updates

In Chapter 2, Hooks, to create a SQL table, we used phpMyAdmin (any SQL manager tool will do). However, you will agree that it isn't very handy for the merchant who wants to install the module. There are no PrestaShop official methods to create, delete, or update a database table in a module. I will show you the one used in most of the native PrestaShop modules.

In this chapter, we will see how to do the following:

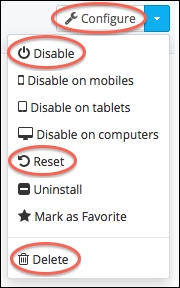
  • Create a SQL table when the module is installed

  • Delete a SQL table when the module is uninstalled

  • Alter the existing SQL table when the module is updated

Creating a database table on module installation


First of all, we will create a directory named install in the module directory. In this directory, create one file named install.sql in which you will put the SQL request that you want to execute on installation. In our case, it will be the mymod_comment table creation (the one we created manually in Chapter 2, Hooks):

CREATE TABLE IF NOT EXISTS `PREFIX_mymod_comment` (
  `id_mymod_comment` int(11) NOT NULL AUTO_INCREMENT,
  `id_product` int(11) NOT NULL,
  `grade` tinyint(1) NOT NULL,
  `comment` text NOT NULL,
  `date_add` datetime NOT NULL,
  PRIMARY KEY (`id_mymod_comment`)
) ENGINE=InnoDB  DEFAULT CHARSET=utf8 AUTO_INCREMENT=1 ;

Note

As you can see, I replaced the usual ps_ with PREFIX_. That way, we will be able to replace the PREFIX_ string with the prefix chosen by the merchant. It's the method used in PrestaShop installer.

Then, in the install method in mymodcomments.php, we will load the SQL file content and execute it.

We might have...

Deleting a table on uninstallation


The uninstall method is pretty much constructed the same way as the install method.

First, create an uninstall.sql file in the install directory of your module in which you will write the following SQL command to drop the mymod_comment table:

DROP TABLE `PREFIX_mymod_comment`;

Next, in mymodcomment.php, write an uninstall method to do the following:

  • Call the uninstall parent method

  • Load the uninstall.sql file

  • Check the return values

We will also delete the configuration values MYMOD_GRADES and MYMOD_COMMENTS. It isn't mandatory but it's cleaner that way.

At the end, you should have something like this:

public function uninstall()
{
  // Call uninstall parent method
  if (!parent::uninstall())
    return false;

  // Execute module install SQL statements
  $sql_file = dirname(__FILE__).'/install/uninstall.sql';
  if (!$this->loadSQLFile($sql_file))
    return false;

  // Delete configuration values
  Configuration::deleteByName('MYMOD_GRADES');
  Configuration...

Upgrading your module


This section is optional unless you want to distribute your module (that is, give or sell). However, if you skip this part, be sure to use the module attached with this chapter, instead of your own, before going to the next chapter.

This section is only for PrestaShop 1.5 and newer (module upgrade methods did not exist in PrestaShop 1.4).

Why use an update method? When you improve one of your modules, there may be times you will need to add a SQL table, alter existing ones, or even make specific configuration actions. In most cases, the merchant won't be able to make the updates manually and you can't ask them to uninstall/reinstall the module because, in our case, it means that all the comments posted will be deleted.

Let's add some fields (firstname, lastname, and e-mail address) to the comment form on the product pages. We will not only need to update the PHP and template files, but also alter the mymod_comment SQL table.

First of all, in mymodcomments.php, change the...

Updating the module code


We have updated the mymod_comment table with the three new fields; we now have to update the code of the module to use these fields. I won't explain this part in detail since it's not very difficult and there is nothing new here. You can take the module attached with this chapter if you want to skip this part. In displayProductTabContent.tpl, add the following HTML fields in the form:

<div class="form-group">
  <label for="firstname">
    {l s='Firstname:' mod='mymodcomments'}
  </label>
  <div class="row"><div class="col-xs-4">
    <input type="text" name="firstname" id="firstname" class="form-control" />
  </div></div>
</div>
<div class="form-group">
  <label for="lastname">
    {l s='Lastname:' mod='mymodcomments'}
  </label>
  <div class="row"><div class="col-xs-4">
    <input type="text" name="lastname" id="lastname" class="form-control" />
  </div></div>
<...

Adding a callback to options


One last method I want to introduce you to is onClickOption. This method will permit you to set the JavaScript OnClick trigger on the module's action buttons.

Here are the different action buttons that are compliant with the onClickOption method:

You are probably wondering when we should use the onClickOption method.

This method allows many possibilities. For example, in the case of our module, when the merchant uninstalls the module, it automatically drops the table of comments. When the merchant decides to reinstall the module, he won't retrieve the old comments.

Clicking the uninstall button by mistake is possible. With this method, we can display a confirmation box to ask the merchant whether he is really sure about performing this action.

To do so, you do not need to attach your module to any hook. Just add the following method to your module's main class:

public function onClickOption($type, $href = false)
{
}

The $type string contains keyword matching with the...

Summary


In this chapter, we saw how to use the install and uninstall methods. You also learned how to handle module upgrade, more precisely, a SQL upgrade. Lastly, we talked about the onClickOption method that permits you to improve the merchant experience on your module.

In the next chapter, you will learn how to use front controllers, object model, and overrides; you will then be able to create new features without being limited by the hooks.

lock icon
The rest of the chapter is locked
You have been reading a chapter from
PrestaShop Module Development
Published in: Nov 2014Publisher: ISBN-13: 9781783280254
Register for a free Packt account to unlock a world of extra content!
A free Packt account unlocks extra newsletters, articles, discounted offers, and much more. Start advancing your knowledge today.
undefined
Unlock this book and the full library FREE for 7 days
Get unlimited access to 7000+ expert-authored eBooks and videos courses covering every tech area you can think of
Renews at $15.99/month. Cancel anytime

Author (1)

author image
Fabien Serny

Fabien Serny is a former core developer at PrestaShop. He has 10 years of experience in web development and e-commerce. He has worked for several big e-commerce companies in France, and then created his own company named 23Prod in late 2010. In 2014, along with two other former core developers from PrestaShop, he launched Froggy Commerce, a platform that sells simple and powerful modules for PrestaShop based on the needs of e-tailers. You can visit his websites http://www.23prod.com and http://www.froggy-commerce.com.
Read more about Fabien Serny