Search icon
Arrow left icon
All Products
Best Sellers
New Releases
Books
Videos
Audiobooks
Learning Hub
Newsletters
Free Learning
Arrow right icon
Practical Predictive Analytics

You're reading from  Practical Predictive Analytics

Product type Book
Published in Jun 2017
Publisher Packt
ISBN-13 9781785886188
Pages 576 pages
Edition 1st Edition
Languages
Author (1):
Ralph Winters Ralph Winters
Profile icon Ralph Winters

Table of Contents (19) Chapters

Title Page
Credits
About the Author
About the Reviewers
www.PacktPub.com
Customer Feedback
Preface
Getting Started with Predictive Analytics The Modeling Process Inputting and Exploring Data Introduction to Regression Algorithms Introduction to Decision Trees, Clustering, and SVM Using Survival Analysis to Predict and Analyze Customer Churn Using Market Basket Analysis as a Recommender Engine Exploring Health Care Enrollment Data as a Time Series Introduction to Spark Using R Exploring Large Datasets Using Spark Spark Machine Learning - Regression and Cluster Models Spark Models – Rule-Based Learning

Chapter 12. Spark Models – Rule-Based Learning

In this section, we will learn how to implement some rule-based algorithms. The method in which these algorithms can be implemented depends upon the language interface you are using and the version of Spark which is running.

For Spark 2.0, the only languages which support rule-based decision trees are Scala and Python. So in order to demonstrate how decision rules can be constructed directly in Spark, we will illustrate an example that uses Python to determine the rules for being frisked.

For other languages, such as R, there is currently no facility to run a decision tree algorithm directly on a Spark dataframe; however, there are other methods that can be used which will yield accurate trees.

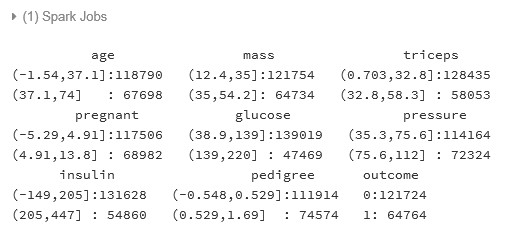
We will demonstrate how to first extract a sample from Spark, download it to base R, and run our usual tools, such as rpart. Big datasets will typically contain much more data than you might need for a decision tree, so it makes perfect sense to sample appropriately...

Loading the stop and frisk dataset


We will be using the diabetes dataset which was constructed in the last chapter. For some of the other decision tree examples, we will need to load the stop and frisk dataset. You can obtain this dataset from the following URL: http://www1.nyc.gov/site/nypd/stats/reports-analysis/stopfrisk.page.

Select the 2015 CSV zip archive and download and extract the files to the projects directory, e.g C:/PracticalPredictiveAnalytics/Data, and name the file 2015_sqf_csv

Importing the CSV file to databricks

Databricks contains a simple user interface which allows you to load a file to the Databricks HDFS filesystem. Alternatively, you can load the file directly to Amazon Web Services (AWS) and read the file directly from the Databricks API.

  1. Switch to the Databricks application, select Tables, and then Data Import. Note that in some of the versions of Databricks this is embedded under the Data menu: Select "Tables", and then click the +.
  2. You may be prompted to create a new...

Reading the table


Once you have completed the preceding steps, the table you have just created will be registered in the databricks system and will remain persistent across sessions, i.e you will not need to reload the data every time you login.

Running the first cell

Begin by running the first cell (also referred to as a code chunk), which simply will get a count of the number of records by year. You can access the code in this chapter by downloading it from the book's site. Alternatively, you can copy each section of the following code into a new cell and create your own notebook that way.

Since stop frisk has been imported and has already been registered as a table, we can begin to use SQL to read it some of the counts in order to see how large the file is:

#embed all SQL within the sql() function

yr <- sql("SELECT year,frisked,count(*) as year_cnt FROM stopfrisk group by year,frisked") 
display(yr) 

After a few seconds, the output will appear as a simple formatted table. A simple calculation...

Discovering the important features


We will now introduce the OneR package to discover some of the important features of the dataset. The OneR package will produce a single decision rule for each of the features and then rank them in terms of accuracy. Accuracy is defined as the probability of classifying the outcome correctly and can be expressed as a confusion or error matrix, which we have seen before in the previous chapters. The OneR package has some other nice features, such as the ability to bin integer variables optimally in order to yield the best predictor.

The OneR package does not run natively on Spark, so we first need to use the collect() and sample() functions to perform a 95% sample of the Spark dataframe and then move it to a local R dataframe via the collect() function.

Although this Spark dataframe is small enough to perform the example without the sampling, it is important to know how to sample from a dataframe, since if you are using Spark as intended, your dataframes will...

Running the OneR model


The syntax to the OneR model should be familiar. The outcome variable frisked is specified on the left side of the formula (~) and the features are specified on the right side. As you will recall, the metacharacter (.) designates that all features will be used as predictors:

model <- OneR(train_data, frisked ~ ., verbose = TRUE) 
summary(model) 

The (partial) summary output displays the accuracy based upon selecting only one variable as a predictor along with its classification rate. The significant variables are starred.

The attribute and the accuracy metrics for the first 7 variables are shown next. Notice that once accuracy reaches 67.61% it does not decrease:

The call to the function is shown in the log, and the Decision Tree rules are displayed.

Interpreting the output

The output from the summary gives a good sense of the importance of each variable as an individual predictor. All of the accuracy measures range from 67.61% to 68.56%, so there is no obvious one single...

Another OneR example


This example uses the much larger diabetes dataset. Since most of the variables in this dataset are numeric, OneR can bin all of them:

  1. First, read the Spark diabetes table using SQL, which has already been registered in a previous chapter.
  2. Collect a 15% random sample of the data and assign it to an R (not Spark!) dataframe named "local".
  3. Bin all of the available variables based upon their ability to predict the outcome and assign it to an R dataframe named "data":
        library(OneR) 
        df = sql("SELECT outcome, age, mass, triceps, pregnant,
        glucose, pressure, insulin, pedigree 
        FROM global_temp.df_view") 

        local = collect(sample(df, F,.15)) 

        data <- optbin(local,outcome~.) 
        summary(data) 
  1. Run the OneR model using all of the variables to predict the outcome. Recall that the outcome is an indication of whether or not diabetes is present:
        model <- OneR(data, outcome~., verbose = TRUE) 
        summary(model) 

...

Constructing a decision tree using Rpart


While OneR is very good at determining simple classification rules, it is not able to construct full decision trees. However, we can extract a sample from Spark and route it to any R decision tree algorithm, such as rpart.

First collect the sample

To illustrate this, let's first take a 50% sample of the stop and frisk dataframe. We also want to make sure that the amount of data we extract can be processed easily by base R, which has a memory limitation that is dependent upon the CPU size.

  • The code below will first extract a 50% sample from Spark and store it in a local R dataframe named dflocal.
  • Then it will run an str() command to verify the rowcount and the metadata:
dflocal = collect(sample(df, F,.50,123)) 
str(dflocal) 

The output indicates that there are 11,311 rows, which is roughly 50% of the 22,563 rows from the Stop and Frisk data.

Decision tree using Rpart

We will run our rpart algorithm as a regression tree. Recall that a regression tree is used...

Running an alternative model in Python


In this example, we ran a decision tree in R by extracting a sample from the Spark dataframe and running the tree model using base R. While that is perfectly acceptable (since it forced you to think about sampling), in many instances it would be more efficient to run the models directly on the Spark dataframe using a MLlib package or equivalent.

For the version of Spark, you should be working with (2.1); decision tree algorithms are not available to be run under R. Fortunately, native Spark decision trees are already implemented in Python and Scala. We will illustrate the example using Python so that you can see that there are options available. If you will be following algorithm development in Spark you will find that often algorithms are written first in Scala, since that is the native Spark language.

Running a Python Decision Tree

Here are some notes on the Python decision tree code which appears below.

For the first code chunk, notice the "magic" directive...

Indexing the classification features


Indexing is used to optimize data access and supply the parameters to specific machine learning algorithms in an acceptable format.

We will be incorporating the race variable into the decision tree model, so the first step is to determine what the different values of race are. We will do this by again using SQL to count the frequency by race. Notice we can say either "Group by Race" or "Group by 1" which is a shorthand reference to the first column specified in the select statement (which is race):

%python 
dfx = spark.sql("SELECT race,count(*) FROM stopfrisk group by 1") 
dfx.show()  

Observe that there are eight values, Q, B, U, Z, A, W, I, and P:

Next, use indexer.fit(df2) transform. This will map a string factor (race) to a numeric index (race_indexed):

%python 
indexer = StringIndexer(inputCol="race", outputCol="race_indexed") 
df3 = indexer.fit(df2).transform(df2) 
df3.show(15) 
#drop race for the final dataframe
df4 = df3.drop("race") 

Look at the pairs...

Summary


This concludes this chapter, and this book. I started off by saying that this was a different kind of predictive analytics book, and I covered many different kinds of topics, from both a technical and conceptual viewpoint. I hope that you have learned a lot from this and that it has given you some new algorithms to use, and has taught you something about some 'older' tools, such as SQL, which are very capable of doing some of the heavy lifting that is sometimes needed. I also tried to emphasis 'small data', metadata, and sampling in the hopes that that will aid you in understand your data better, just by virtue of being able to look at individual pieces separately. I also hope that some of the material in the book will enable you to work collaboratively with different team members having different skill sets. That could be anything from someone who is an expert in optimizing code, or someone who is an expert in statistics, or even someone who has worked with all of the key people...

lock icon The rest of the chapter is locked
arrow left Previous Chapter
You have been reading a chapter from
Practical Predictive Analytics
Published in: Jun 2017 Publisher: Packt ISBN-13: 9781785886188
Register for a free Packt account to unlock a world of extra content!
A free Packt account unlocks extra newsletters, articles, discounted offers, and much more. Start advancing your knowledge today.
Unlock this book and the full library FREE for 7 days
Get unlimited access to 7000+ expert-authored eBooks and videos courses covering every tech area you can think of
Renews at $15.99/month. Cancel anytime}