Appendix A. Working with Repositories
Spoon allows you to store your transformations and jobs under two different configurations—file based and repository based. In contrast to the file-based configuration that keeps the transformations and jobs in XML format such as *.ktr and *.kjb files in the local file system, the repository-based configuration keeps the same information in tables in a relational database.
While working with the file-based system is simple and practical, the repository-based system can be convenient in some situations. The following is a list of some of the distinctive repository features:
Repositories implement security. In order to work with a repository, you need credentials. You can create users and profiles with different permissions on the repository; however, keep in mind that the kind of permissions you may apply is limited.
Repositories are prepared for basic team development. The elements you create (transformations, jobs, database connections, and so on) are shared by all repository users as soon as you create them.
If you want to use PDI as the input source in dashboards made with the CDF (refer to Chapter 13 for details), the only way you have is by working with repositories.
PDI 4, in its Enterprise version, will include a lot of new repository features such as version control.
Before you decide on working with a repository, you have to be aware of the file-based system benefits that you may lose out on. Here are some examples:
When working with the repository-based system, you need access to the repository database. If, for some reason, you cannot access the database (due to a network problem or any other issue), you will not be able to work. You don't have this restriction when working with files—you need only the software and the .ktr/.kjb files.
When working with repositories, it is difficult to keep track of the changes. On the other hand, when you work with the file system, it's easier to know which jobs or transformations are modified. If you use Subversion, you even have version control.
Suppose you want to search and replace some text in all jobs and transformations. If you are working with repositories, you would have to do it for each table in the repository database. When working with the file-based system, this task is quite simple—you could create an Eclipse project, load the root directory of your jobs and transformations, and do the task by using the Eclipse utilities.
This appendix explains how to create a repository and how to work with it. You can give repositories a try and decide for yourself which method, repository-based or file-based, suits you best.
If you want to work with the repository-based configuration, you have to create a repository in advance.
Time for action – creating a PDI repository
To create a repository, follow these steps:
Open MySQL Command Line Client.
In the command window, type the following:
Open Spoon.
If the repository dialog appears, skip to step 6.
Open the repository dialog from the Repository | Connect to repository menu.
Click on New to create a new repository. The repository information dialog shows up. Click on New to create a new database connection.
The database connection window appears. Define a connection to the database you have just created and give a name to the connection— PDI_REPO_CONN in this case.
Tip
If you want to refer to the steps on creating the database connection, check out Time for action – creating a connection to the Steel Wheels database section in Chapter 8.
Test the connection to see that it is properly configured.
Click OK to close the database connection window. The Select database connection box will show the created connection.
Give the name MY_REPO to the repository. As description, type My first repository.
Click on Create or Upgrade.
PDI will ask you if you are sure you want to create the repository on the specified database connection. Answer Yes if you are sure of the settings you entered.
A dialog appears asking if you want to do a dry run to evaluate the generated SQL before execution.
Answer No unless you want to preview the SQL that will create the reposprogress window appears showing you the progress while the repository is being created.
Finally, you see a window with the message Kettle created the repository on the specified connection. Close the dialog window.
Click on OK to close the repository information window. You will be back in the repository dialog, this time with a new repository available in the repository drop-down list.
If you want to start working with the created repository, please refer to the Working with the repository storage system section. If not, click on No Repository. This will close the window.
In MySQL you created a new database named PDI_REPO. Then you used that database to create a PDI repository.
Creating repositories to store your transformationand jobs
A Kettle repository is a database that provides you with a storage system for your transformations and jobs. The repository is the alternative to the *.ktr and *.kjb file-based system.
In order to create a new repository, a database must have been created previously. In the tutorial, the repository was created in a MySQL RDBMS. However, you can create your repositories in any relational database.
Note
The PDI repository database should be used exclusively for its purpose!
Note that if the repository has already been created from another machine or by another user, that is, another profile in the operating system, you don't have to create the repository again. In that case, just define the connection to the repository but don't create it again. In other words, follow all the instructions but don't click the Create or Upgrade button.
Once you have created a repository, its name, description, and connection information are stored in a file named repositories.xml, which is located in the PDI home directory. The repository database is populated with a bunch of tables with familiar names such as transformation, job, steps, and steps_type.
Note that you may have more than one repository—different repositories for different projects, different repositories for different versions of a project, a repository just for testing new PDI features, and another for serious development, and so on. Therefore, it is important that you give the repositories meaningful names and descriptions so that you don't get confused if you have more than one.
Working with the repository storage system
In order to work with a repository, you must have created at least one. If you haven't, please refer to the section Creating a repository.
If you already have a repository and you want to work with it, the first thing you have to do is to log into it. The next tutorial helps you do this.
Time for action – logging into a repository
To log into an existent repository, follow these instructions:
Launch Spoon.
If the repository dialog window doesn't show up, select Repository | Connect to repository from the main menu. The repository dialog window appears.
In the drop-down list, select the repository you want to log into.
Type your username and password. If you have never created any users, use the default username and password—admin and admin. Click on OK.
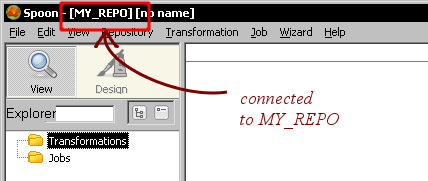
You will now be logged into the repository. You will see the name of the repository in the upper-left corner of Spoon:
You opened Spoon and logged into a repository. In order to do that, you provided the name of the repository and proper credentials. Once you did it, you were ready to start working with the repository.
Logging into a repository by using credentials
If you want to work with the repository storage system, you have to log into the repository before you begin your work. In order to do that, you have to choose the repository and provide a repository username and password.
The repository dialog that allows you to log into the repository can be opened from the main Spoon menu. If you intend to log into the repository often, you'd better select Edit | Options... and check the general option Show repository dialog at startup?. This will cause the repository dialog to always show up when you launch Spoon.
It is possible to log into the repository automatically. Let's assume you have a repository named MY_REPO and you use the default user. Add the following lines to the kettle.properties file:
The next time you launch Spoon, you will be logged into the repository automatically.
Tip
For details about the kettle.properties file, refer to the section on Kettle variables in Chapter 2.
Note
Because the log information is exposed, auto login is not recommended.
Defining repository user accounts
To log into a repository, you need a user account. Every repository user has a profile that dictates the permissions that the user has on the repository. There are three predefined profiles:
There are also two predefined users:
If you have Administrator profile, you can create, modify, rename, or delete users and profiles from the Repository explorer. For details, please refer to the section Examining and modifying the contents of a repository with the Repository explorer, later in this chapter. Any user may change his/her own user information both from the Repository explorer and from the Repository | Edit current user menu optio.
Creating transformations and jobs in repository folders
In a repository, the jobs and transformations are organized in folders. A folder in a repository fulfills the same purpose as a folder in your drive—it allows you to keep your work organized. Once you create a folder, you can save both transformations and jobs in it.
While connected to a repository you design, preview, and run jobs and transformations just as you do with files. However, there are some differences when it comes to opening, creating, or saving your work. So, let's summarize how you do those tasks when logged into a repository:
Creating database connections, partitions, servers, and clusters
Besides users, profiles, jobs, and transformations, there are some additional PDI elements that you can define:
All these elements can also be created, modified, and deleted from the Repository explorer.
Once you create any of these elements, it is automatically shared by all repository users.
Backing up and restoring a repository
A PDI repository is a database. As such, you may regularly backup it with the utilities provided by the RDBMS. However, PDI offers you a method for creating a backup in an XML file.
You create a backup from the Repository explorer. Right-click the name of the repository and select Export all objects to an XML file. You will be asked for the name and location of the XML file that will contain the backup data. In order to back up a single folder, instead of right-clicking the repository name, right-click the name of the folder.
You can restore a backup made in an XML file also from the Repository explorer. Right-click the name of the repository and select Import all objects from an XML file. You will be asked for the name and location of the XML file that contains the backup.
Examining and modifying the contents of a repository with the Repository explorer
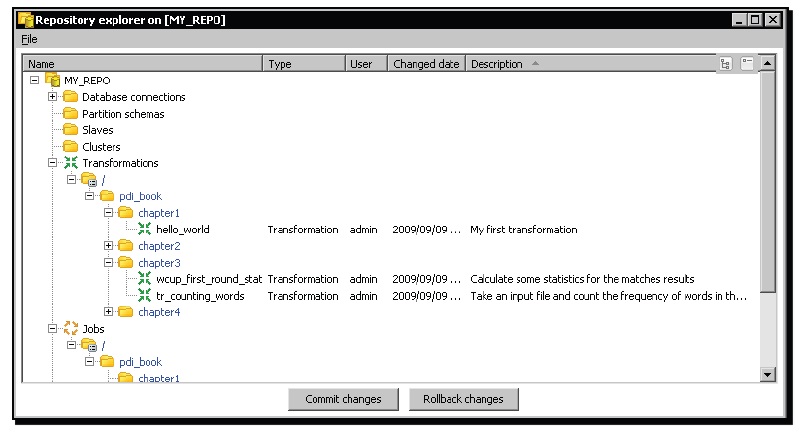
The Repository explorer shows you a tree view of the repository to which you are connected. From the main Spoon menu, select Repository | Explore Repository and you get to the explorer window. The following screenshot shows you a sample Repository explorer screen:
In the tree you can see: Database connections, Partition schemas, Slave servers (slaves in the tree), Clusters, Transformations, Jobs, Users, and Profiles.
You can sort the different elements by name, user, change data, or description by just clicking on the appropriate column header: Name, User, Changed date, or Description. The sort is made within each flder.
The Repository explorer not only shows you these elements, but also allows you to create, modify, rename, and delete them. The following table summarizes the available actions:
Note
When you explore the repository, you don't see jobs and transformations mixed. Consequently, the whole folder tree appears twice—once under Transformations and then under Jobs.
In order to confirm your work, click on Commit changes. If you make a mistake, click on Rollback changes.
Migrating from a file-based system to a repository-based system and vice-versa
No matter which storage system you are using, file based or repository based, you may want to move your work to the other system. The following tables summarize the procedure for doing that:
Migrating from file-based configuration to repository-based configuration:
Migrating from file-based configuration to repository-based configuration:
Note
You have to be logged into the repository in order to perform any of the explained operations.
If you share a database connection, a partition schema, a slave server, or a cluster, it will be available for using both from a file and from any repository, as the shared elements are always saved in the shared.xml file in the Kettle home directory.
This appendix covered the basics concepts for working with repositories. Besides the topics covered here, working with repositories is pretty much the same as working with files.
Although the tutorials in this book were explained assuming that you work with files, all of them can be implemented under a repository-based configuration with minimal changes. For example, instead of saving a transformation in c:\pdi_labs\hello.ktr, you could save it in a folder named pdi_labs with the name hello. Besides these tiny details, you shouldn't have any trouble in developing and testing the exercises.