


Preparing a Docker manager
You already know that we’ll be using Docker from now on to manage our virtual machines and install the required services to run AC. There are multiple examples of docker-compose.yml files available on the web. However, working with docker-compose and its configuration files might be a challenge for some. That is why I’ll show you, in my opinion, the best tool there is to manage everything for us with a few simple commands. In Chapter 2, we will put this tool to use and configure a fully working open source version of Magento.
To get our local development environment ready, we have to do three things:
- Install a Docker manager: First, we’ll focus on getting a Docker manager running. We can do this via the CLI. We will be using it a lot from now on, especially once we have AC/Magento Open Source running locally.
At the time of writing, my Docker manager of choice is Warden.
- Configure DNS resolution: The mechanism to translate a domain name into its associated IP address is called DNS resolution. From now on, all our projects will use
*.testas the domain extension. For example, our first project will be available at the following URL, which we will set up in Chapter 2: https://app.packt1.test.It is important to note that there is no domain extension for
*.test. This is something we will use for local development. That’s why we have to teach our operating system how to resolve (match) all domains available at*.testwith our local machine. While the initial configuration is being done with Warden during the installation, certain operating systems might require additional customization to enable successful DNS resolution. I’ll describe this process for all three operating systems. - Install SSL certificates: I don’t like to be asked the question, “This certificate is not secure. Are you sure you want to proceed?” each time I open my project. We need to configure our web browsers (or operating systems) to trust our local SSL certificates. The main one will be installed alongside Warden.
The next section marks the concluding stage in preparing our local workshop. It’s advisable to move forward only if your operating system is equipped with fully operational installations of Docker Desktop, Docker, and Docker Compose.
What is Warden?
Warden is a CLI utility for orchestrating Docker-based developer environments. It enables multiple local environments to run simultaneously without port conflicts via the use of a few centrally run services for proxying requests into the correct environment’s containers: https://github.com/wardenenv/warden.
Warden was created by David Alger and we are all thankful for his work as it has improved our workflows and the way we manage projects. The official documentation is located at https://docs.warden.dev/.
There is also a second option that is very similar to this one: Reward. It is written in Go, and it supports Linux, macOS, and Windows (via WSL 2). You can read more about Reward on the official website: https://rewardenv.readthedocs.io/en/latest/.
My pick is Warden, at least for now. I’m saying for now because, at the time of writing, a lot of improvements have been made.
Time for CLI
Whichever tool you decide to use, be it Warden or Reward, can only be installed in CLI.
This is the moment when we’ll start working with the CLI, so if you have not worked with it before, it might be a little weird, but trust me, it is very simple and quite handy.
Before we proceed with installing Warden, let’s discuss some CLI applications that will improve your workflow and work better than natively installed applications.
The following table shows terminals for working in each system’s CLI:
|
Windows |
Linux |
macOS |
|
Default: Command-line prompt |
Default: Any terminal that comes with the Linux distribution |
Default: Default terminal on macOS |
|
Recommended: Hyper Terminal |
Recommended: Terminator |
Recommended: iTerm2 |
Table 1.1 – List of terminal applications
I’ve worked on all the operating systems listed in this table. Each default terminal application to work with the CLI had some limitations that I did not like. Let me give you an example – the Windows command-line prompt does not allow you to have multiple terminals in the same window. The same goes for any default Linux and macOS terminal apps.
When working with AC, we will need to run a lot of commands in the CLI. Let’s consider two examples: clearing the cache (more about the cache will be covered in Chapter 3) and watching CSS compilation. I prefer to be able to do this in one application window, not multiple ones.
That’s why I’ve shared the list of recommended terminal applications – they keep everything in one place. As shown in the following figure, two terminals are split vertically in one window:
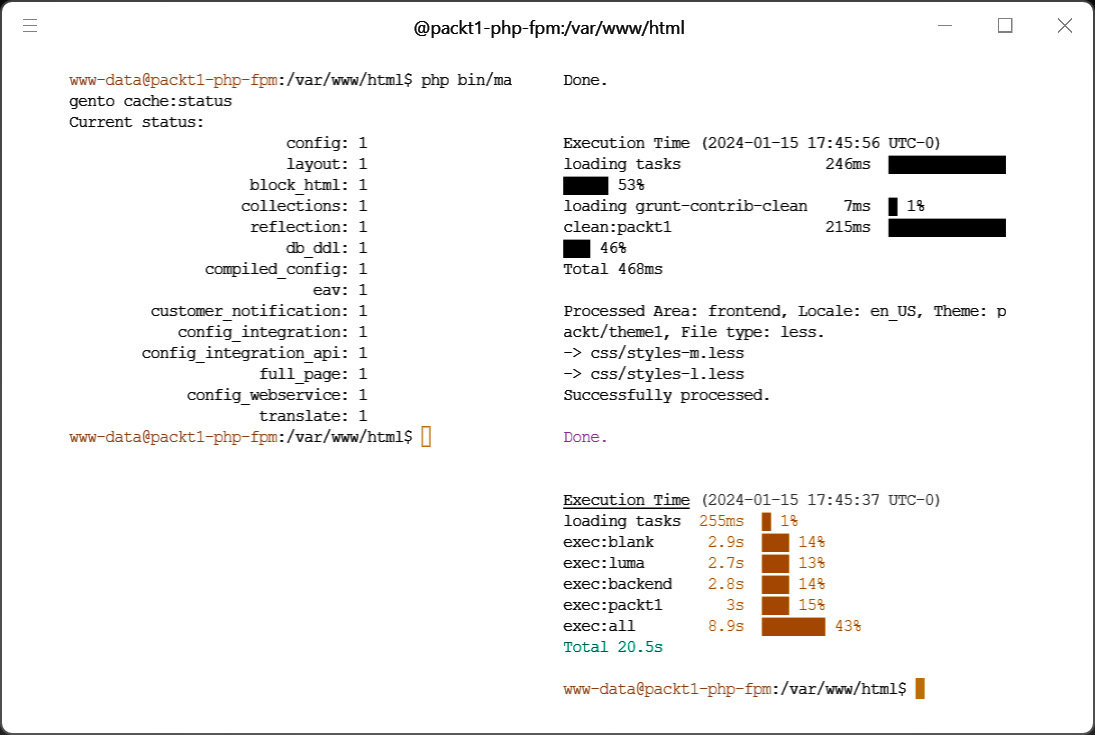
Figure 1.20 – Terminals split in a window
Now that you know what Warden is and why a good terminal application might help you with your daily work, let’s proceed with its installation.
Installing Warden
Open your system’s terminal and follow these steps for each OS:
- Windows: Hit the Windows key + r, type
cmd, and press Enter. Alternatively, open any terminal application, typewsland press Enter; this will log you into your Linux instance. - OSX: Hit Command + Space to open Spotlight. Type
terminaland start the application. If you have installed iTerm2, I recommend selecting this as your main terminal application. - Linux: Hit Ctrl + Alt+ T. This will start a terminal in a new window.
Once you are in your terminal, type the following commands (they will work on all systems). Note that we are going to use sudo before each command. It stands for Super User DO and will allow the command to be executed with root-level privileges:
sudo mkdir /opt/warden
sudo chown $(whoami) /opt/warden
git clone -b main https://github.com/wardenenv/warden.git /opt/warden
echo 'export PATH="/opt/warden/bin:$PATH"' >> ~/.bashrc
PATH="/opt/warden/bin:$PATH"
warden svc up
This will install Warden and set all proper privileges on your system. The last command will configure everything that is required. You should see a message very similar to this one:
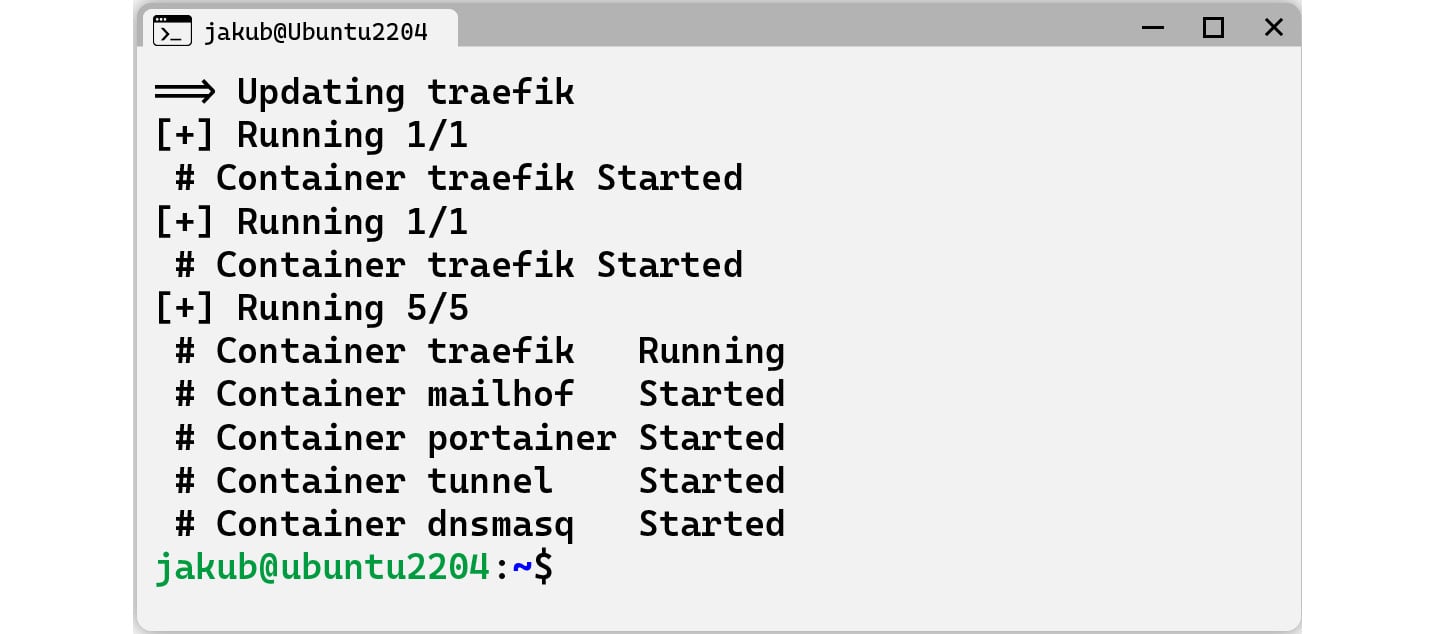
Figure 1.21 – Message upon configuration
I could say that everything is ready for you to start local development, but there are a few steps left and they depend on the operating system that’s installed on your machine.
Warden’s initial installation will configure the following services on your local machine. Type any of these URLs to check whether they work on your end:
- https://traefik.warden.test/
- https://portainer.warden.test/
- https://dnsmasq.warden.test/
- https://mailhog.warden.test/
If you see the message shown in Figure 1.22, then you need to configure DNS resolution on your machine:

Figure 1.22 – Checking DNS resolution
In the next section, I’ll show you how to configure DNS resolution on each operating system. By doing this, we will teach our computers how to resolve any URL that ends with .test regarding the URL address you type in your browser.
You’ve probably realized that we’ll be using *.test as the domain extension for our projects. However, with Warden as our base, we won’t have to configure everything each time we create a new project. Everything will work out of the box, but we need to tell our operating system how to find and resolve the domain names.
Configuring DNS resolution
I hope you won’t mind if I won’t dig into the role of dnsmasq or any other services installed by Warden. I would us to focus on finishing up our local environment setup and tell our operating systems how to resolve the *.test domain extension. As I’ve done previously, I’ll cover this for every operating system. First, we’ll look at Windows.
Configuring DNS resolution on Windows
You need to set 127.0.0.1 as your main DNS. It will not break anything but might cause issues with some VPNs, so make sure you go through this with your system administrator. Follow these steps:
- On Windows 10/11, go to your active network connection settings and edit DNS server assignment, as follows:

Figure 1.23 – DNS settings
- Click Edit.
- Change Automatic to Manual:
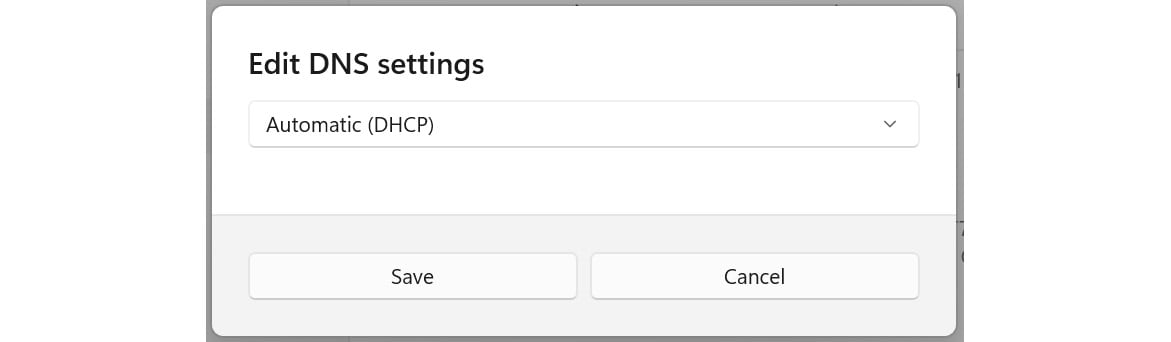
Figure 1.24 – Changing Automatic to Manual
- Change Preferred DNS to
127.0.0.1. - Change Alternate DNS to one of the following:
8.8.8.8or8.8.4.4for Google1.1.1.1or1.0.0.1for CloudFlare9.9.9.9or149.112.112.112for Quad9
- Click Save.
Here, we forced the Windows network connection to use our local machine (127.0.0.1) as the main domain name resolver. This is being done by dnsmasq, one of the services installed with Warden.
If you’re wondering why we’ve added the alternate DNS, it is very simple. If your Docker container with dnsmasq goes down, your network connection won’t be able to match any domain name with its IP. Your computer will stop matching (resolving) the domain names and you might start to think that your internet connection is broken. It’s not – that’s why we’ve added the alternative DNS, to make sure domain names are resolved and you won’t experience any weird issues.
Let’s proceed further. Try typing one of the URLs mentioned earlier. It should work now! At this point, you are almost ready; we just need to resolve a small certificate issue as you’ll probably see something like this:
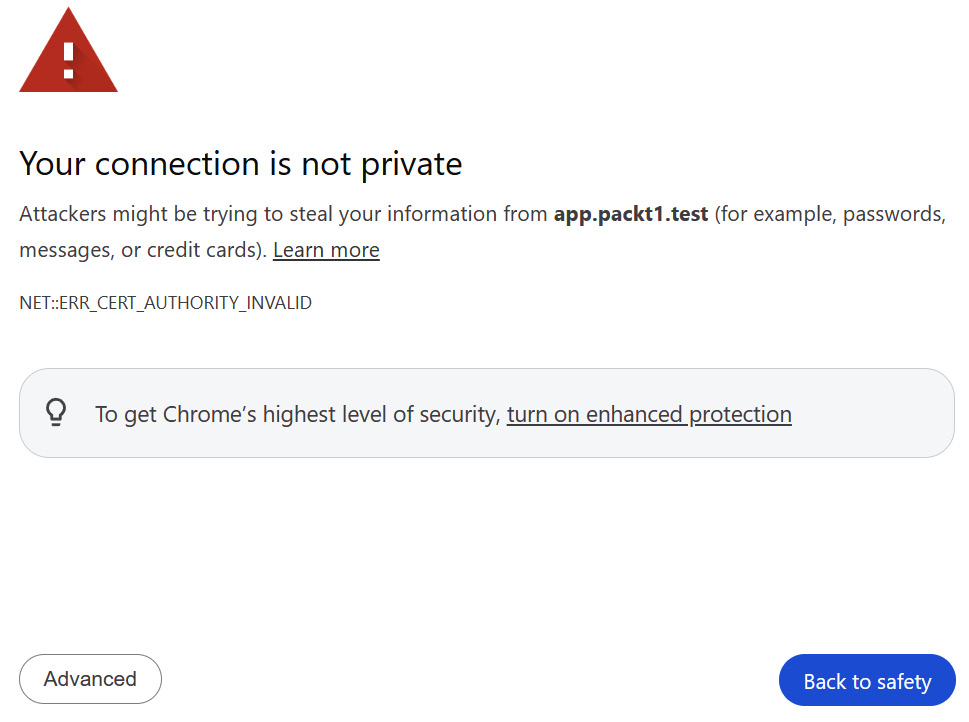
Figure 1.25 – Invalid SSL
Please proceed to the SSL Configuration section of this chapter if you’re working on Windows. Stay put to see the setup for macOS and Linux.
Configuring DNS resolution on macOS
There’s not much to write about here. DNS resolution is done automatically on macOS. This means that all the URLs mentioned earlier will work for you out of the box.
You shouldn’t experience any issues with the SSL either (as people working on Windows might encounter) as the entire process of installing AC is done automatically when Warden is installed.
Configuring DNS resolution on Linux
The Linux installation is quite simple. All we need to do is install something and edit just one file. This service might already be installed on your Linux PC, but I’ve assumed it’s not. Follow these steps:
- Install
resolvconfusing the following command:sudo apt update && sudo apt install resolvconf
- Once installed, edit the
/etc/resolvconf/resolv.conf.d/basefile and place the following content:search home net nameserver 127.0.0.1 nameserver 1.1.1.1 nameserver 1.0.0.1
You can also use Google IPs or the ones from Quad9. They were described in the Configuring DNS resolution on Windows part of this section.
- Restart the network manager:
sudo systemctl restart NetworkManager
With DNS set up, let’s proceed to configuring SSL.
SSL configuration
This section will cover how to make sure our browsers trust our local certificates, which were created by Warden during its installation. We don’t want to click the I trust this certificate option each time we start to work on a project, do we?
I won’t dive into the details of each operating system this time because of the following reasons:
- On macOS, SSL will work automatically. Warden adds the certificate to the user’s trust settings during installation.
- On Linux, the main certificate file is copied to a proper system location and should work automatically.
On Windows, we need to do the following:
- Find the main certificate file on your Linux WSL machine. In my case, the path was as follows:
\\wsl.localhost\Ubuntu-22.04\home\jakub\.warden\ssl\rootca\certs
- Create a copy of the
ca.cert.pemfile and name itca.cert. - Open the Control Panel area and find the Manage user certificates section.
- Expand the Trusted Root Certification Authorities section.
- Right-click on Certificates; under it, select All Tasks | Import.
- Locate the certificate file. You should see something similar to the following:

Figure 1.26 – Certificate file
- Open your Chrome browser. If you are using Firefox as your main browser, jump to the Possible issues with SSLs section.
- Go to one of the URLs listed earlier; I’ll use this one: https://mailhog.warden.test/.
- I am using Chrome, so this is what I can see:
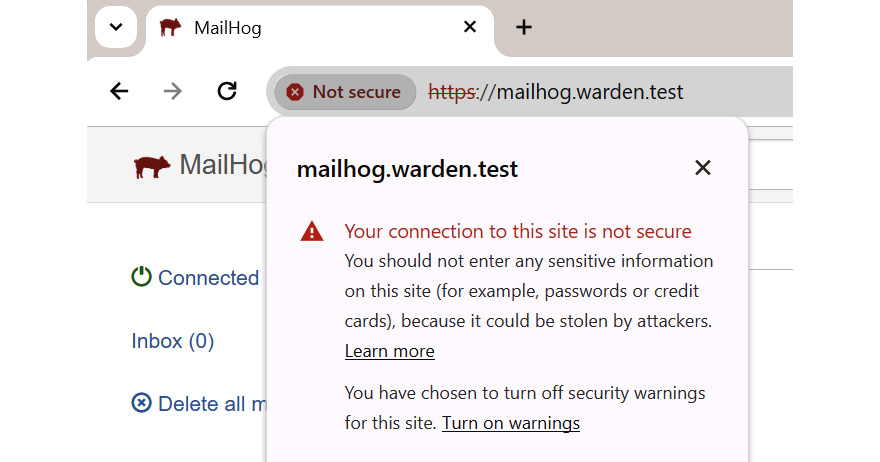
Figure 1.27 – Checking the status on Chrome
Let’s quickly explore some of the common issues that you might face while doing this.
Common issues with SSL certificates
It is possible that even though you have SSL configured on your local operating system, you might have to proceed with some extra steps to make your browser trust SSL certificates created by Warden.
For Firefox on all systems, navigate to Preference | Privacy & Security | View Certificates (bottom of the page) | Authorities | Import and select the same file we added on Windows:
\\wsl.localhost\Ubuntu-22.04\home\jakub\.warden\ssl\rootca\certs\ca.cert.pem
If you are on Linux/macOS, the file’s location will be as follows:
~/.warden/ssl/rootca/certs/ca.cert.pem
For Chrome on Linux, navigate to Chrome Settings | Privacy and Security | Manage Certificates (see more) | Authorities | Import and select the file.
Reload the page; you should no longer see a message stating that the SSL certificate is untrusted.