Reader small image

You're reading from  ESP8266 Internet of Things Cookbook

Product typeBook
Published inApr 2017
PublisherPackt
ISBN-139781787288102
Edition1st Edition
Tools
Concepts
Right arrow
Author (1)
Marco Schwartz
Marco Schwartz
author image
Marco Schwartz

Marco Schwartz is an electrical engineer, entrepreneur, and blogger. He has a master's degree in electrical engineering and computer science from Supélec, France, and a master's degree in micro engineering from the Ecole Polytechnique Fédérale de Lausanne (EPFL), Switzerland. He has more than five years' experience working in the domain of electrical engineering. Marco's interests center around electronics, home automation, the Arduino and Raspberry Pi platforms, open source hardware projects, and 3D printing. He has several websites about the Arduino, including the Open Home Automation website, which is dedicated to building home automation systems using open source hardware. Marco has written another book on home automation and the Arduino, called Home Automation With Arduino: Automate Your Home Using Open-source Hardware. He has also written a book on how to build Internet of Things projects with the Arduino, called Internet of Things with the Arduino Yun, by Packt Publishing.
Read more about Marco Schwartz

Right arrow

Controlling pins using MicroPython


In this recipe, we will learn how to control the ESP8266 pins with MicroPython. To do that we will come up with a setup where we will be switching the state of an LED connected to an ESP8266 board GPIO pin. This will help you understand how to control digital outputs using MicroPython.

Getting ready

You will need the following things to accomplish the setup:

Begin by mounting the LED onto the breadboard. Connect one end of the 220 Ω resistor to the positive leg of the LED (the positive leg of an LED is usually the taller one of the two legs). Connect the other end of the resistor to pin 5 of the ESP8266 board. Then connect the negative leg of the LED to the GND pin of the ESP8266 board. The connection is as shown in the following diagram:
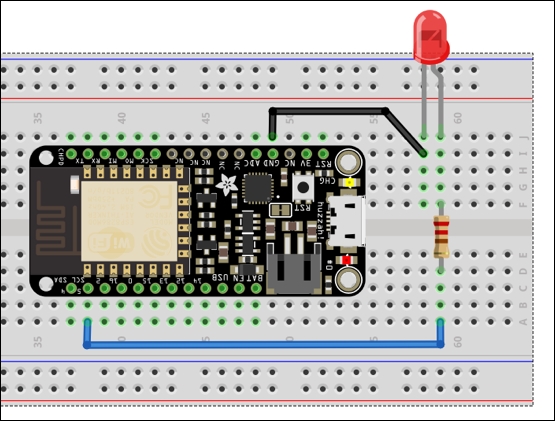
Once the setup is complete, connect the ESP8266 board to your computer via a USB cable...

lock icon
The rest of the page is locked
Previous PageNext Page
You have been reading a chapter from
ESP8266 Internet of Things Cookbook
Published in: Apr 2017Publisher: PacktISBN-13: 9781787288102

Author (1)

author image
Marco Schwartz

Marco Schwartz is an electrical engineer, entrepreneur, and blogger. He has a master's degree in electrical engineering and computer science from Supélec, France, and a master's degree in micro engineering from the Ecole Polytechnique Fédérale de Lausanne (EPFL), Switzerland. He has more than five years' experience working in the domain of electrical engineering. Marco's interests center around electronics, home automation, the Arduino and Raspberry Pi platforms, open source hardware projects, and 3D printing. He has several websites about the Arduino, including the Open Home Automation website, which is dedicated to building home automation systems using open source hardware. Marco has written another book on home automation and the Arduino, called Home Automation With Arduino: Automate Your Home Using Open-source Hardware. He has also written a book on how to build Internet of Things projects with the Arduino, called Internet of Things with the Arduino Yun, by Packt Publishing.
Read more about Marco Schwartz