Reader small image

You're reading from  Data Acquisition Using LabVIEW

Product typeBook
Published inDec 2016
PublisherPackt
ISBN-139781782172161
Edition1st Edition
Right arrow
Author (1)
Yik Yang
Yik Yang
author image
Yik Yang

Yik Yang  is a test engineer living in Chicago who has specialized in automation and data analysis. Having worked in multiple fields such as semiconductor, automotive, and power, he has experience with different types of automation and understands what are the industries' needs.He started his career after receiving his Bachelor's and Master's degrees in Electrical Engineering at Virginia Tech. In his career, he worked on automation projects that used CompactDAQ, PXI, FPGA, and so on in LabVIEW. He has also spent a lot of time with Lean Six Sigma and statistical analysis with JMP. He is a certified Professional Engineer (PE) in North Carolina and a Certified LabVIEW Developer (CLD).
Read more about Yik Yang

Right arrow

Chapter 8. DAQ at a Distance - Network and Distributed Systems

Today we live in the age of networks to the extent that it is actually hard to find isolated islands with no network around. To take advantage of these networks is not only beneficial, but at times very necessary. After the initial setting, many of the adjustments and data collection can be performed remotely just outside the lab (with VPN and proper connections). In general, device manufacturers provide drivers for use by customers. National Instruments has taken downloading and installation of drivers, and more importantly version control of the drivers, and have made it even easier. LabVIEW version 8.5 and beyond is capable of acquiring and installing drivers from within LabVIEW. Since much of this (acquiring the drivers and installation) uses the Internet and local networks, it is worthwhile to dedicate a complete chapter to it.

In this chapter, we will learn:

  • Developing and monitoring from a distance

  • Distributed Test application...

Verifying the computer's connection


It may sound trivial, and in most cases it is, but if this unit is being used in a professional company, it's IT department can be very helpful in case there are issues. But be aware that simple security (a username and password) will be required. We will verify that all connections and security are taken care of by simply looking for the device and verifying the local IP of the GPIB assigned to it by running GPIB Ethernet Wizard:

  1. Launch NI Max and click on Devices and Interfaces.

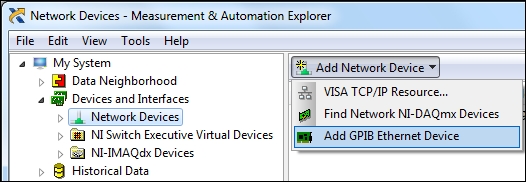
  2. Click on Network Devices on the left-hand pane.

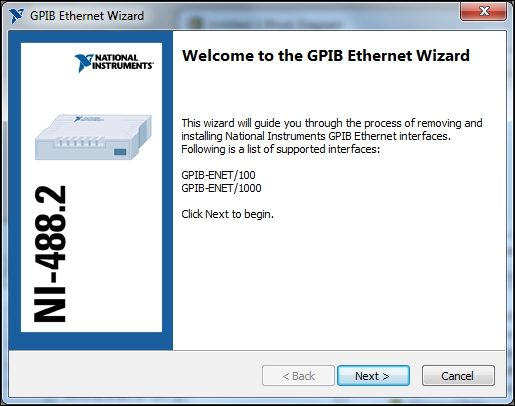
  3. From the right-hand side drop-down menu click on Add Network Device and choose Add GPIB Ethernet Device. This will launch NI-488.2, the GPIB Ethernet Wizard.

  4. Click on the Next button. This is the crucial point; that is, the software will start to search for connected devices. If all goes well you will see the list of detected devices or at least one device. But before looking at a successful search, let's look at the failure window...

A distributed test application using GPIB-ENET


With the connections ready and everything set up, we will run a simple example. In this example, we will set the power supply to 2.3v DC and connect the DS 2022 leads to the power supply:

  1. Launch LabVIEW, open a blank VI, and use Tektronix VI Tree. Drag and drop the following modules on the block diagram in the VI (see the block diagram of the following window):

  2. Connect all wires to have a complete VI, as depicted in the following screenshot:

  3. This will produce the following Front Panel:

  4. On the Front Panel, click on the arrow and choose the appropriate instrument:

    • In our example, we have GPIB0::9::INSTR. Leave all other inputs with their default values.

    • Press the Run arrow icon in the top left corner to execute the VI.

    • LabVIEW chooses the X and Y limit values automatically and they change rapidly, sometimes so rapidly that one cannot see the correct trace that is drawn.

  5. Right-click on the Front Panel window and choose to remove the automatic assignment...

Summary


It has been years since tasks have been carried out remotely. LabVIEW is no exception. In this chapter, we showed how to use. Conet an ENET100 and we went through the connection step-by-step and verified each one.

Note that we used a local network. In a manufacturing or lab area, you may have to ask your network administrator to assign you a static one.

lock icon
The rest of the chapter is locked
You have been reading a chapter from
Data Acquisition Using LabVIEW
Published in: Dec 2016Publisher: PacktISBN-13: 9781782172161
Register for a free Packt account to unlock a world of extra content!
A free Packt account unlocks extra newsletters, articles, discounted offers, and much more. Start advancing your knowledge today.
undefined
Unlock this book and the full library FREE for 7 days
Get unlimited access to 7000+ expert-authored eBooks and videos courses covering every tech area you can think of
Renews at $15.99/month. Cancel anytime

Author (1)

author image
Yik Yang

Yik Yang  is a test engineer living in Chicago who has specialized in automation and data analysis. Having worked in multiple fields such as semiconductor, automotive, and power, he has experience with different types of automation and understands what are the industries' needs.He started his career after receiving his Bachelor's and Master's degrees in Electrical Engineering at Virginia Tech. In his career, he worked on automation projects that used CompactDAQ, PXI, FPGA, and so on in LabVIEW. He has also spent a lot of time with Lean Six Sigma and statistical analysis with JMP. He is a certified Professional Engineer (PE) in North Carolina and a Certified LabVIEW Developer (CLD).
Read more about Yik Yang