

Introduction
In this chapter, we'll develop a mini-project by taking a very common use case that solves the business problem of sharing data across different applications using CSV. We'll use Durable Functions, which is an extension to Azure Functions that lets you write workflows by writing a minimal amount of code.
Here are the two core features of Durable Functions that we'll be using in the recipes of this chapter:
- Orchestrator: An orchestrator is a function that is responsible for managing all activity triggers. It can be treated as a workflow manager that has multiple steps. The orchestrator is responsible for initiating the activity trigger, passing inputs to the activity trigger, getting the output, maintaining the state, and then passing the output of one activity trigger to another if required.
- Activity trigger: Each activity trigger can be treated as a workflow step that performs a function.
Note
You can learn more about Durable Functions at https...
Business problem
In general, every organization uses applications that are hosted on multiple platforms across different datacenters (either on the cloud or on-premises). Often, there will be a need to feed data from one application to another system. Usually, CSV spreadsheets (or, in some cases, JSON or XML files) are used to export data from one application and import it into another application.
You may think that exporting CSV files from one application to another would be a straightforward job, but if there are many applications that need to feed data to other applications, and on a weekly/monthly basis, then this process would become very tedious and there is a lot of scope for manual error. So, the solution is obviously to automate the process as far as possible.
In this chapter, we'll learn how to develop a durable solution based on serverless architecture using Durable Functions. Chapter 7, Developing reliable serverless applications using durable functions, already...
The durable serverless way of implementing CSV imports
The following diagram shows all the steps required to build the solution using serverless architecture:
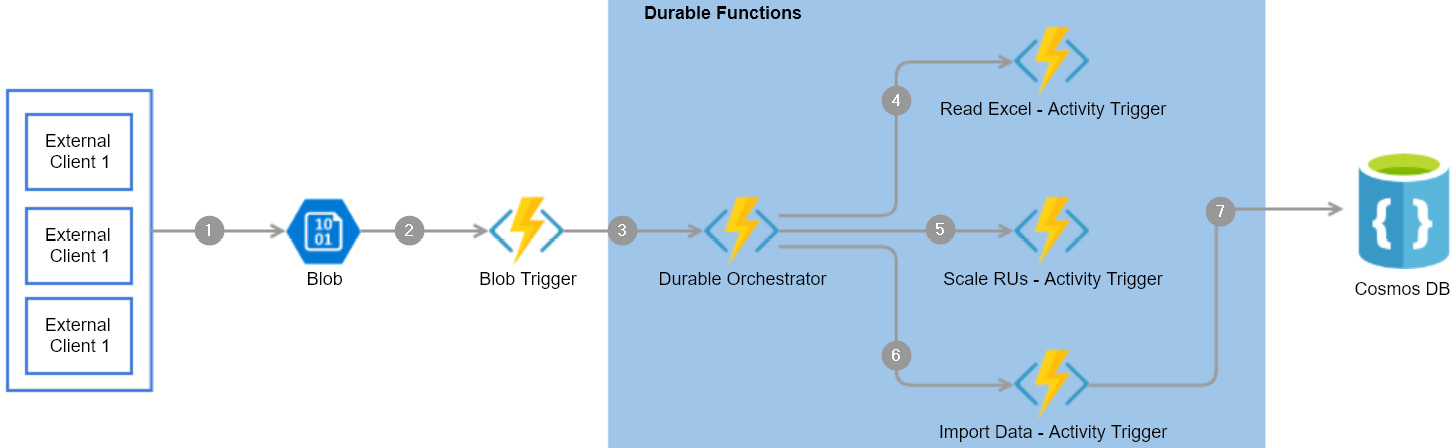
Figure 8.1: Durable Functions—architecture process flow
Here are the detailed steps pertaining to the preceding architecture diagram that will be implemented in this chapter:
- External clients or applications upload a CSV file to blob storage.
- A blob trigger gets triggered once the CSV file is uploaded successfully.
- The durable orchestrator is started from the blob trigger.
- The orchestrator invokes Read CSV - Activity Trigger to read the CSV content from blob storage.
- Orchestrator invokes Scale RUs - Activity Trigger to scale up the Cosmos DB collection's throughput so that it can accommodate the load.
- Orchestrator invokes Import Data - Activity Trigger to prepare the collection to bulk import data.
- Finally, Import Data - Activity Trigger loads the collection...
Uploading employee data to blob storage
In this recipe, we'll develop a console application for uploading the CSV sheet to blob storage.
Getting ready
Perform the following steps:
- Install Visual Studio 2019.
- Create a storage account and create a blob container with the name
csvimports. - Create a CSV file with some employee data, as shown in Figure 8.2:

Figure 8.2: CSV file with employee data
How to do it...
In this section, we are going to create a .NET Core–based client application that uploads the csv file to the blob container by performing the following steps:
- Create a new Console App (.NET Core) project named
CSVImport.Clientusing Visual Studio, as shown in Figure 8.3:
Figure 8.3: Creating a new Console App (.NET Core) project using Visual Studio
- Once the project is created, execute the following commands in the NuGet package manager:
Install-Package Microsoft.Azure.Storage.blob
Install-Package Microsoft.Extensions.Configuration...
Creating a blob trigger
In this recipe, we'll create a function app with the Azure Functions V3 runtime and learn how to create a blob trigger using Visual Studio, and we'll also see how the blob trigger gets triggered when the CSV file is uploaded successfully to the blob container.
How to do it…
Perform the following steps:
- Add a new project named
CSVImport.DurableFunctionsto the existing solution by choosing the Azure Functions template, as shown in Figure 8.8:
Figure 8.8: Visual Studio—creating a new Azure Functions project
- The next step is to choose the Azure Functions runtime as well as the trigger. Choose Azure Functions v3 (.NET Core), choose Blob trigger, and provide the following:
Storage Account (AzureWebJobsStorage): This is the name of the storage account in which our blob container resides.
Connection string setting: This is the connection string key name that refers to the storage account.
Path: This is the name of the blob container...
Creating the durable orchestrator and triggering it for each CSV import
This is one of the most important and interesting recipes. We'll learn how to create the durable orchestrator responsible for managing all the activity functions that we create for the different individual tasks required to complete the CSVImport project.
How to do it...
In this section, we are going to create an orchestrator and also learn how to invoke it by performing the following steps:
- Create a new function by right-clicking on
CSVImport.DurableFunctions, click on Add, and then choose New Azure Function, as shown in Figure 8.14:
Figure 8.14: Visual Studio—adding a new function
- In the Add New Item popup, choose Azure Function, provide the name
CSVImport_Orchestrator, and click on Add, as shown in Figure 8.15:
Figure 8.15: Visual Studio—adding a new function
- In the New Azure Function popup, select the Durable Functions Orchestration template and click on the OK button...
Reading CSV data using activity functions
In this recipe, we'll retrieve all the data from specific CSV sheets by writing an activity function.
Let's now make some code changes to the orchestration function by writing a new activity function that can read data from a CSV sheet located in the blob container. In this recipe, we'll create an activity trigger named ReadCSV_AT that reads the data from the blob stored in the storage account. This activity trigger performs the following jobs:
- It connects to the blob using a function,
ReadBlob, of a class namedStorageManager. - It returns the data from the CSV file as a collection of employee objects.
Getting ready
Install the following NuGet package in the CSVImport.DurableFunctions project:
Install-Package Microsoft.Azure.Storage.blob
How to do it...
If you think of Durable Functions as a workflow, then the activity trigger function can be treated as a workflow step that takes some kind of...
Autoscaling Cosmos DB throughput
In the previous recipe, we read data from a CSV file and put it into an employee collection. The next step is to insert the collection into a Cosmos DB collection. However, before inserting the data into a Cosmos DB collection, we need to understand that in real-world scenarios, the number of records that we would need to import would be huge. Therefore, you may encounter performance issues if the capacity of the Cosmos DB collection is insufficient.
Note
Cosmos DB collection throughput is measured by the number of Request Units (RUs) allocated to the collection. Read more about it at https://docs.microsoft.com/azure/cosmos-db/request-units.
Also, in order to lower costs, for every service, it is recommended to have the capacity at a lower level and increase it whenever needed. The Cosmos DB API allows us to control the number of RUs based on our needs. As we need to do a bulk import, we'll increase the RUs before we start importing the...
Bulk inserting data into Cosmos DB
Now that we have scaled up the collection, it's time to insert the data into the Cosmos DB collection. In this recipe, you will learn about one of the simplest ways of inserting data into Cosmos DB.
How to do it...
- Create a new activity trigger named
ImportData_AT, which takes an employee collection as input and saves the data in the Cosmos DB container. Paste the following code into the new activity trigger that does the job:[FunctionName("ImportData_AT")] public static async Task<string> ImportData_AT( [ActivityTrigger] List<Employee> employees, [CosmosDB(ConnectionStringSetting = "CosmosDBConnectionString")]DocumentClient client, ILogger log) { foreach (Employee employee in employees) { await client.CreateDocumentAsync(UriFactory. CreateDocumentCollectionUri("cookbookdb", "EmployeeContainer"), employee); log.LogInformation($"Successfully...
The rest of the chapter is locked
You have been reading a chapter from
Azure Serverless Computing Cookbook. - Third EditionPublished in: Jun 2020Publisher: PacktISBN-13: 9781800206601
Register for a free Packt account to unlock a world of extra content!
A free Packt account unlocks extra newsletters, articles, discounted offers, and much more. Start advancing your knowledge today.
undefined
Unlock this book and the full library FREE for 7 days
Get unlimited access to 7000+ expert-authored eBooks and videos courses covering every tech area you can think of
Renews at $15.99/month. Cancel anytime