


The “Fuzzy” layer – bridging the gap from C++ to Blueprint
Most engines work on the concept of layers. Each layer has a specific job to do, and when stacked in the correct order, they simplify the development and maintenance of an engine. For example, if a new graphics language emerges that it would be wise to support, only the layer with the graphics pipeline needs to be changed.
There is no hard and fast rule for the number or breakdown of layers in an engine, but what you will generally find is a separation that resembles Table 1.1:
|
Tool Full of Editor functions that speed up standard tasks. This suite is generally what an engine is marketed on. |
|
Gameplay All of the custom systems created to facilitate interaction mechanics that will be bespoke in the built game. |
|
Function Where all automatic internal systems are handled like input capture and physics processing, etc. |
|
Resource Memory management and asset streaming are handled here. |
|
Platform Essentially, the graphics pipeline definition and build platform native integrations if the engine supports it. |
|
Base Full of core dependency libraries such as UI frameworks for the Editor and math libraries. |
Table 1.1 – Common engine layers and their uses
Although Unreal may not explicitly label its layers in this way, we can see them in action in the relationship between how Unreal processes C++ and Blueprint gameplay. Functions created with certain specifiers in C++ can be accessed in Blueprint, but the reverse is not true. This shows there is an order to our actions where signals can only be passed one way. We’ll refer to this internal separation between gameplay layers as the Fuzzy layer.
The fact that the Fuzzy layer exists places a limitation on how we design our systems, but in turn, we gain a separation that enables gameplay programmers to work alongside designers with little friction. Systems can be developed for simple creative use within accessible Blueprints with the more efficient C++ code hidden out of sight. To facilitate this construction, Unreal gives us Property Specifiers and Function Specifiers to define how signals will punch through.
Property Specifiers
Property Specifiers define characteristics of C++-defined variables when viewed and accessed in the Blueprint layer. The Unreal docs provide a handy table explaining the different levels of security afforded by each, along with some more specific ones designed for events, collections, and replication over networks (https://docs.unrealengine.com/5.0/en-US/unreal-engine-uproperties/). The six Display Property Specifiers most commonly used are as follows:
EditAnywhere– The value will be changeable in all class defaults and instance detail panels. This specifier is generally used while prototyping as it displays the variable in most places, with the most options for changing its value. However, security is the price paid for this flexibility, allowing any designer to change the default and instance values, and so access should be restricted down to what you actually need once a system is tested as working.EditDefaultsOnly– The value will only be changeable in class defaults. Useful when a variable needs to be changed for balancing and all instances are spawned at runtime, where you wouldn’t have access to instance detail panels anyway. Can also be used to ensure no spawned instance has a rogue different value if necessary for execution.EditInstanceOnly– The value will only be changeable in instance detail panels. Useful for allowing designers different values on bespoke placed actors in a scene but restricting the default value to something that is tested as working.VisibleAnywhere– The value will be visible in all class defaults and instance detail panels, with no option for changing it from the Editor. This is useful for debugging how the initialization process affects a value when it is unknown if the code is generally wrong or wrong at an edge case. The latter will show incorrect values at the instance level, whereas the former will be wrong at both levels.VisibleInstanceOnly– The value will only be visible in instance detail panels. Useful for surface-level debugging of values in each instance without cluttering the screen with debug messages when you have a large number of instances spawned.VisibleDefaultsOnly– The value will only be visible in class defaults. Useful for designers to reference what a functional value is and create a parity in the visual elements of an actor. This is the highest security level as each actor will display the starting value in one place.
There are two access specifiers we need to pay attention to for now: BlueprintReadOnly and BlueprintReadWrite. They give child Blueprint-based classes access to either just the getter or both getter and setter in their graphs.
Function Specifiers
Function Specifiers work similarly to Property Specifiers, defining how functions should be seen and accessed by the Blueprint layer, with some subtleties to their usage. You can find a full list of Function Specifiers in the Unreal docs (https://docs.unrealengine.com/5.0/en-US/ufunctions-in-unreal-engine/), but the three we are interested in are detailed next:
BlueprintCallable– As the name suggests, Blueprint classes can call this function if it is in a parent class and it has the correct encapsulation type (public or protected).BlueprintImplementableEvent– The stub for this function signature is defined in C++ without any implementation. This allows C++ systems to call it and Blueprint systems to fill out its actual body. You might use this for triggering visual effects like a laser beam on a gun when it is fired.BlueprintNativeEvent– This allows C++ to define a function that is filled out in Blueprint, but in this case, there can also be a default implementation, which will also be run. Unreal achieves this by generating two more function definitions for you:*_Implementation()andExecute_*(). The former is used for the C++ side that must be run, and the latter is the function that must be called in C++ to fire both implementations.
Important note
As with layering, the C++ side of BlueprintNativeEvents will execute before the Blueprint side.
Using Property and Function Specifiers, we can make systems that cross the Fuzzy layer, but almost as important as routing function signals is designing inheritance hierarchies that smooth this process.
Useful inheritance
As standard practice, it is best to make sure that anything instanced in your world is a Blueprint class. This helps with debugging and linking classes with references as you have all the visual tools built into the Editor for tracing executions, and if classes are renamed or if they move directories, then links are live instead of text-based, preventing crashes.
To make this inheritance strategy work, it is recommended you think about your system from an abstract gameplay point of view. Which classes affect the mechanics? These classes need to have a C++ representation for efficiency, and so a hierarchy can be designed. From there, we inherit Blueprint classes from the end of each branch. This gives us the Blueprint classes to link, create instances of, and add visual components to:
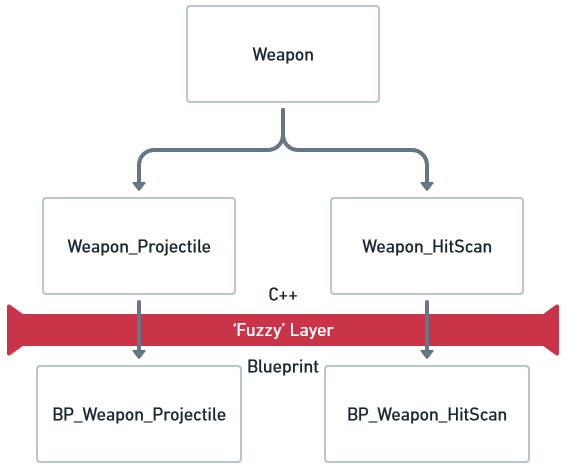
Figure 1.6 – Example hierarchy for a weapon mechanic that includes both Projectile and HitScan mechanic types
In Figure 1.6, the C++ classes would contain all the logic for ammo, damaging actors, interaction handling, and so on. Then, in the Blueprint classes, components to display the mesh, run the kickback animations, and display the muzzle flash would be added. There would most likely be a function in the Weapon parent class called from somewhere in the firing logic that looks like this:
UFUNCTION(BlueprintImplementableEvent)
void Fire_Visuals();
This could then be implemented in the Blueprint classes to trigger visual effects. Using some of the patterns we will cover later, namely the type object pattern, you can create a vast array of weapons from these few classes with some simple asset and variable changes. This shows how the artist, designer, and programmer can all work together on one system without getting in each other’s way while still benefitting from the efficiency gain in C++.
In theory, this process is perfect, but theory rarely translates to the real world. A lot of dev time is usually spent working out how to do something based on forum posts, documentation, and videos. It’s great that these resources exist; almost every problem you come across has likely been solved by someone else, but there is no guarantee they have been developed with the same practice. You will come across a situation where the fix you need is in a Blueprint tutorial/example and your system needs it to be in C++, so let’s have a look at the translation process.


