


Setting up our environment and configuring UmiJS
In this section, we'll install and configure VSCode, the EditorConfig extension, and the Prettier extension, and create our first UmiJS project.
Let's begin by installing a source code editor. You can use any editor that supports JavaScript and TypeScript, but I will use VSCode extensively in this book. It's a free editor with an integrated terminal and internal Git control that natively supports JavaScript, TypeScript, Node.js, and many extensions for other languages.
VSCode is available as a Snap package, and you can install it on Ubuntu by running the following command:
$ sudo snap install code ––classic
For Mac users, you can install it using Homebrew on macOS by running the following command:
$ brew install --cask visual-studio-code
If you are using Chocolatey on Windows, you can run the following command:
> choco install vscode
Alternatively, you can download the installer available at https://code.visualstudio.com/.
Important Note
You can find instructions on installing Homebrew on macOS at https://brew.sh/ and installing Chocolatey on Windows at https://chocolatey.org/install. If you are a Windows user, you can install Ubuntu in Windows Subsystem for Linux (WSL) and set up your project using common Linux commands. You can read more about WSL at https://docs.microsoft.com/en-us/windows/wsl/install.
Next, we need to install the dependencies required to develop with UmiJS. First, let's install Node.js by typing and running the following commands in the terminal:
$ sudo apt update
$ sudo apt install nodejs -y
The first command updates the mirrors, and the second command installs Node.js with the -y flag, which skips user confirmation to install.
You can install Node.js using Homebrew on macOS by running the following command:
$ brew install node
If you are using Chocolatey on Windows, you can run the following command:
> choco install nodejs
Alternatively, you can download the installer available at https://nodejs.org/en/.
Node.js has a default package manager named npm, but we will extensively use Yarn instead of npm in this book, so I recommend installing it. You can do that by running the following command in the terminal:
$ npm install -g yarn
This command will install Yarn globally in your system.
With that, we are ready to get started with UmiJS. But first, let's understand UmiJS a bit more and what kinds of problems it can solve.
Introduction to UmiJS and creating your first project
UmiJS is a framework for developing enterprise-class frontend applications. This means Umi provides a set of tools for solving everyday problems faced when building large business applications that need to deliver a modern user experience and must be easy to maintain and modify.
With Umi, you can quickly develop an application with internationalization, permissions, and beautiful interfaces taking advantage of Umi's deep integration with Ant Design.
Another significant advantage of Umi is that there are a variety of published plugins you can add to your project as you need. You can also extend it by developing your own plugins to meet specific solutions.
Now that you know more about Umi, let's create your first project by following these steps:
- Create a new folder for the project and open it in the terminal:
$ mkdir umi-app; cd umi-app
- Create a new project using the
umi-apptemplate:$ yarn create @umijs/umi-app
- Install the project dependencies by running the following command:
$ yarn
- Start the project by running the following command:
$ yarn start
We now have a project set up! You can open it by typing http://localhost:8000 in the browser and see the result.
Let's do the final configurations to simplify our work by adding code formatting.
Installing the EditorConfig and Prettier extensions
One of the tools UmiJS provides by default in the umi-app template is EditorConfig, a file format that editors read to define the code style across IDEs and text editors. You'll learn more about code style in Chapter 5, Code Style and Formatting Tools. Some editors and IDEs offer native support to EditorConfig, while in other cases, such as VSCode, you need to install a plugin, so let's install it by following these steps:

Figure 1.1 – VSCode quick open
- Type the following command and press Enter to install the official extension for EditorConfig support:
ext install EditorConfig.EditorConfig
The umi-app template comes preinstalled with Prettier, which is preconfigured for formatting the code. You can use it by running the yarn prettier command. Still, a better option is to let VSCode format it for you when you save changes or paste code blocks.
For that, we need to install the Prettier extension and configure it as the default code formatter. To install and configure the Prettier extension, follow these steps:
- Press Ctrl + P and type the following command, then press Enter to install the official extension for Prettier support:
ext install esbenp.prettier-vscode
- Next, press Ctrl + , to open the VSCode preferences, and in the search field, type
formatterand press Enter. - Under Editor: Default Formatter, select Prettier - Code formatter.
- Check the Editor: Format On Paste and Editor: Format On Save options, as shown in the following screenshot:
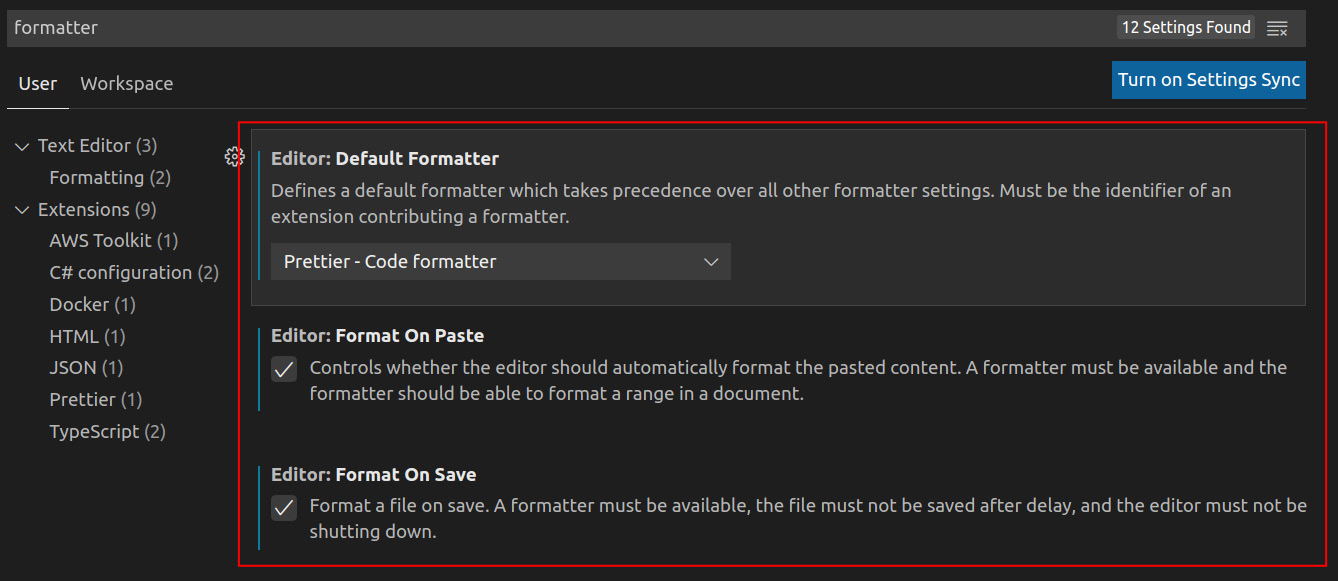
Figure 1.2 – VSCode editor configuration
In this section, we learned how to configure our environment, learned more about UmiJS, and created our first project. Now, let's take a closer look at the project structure.