Reader small image

You're reading from  Mastering Adobe Photoshop Elements 2023 - Fifth Edition

Product typeBook
Published inDec 2022
PublisherPackt
ISBN-139781803248455
Edition5th Edition
Right arrow
Author (1)
Robin Nichols
Robin Nichols
author image
Robin Nichols

Born in the UK, Robin Nichols has always had a great love for recording the world with a camera. After finishing school, he studied fine art, before moving on to study at Nottingham Trent University, where he gained a degree in creative photography. He subsequently worked in the advertising industry for several years, before emigrating to Australia in 1985. Robin has always worked in photography: as a black and white printer, a cameraman, a stock photographer, and a freelance photographer. During the 1990s, Robin contributed to several photo-centric publications in Australia, New Zealand, Singapore, and the UK.
Read more about Robin Nichols

Right arrow

Photoshop Elements Features Overview

Adobe Photoshop Elements is a pixel-based graphics photo editing application that was first released in 2001. Its appearance followed on from an entry-level program called Photoshop LE, a light edition of Adobe Photoshop, which was a product made available mostly for students and teachers, though it was sometimes bundled with other hardware products at the point of sale. If you count its LE predecessor, Photoshop Elements 2023 is now in its 23rd version.

Initially, Photoshop Elements was released as a basic, entry-level product for consumer moms and dads trying to get their collective heads around digital technology. But over the years, it has dramatically expanded its feature set, inheriting many significant professional-level tools from its more complex sibling, Adobe Photoshop.

So, how different is Elements from Photoshop? Interestingly, Adobe maintains that the principle difference between the two is that Elements is still essentially...

What's New in Photoshop Elements 2023?

Unsurprisingly with this new release, you'll find a couple of nice new features that further expand its AI development. As with the previous version, its most notable new feature, Moving Elements, expands on its previously launched Moving Overlays to produce an animated GIF or MP4 video file. You'll also experience some housekeeping improvements—expanding its range of features such as overlays, backgrounds, templates, skies, and patterns, a beta version of Elements available anywhere via a Browser, plus improvements to the interface design including a Search function in the Guided Edit mode. Let's take a look at one of Elements' new features: Moving Elements.

Moving Elements

Ramping up the amazing range of cool features available via the Enhance menu, Moving Elements gives users the chance to animate their images—or rather, part of their images—through a relatively simple...

How Elements is designed to work

Elements' designers have produced an application that offers everything, from a comprehensive method of file organization (vital in such a media-rich environment), to a highly sophisticated level of editing prowess. It'll look a bit scary if you have not used this program before, but don't let this get in the way! Elements can be used in any number of different ways, from a super easy mode (see the new How do I do that... section), to super complex. It's entirely up to you which path you choose—and, of course, you can chop and change your editing style whenever the situation suits. Its "official" workflow might be something like the following:

With your images already transferred to a computer, install and start Elements. Start the program and from the Home Screen, click the Organizer button:

  • Use the Organizer to import your media bit by bit so as not to overwhelm yourself—you can import stills...

A typical workflow example

For your reference, here's how I use Elements.

First off, I always transfer images from a card reader directly into a pre-named folder on my computer or external hard drive (Mac or PC, whichever I am using at the time).

After each download, I try to remember to back up everything to a second drive—by dragging and dropping from one drive to the other (my external hard drives are formatted to be 100% readable by both PC and Mac computers—a tech term called ExFAT formatting).

Card reader: Here's a glimpse of how I work with images. I manually download images straight into labelled folders. This is my travel file—so folders are labeled by year and destination. Inside each are more folders corresponding to each day of travel in that location.

Since I always specifically name folders each time I download a new batch of files, I don't need to use the Organizer a great deal—but I would recommend...

How I like to edit images

I've learned from years of picture editing that even though nearly every digital file might look fine on the camera's LCD screen, they are usually a bit lackluster once on the computer. This could be because the original lighting was poor, or because the computer screen is not calibrated. But it's most likely caused by the camera's operating software.

Editing Raw Files: Double-click a RAW file and it must open first in this special edit window. Here, you can achieve an amazing range of tonal improvements—from simple contrast and color boosts to noise reduction, cropping, and sharpening. The original is on the left, and the edited version (right) has had five sliders adjusted (in red) to add visual drama to the file.

Here's how I (try to) make each image pop on the page:

  • The first thing is to correct the global tones in the file (using the contrast slider).
  • If it's in the RAW file...

The five faces of Adobe Photoshop Elements 2023

Here's a brief overview of the five main parts of Photoshop Elements that you'll encounter when working on your images—the Home Screen, Organizer, Quick Edit, Guided Edit, and Expert Edit. Generally, you might use just one or two of these windows—for example, the Organizer and the Expert Edit mode. But of course, you can freely swap between the editor and the Organizer, depending on your requirements—and skill level.

This is the Home Screen, the first panel you will see in Elements. Use it to gain inspiration from the range of auto creations, as a source of instruction (from the web links), or simply as a gateway to the other parts of Elements: the Organizer and the Quick, Guided, and Expert Edit modes.

This is the Organizer. Use this part of Elements to import and view all your pictures, Photoshop Elements projects, videos, and music clips. Use Organizer...

The Home screen

What was referred to in Adobe Photoshop Elements 2018 as the eLive screen is now the Home screen. It's the first thing you see when Elements starts and, like its predecessor, is there to provide users with creative inspiration on how to edit images, embark on creative projects, and use its many auto creations (highlighted in red in the following screenshot). You can use it to learn how to accomplish basic editing tasks and for fun activities such as creating YouTube memes, automated slideshows, movies, and more, simply by clicking any of the pictorial links on the Home screen—which then takes you to an online tutorial.

Getting started: This is the new Elements 2023 Home screen. Over time, the application adds effects (such as Pattern Brush, highlighted in red here) using your own images and provides online links (along the top of the screen) to more creative processes as a source of inspiration. It's also the go-to screen...

The Organizer

One drawback of digital photography is that we accumulate masses of images and other assets like audio files and video clips. Keeping track of everything can be a nightmare, especially if you plan on upgrading your skill set from keen amateur status to something approaching a professional occupation.

Sorting everything into meaningful collections, therefore, is the main function of the Organizer. Once installed, note that it runs as a separate application, albeit one with almost inseparable ties to the photo-editing part of Elements, and, indeed, with its video-editing partner, Adobe Premiere Elements (often sold with Elements as a bundle).

Photos and other digital assets are imported into the Organizer and sorted into meaningful groups using a range of clever tools such as albums, keywords, labels, place and people tags, star ratings, and metadata. All these attributes can be applied to your files which means its organizational and file search capabilities are...

The Catalog

Elements refers to your image files using links—nothing is ever physically moved into the application. When files are imported, Elements makes links to where the images are kept (normally this is in the Pictures folder but it could also be other hard drives in the computer or external drives). This linking information, along with all the metadata, image thumbnails, tags, attributes, and keywords—in fact, everything you do with the program—is what is saved in the all-important catalog.

Occasionally, you will be reminded to "back up" this catalog. If you have simply downloaded and installed Elements and proceeded to get on with your image organization and editing, you might not even know that there was a catalog, or what it does. It's important from back up this catalog on a drive that's separate to where Elements is running. An external hard drive is a good choice for this task.

The Catalog Manager (Organ...

Photo Editor: Quick Edit mode

Adobe presents its editing features in three different windows or edit modes located in Photo Editor, which is a separate application from the Organizer. If you are a newcomer to Elements, I'd suggest starting with the simplest editing mode—this is the Quick Edit mode.

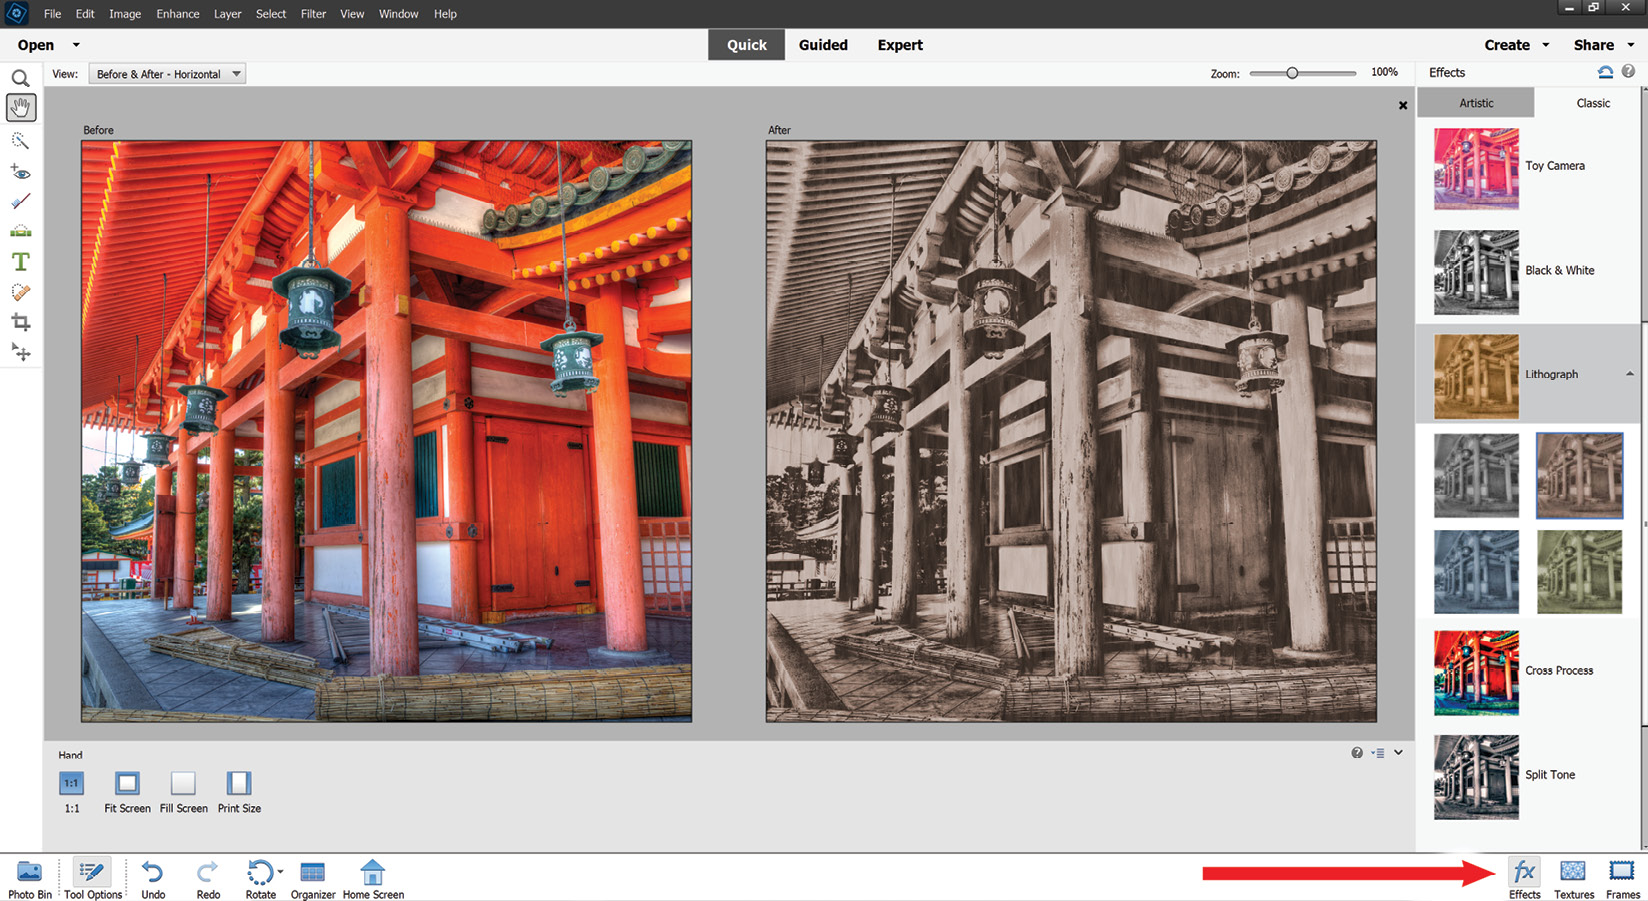
Quick Edit 'before' and 'after': As you can see here, in the Quick Edit mode, the image being edited can be displayed in different view formats: a before view, an after view, or, as seen here, the more useful before-and-after view mode. The right-hand side of the screenshot displays some of the excellent single-click effects available in this mode (accessed by clicking the Effects tab, arrowed, at the bottom of the screen). In fact, there are 55 to choose from (5 variants of 11 originals), plus 30 new artistic looks (accessed at the top of the tab). This is a fantastic feature, producing one-click results, many of which are quite...

Photo Editor: Guided Edit mode

As the name suggests, the Guided Edit workspace is packed with step-by-step instructions that guide you through a range of tasks—from tone fixes to far more complex processes such as panorama stitching and special type effects; there are 47 to be exact, presented in a beautifully designed and easy-to-use format. All you need to do is choose one of the effects and follow the step-by-step directions—easy!

Topics include Basics, Color, Black & White, Fun Edits, Special Edits, Photomerge (a mini-application designed for stitching images together into widescreen panoramas, among other things) and a new Search feature.

Guided Edit mode is a creative powerhouse. This screenshot demonstrates what the Guided Edit screen looks like (with the Fun Edits tab selected). Note that while this screen is visually quite busy, its interactive design makes it quite clear what each of these effects looks like when applied to...

Photo Editor: Expert Edit mode

Having played with the Quick and Guided Edit modes, you might find this advanced editing workspace a little challenging, especially if you are a newcomer to photo editing.

Expert Edit Mode: In this edit mode, most features are manually operated (for greater creative control), here showing the Adjust Sharpness tool (Enhance>Adjust Sharpness).

When using the Expert Edit mode, it's a good idea to have an editing plan—a basic idea of what you'd like to achieve visually once the image is open in the main window. Some experience with the tools is also important—but you'll have picked up a lot of experience using them from experience gleaned with the previous two edit modes. In some ways, the Expert Edit mode resembles Adobe Photoshop—although I'd add that it also contains a lot of processes that you will not find in Photoshop. We will cover this in greater detail in Chapter 5, Easy...

Working with panels and the Panel Bin

You'll find the most important panels in the Panel Bin, located on the right-hand side of the main screen in the Quick and Expert Edit modes. While they might not be the most glamorous part of this application, panels still play an important part in your day-to-day workflow.

Using Styles – drop shadows and more: Styles, third panel from the right (arrowed), contains a lot of special effects—from a simple color filter to something a lot more sophisticated, such as the plastic look yellow neon effect seen on my La Habana, Cuba text layer. One click on the thumbnail and the effect is applied. Easy.

The principle panels in the Quick Edit mode are the Adjustments panel (Chapter 3, The Basics of Image Editing), Effects, Textures, and Frames (Chapter 4, Getting Started with Easy Solutions). The Expert Edit mode has a wider selection of panels, including Layers, Effects, Filters, Styles, and Graphics (Chapter...

Panel Functions

Elements has many panels, each providing essential help with certain aspects of the editing process. Some refer to the Quick Edit mode only (such as Adjustments), while others only appear in the Expert mode (such as the Info panel).

Here's an overview of what each panel offers:

  • Adjustments: This provides sliders to adjust the Exposure, Lighting (contrast), Color, Balance, and Sharpness settings.
  • Effects: Provides the user with a great range of looks—automated effects recipes that can be applied to an image with a single click; it now includes 40 new "artistic" looks.
  • Textures: Elements has a wide range of assets, such as surface textures, that, once clicked, are added to the file as an overlay. Good for backgrounds, web pages, and so on.
  • Frames: Used mostly for graphic artwork. Click on an asset thumbnail in the panel and it downloads it from www.adobe.com, before automatically resizing and applying itself to the image...

The Create and Share menus

When digital photography became mainstream 20 years ago, there were precious few things you could do with your images other than looking at them on low-resolution screens—digital printing was in its infancy, as were reliable computers, the internet, and editing software. It took programs such as Photoshop Elements to introduce us to the concept of doing something more than just looking at images on a screen. It began with a few creative projects and is now driving a huge range of activities, ranging from book printing to slideshows, scrapbooking, and custom stationery.

Effective automation: Creative projects are an excellent way to execute relatively complex actions with ease. In the screenshot here, all I did to complete this layout was find six different photos, open them, then choose Photo Collage from the Create menu (top right). The application automatically arranges the files according to the layout chosen in the right...

The Enhance Menu

Aside from the panels and easy-to-use single-click effects available scattered about the Elements edit modes, the application is also bristling with drop-down menus. These provide the basics—such as commands for a new document (File>New Document), opening an existing document (File>Open), and closing a document (File>Close), pretty much as you'd expect to find in other photo-editing applications. We deal with these menus in later chapters, as well as at the back of the book in the Feature Appendix.

I regard the Enhance menu as the most creative of all the menus—this is where you'll find many of Elements' excellent tools, both automated and manual.

Try everything in the Enhance menu: One of the lesser-known tools, Color Curves, is a good color correction tool inherited, in a modified form, from Adobe Photoshop CC (see Chapter 8, Additional Tools and Features, for more on this tool).

...

Working with video and Premiere Elements

Adobe Premiere Elements targets the consumer video-editing market and, increasingly so, these two applications are often sold as a bundle, which incidentally should save you money of around 25% or more compared to buying the two applications separately.

Video timeline: As with most video editors, Premiere Elements 2023 features a non-linear timeline along which your clips are arranged. You can do this manually—or leave it to one of its auto video functions. It comes with a wide range of manual and automated features—many of which might look more at home in a top-of-the range professional application. Another very handy feature is its automated Quick Movie function—just find a few clips and the application edits them into a video in a matter of minutes!

We can use the Organizer to catalog still images, as well as HD video clips, GIFs (Graphics Interchange Format files used to record short...

Create menu features

Elements' Create menu is stacked with great features—but watch out, the list of what's available is slightly different between what you'll find in the Organizer versus the Editor.

The Create menu (Organizer) contains links to the following:

  • Slideshow
  • Photo Collage
  • Quote Graphic
  • Photo Prints
  • Photo Book
  • Greeting Card
  • Photo Calendar
  • Video Story
  • Video Collage

The Create menu (Editor) contains fewer links:

  • Slideshow
  • Photo Collage
  • Quote Graphic (image below)
  • Photo Prints
  • Photo Book
  • Greeting Card
  • Photo Calendar

You'll see A LOT of keyboard shortcuts in the following chapters. My advice to all learners is to pick up maybe 10 to 15 of your favorites, and research the rest when the need arises. After all, no one can be expected to remember all the hundreds of published shortcuts.

Here are 10 of my favorite shortcuts:

Ctrl/Cmd + O (Opens a file).

...

Summary

In this chapter, we have learned about the different parts that make up the Photoshop Elements image-editing application. We have also taken a peek at some of the great new features found in this 2023 version. This innovative software package not only offers a comprehensive suite of truly professional editing tools, but its Organizer, running as a separate application to the main edit modules, can be used to catalog all our media assets and display them in one place: as stills, music, clips, and even HD videos. We have also discovered that you can even start editing your work in the Organizer. fixing the color and contrast at the click of a mouse, as well as adding your work to a range of very neat step-by-step fun projects via its very handy Create Menu. Even so, its basic function is to help you get your stuff into some kind of order.

Once done, depending on the level of editing required, and your experience, it's relatively simple to jump from the Organizer into...

lock icon
The rest of the chapter is locked
You have been reading a chapter from
Mastering Adobe Photoshop Elements 2023 - Fifth Edition
Published in: Dec 2022Publisher: PacktISBN-13: 9781803248455
Register for a free Packt account to unlock a world of extra content!
A free Packt account unlocks extra newsletters, articles, discounted offers, and much more. Start advancing your knowledge today.
undefined
Unlock this book and the full library FREE for 7 days
Get unlimited access to 7000+ expert-authored eBooks and videos courses covering every tech area you can think of
Renews at €14.99/month. Cancel anytime

Author (1)

author image
Robin Nichols

Born in the UK, Robin Nichols has always had a great love for recording the world with a camera. After finishing school, he studied fine art, before moving on to study at Nottingham Trent University, where he gained a degree in creative photography. He subsequently worked in the advertising industry for several years, before emigrating to Australia in 1985. Robin has always worked in photography: as a black and white printer, a cameraman, a stock photographer, and a freelance photographer. During the 1990s, Robin contributed to several photo-centric publications in Australia, New Zealand, Singapore, and the UK.
Read more about Robin Nichols