Reader small image

You're reading from  Mastering Adobe Photoshop Elements 2023 - Fifth Edition

Product typeBook
Published inDec 2022
PublisherPackt
ISBN-139781803248455
Edition5th Edition
Right arrow
Author (1)
Robin Nichols
Robin Nichols
author image
Robin Nichols

Born in the UK, Robin Nichols has always had a great love for recording the world with a camera. After finishing school, he studied fine art, before moving on to study at Nottingham Trent University, where he gained a degree in creative photography. He subsequently worked in the advertising industry for several years, before emigrating to Australia in 1985. Robin has always worked in photography: as a black and white printer, a cameraman, a stock photographer, and a freelance photographer. During the 1990s, Robin contributed to several photo-centric publications in Australia, New Zealand, Singapore, and the UK.
Read more about Robin Nichols

Right arrow

Setting Up Photoshop Elements from Scratch

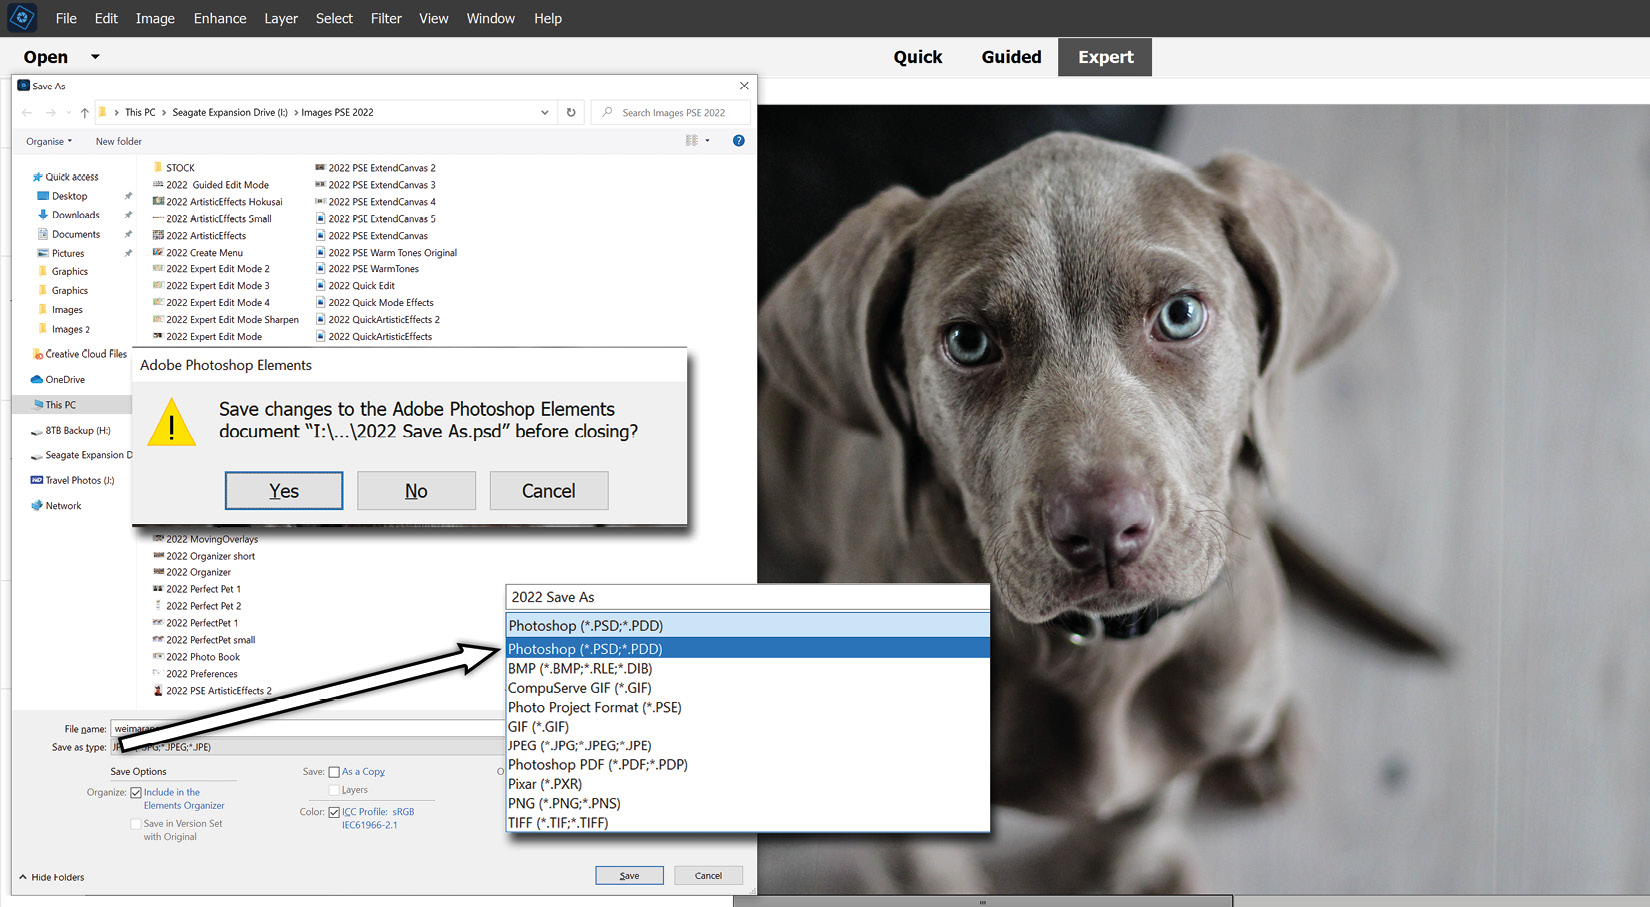
If you are new to Photoshop Elements, then this is the chapter for you. Here, we'll be looking at how to set up your camera, computer, monitor, data storage, and media backup—all of which are vitally important steps toward developing the perfect editing workflow. Getting your setup correct from the outset will enable you to plunge straight into the learning process without having to waste time renaming files or folders, go looking for lost images, or worse, losing materials because it never occurred to you to back up your original files in a timely fashion.

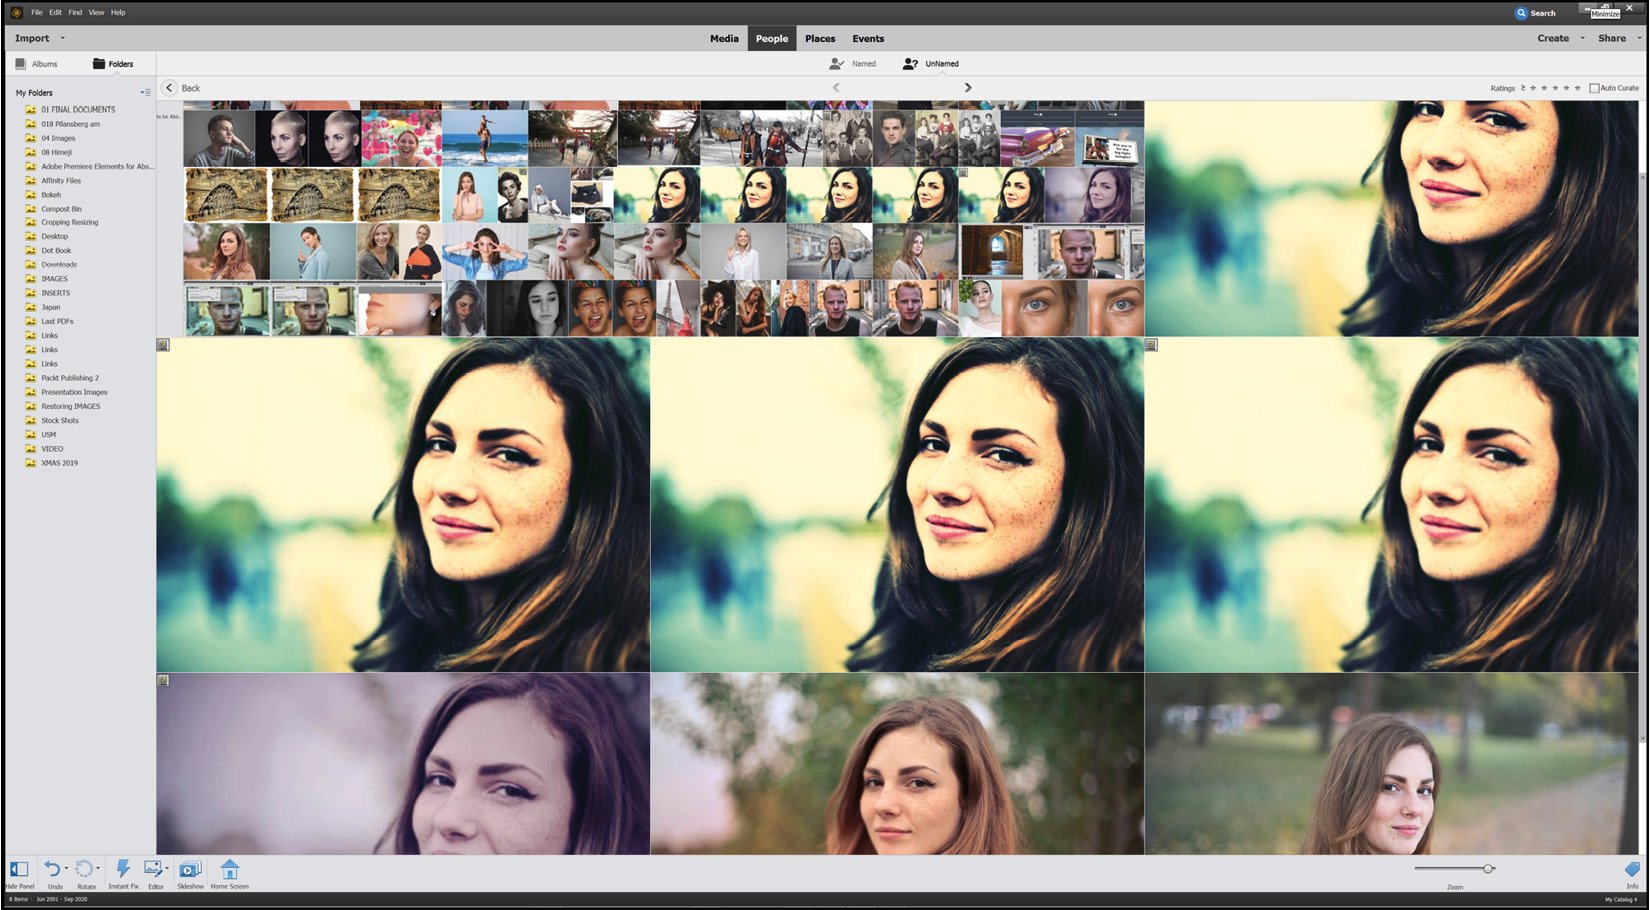
This chapter also discusses how to import your media, how to back it up safely, plus how to start sorting through the thousands of images in your collection using a terrific range of organizational tools, such as Keyword Tags, Star ratings, Events, People, and Places (GPS).

And even if you are not new to Elements, take some time here to check that your camera settings...

Setting up a photo editing computer

Although we take the multi-use characteristic of computers for granted these days, using such a machine to store, process, and edit high-resolution stills and video data requires a totally different set of features compared to a machine that's only used for web browsing, social media, emailing, or downloading music.

Although the compatibility of Windows and Mac computers used to be very minimal, their operating systems are now far more user-friendly, both in the way third-party hardware interacts (such as external drives) and in that most software is now shared between the two systems.

Operating system wars: Is there really a difference between running Elements on a Windows or Mac computer? The answer to this question can get you into a lot of hot water, depending on the technical leaning of the person being asked. I have used Windows and Mac desktops and laptops for a long time and find that, when editing images...

Importing media into the Elements Organizer

As mentioned in Chapter 1, Photoshop Elements Features Overview, when images are imported into the Elements Organizer, they are not physically copied into the application; they are just linked from the place where they are stored (typically, this is the Pictures folder) in the Organizer. Should Elements or your computer develop a technical issue and you have to delete and reinstall the application, you just need to reinstate the catalog from the backup version, and it automatically re-links all files. Sometimes, it's necessary to actually point the program to the hard drive where the images are stored, but as often as not, Elements will search and find every image that was previously linked in the catalog. It's a clever program.

Import: Using the Import button (in the top left-hand corner in the Organizer), you can bring images, audio, or video clips into the Elements Organizer directly using the From...

Reviewing the media

Looking at your media in the Organizer couldn't be easier. The main window displays all media files in a mode called Grid View—these are adjustable thumbnails. But note that if you create and populate albums, the main window will only display the contents of each album.

Compartmentalizing a photo collection into multiple albums, therefore, is an effective way to break up what would otherwise be a confusing mass of files populating (or flooding) the main screen into smaller, more visually digestible quantities.

Small thumbnails or big thumbnails: One tip for anyone wanting to sort through a lot of images is to maximize the thumbnail size (using the slider—arrowed) so the screen effectively only displays one image at a time, as seen in this coastal seascape, then use the up/down arrows on the keyboard to scroll through the latest import while examining each file full size. Every time you find an image that you want...

Media backup

As we expand our image and media collection, we'll not only need large capacity hard drives, but also data backups. It's important to perform backups in case the original drive corrupts, or suffers a mechanical failure. Nothing is forever and even though the drive might be a premium brand, things can still go wrong, usually when you least expect it.

There's no point in backing up images, or your Elements Catalog, to the place where the originals are also stored—typically your computer's hard drive. If it becomes corrupted, everything is lost. Consider a large-capacity hard drive that is used only for backing up your data: images, music, Elements' Catalog, and so on. Most PCs have room for additional internal drives. If you use a Mac, you'd be better off buying an external hard drive.

If you are using a Mac, backing up your data is easy using a pre-installed Apple application called Time Machine. Windows users also have it easy...

Organizing your work: Star rating photos

Some of you might be familiar with the Windows operating system's star ratings. This is a feature that allows you to award a file one to five stars, depending on their merit. You can then search for files (in this context, images) that are displaying X number of stars.

You might give your best images five stars, and those that need editing three stars—that kind of thing. Ratings appear in a wide range of photo editing applications, including Adobe Bridge, Lightroom, and Camera Bits' Photo Mechanic image browser, and for good reason—it's a system that's easy to implement and effective in its organizational potential. Here's how to get this happening:

Step one: Right-click an image in the Organizer.

Step two: From Ratings in the contextual menu, slide over the number of stars you'd like to award that image (from one to five). Or select one or more images in the main window, and hit any number...

Organizing your work: Picture search using Metadata

Metadata is little more than a small text file that records all your camera details at the time a photo is taken. We rarely read the metadata unless we specifically look for it or, in this context, use it to search for images. Metadata records camera and lens details, date, time, size, resolution, filename, and, if your camera has the feature, a set of GPS coordinates.

The advantage of metadata is that the information already exists, so we can use Organizer to search our image database using any of those pre-recorded metadata details for a fast result.

You might think that the Find by Details (Metadata) search field looks a bit confusing because it offers so many ways to search for images. You can also use this dialog box to save frequently used searches—a real time-saver. It can also be used to search for images by the date and time captured (this is especially useful if you holiday in different time zones).

...

Organizing your work: Keyword Tagging

One of the best features in Elements is its ability to sort out hundreds, thousands, or even tens of thousands of images using the tested method of keyword tags.

While viewing a newly imported batch of pictures, select a file by clicking it once and, in the bottom right-hand corner of the screen, type in a keyword.

Keyword tagging: You can see that, in the red arrowed field, I have added the words 'Surfing' and 'Australia'. If I import and add keywords to hundreds of surfing images in the Organizer, all I need to do is click on the Surfing/Australia tags (both highlighted in blue here) to find those images—they can then be placed in an album called 'Surfing'.

I think keywording is one of the most important setup features in this program. Get into the habit of adding a keyword, or keywords, to everything you import into the Organizer and you will be able to search, and find, almost...

Organizing your work: Places

The Organizer has a huge range of features designed to help photographers keep track of, and search for, their images. I think there are too many search features—but that's just my opinion.

The Places feature has been in Elements for many years. Its principal use is to automatically put any image that contains GPS data onto an internet-driven world map so that users can identify pictures simply by seeing the locations where they were actually shot.

In earlier versions of this program (several years ago), few cameras had GPS capabilities, so the only option open to you if you needed this kind of display was to drag images from the grid on the left-hand side of the screen onto the map to 'pin' them in place instead. You can still do this.

The feature has two view modes: Pinned and Unpinned. In the latter mode, you can select single or multiple images and drag them to the location where they were shot...

Organizing your work: Events

The Events category is, I think, more useful to everyday photographers. Why? Because Events starts off by using dates as a way to categorize images. We might take a bunch of shots over a family weekend or on our 12-day trip to Bali. Using the Events feature, these images can be grouped into either events dictated solely by the data or read from the metadata, or they can be grouped and renamed into something more memorable, such as Family Weekend, 2019, or simply Bali Vacation.

Events at work: This screenshot illustrates the power of sorting by date. The bottom window shows Events, with the Number of Groups slider positioned to the left-hand side (highlighted in red). Everything is pushed against everything else because the search engine is effectively compressing time. The middle window (highlighted in blue) shows how, if the slider is pushed to the right, images are displayed on an almost day-by-day basis, making it easier to...

Organizing your work: People

Elements' People mode is really all about using face recognition, an algorithm that analyzes images in the background as they are imported into the Organizer for the first time.

If it detects a face in an image, it presents it as a circular thumbnail in the main People window. If it thinks that there are several of the same person in the import, they will be automatically stacked like a deck of cards. You can view the results in the Unnamed panel. Every image will appear with the label Add Name underneath the thumbnail to begin with.

If you recognize the person depicted, click in the Add Name field and type in the name. As soon as you click the check symbol to the right of the field to lock it in, the thumbnail stack disappears.

This is the People window—you can let Elements run through your image collection to identify images with people in them automatically. It works really well—but it will also make...

Understanding JPEG and RAW file formats

Nearly all digital cameras can shoot and record two types of picture file: JPEG and RAW files. Some models can also record a third file type called DNG (digital negative) another type of RAW file. We'll look at them later in this chapter.

The difference between JPEG and RAW files is simple: JPEG files are 8-bit picture files. These are processed in-camera and then compressed (squashed) to maximize storage space, before being saved to the memory card.

RAW files are usually 10-bit files that have little or no processing applied in camera, and they are not compressed before being saved to the memory card. The result is a file that is several times larger than a JPEG, but one that can be edited to a far higher degree of accuracy than the humble JPEG.

Though shooting in the RAW format is recommended, you'll find that your camera's files are quite different from RAW files from other camera models. Sony RAW files...

Saving Files

It's important to note that, when saving JPEG, TIFF, PSD, or PNG files, if you choose the Save option (File>Save), some older applications might write the new file on top of the old one, effectively deleting the original and saving the (hopefully) improved new version instead. Not so with Elements as it always asks whether it's OK to overwrite the previous version of this file—a face-saving feature in some cases.

If you open a file, do nothing to it, then choose File>Save, nothing happens because there's been no change so there's nothing to save. However, if you make any kind of alteration to the file, then choose File>Save, you'll see the Save As panel appear. This allows you to do the following:

  • Save your progress.
  • Change the file format if needed.
  • Include that saved file back in the Organizer.
  • Save it as a copy (as in NewPortrait copy.jpg).
  • Save it into a Version Set (see overleaf...

Saving Version Sets

Other options in the Save As dialog window include Save in Version Set with Original and Save as a Copy. What the first feature does is save the new version of your (cherry blossom) shot with the original file for safe-keeping. In Organizer, you only see the original image, but if you right-click it, you can choose to see all the different versions you might have made from the original.

This is called a Version Set—single photos stacked into one file like a deck of cards. You can add more or delete existing versions as you need. Everything is kept in the one file, saving screen space.

I like to experiment with all sorts of special effects—and there's more than enough potential to do this using Elements' Effects and Adjustments tools. So, Version Sets might be just the feature you need to keep all those variations on a theme safely stored in one file till you decide which one to use.

...

Managing catalogs

The Catalog Manager (Organizer>File>Manage Catalogs) is used for several tasks. These include the following:

  • Create new catalogs.
  • Rename existing catalogs.
  • Convert a previous, older version of an Elements catalog to the new version of the software.
  • Optimize a catalog—this helps reduce its size, making it more efficient.

While a software-driven data backup is a good procedure to set up for all users, it might not back up your Photoshop Elements catalog. And even if it did, it wouldn't be in a format that Elements can recognize, should you need to restore it after a software mishap.

Back up the catalog: It's important to ensure that your backed-up catalog is saved to a location different from where the default catalog is stored. For most, this means saving it to a different drive—in the screenshot above, there are five different drives available for backup.

Tip:

If...

Digitizing Photos with a Scanner

There's a general assumption in the photography community that we only produce images using a camera or smartphone. While this might be partly true, there's also a sizeable proportion of image keepers who produce digital images using a dedicated scanner—although you can of course use a regular camera to scan artwork which we'll look at later.

Scanner types

Basically there are two types of scanner: the flatbed type, designed specifically for scanning paper documents and artwork (note: some of the more expensive flatbed models incorporate a lamp in the scanner lid thus enabling them to scan film) and the dedicated film scanner, designed to scan all kinds of negative or positive film (slides).

Above, left: Epson's current top-of-the-range flatbed and film scanner. Centre left: An innovative film scanner for smartphones. Centre right: A simple Kodak film scanner and, at right: a high quality...

Digitizing Photos with a Camera

Digitizing your precious family photos or artworks with a camera might not be a first thought to some, but, when done properly, it can produce outstanding results, even with an inexpensive compact camera or a smartphone. The easiest way to copy any document is to place it on a flat surface, access your smartphone's camera, line it up, and take the shot. You can do the same with a compact camera, or a DSLR, but if accuracy is required, you'll be aware that lining up the print, getting close enough, overshadowing and uneven lighting, and pop-up flash can all make a copy look amateur in its execution. Here are some tips on how to produce professional-looking copies:

  • Always use a camera (or smartphone) stand. Shooting indoors, unless the location is brightly lit, produces slow shutter speeds and potentially camera shake. Supporting your camera/phone on a tripod produces much sharper results, regardless of shutter...

Color management: Understanding color spaces

Cameras, all monitors, and most printers can display only a limited range of colors—this is called the color space. The industry standard space is called sRGB color (Standard, Red, Green, and Blue), but there are many other spaces, such as Adobe RGB (1998) and ProPhoto RGB, to name just two.

Most color spaces correctly claim to encompass a broader range of color than sRGB. While this is certainly true, actually being able to see an increase in the range of colors with one of these wider-ranging spaces, on both a computer screen and in print, is a characteristic that's hard to evaluate because most screens and printers cannot recreate the number of colors captured by the camera regardless of what color space it was recorded in.

Most consumer cameras can only function in the sRGB or Adobe RGB (1998) color spaces.

I think the best practice for amateur photographers is to choose sRGB. This matches the range of colors that...

Color management: Color settings

It's a sad fact that all image editing is virtually worthless if the monitor on which you make all your creative decisions doesn't actually represent the correct color, brightness, and contrast accurately.

Color management—the process of making sure that what you see onscreen is both accurate to life and will be correctly reproduced online and in print—is, I think, an unnecessarily complex operation. Although Elements' calibration is not nearly as controllable as that found in Photoshop CC, it's presented in a reasonably easy format that should work well in most situations. And if you are sending your work into a commercial print environment, you can always let them handle the finer complexities of color reproduction, which allows you to pay more attention to the editing process.

What you'll find in the program's Color Settings dialog box are four simple options:

  • No...

Color Management: Screen and printer calibration

Another important technique for ensuring that what you see onscreen is accurate is to calibrate your monitor with a hardware calibration device.

These third-party sensors plug into the USB outlet on the computer and hang over the screen. Run the associated software and the sensor will determine whether the RGB colors displayed onscreen really are 100% red, green, blue, white, gray, and black. If the screen is different from the known values for these colors, the software adjusts the brightness and color to make it display correctly. This is a far more accurate method of color management than using the human eye to gauge the settings. As a general rule, screens need calibrating every six months or so, especially if they are used a lot.

Screen calibration: Attaching a USB-powered hardware calibrator to the laptop or desktop screen is easy. Pictured is the (reasonably inexpensive) ColorVision Spyder5 device...

Organizer keyboard shortcuts

I always provide my students with a list of 10-20 keyboard shortcuts. I can usually see that most are not happy with having yet more stuff to remember. But if you train yourself to use some of these, instead of relying on the mouse all the time, you'll not only reduce the risk of RSI, but you'll also find many repetitive tasks so much safer and faster to execute. Two hands are always better than one.

Operations and their respective Windows/Mac shortcuts are as follows

  • Undo last operation: Ctrl/Cmd + Z
  • Redo last operation: Ctrl/Cmd + Y
  • Copy: Ctrl/Cmd + C
  • Paste: Ctrl/Cmd + P
  • Select all: Ctrl/Cmd + A
  • Deselect: Ctrl/Cmd + Shift + D
  • Rotate image 90 degrees left: Ctrl/Cmd + Left Arrow
  • Rotate image 90 degrees right: Ctrl/Cmd + Right Arrow
  • Adjust date and time: Ctrl/Cmd + J
  • Edit in Expert Edit Mode: Ctrl/Cmd + I
  • Edit in Premiere Elements Editor: Ctrl/Cmd + M
  • Zoom in: Ctrl/Cmd + +
  • Zoom out: Ctrl...

Summary

It's always been something of a dry subject, but setting up a computer for quality photo editing tasks is not as simple a task as many might imagine—and of course, it's far more demanding on your equipment than simply writing a few emails and surfing the internet!

This chapter explained the basics of setting up a computer: adding memory, choosing hard drives, considering backup drive options, as well as learning about color spaces, and calibrating the monitor so that what we see onscreen is an accurate depiction of what we photographed. It's a big topic but once understood, it will send you out into the editing universe well prepared.

We also took note of the many tools found in Elements Organizer that are designed to help us keep track of our ever-increasing photo and video media collections. And again, although this is often seen as being as exciting as cleaning the bathroom or filling out a tax return, once done, you'll find yourself on top...

lock icon
The rest of the chapter is locked
You have been reading a chapter from
Mastering Adobe Photoshop Elements 2023 - Fifth Edition
Published in: Dec 2022Publisher: PacktISBN-13: 9781803248455
Register for a free Packt account to unlock a world of extra content!
A free Packt account unlocks extra newsletters, articles, discounted offers, and much more. Start advancing your knowledge today.
undefined
Unlock this book and the full library FREE for 7 days
Get unlimited access to 7000+ expert-authored eBooks and videos courses covering every tech area you can think of
Renews at €14.99/month. Cancel anytime

Author (1)

author image
Robin Nichols

Born in the UK, Robin Nichols has always had a great love for recording the world with a camera. After finishing school, he studied fine art, before moving on to study at Nottingham Trent University, where he gained a degree in creative photography. He subsequently worked in the advertising industry for several years, before emigrating to Australia in 1985. Robin has always worked in photography: as a black and white printer, a cameraman, a stock photographer, and a freelance photographer. During the 1990s, Robin contributed to several photo-centric publications in Australia, New Zealand, Singapore, and the UK.
Read more about Robin Nichols