Reader small image

You're reading from  Data Acquisition Using LabVIEW

Product typeBook
Published inDec 2016
PublisherPackt
ISBN-139781782172161
Edition1st Edition
Right arrow
Author (1)
Yik Yang
Yik Yang
author image
Yik Yang

Yik Yang  is a test engineer living in Chicago who has specialized in automation and data analysis. Having worked in multiple fields such as semiconductor, automotive, and power, he has experience with different types of automation and understands what are the industries' needs.He started his career after receiving his Bachelor's and Master's degrees in Electrical Engineering at Virginia Tech. In his career, he worked on automation projects that used CompactDAQ, PXI, FPGA, and so on in LabVIEW. He has also spent a lot of time with Lean Six Sigma and statistical analysis with JMP. He is a certified Professional Engineer (PE) in North Carolina and a Certified LabVIEW Developer (CLD).
Read more about Yik Yang

Right arrow

Chapter 5. Debugging Techniques

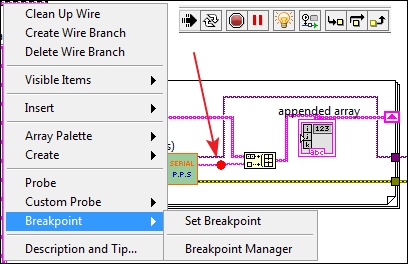
Even if you are a very experienced programmer and a seasoned engineer, chances are that you will make mistakes while coding and will need help to resolve all occurring warnings and errors to complete your program. We all know that one may open a text editor and write some code and have a running operating system compile the code. But serious collaborative programming requires a professional IDE. Visual Studio (as an example) jumps to my mind as I write these lines. It seems every day a new language appears in the industry and along with it a new development environment.

As a comparison, LabVIEW has gone one step beyond others since its inception, which is its ability to communicate seamlessly with hardware. LabVIEW has a very comprehensive and reliable IDE that is very intelligent such that the intelligence built in LabVIEW may be mistaken as "anybody can program in LabVIEW", it is "trivial" such that they do not need to go through formal training to use it...

Error conditions


The most common and most obvious error condition is when an attempt is made to wire (connect) two incompatible objects (different types) or functions together. In this condition a broken wire appears. A VI with even one broken wire will not run. Most functions have an error input and output that are very helpful. Error wires are a cluster and carry more than one form of information. Note the expanded Front Panel window showing the three components (Status, Code, and Source) that are encompassed in an error cluster notice. In the following figure (left) a hypothetical VI that does nothing; therefore, there is no error, so the status is a green checkmark (this is a Boolean value) and can be used as such.

A useful and common use for this Boolean value is to use the false state (where there is no error) to continue running with the rest of the program where you suspect the possibility of a frequent error condition that may exist. In our example, note that we start by opening...

Debugging - broken arrow


As mentioned previously, when a VI is "seriously!" broken, it does not run and a broken arrow is displayed. Since the error is immediately recognized by LabVIEW, usually in such particular cases, the fix is probably simple (unless a major design error is recognized). A more difficult situation maybe where there are no obvious errors, but the VI does not do what we intend it to do. We will now take a closer look at a version of a VI we used in Chapter 4, DAQ Programming Using LabVIEW:

When we run the preceding VI several times, we will notice a couple of issues with the VI. Note that a displayed array may be extended horizontally or vertically:

  • The array gets longer and longer and new values are appended to the end of the results from the previous run

  • There are blank array elements between the array entries (this was an error with the logic of the VI and we fixed it by adding a check for blank array elements)

To fix the issue, we know that we need to initialize the...

Debugging - highlight execution


Given the nature of data transfer used in LabVIEW (wires) one of the most useful debugging tools available in LabVIEW is the concept of "Highlighted Execution".

If you click on the light bulb, LabVIEW will slow down the execution of VI, and one or several moving dots will trace the order of execution and transfer of data will be visible and traceable by the programmer. Also, in this state, all the VI starts off dimmed and as the execution continues, the parts of code that are executed exit the dimmed state. Another very important tidbit to notice is that in "Highlight Execution" while the dots travel on the wires that are currently being executed, the actual value that is carried at the moment on that wire is also displayed. The following figure is a partial cropped part of an example code of one of the examples that are shipped with LabVIEW.

Note: the left side of the picture is executed while the right side, where a loop is about to complete execution, is...

Debugging - Set Breakpoint


As the title suggests, a programmer may set one or several breakpoints on various wires on different locations of a given VI. As expected, once the execution of the VI reaches the given stop point, LabVIEW stops the execution of the VI and waits for the user input.

As indicated in the preceding figure, to create a Breakpoint in a given location, right-click on the exact spot where you want to have a breakpoint, and from the sub menu belonging to the Breakpoint select Set Breakpoint. Note that the preceding screenshot is a composite diagram that shows the tool bar section of the Block Diagram window of the same example we have been using in this chapter. We have placed a breakpoint right after the SUB-VI and just before a value is added to the array. Note also that in this particular case, we have also enabled Highlight Execution. Currently, all tools are simultaneously available to us. From left to right:

  1. Of course the Run button is pressed and the VI is running...

Debugging - Probe, Custom Probe


As mentioned earlier, LabVIEW objects and functions are connected to each other through data carrying wire. One of the very effective methods of debugging is to create probes and custom probes in various locations, on wires of interests. Probes or (custom probes) in conjunction with highlighted execution or breakpoints in place, LabVIEW will open a new window (right bottom on the following diagram) that concurrently shows the value of each wire where each probe has been placed. To create a probe (or a custom probe), right-click on the specific locations where you want a probe to be placed and select Probe or Custom Probe.

This example simply consists of three random number generators that are connected to each other to do arbitrary simple mathematical manipulations. We have enclosed the connection inside a while loop and placed a 1000 milliseconds delay inside the while loop to slow down the loop so that an observer can distinguish between the numbers that...

Summary


In this chapter, we have explored most, but not all debugging techniques that LabVIEW provides. Error cluster, broken wires, set breakpoints, and set probes are among the most widely used tools and techniques used to debug a VI. Special cautionary notes were included in this chapter to remind us that debugging techniques require slowing down the process, or abruptly stopping a running VI. This is because as our emphasis is on data acquisition, which requires direct connection and control of the hardware and instruments, special care must be taken to note what immediate effect debugging might have on connected hardware and instruments.

Special cautionary notes were included in this chapter to highlight data acquisition special environment development in which we are dealing with both a running software and one or more hardware. Debugging in this situation takes on a whole new meaning in regards to some of the equipment used. One must take special note that slowing down software may...

lock icon
The rest of the chapter is locked
You have been reading a chapter from
Data Acquisition Using LabVIEW
Published in: Dec 2016Publisher: PacktISBN-13: 9781782172161
Register for a free Packt account to unlock a world of extra content!
A free Packt account unlocks extra newsletters, articles, discounted offers, and much more. Start advancing your knowledge today.
undefined
Unlock this book and the full library FREE for 7 days
Get unlimited access to 7000+ expert-authored eBooks and videos courses covering every tech area you can think of
Renews at €14.99/month. Cancel anytime

Author (1)

author image
Yik Yang

Yik Yang  is a test engineer living in Chicago who has specialized in automation and data analysis. Having worked in multiple fields such as semiconductor, automotive, and power, he has experience with different types of automation and understands what are the industries' needs.He started his career after receiving his Bachelor's and Master's degrees in Electrical Engineering at Virginia Tech. In his career, he worked on automation projects that used CompactDAQ, PXI, FPGA, and so on in LabVIEW. He has also spent a lot of time with Lean Six Sigma and statistical analysis with JMP. He is a certified Professional Engineer (PE) in North Carolina and a Certified LabVIEW Developer (CLD).
Read more about Yik Yang