

The ease of use and GUI interface of LabVIEW makes it an ideal candidate for test and data acquisition automation in general, but LabVIEW has built-in automation express VIs that make the process of automation even easier. In this chapter, we will use an NI USB 6008, a simple USB data acquisition (DAQ) device, and the DAQ assistant express VI to see how we can utilize the auto code generation of LabVIEW to acquire external data. We will use a function generator to create a triangular wave and capture the output both graphically and numerically in LabVIEW.
To demonstrate one simple aspect of LabVIEW automation, we will attempt to capture a triangular waveform created by a function generator. We will connect an FG085 function generator directly to a DAQ (NI USB 6008). The function generator will create a triangular wave form and we will capture this wave both graphically, on the front panel window of LabVIEW, and also save the data collected in a separate file for later use and analysis.
We will use the following:
National Instrument USB 6008:
:
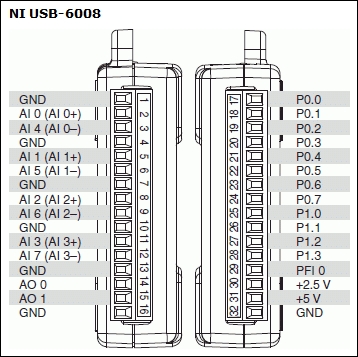
USB 6008 DAQ is a low-cost multifunction DAQ. As the name implies, this DAQ connects to the PC via a USB bus. Connect the USB DAQ to the PC using a USB cable. Note the auto recognition of the device by the computer on the taskbar. If all goes well, the green LED next to the input cable will blink continuously. If the drivers are not already installed, use the CD accompanying the DAQ to install the divers. It is best to check the National Instruments website to make sure that you have the latest version of the driver.
Note: It is imperative to make certain that the USB DAQ is correctly recognized by the PC running LabVIEW. One way to verify this is to look at the Device Manager under the Control Panel of Windows. If you cannot see the device in the list of devices under Device Manager, check the connections and cables, and, most importantly, verify that you have installed the correct device drivers for the specific...
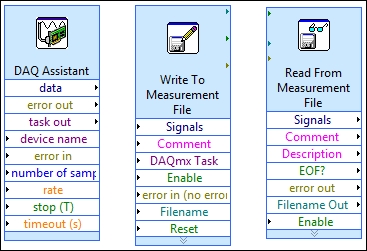
We will use DAQ assistant, which is an express VI, in this example. Unlike other VIs, an express VI contains scripts and automation that guide the user through different windows to make appropriate changes to various settings and entry boxes to customize the VI to manage one or several inputs and outputs and tasks:
Perform the following steps:
Launch LabVIEW and create a new VI, choose an appropriate name for it, and save the VI.
Right-click on the Block Diagram window of the newly created VI and, from Measurement I/O, click on NI-DAQmax and choose DAQ Assist, and place it on the Block Diagram window:

Once the function is placed on the window, quick initialization will take place:

The next screen will present you with two choices. Note the plus (+) signs next to Acquire Signals and Generate Signals. We are going to acquire a voltage signal. Click on the plus sign next to Acquire Signals then click on the (+) next to Analog Inputs and select Voltage.
A physical...
In this chapter, we used the automation capabilities of LabVIEW to create a VI that captures a triangular signal through simple DAQ hardware. We used the DAQ Assistant VI to do almost all of the required programming. Although assistant VIs are very easy to use and arrive at quick solutions, they lack the precise control capabilities that most real-life data acquisition conditions require. We will use NI-DAQmax data acquisition VIs in Chapter 4, DAQ Programming Using LabVIEW, to illustrate how LabVIEW can be used to measure a true physical phenomenon (such as temperature, light, and so on) and convert it to appropriate data that can be manipulated and analyzed with a computer.
The rest of the chapter is locked
You have been reading a chapter from
Data Acquisition Using LabVIEWPublished in: Dec 2016Publisher: PacktISBN-13: 9781782172161
Register for a free Packt account to unlock a world of extra content!
A free Packt account unlocks extra newsletters, articles, discounted offers, and much more. Start advancing your knowledge today.
undefined
Unlock this book and the full library FREE for 7 days
Get unlimited access to 7000+ expert-authored eBooks and videos courses covering every tech area you can think of
Renews at €14.99/month. Cancel anytime