Reader small image

You're reading from  Getting Started with Unity 5

Product typeBook
Published inMay 2015
Publisher
ISBN-139781784398316
Edition1st Edition
Tools
Right arrow
Author (1)
Dr. Edward Lavieri
Dr. Edward Lavieri
author image
Dr. Edward Lavieri

Dr. Edward Lavieri is a veteran software engineer and developer with a strong academic background. He earned a Doctorate of Computer Science from Colorado Technical University, an MS in Management Information Systems (Bowie State University), an MS in Education (Capella University), and an MS in Operations Management (University of Arkansas). He has been creating and teaching computer science courses since 2002. Edward retired from the U.S. Navy as a Command Master Chief after 25 years of active service. He is the founder and creative director of three19, a software design and development studio. Edward has authored more than a dozen technology books, including several on Java.
Read more about Dr. Edward Lavieri

Right arrow

Chapter 6. Adding a Graphical User Interface

Our game is nearly complete. One feature that players expect is a graphical user interface (GUI). That is, the set of images, text, and buttons that a player interacts with during the game. We do not want to disappoint or alienate our users, so we'll add some key GUI components to help professionalize our game.

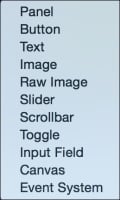
This chapter begins with an overview of Unity 5's User Interface (UI) system, followed by a look at game navigation. Also in this chapter, we will create the following GUI components:

  • Heads-up display (HUD)

  • Minimap

  • Full-screen navigation navigation

Before we start building our GUI, I'll cover the importance of GUI components and Unity's UI tools.

After reading this chapter, you will:

  • Understand the significance of GUIs

  • Understand Unity 5's UI system

  • Be able to create HUD

  • Be able to create minimaps

  • Be able to create full-screen navigational menus

An overview of GUI


A GUI is a collection of visual components such as text, buttons, and images that facilitates a user's interaction with software. GUIs are also used to provide feedback to players. In the case of our game, the GUI allows players to interact with our game. Without a GUI, the user would have no visual indication of how to use the game. Imagine software without any on-screen indicators of how to use the software. The following image shows how early user interfaces were anything but intuitive:

We use GUIs all the time and might not pay too close attention to them, unless they are poorly designed. If you've ever tried to figure out how to use an app on your Smartphone or could not figure out how to perform a specific action with desktop software, you've most likely encountered a poorly designed GUI.

Functions of a GUI

Our goal is to create a GUI for our game that both informs the user and allows interaction between the game and the user. To that end, GUIs have two primary purposes...

Unity 5's UI system


Unity's UI system has recently been re-engineered and is now more powerful than ever. Perhaps the most important concept to grasp is the Canvas object. All UI elements are contained in a canvas. Projects and scenes can have more than one canvas. You can think of a canvas as a container for UI elements.

Canvas

To create a canvas, you simply navigate and select GameObject | UI | Canvas from the drop-down menu. You can see from the GameObject | UI menu pop-up that there are 11 different UI elements, as shown in the following screenshot:

Alternatively, you can create your first UI element, such as a button, and Unity will automatically create a canvas for you and add it to your Hierarchy view. When you create subsequent UI elements, simply highlight the canvas in the Hierarchy view and then navigate to GameObject | UI menu to select a new UI element.

The following table is a brief description of each of the UI elements:

HUD


A game's HUD is graphical and textual information available to the user at all times. No action should be required of the user, other than to look at a specific region of the screen to read the displays. For example, if you are playing a car-racing game, you might have an odometer, speedometer, compass, fuel tank level, air pressure, and other visual indicators always present on the screen.

Our game will have these on-screen elements:

  • The number of units of corn Colt currently has

  • The number of units of corn Colt has gathered in total

  • The number of units of water Colt currently has

  • The number of units of water Colt has gathered in total

  • The number of piglets, pigs, and blue ribbon pigs currently on the farm

  • The number of chicks, chickens, and blue ribbon chickens currently on the farm

Creating an HUD

The following are the steps to create our game's HUD:

  1. Open the game project and load the scene.

  2. Navigate and select the GameObject | UI | Text option from the drop-down menu. This will result in a...

Mini-maps


Miniature-maps or mini-maps provide game players with a small visual aid that helps them maintain perspective and direction in a game. These mini-maps can be used for many different purposes, depending on the game. Some examples include the ability to view a mini-map that overlooks an enemy encampment, a zoomed out view of the game map with friendly and enemy force indicators, and a mini-map that has the overall tunnel map while the main game screen views the current section of tunnel.

While we do not necessarily need a mini-map for our Little Farmer Colt game, we'll create one so that you can replicate the task in your own games.

Creating a mini-map

The following are the steps we'll use to create a mini-map for our game:

  1. Navigate and select GameObject | Camera from the top menu.

  2. In the Hierarchy view, change the name from Camera to Mini-Map.

  3. With the mini-map camera selected, go to the Inspector view and click on the Layer button, then Add Layer in the pop-up menu.

  4. In the next available...

Game navigation


Many games start with a full-screen game navigation menu when the game is first launched. Typical elements on these screens are text, images, and buttons. The text will normally display the game's title and the images will be related to the game. One or more buttons are also a normal UI element on main game screens. A very simple game might have a single Play button, while more complex games can have several buttons such as play, mode, level, instructions, campaign, and more.

We do not need a fancy game menu screen to allow the user to navigate between scenes or levels. It is important to be able to create these types of screens for more complex games, so we'll dive into this a bit and add a functional button to our existing HUD canvas.

By performing the following steps, we will create a new scene to our game. This will be the main scene that shows a play button. When a user clicks on the play button, the farm scene will be loaded:

  1. Save the current scene and the project.

  2. Select...

Summary


In this chapter, you learned about the UI system in Unity 5. You gained an appreciation of the importance of GUIs in games we create. As you've learned, there are different types and functions of GUIs. You gained hands-on experience with creating a HUD and a mini-map. You also learned how to create a scene to handle the game's initial load. You walked through the steps of creating a clickable button and scripted the button to load a scene other than the current one. Most importantly, you achieved a level of confidence in creating GUI elements and referencing them in scripts.

In the next chapter, we will look at ways to give our game some final touches. Specifically, we'll add sound effects to breathe life into our game. We'll add shadows to make the game look more realistic. We'll even create some special lighting effects. Our next chapter is about more than just polishing the game; it also contains ways to optimize our game through rendering options and code optimization.

lock icon
The rest of the chapter is locked
You have been reading a chapter from
Getting Started with Unity 5
Published in: May 2015Publisher: ISBN-13: 9781784398316
Register for a free Packt account to unlock a world of extra content!
A free Packt account unlocks extra newsletters, articles, discounted offers, and much more. Start advancing your knowledge today.
undefined
Unlock this book and the full library FREE for 7 days
Get unlimited access to 7000+ expert-authored eBooks and videos courses covering every tech area you can think of
Renews at $15.99/month. Cancel anytime

Author (1)

author image
Dr. Edward Lavieri

Dr. Edward Lavieri is a veteran software engineer and developer with a strong academic background. He earned a Doctorate of Computer Science from Colorado Technical University, an MS in Management Information Systems (Bowie State University), an MS in Education (Capella University), and an MS in Operations Management (University of Arkansas). He has been creating and teaching computer science courses since 2002. Edward retired from the U.S. Navy as a Command Master Chief after 25 years of active service. He is the founder and creative director of three19, a software design and development studio. Edward has authored more than a dozen technology books, including several on Java.
Read more about Dr. Edward Lavieri

UI element

Description

Panel

A frame object.

Button

...