Reader small image

You're reading from  iOS 17 Programming for Beginners - Eighth Edition

Product typeBook
Published inOct 2023
Reading LevelBeginner
PublisherPackt
ISBN-139781837630561
Edition8th Edition
Languages
Tools
Right arrow
Author (1)
Ahmad Sahar
Ahmad Sahar
author image
Ahmad Sahar

Ahmad Sahar is a trainer, presenter, and consultant at Tomafuwi Productions, specializing in conducting training courses for macOS and iOS, macOS Support Essentials certification courses, and iOS Development courses. He is a member of the DevCon iOS and MyCocoaHeads online communities in Malaysia and has conducted presentations and talks for both groups. In his spare time, he likes building and programming LEGO Mindstorms robots.
Read more about Ahmad Sahar

Right arrow

Getting Started with SwiftUI

In previous chapters, you created the user interface (UI) for the JRNL app using storyboards. The process involved dragging objects representing views to a storyboard, creating outlets in view controller files, and connecting the two together.

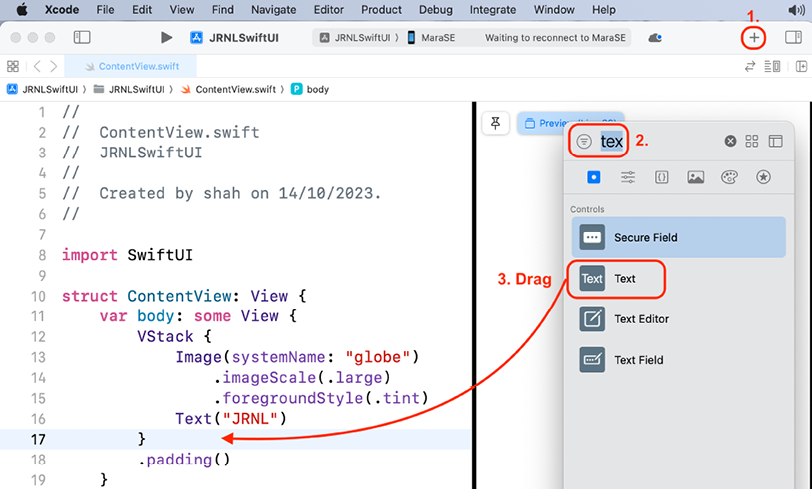
This chapter will focus on SwiftUI, an easy and innovative way to create apps across all Apple platforms. Instead of specifying the user interface using storyboards, SwiftUI uses a declarative Swift syntax, and works with new Xcode design tools to keep your code and design in sync. Features such as Dynamic Type, dark mode, localization, and accessibility are automatically supported.

In this chapter, you will build a simplified version of the JRNL app using SwiftUI. This app will contain just the Journal List and Journal Entry Detail screens. Since writing apps with SwiftUI is very different from what you have already done, you will not be modifying the JRNL project you have been working on thus far. You will...

Technical requirements

You will create a new SwiftUI Xcode project for this chapter.

The resource files and completed Xcode project for this chapter are in the Chapter24 folder of the code bundle for this book, which can be downloaded here:

https://github.com/PacktPublishing/iOS-17-Programming-for-Beginners-Eighth-Edition

Check out the following video to see the code in action:

https://youtu.be/xk_7V3-GbPE

Let’s start by creating a new SwiftUI Xcode project for your SwiftUI app in the next section.

Creating a SwiftUI Xcode project

A SwiftUI Xcode project is created in the same way as a regular Xcode project, but you configure it to use SwiftUI instead of storyboards to create the user interface. As you will see, the user interface is generated entirely in code, and you’ll be able to see changes in the user interface immediately as you modify your code.

You can watch a video of Apple’s SwiftUI presentation during WWDC20 at https://developer.apple.com/videos/play/wwdc2020/10119.

You can watch a video showing what’s new in SwiftUI during WWDC23 at https://developer.apple.com/videos/play/wwdc2023/10148/.

Apple’s official SwiftUI documentation can be found online at https://developer.apple.com/xcode/swiftui/.

Let’s begin by creating a new SwiftUI Xcode project. Follow these steps:

  1. Launch Xcode and create a new Xcode project.
  2. Click iOS. Select the App template, and then click Next.
  3. The Choose...

Creating the Journal List screen

When using storyboards, you modify attributes of a view using the Attributes inspector. In SwiftUI, you can modify either your code or the preview in the canvas. As you have seen, changing the code in the ContentView file will immediately update the preview, and modifying the preview will update the code.

Let’s customize the ContentView structure to display the data of a particular restaurant. Follow these steps:

  1. Click the Library button. Type tex in the filter field, and drag a Text view to the canvas and drop it under the JRNL text:

Figure 24.6: Library with Text object to be dragged

  1. Xcode has automatically added code to the ContentView file for this text view. Verify that your code looks like this:
    struct ContentView: View {
      var body: some View {
        VStack {
          Image(systemName: "globe")
            .imageScale(.large)
            .foregroundStyle(.tint)
          Text("JRNL")...

Adding model objects and configuring navigation

You now have a view that can be used to represent a journal entry in the Journal List screen. You’ll use this view as a cell in a SwiftUI list, which is a container that presents data in a single column. You’ll also configure model objects to populate this list. Follow these steps:

  1. Right-click on the HStack view and choose Embed in VStack from the pop-up menu. This keeps all the views together when you embed them in a list.
  2. Right-click on the outer VStack view and choose Embed in List to display a list containing five cells in the canvas. Remove the padding modifiers as well.
  3. Verify that your code now looks like this:
    struct ContentView: View {
      var body: some View {
        List(0 ..< 5) { item in
          VStack {
            HStack {
              Image(systemName: "face.smiling")
                .resizable()
                .frame(width: 90, height: 90)
              VStack {
                Text("...

Using MapKit for SwiftUI

During WWDC23, Apple introduced expanded MapKit support for SwiftUI, which makes it easier than ever to integrate Maps into your app. Using SwiftUI, you can easily add annotations and overlays to a map, control the camera, and more.

To watch Apple’s Meet MapKit for SwiftUI video during WWDC23, refer to this link: https://developer.apple.com/videos/play/wwdc2023/10043/.

At this point, you have created the Journal List screen, and tapping each cell in this screen displays the journal entry’s title on a second screen. You’ll modify your app to display a Journal Entry Detail screen when a cell on the Journal List screen is tapped, but before that, you’ll create a SwiftUI view that displays a map. Follow these steps:

  1. Choose File | New | File to open the template selector.
  2. iOS should already be selected. In the User Interface section, click SwiftUI View and click Next.
  3. Name the new file MapView...

Completing the Journal Entry Detail screen

You now have a SwiftUI map view displaying a map. Now, you’ll create a new SwiftUI view to represent the Journal Entry Detail screen and add the map view to it. Follow these steps:

  1. Choose File | New | File to open the template selector.
  2. iOS should already be selected. In the User Interface section, click SwiftUI View and click Next.
  3. Name the new file JournalEntryDetail and click Create. The JournalEntryDetail file appears in the Project navigator.
  4. Declare and define the JournalEntryDetail structure in this file as shown here:
    import SwiftUI
    struct JournalEntryDetail: View {
      var selectedJournalEntry: JournalEntry
      var body: some View {
        ScrollView {
          VStack{
            Spacer().frame(height: 30)
            Text(selectedJournalEntry.date.formatted(.dateTime.day()
            .month().year()))
              .font(.title)
              .fontWeight(.bold)
              .frame(maxWidth: .infinity, alignment: .trailing...

Summary

In this brief introduction to SwiftUI, you’ve seen how to build a simplified version of the JRNL app using SwiftUI.

You started by adding and configuring SwiftUI views to create the Journal List screen. You then added the model objects to your app and configured the navigation between the Journal List and Journal Entry Detail screens. After that, you used MapKit to build a map view for the Journal Entry Detail screen. Finally, you created the Journal Entry Detail screen and added to it the map view you created earlier.

You now know how to use SwiftUI to create an app that reads model objects, presents them in a list, and enables navigation to a second screen containing a map view. You are now able to implement this in your own projects.

In the next chapter, you will learn about WidgetKit, which lets you build interactive widgets for your app.

Learn more on Discord

To join the Discord community for this book – where you can share feedback,...

lock icon
The rest of the chapter is locked
You have been reading a chapter from
iOS 17 Programming for Beginners - Eighth Edition
Published in: Oct 2023Publisher: PacktISBN-13: 9781837630561
Register for a free Packt account to unlock a world of extra content!
A free Packt account unlocks extra newsletters, articles, discounted offers, and much more. Start advancing your knowledge today.
undefined
Unlock this book and the full library FREE for 7 days
Get unlimited access to 7000+ expert-authored eBooks and videos courses covering every tech area you can think of
Renews at €14.99/month. Cancel anytime

Author (1)

author image
Ahmad Sahar

Ahmad Sahar is a trainer, presenter, and consultant at Tomafuwi Productions, specializing in conducting training courses for macOS and iOS, macOS Support Essentials certification courses, and iOS Development courses. He is a member of the DevCon iOS and MyCocoaHeads online communities in Malaysia and has conducted presentations and talks for both groups. In his spare time, he likes building and programming LEGO Mindstorms robots.
Read more about Ahmad Sahar