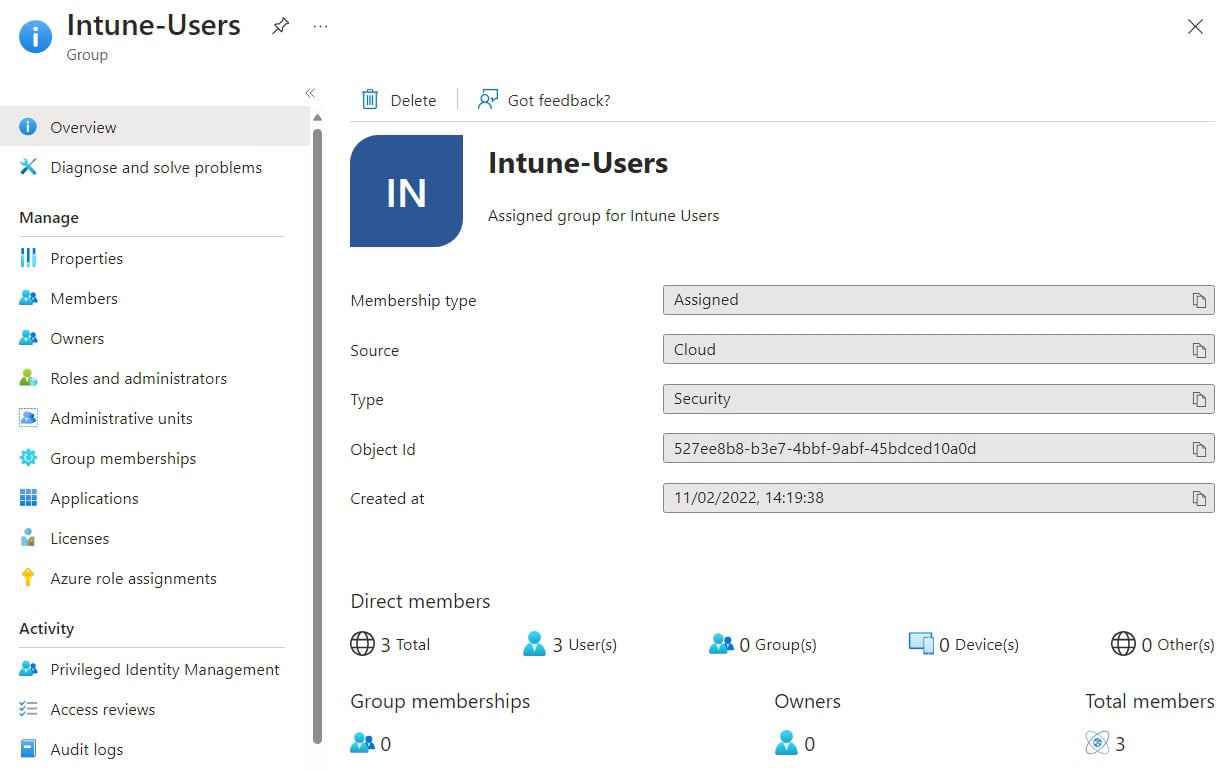
In this recipe, we will configure Entra ID dynamic groups, where we can configure a group to automatically populate based on specified criteria. This example will cover both user and device-based queries.
Getting ready
First, load the Entra portal, expand Groups, and click on All groups (you can also access groups within the Intune portal, which loads the same window).
How to do it…
Dynamic groups are automated; you set a membership rule (the user is a member of a particular location, device prefix, and so on), and then Entra ID reviews the rules on a schedule and adds/removes members accordingly. It is worth noting that there can be a delay while Entra queries the membership rules to populate the group membership.
For this example, we will create one Office user group and one Autopilot device dynamic group that we can use later on.
The user group will collect any users with an Office Business license (not the Enterprise ones), while the device group will collect all of your Autopilot devices; we will cover this in more detail in Chapter 4.
Creating a dynamic Office user group
Follow these steps to create a dynamic group containing only licensed Office users:
- Starting with the user group, click New Group and enter the basic details:
- Group type: Security.
- Enter Group name and Group description details.
- Change the membership type to Dynamic User.
- You will notice that we have to create a dynamic query. So, click Add dynamic query. This will take you to the Configure Rules interface and is where you can view the properties available and set them accordingly. If you already know the query, you can add it directly into the Rule syntax window.
To detect Office users, we are going to check the user assigned plans:
- For Property, select assignedPlans.
- Set Operator to Any.
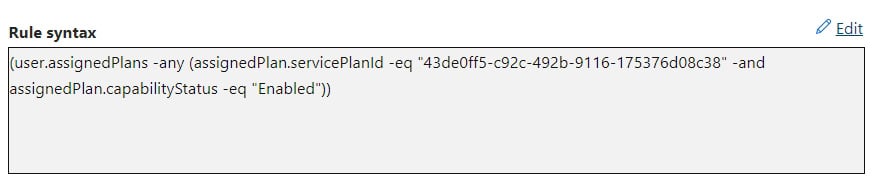
- The Value needs to be
(assignedPlan.servicePlanId -eq "43de0ff5-c92c-492b-9116-175376d08c38" -and assignedPlan.capabilityStatus -eq "Enabled")). - It should look like this in the syntax (sometimes, you may need to edit it to add the final closing brackets):
Figure 1.8 – Entra ID – new dynamic rule result
- Now, click the Validate Rules button.
- Add a user who has an Office license assigned and click Select.
- Then, click Validate. Here, you can see I have only assigned the license to one of my two users:
Figure 1.9 – User validation results
With that, we have created a dynamic user group for users with an Office license.
To find the servicePlanId value for individual products, you can use a downloadable CSV from the Microsoft site. You can use this to create any other dynamic groups: https://learn.microsoft.com/en-us/azure/active-directory/enterprise-users/licensing-service-plan-reference.
Creating a dynamic Autopilot device group
When we create our Autopilot profile later, in Chapter 4, we will configure it to automatically pick up all users/devices. However, in a pilot or Proof of Concept (PoC), we may only want to target those devices enrolled in Autopilot. For this, we can query the device’s ZTID, which is added when we import it (covered in Chapter 4).
Follow this process to create our dynamic grou:.
- Create a New Group value in Entra ID, but this time, pick Dynamic Device as the membership type. Set Group type to Security. Then, add the Group name and Group description values. Finally, click Add dynamic query.
- This one is slightly more straightforward. Set Property to devicePhysicalIds, Operator to Any, and Value to
(_ -startsWith "[ZTDid]:
Figure 1.10 – Dynamic rule creator
- It should look like this (sometimes, you may need to edit it to add the final closing brackets). Click OK on this screen:
Figure 1.11– Dynamic device query
We do not need to validate this one as we do not have a device enrolled yet anyway.
- Now, click Save, then Create on the following screen.
With that, we have created our dynamic Autopilot devices group so that it is ready to enroll devices in Chapter 4.
Automating it
This script will demonstrate how we can use Graph and PowerShell to create both of our dynamic groups, demonstrating the different queries.
Dynamic Office user group
This is similar to a static group, except we must add an extra line for the dynamic rule:
- Set the necessary variables:
$groupname = "TestGroup123"
$groupdescription = "TestGroupDescription"
$membershiprule = '(user.assignedPlans -any (assignedPlan.servicePlanId -eq \"43de0ff5-c92c-492b-9116-175376d08c38\" -and assignedPlan.capabilityStatus -eq \"Enabled\"))'
$groupnickname = ($groupname -replace '[^a-zA-Z0-9]', '').ToLower()
Important note
We have single quotes around the rule because we are using double quotes in the rule and also escaping the double quotes.
- Now, give it a URL:
$url = "https://graph.microsoft.com/beta/groups"
Populate the JSON
$json = @"
{
    "description": "$groupdescription",
    "displayName": "$groupname",
    "groupTypes": [
        "DynamicMembership"
    ],
    "mailEnabled": false,
    "mailNickname": "$groupnickname",
    "membershipRule": "$membershiprule",
    "membershipRuleProcessingState": "On",
    "securityEnabled": true
}
"@
Finally, submit our Graph request:
Invoke-MgGraphRequest -Uri $url -Method Post -Body $json -ContentType "application/json"
This script will create a dynamic group for users who have an active Office license based on the SKU and license properties.
Dynamic Autopilot device group
This is the same as the user group but with a different rule. The Graph backend does not differentiate between user and device groups.
We can now create a PowerShell script to create a dynamic group:
- Set the necessary variables:
$groupname = "TestGroup123"
$groupdescription = "TestGroupDescription"
- Set the mail nickname:
$groupnickname = ($groupname -replace '[^a-zA-Z0-9]', '').ToLower()
- Set the membership rule:
$membershiprule = '(device.devicePhysicalIDs -any (_ -startsWith "[ZTDid]"))'
- Set the URL:
$url = "https://graph.microsoft.com/beta/groups"
- Populate the JSON:
$json = @"
{
    "description": "$groupdescription",
    "displayName": "$groupname",
    "groupTypes": [
        "DynamicMembership"
    ],
    "mailEnabled": false,
    "mailNickname": "$groupnickname",
    "membershipRule": $membershiprule,
    "membershipRuleProcessingState": "On",
    "securityEnabled": true
}
"@ - Finally, submit our Graph request:
Invoke-MgGraphRequest -Uri $url -Method Post -Body $json -ContentType "application/json"
We now have a script for creating our dynamic Autopilot group.
 Argentina
 Australia
 Austria
 Belgium
 Brazil
 Bulgaria
 Canada
 Chile
Chile
 Colombia
 Cyprus
 Czechia
 Denmark
 Ecuador
 Egypt
Egypt
 Estonia
 Finland
 France
 Germany
 Great Britain
 Greece
 Hungary
 India
India
 Indonesia
 Ireland
 Italy
Italy
 Japan
Japan
 Latvia
 Lithuania
 Luxembourg
 Malaysia
 Malta
Malta
 Mexico
 Netherlands
 New Zealand
 Norway
 Philippines
 Poland
 Portugal
 Romania
 Russia
 Singapore
 Slovakia
 Slovenia
 South Africa
 South Korea
 Spain
Spain
 Sweden
 Switzerland
 Taiwan
 Thailand
 Turkey
 Ukraine
 United States