Reader small image

You're reading from  Building Real-World Web Applications with Vue.js 3

Product typeBook
Published inJan 2024
Reading LevelIntermediate
PublisherPackt
ISBN-139781837630394
Edition1st Edition
Languages
Tools
Right arrow
Author (1)
Joran Quinten
Joran Quinten
author image
Joran Quinten

Joran Quinten's passion involves getting people to love technology and getting technology to play nice. With over a decade of experience in developing and designing software, he has built up a broad background in development and architecture. He loves sharing knowledge and has been invited to speak at several tech events. Joran graduated from Fontys University of Applied Sciences, Eindhoven in 2010. Currently, he works for Jumbo Supermarkten, a national grocery chain where he is the technical lead of the design system team and acts as an ambassador for the tech department. He is passionate about mentoring and coaching junior developers. Joran lives close to Eindhoven with his wife, son and daughter.
Read more about Joran Quinten

Right arrow

Introduction to Vue.js

This book will get you familiar with one of the most popular modern frontend frameworks at this time: Vue.js. Modern frameworks make it easy to add interactivity to static web pages and can help you build entire web applications!

The latter is exactly what you will be learning while going through this book. You will learn different techniques that fit specific use cases, and this will result in a collection of portfolio-ready projects.

Before you start building projects, we will take a look at the context in which we will build those projects. In this chapter, we will get you set up to start any Vue.js project using the best practices.

We will cover the following topics in this chapter:

  • The need for Vue.js
  • Requirements and tooling
  • Setting up the development environment
  • My first app

Technical requirements

Before we get started, we need to make sure we’ve met all requirements to install and run Vue.js, and to also develop applications. Familiarity with HTML, CSS, and JavaScript with TypeScript is required to understand the concepts that are built on top of these technologies.

In order for us to run Vue.js locally, we need to install Node.js (https://nodejs.org/en/download). This is a runner for JavaScript on your development machine.

The need for Vue.js

There are a number of frontend frameworks available, and this is an ever evolving and changing landscape. The Vue.js ecosystem is, at this point in time, a very mature landscape, which offers numerous plugins and tooling built on top of it.

Vue.js is a community-driven open source project maintained and developed by people from all over the world. It originated as a personal side project by Evan You and has grown to a framework with high adoption by all types of organizations, such as NASA, Apple, Google, and Microsoft. Being funded by sponsorships from both companies as individuals, Vue.js is an independent framework.

Vue.js is currently on version 3, a breaking change from the previous version, although most patterns are still applicable. Vue.js 3 supports all ES2015-compatible browsers.

Let’s look at some reasons to choose Vue.js to build web applications:

  • It’s performant because it was built to be optimized from the ground up.
  • It’s lightweight, tree-shakeable, and ships only the code that is needed to run your application. The minimal code (after being optimized in a build step) is about 16 KB in size.
  • It’s highly scalable, using preferred patterns such as Single File Components and the Composition API, which makes it suitable for enterprise applications.

    Single File Components are part of the Vue.js philosophy where the template, script, and styling of a component are encapsulated in a single file, with the goal of improving the organization, readability, and maintainability of code.

    The Composition API allows better organization and reuse of code throughout the application, which makes code more modular and easy to maintain.

On top of all these benefits, the learning curve is very accessible for entry-level developers. With syntax that is similar to classic HTML, JavaScript, and CSS notation, it’s easy to get started and find your way around.

In this chapter, we will guide you through the initial setup and go through the steps and setup that you can use as boilerplate for all future Vue.js projects. We will be adopting the recommended setup to make sure you will learn and apply best practices from the start.

We’ll first make sure that you have the developer environment set up so that you can start creating interactive web applications!

Requirements and tooling

In order to get started with Vue.js development efficiently, we will need to make sure you can actually run and edit the code sensibly. While you could technically run the code using the library from a Content Delivery Network (CDN), this is not recommended for real-world applications. As the official docs (https://vuejs.org/guide/introduction.html) also state, there is no build setup involved, and the drawback is that this setup does not support the Single File Component syntax and leaves you with little control over applications’ optimizations such as compiling, minification, and lazy loading.

In this book, we will make use of the Vue.js npm package and then use it to scaffold starter projects to build upon. We will start all of our projects using the command line. To use the npm package, you will need to install Node.js (a JavaScript runtime environment). Make sure to install at least Node.js version 18. npm is a public repository (https://www.npmjs.com/) where developers publish, share, and use JavaScript packages.

Node.js can be downloaded from https://nodejs.org/en. You can confirm the correct installation of the version by opening a Command-Line Interface (CLI) and typing the following:

node -v

It should return something like this:

v18.0.0

It is always possible to develop or experiment without any local installations. We can turn to web-based environments for that. These environments offer sandboxed environments with sensible presets out of the box. This means they often are configured to use the recommended settings from the official documentation. They offer less control and are somewhat limited in more specific use cases. They are highly valuable, though, if you want to experiment with some of the concepts.

Online resources

Vue.js provides an online development playground, https://sfc.vuejs.org/, but I would like to point out StackBlitz (https://stackblitz.com/), where you can instantiate complete development environments that run in the browser. While it’s not useful for deploying applications, this is an excellent way of testing a proof of concept or just using it as a small playground.

You can just register, start a new project, and choose a Vue.js 3 template to get started. Code examples will be available on GitHub, where you can clone or fork the repository to validate your own code against the working example.

For future reference, the Vue.js docs (https://vuejs.org/guide/introduction.html) are very accessible and offer a step-by-step explanation of all the possible contexts. I would certainly recommend checking them out for a more in-depth understanding of the topics we will be covering.

Once you get involved in the Vue.js community, you will find that it is a very helpful, supportive, and friendly community. Again, the official Vue.js website provides some guidance (https://vuejs.org/about/community-guide.html).

Welcome to the community, now let’s get started!

Setting up the development environment

There are many ways of writing and editing code, and in time, you will find a flow that works best for you. For this book, we will get started using a generally recommended setup. Feel free to make changes that work for you.

Vue.js development takes place in an environment that allows you to write code efficiently by highlighting correct code and helping you to catch errors before you save your changes. Debugging and validating code can take place in various stages, but for the scope of this book, we’ll use the development interface as well as the browser environment.

Let’s start by installing a widely adopted development interface.

Integrated development environment

An Integrated Development Environment (IDE) helps you write and edit code by supporting helpers such as syntax highlighting, formatting, and plugins that tie in with the framework of choice. Any modern editor will do, but in this book, we will use Microsoft Visual Studio Code (VSCode), which is free to use and provides a good developer experience; it can be downloaded from https://code.visualstudio.com/.

On top of the installation of the IDE, I recommend the following plugins, which make the developer experience much more pleasant:

  • Vue Language Features (Volar): Supports the markup of Vue.js 3 snippets and highlighting
  • Vue Volar extension pack: Adds some recommended plugins to help automate some chores while coding
  • Better comments: For better markup of comments in the code
  • Indent-rainbow: Applies color to indented blocks of code, to quickly identify levels of indentation

Vue.js can be developed using many other IDEs, other IDEs, such as WebStorm, Sublime Text, Vim/NeoVim, and Emacs. Choose what suits you, bear in mind that screenshots will be shown using the recommended VSCode setup, as described earlier.

Vue.js DevTools

Today’s browsers come with built-in tools that allow web developers to inspect and manipulate the HTML, CSS, and JavaScript code of web pages, test and debug their code, measure page performance, and simulate various device and network conditions.

macOS users can open the DevTools using Cmd + Option + I. Windows or Linux users can use Ctrl + Shift + I.

It is good to note that when you’re inspecting an element in the browser, the elements you will see are the elements that are rendered by Vue.js! If you inspect the source code of the browser, you will see just the mounting point of the app. This is the virtual Document Object Model (DOM) in action, and we will clarify that a bit later on.

Since Vue.js runs (typically) in a browser environment, using DevTools is a skill that is just as valuable as writing clean code. For Chromium-based browsers and Firefox, Vue.js offers a standard plugin.

The Vue.js DevTools plugin helps you with inspecting and manipulating Vue.js components while they are running in the browser. This will help with pinpointing bugs and getting a better understanding of how the state of the app is translated to the User Interface (UI).

Note

You can find more information and install the plugin here: https://vuejs.org/guide/scaling-up/tooling.html#browser-devtools.

We will take an in-depth look at the Vue.js DevTools at a later stage. At this point, we’ve met all of the requirements of starting out with any Vue.js app, either small or large scale. They all meet the same basic requirements.

At this point you must be eager to dive in and start with the first project, so let’s create a small app to familiarize ourselves with development.

My first app

Let’s put our acquired tools and knowledge to the test by creating our very first Vue.js application, shall we?

You would usually start by opening your CLI and navigating to a folder where you want to start your projects. Typing the following command creates a new empty project using the official create-vue tool:

npm init vue@latest

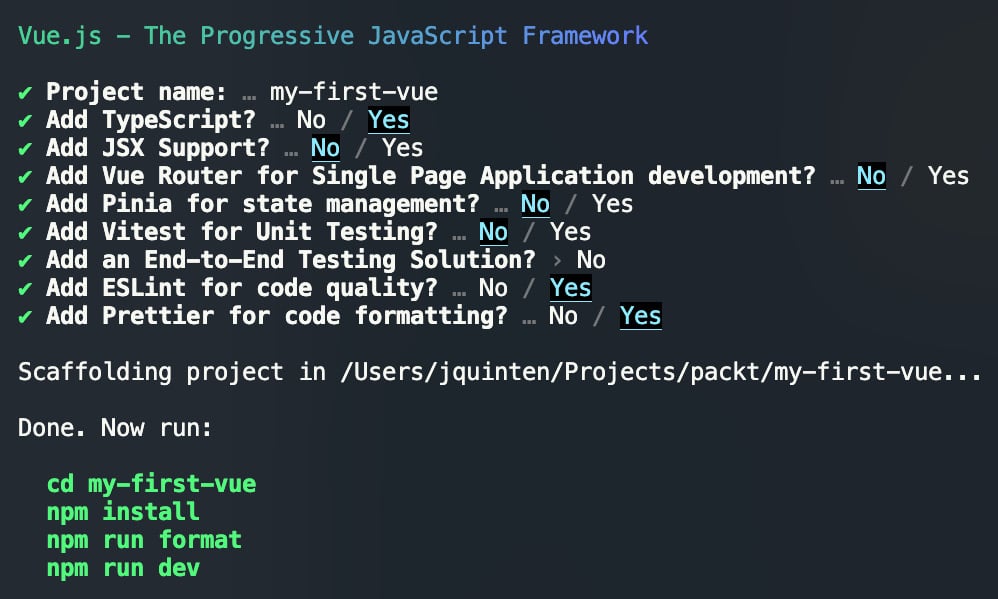
Hit y to proceed, choose my-first-vue as the project name, and select the options shown in the following figure:

Figure 1.1 – Using the Vue CLI to scaffold out an app with presets

Figure 1.1 – Using the Vue CLI to scaffold out an app with presets

We’ve selected TypeScript as a superset of JavaScript, which adds static typing. We’ve also enabled ESLint and Prettier. ESLint checks for syntax errors, formatting issues, and code style inconsistencies, and can even integrate with your IDE to visually mark problematic code. Prettier is used to enforce a consistent code style. These three options enhance the developer experience by highlighting potential issues before you run your code.

Then, following the instructions, you can move into the created folder and type npm install to install the required dependencies. This will download the required package files from the npm registry and install them in the node_modules subfolder of your project.

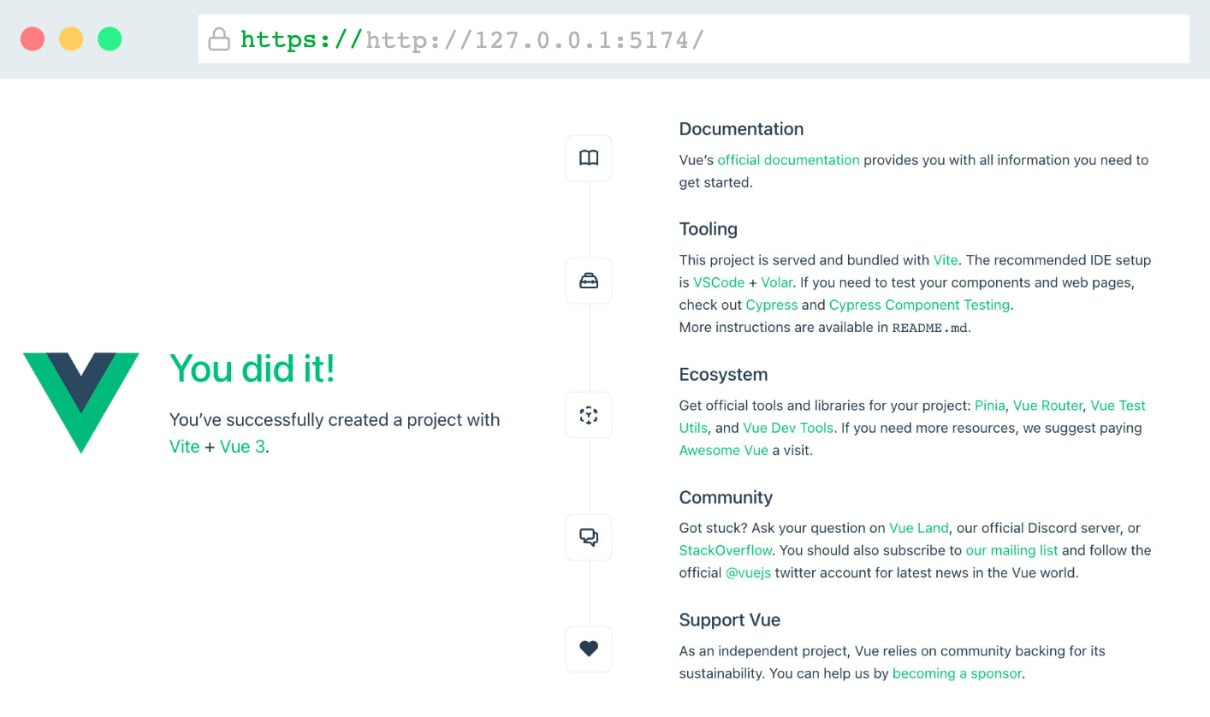
If you run npm run dev the project will spin up a development server, which you can access with your browser. Usually, the local address will be something similar to http://127.0.0.1:5173/.

If you open that URL in the browser, you should see your first Vue.js application! The default is an empty starter that holds many of the pointers and links that we’ve already covered at this point, but it is a good starting point for any developer starting with Vue.js.

Figure 1.2 – Your very first Vue.js app!

Figure 1.2 – Your very first Vue.js app!

With successful installation, we can take a closer look at what has actually been installed. Let’s dive into the installation files!

The project in the IDE

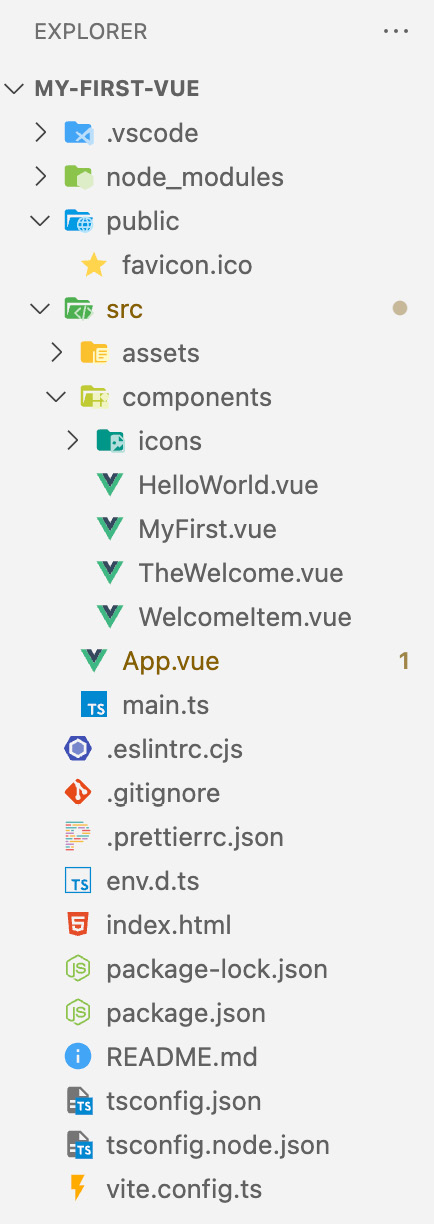
Now, if you open up the project in your IDE of choice, you will notice a predetermined structure. This will be applicable to all the projects that are scaffolded out this way. Let’s take a quick look at the structure:

Figure 1.3 – The expanded folder structure of the starter app

Figure 1.3 – The expanded folder structure of the starter app

At the root of the project, you’ll find different types of files that are specific to configuring the project. The main files here are index.html and package.json. The index.html file is the entry point of the app. It is a lightweight HTML template with a div element that has the id app will be the mounting point of the application.

The package.json file is a file that describes the project as a package, defines node scripts that can be executed, and also holds the references to all packages that the project depends on. The node_modules folder is the folder that holds all of the installed packages from the package.json file. This can be considered a read-only folder for our purposes.

Then we have the public and src folders. The public folder contains static assets, such as fonts, images, and icons that do not have to be processed by the build system. In the starter project, you will find a default favicon.ico present.

Lastly, the src (short for source) folder is the folder in which we will be making the most changes. It contains two root files at this point. The main.ts file registers the Vue application and the styles and mounts it to the HTML template.

The App.vue file is the entry point of the Vue.js application. If you open it, you might find some familiar syntaxes mixed in a single file, such as script tags, HTML, and CSS. We will get to that later.

It also contains an assets folder similar to the public folder, with the difference that these folders can and will be processed by the build system. And finally, there is the components folder, where you can place the components that make up the application. If you adopt Single File Components, each will fulfill a specific role and encapsulate the template, script, and styles. You can already see a couple of components, which make up the default starting page.

Your first coding steps

Let’s create the first component and add it to the app:

  1. Create a new file in the components folder called MyFirst.vue.

    A Vue.js component is preferably named using at least two camel-cased words and typically consists of a script, template, and style block. None of these are mandatory (although a style block without context would be of little value).

  2. Let’s create a small HTML snippet:
    <template>    <div>My first <span>Vue.js</span> component!</div></template>
  3. In App.vue, you can use this as a Vue.js component already! If you open it up, you will see a script tag with import statements. You can remove the TheWelcome import line and replace it with this:
    import MyFirst from './components/MyFirst.vue'
  4. Next, in the template tag, you can remove the <TheWelcome /> HTML-like tag and replace it with the <MyFirst /> HTML notation.

    If you were still running the code, you would have noticed that the browser updated itself to reflect the changes. This is called hot reloading and makes for a smooth development flow. If you have stopped the process, you can restart it and revisit the page in the browser.

    You should see the component that you’ve created!

  5. Let’s add a styling block to add some CSS to the component and see the hot reloading in action. In the MyFirst.vue file, add the following code below the template block:
    <style scoped>div {  color: #35495f;  font-size: 1.6rem;}span {  color: #41b883;  font-weight: 700;}</style>

    The contents of the style block will be processed like a normal CSS file. The scoped attribute means that the div and span style definitions are scoped down to only this component. Vue adds a unique data attribute to the virtual DOM and attaches the CSS rules to that attribute. In App.vue, you can see that global styles are also supported.

In the browser, you will see the component update itself with the new styling! Now that we’re familiar with the development environment, we’ll start to create a more interactive component in the next chapter.

Summary

At this point, you are ready to get started with Vue.js development. We’ve worked on setting up our local environment, and we used the recommended way of scaffolding out a new starter project.

In the next chapter, we’ll take a closer look at some of the Vue.js concepts (such as reactivity) and learn to inspect our app using official tools. Each lesson will introduce new concepts to apply in development.

You have been reading a chapter from
Building Real-World Web Applications with Vue.js 3
Published in: Jan 2024Publisher: PacktISBN-13: 9781837630394
Register for a free Packt account to unlock a world of extra content!
A free Packt account unlocks extra newsletters, articles, discounted offers, and much more. Start advancing your knowledge today.
undefined
Unlock this book and the full library FREE for 7 days
Get unlimited access to 7000+ expert-authored eBooks and videos courses covering every tech area you can think of
Renews at €14.99/month. Cancel anytime

Author (1)

author image
Joran Quinten

Joran Quinten's passion involves getting people to love technology and getting technology to play nice. With over a decade of experience in developing and designing software, he has built up a broad background in development and architecture. He loves sharing knowledge and has been invited to speak at several tech events. Joran graduated from Fontys University of Applied Sciences, Eindhoven in 2010. Currently, he works for Jumbo Supermarkten, a national grocery chain where he is the technical lead of the design system team and acts as an ambassador for the tech department. He is passionate about mentoring and coaching junior developers. Joran lives close to Eindhoven with his wife, son and daughter.
Read more about Joran Quinten