


 Download code from GitHub
Web development has significantly evolved in recent years, particularly with the apparition of web frameworks. We will learn how to use the Django framework to create a complete website.
In this chapter, we will discuss the following:
- The changes in the Web
- A presentation of Django
- MVC development pattern
The Web that you see today has not always been as it appears today. Indeed, many technologies such as CSS, AJAX, or the new HTML 5 version have improved the Web.
The Web was born 25 years ago, thanks to growing new technologies. Two of these have been very decisive:
- The HTML language is a display language. It allows you to organize information with nested tags.
- The HTTP protocol is a communication network protocol that allows a client and a server to communicate. The client is often a browser such as Firefox or Google Chrome, and the server is very often a web server such as Nginx, Apache, or Microsoft IIS.
In the beginning, developers used the <table> tag to organize various elements of their page as the menu, header, or content. The images displayed on the web pages were of low resolutions to avoid the risk of making the page heavy. The only action that users could perform was to click on the hypertext links to navigate to other pages.
These hypertext links enabled users to navigate from one page to another by sending only one type of data: the URL of the page. The Uniform Resource Locator (URL) defines a unique link to get resources such as an HTML page, picture, or PDF file. No data other than the URL was sent by the user.
The term Web 2.0 was coined by Dale Dougherty, O'Reilly Media Company, and was mediated in October 2004 by Tim O'Reilly during the first Web 2.0 conference.
This new Web became interactive and reachable to beginners. It came as a gift to many technologies, including the following:
- The server-side languages such as PHP, Java Server Page (JSP), or ASP. These languages allow you to communicate with a database to deliver dynamic content. This also allows users to send data in HTML forms in order to process data using the web server.
- Databases store a lot of information. This information can be used to authenticate a user or display an item list from older to more recent entries.
- Client-side script such as JavaScript enables users to perform simple tasks without refreshing the page. Asynchronous JavaScript and XML (AJAX) brings an important feature to the current Web: asynchronous swapping between the client and the server. Thanks to this, there is no need to refresh the page in order to enjoy the website.
Today, Web 2.0 is everywhere, and it is a part of our everyday life. Facebook is a perfect example of a Web 2.0 site, with complete interaction between users and the storage of massive amounts of information in its database. Web applications have been popularized as webmails or Google web applications.
It's in this philosophy that Django emerged.
Django was born in 2003 in a press agency of Lawrence, Kansas. It is a web framework that uses Python to create websites. Its goal is to write very fast dynamic websites. In 2005, the agency decided to publish the Django source code in the BSD license. In 2008, the Django Software Foundation was created to support and advance Django. Version 1.00 of the framework was released a few months later.

Django's slogan is explicit. This framework was created to accelerate the development phase of a site, but not exclusively. Indeed, this framework uses the MVC pattern, which enables us to have a coherent architecture, as we will see in the next chapter.
Until 2013, Django was only compatible with Python version 2.x, but Django 1.5 released on February 26, 2013, points towards the beginning of Python 3 compatibility.
Today, big organizations such as the Instagram mobile website, Mozilla.org, and Openstack.org are using Django.
A framework is a set of software that organizes the architecture of an application and makes a developer's job easier. A framework can be adapted to different uses. It also gives practical tools to make a programmer's job faster. Thus, some features that are regularly used on a website can be automated, such as database administration and user management.
Once a programmer handles a framework, it greatly improves their productivity and the code quality.
Django – a web framework
A framework is a set of software that organizes the architecture of an application and makes a developer's job easier. A framework can be adapted to different uses. It also gives practical tools to make a programmer's job faster. Thus, some features that are regularly used on a website can be automated, such as database administration and user management.
Once a programmer handles a framework, it greatly improves their productivity and the code quality.
Before the MVC framework existed, web programming mixed the database access code and the main code of the page. This returned an HTML page to the user. Even if we are storing CSS and JavaScript files in external files, server-side language codes are stored in one file that is shared between at least three languages: Python, SQL, and HTML.
The MVC pattern was created to separate logic from representation and have an internal architecture that is more tangible and real. The Model-View-Controller (MVC) represents the three application layers that the paradigm recommends:
- Models: These represent data organization in a database. In simple words, we can say that each model defines a table in the database and the relations between other models. It's thanks to them that every bit of data is stored in the database.
- Views: These contain all the information that will be sent to the client. They make views that the final HTML document will generate. We can associate the HTML code with the views.
- Controllers: These contain all the actions performed by the server and are not visible to the client. The controller checks whether the user is authenticated or it can generate the HTML code from a template.
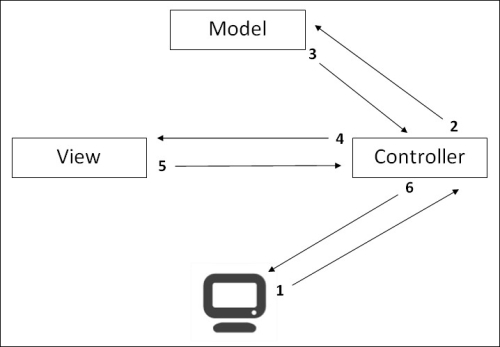
The following are the steps that are followed in an application with the MVC pattern:
- The client sends a request to the server asking to display a page.
- The controller uses a database through models. It can create, read, update, or delete any record or apply any logic to the retrieved data.
- The model sends data from the database; for example, it sends a product list if we have an online shop.
- The controller injects data into a view to generate it.
- The view returns its content depending on the data given by the controller.
- The controller returns the HTML content to the client.
The MVC pattern enables us to get coherence for each project's worker. In a web agency where there is a web designer and there are developers, the web designer is the head of the views. Given that views contain only the HTML code, the web designer will not be disturbed by the developer's code. Developers edit their models and controllers.
Django, in particular, uses an MVT pattern. In this pattern, views are replaced by templates and controllers are replaced by views. In the rest of this book, we will be using MVT patterns. Hence, our HTML code will be templates, and our Python code will be views and models.
The following is a nonexhaustive list of the advantages of using Django:
- Django is published under the BSD license, which assures that web applications can be used and modified freely without any problems; it's also free.
- Django is fully customizable. Developers can adapt to it easily by creating modules or overridden framework methods.
- This modularity adds other advantages. There are a lot of Django modules that you can integrate into Django. You can get some help with other people's work because you will often find high-quality modules that you might need.
- Using Python in this framework allows you to have benefits from all Python libraries and assures a very good readability.
- Django is a framework whose main goal is perfection. It was specifically made for people who want clear code and a good architecture for their applications. It totally respects the Don't Repeat Yourself (DRY) philosophy, which means keeping the code simple without having to copy/paste the same parts in multiple places.
- With regards to quality, Django integrates lots of efficient ways to perform unit tests.
- Django is supported by a good community. This is a very important asset because it allows you to resolve issues and fix bugs very fast. Thanks to the community, we can also find code examples that show the best practices.
Django has got some disadvantages too. When a developer starts to use a framework, he /she begins with a learning phase. The duration of this phase depends on the framework and the developer. The learning phase of Django is relatively short if the developer knows Python and object-oriented programming.
Also, it can happen that a new version of the framework is published that modifies some syntax. For example, the syntax of the URLs in the templates was changed with Version 1.5 of Django. (For more details, visit https://docs.djangoproject.com/en/1.5/ref/templates/builtins/#url.) Despite this, the documentation provides details of each Django update.
In this chapter, we studied the changes that have enabled the Web to evolve into Web 2.0. We also studied the operation of MVC that separates logic from representation. We finished the chapter with an introduction to the Django framework.
In the next chapter, we will set up our development environment with Python, PIP, and Django.
At the end of this chapter, you will have all the necessary elements to begin programming with Django. A website developed with Django is a project that contains one or more applications. Indeed, when a website becomes more important, it becomes necessary to logically separate it into several modules. These modules are then placed in the project that corresponds to the website. In this book, we will not need to create many applications, but they can be very helpful in some cases. Indeed, if one day you create an application and you want to use it in another project, you will need to copy and adapt this application to the new project.
To be able to use Django, you need to install the following software:
- Python 3, to enjoy the third version innovations.
- setuptools is a module that simplifies the installation of the external Python module. However, it does not manage to uninstall the module.
- PIP extends the possibilities of setuptools by removing packages, using easier syntax, and providing other benefits.
- Django, which that we are going to install thanks to PIP.
These installations will be compatible with Windows, Linux, and Mac OS X.
To use all the tools that we have talked about so far, we first need to install Python 3. The following sections describe how we can install Python on different operating systems.
To download the Python executable, visit http://www.python.org/download/ and download the Python MSI file. Please make sure that you choose the right version concerning your platform. The Python installation may need an administrator account.
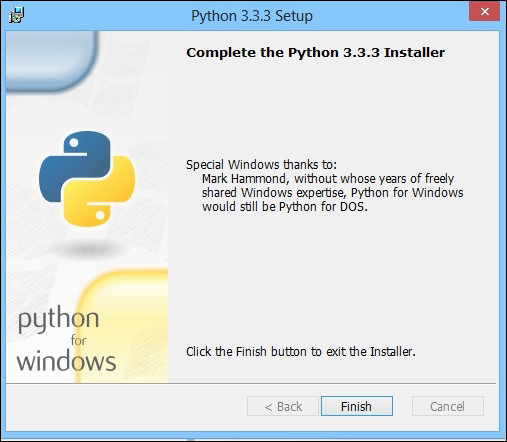
For all the stages of the Python installation, you can leave all the settings at their default values. If the installation has been done properly, you should see the following dialog window open:
To set up Python 3 on Linux, we can use the packet manager APT with the following command:
root@debian:apt-get install python3
Tip
Downloading the example code
You can download the example code files for all Packt books you have purchased from your account at http://www.packtpub.com. If you purchased this book elsewhere, you can visit http://www.packtpub.com/support and register to have the files e-mailed directly to you.
We need to confirm the modifications proposed by APT.
The latest version of Mac OS already has a version of Python. However, Version 2 of Python is installed, and we would like to install Version 3. To do this, visit https://www.python.org/download/ and download the right version. Then, open the file with the extension .dmp. Finally, run the file with the extension .mpkg. If you get an error such as Python cannot be opened because it is from an unidentified developer, perform the following steps:
- In Finder, locate the Python install.
- Press the ctrl key and then click on the app's icon.
- Select Open from the shortcut menu.
- Click on Open.
PIP is a dependence of setuptools. We need to install setuptools to use PIP. The following sections describe how we can install setuptools on different operating systems.
To download the setuptools executable, you have to go to the PyPI website at https://pypi.python.org/pypi/setuptools. Then, we need to click on Downloads and select the right version. In this book, we use Version 1.1, as shown in the following screenshot:

Installing setuptools for Windows
To download the setuptools executable, you have to go to the PyPI website at https://pypi.python.org/pypi/setuptools. Then, we need to click on Downloads and select the right version. In this book, we use Version 1.1, as shown in the following screenshot:
PIP is very popular among Python users, and using PIP is a Django community best practice. It handles the package installation, performs updates, and removes all the Python package extensions. Thanks to this, we can install all the required packages for Python.
If you have installed Python 3.4 or later, PIP is included with Python.
To install PIP, first download it from https://pypi.python.org/pypi/pip/1.5.4.
Then, we need to install PIP from the executable, but don't forget to define the right Python installation folder, as you can see in the following screenshot:
For the next set of steps, go with the default options and complete the installation. With PIP, we will be installing all the required Python packages.
Installing PIP for Windows
To install PIP, first download it from https://pypi.python.org/pypi/pip/1.5.4.
Then, we need to install PIP from the executable, but don't forget to define the right Python installation folder, as you can see in the following screenshot:
For the next set of steps, go with the default options and complete the installation. With PIP, we will be installing all the required Python packages.
We will then install the framework on which we will be working. The following sections describe how we can install Django on different operating systems.
To install Django with PIP, you have to open a command prompt and go to the Scripts directory that you can find in the Python folder. You can install Django with the following command:
C:\Python33\Scripts\pip.exe install django=="X.X"
PIP will download and install the Django packages in the site-packages repository of Python.
To facilitate the PIP utilization that we have just installed, we have to look for the version installed on the system and define an alias to refer to the PIP version installed. Do not forget to execute the following commands as root:
root@debian:compgen -c | grep pip
root@debian:alias pip=pip-3.2
root@debian:pip install django=="1.6"
The first command looks for a usable command containing the word pip. You will certainly find a line such as pip-3.2. It's on this command that we will define an alias with the second command.
The third command installs Version 1.6 of Django.
Installing Django for Windows
To install Django with PIP, you have to open a command prompt and go to the Scripts directory that you can find in the Python folder. You can install Django with the following command:
C:\Python33\Scripts\pip.exe install django=="X.X"
PIP will download and install the Django packages in the site-packages repository of Python.
To facilitate the PIP utilization that we have just installed, we have to look for the version installed on the system and define an alias to refer to the PIP version installed. Do not forget to execute the following commands as root:
root@debian:compgen -c | grep pip
root@debian:alias pip=pip-3.2
root@debian:pip install django=="1.6"
The first command looks for a usable command containing the word pip. You will certainly find a line such as pip-3.2. It's on this command that we will define an alias with the second command.
The third command installs Version 1.6 of Django.
Installing Django for Linux
To facilitate the PIP utilization that we have just installed, we have to look for the version installed on the system and define an alias to refer to the PIP version installed. Do not forget to execute the following commands as root:
root@debian:compgen -c | grep pip
root@debian:alias pip=pip-3.2
root@debian:pip install django=="1.6"
The first command looks for a usable command containing the word pip. You will certainly find a line such as pip-3.2. It's on this command that we will define an alias with the second command.
The third command installs Version 1.6 of Django.
Before you start using Django, you need to create an environment for your applications. We will create a Django project. This project will then contain our applications.
To create the project of our application, we need to run the following command using the django-admin.py file (you can find it in the Python33\Scripts folder):
django-admin.py startproject Work_manager
So as to facilitate the use of the Django commands, we can set the environmental variable of Windows. To do this, you must perform the following steps:
- Right-click on My computer on the desktop.
- Click on Advanced System Settings.
- Next, click on Environmental Variable.
- Add or update the
PATHvariable:- If it does not exist, create the
PATHvariable and set its value asC:\Python33/Scripts - If it exists, append
;C:\Python33\Scriptsto the existing value
- If it does not exist, create the
- Now, you can use the precedent command without the need to put yourself in the
Python33/Scriptsfolder.
Note
There are different ways to perform the previous command:
- The following command will be performed in all cases:
C:\Python33\python.exe C:\Python33\Scripts\django-admin.py startproject Work_manager - The following command will be performed if we have defined
C:\Python33\Scriptsin thePATHvariable:C:\Python33\python.exe django-admin.py startproject Work_manager - The following command will be performed if we have defined
C:\Python33\Scriptsin thePATHvariable and the.pyextension file is defined to run with Python:django-admin.py startproject Work_manager
This command creates a Work_manager folder in the folder from where you run the command. We will find a folder and a file in that folder:
- The
manage.pyfile will be used for actions performed on the project such as starting the development server or synchronizing the database with the models. - The
Work_managerfolder represents an application of our project. By default, thestartprojectcommand creates a new application.
The Work_manager folder contains two very important files:
- The
settings.pyfile contains the parameters of our project. This file is common to all our applications. We use it to define the debug mode, configure the database, or define Django packages that we will use. Thesettings.pyfile allows us to do more things, but our use will be limited to what has been previously described. - The
urls.pyfile contains all our URLs. It is with this file that we make the routing in Django. We will cover this in the next chapter.
We will not program our application in the Work_manager folder because we want to create our own Task_manager application.
For this, run the following command using the manage.py file created by the startproject command You must run the following command in the Work_manager folder which contains manage.py file:
Manage.py startapp TasksManager
This command creates a TasksManager folder in the folder of our project. This folder contains five files:
- The
__ init__.pyfile defines a package. Python needs it to differentiate between the standard folders and the packages. - The
admin.pyfile is not useful at this moment. It contains the models that need to be incorporated in the administration module. - The
models.pyfile contains all the models of our application. We use it a lot for the development of our application. Models allow us to create our database and store information. We will discuss this in Chapter 5, Working with Models. - The
tests.pyfile contains the unit tests of our application. - The
views.pyfile can contain views. This file will contain all the actions before sending the HTML page to the client.
Now that we know the most important files of Django, we can configure our project.
To configure our project or our application, we need to edit the settings.py file in the project folder.
This file contains variables. These variables are the settings that Django reads when initializing the web app. The following are a few of these variables:
DEBUG: This parameter must be set toTruethroughout the duration of development because it is the one that enables the errors to be displayed. Do not forget to set it toFalsewhen putting the project into production, because an error gives very sensitive information about the site security.TIME_ZONE: This parameter sets the region referring to which it must calculate dates and times. The default isUTC.DEFAULT_CHARSET: This sets the character encoding used. On thetask_managerapplication, we use UTF-8 encoding to simplify internationalization. To do this, you must add a line as follows:DEFAULT_CHARSET = 'utf-8'
LANGUAGE_CODE: This sets the language to be used on the website. This is the main useful parameter for internationalization.MIDDLEWARE_CLASSES: This defines the different middleware used.
Middleware are classes and methods, including the methods that are performed during the request process. To simplify the beginning of the development, we will remove a middleware from that parameter. This requires you to comment out the line by adding # in front of it:
# 'django.middleware.csrf.CsrfViewMiddleware',
We'll talk about this middleware in a later chapter to explain its operation and importance.
Now that we have seen the general settings of Django, we can start developing our application.
In this chapter, we have installed all the software needed to use Django. In this chapter, we learned how to create a Django project and an application. We also learned how to configure an application.
In the next chapter, we will start the Django development with an example of a web page containing the text Hello World!.
In this chapter, we will not actually start with the development phase. Instead, we will study the basics of websites to learn Django, namely, the project and application creation. In this chapter, we will also:
- Learn how to use regular expressions
- Create your first URLs
- Create your first view
- Test your application
At the end of the chapter, we will have created our first web page that will display Hello World!.
In the previous chapter, we edited the settings.py file to configure our Django project. We will edit settings.py again to add a new parameter. The following line must be present in settings.py:
ROOT_URLCONF = 'Work_manager.urls'
This parameter will define the Python file that will contain all the URLs of our site. We have already spoken about the previous file as it is in the Work_manager folder. The syntax that is used to define the ROOT_URLCONF variable means that Django takes the URLs in the urls.py file contained in the Workmanager package to the root of the project.
The routing of our application will be based on this file. The routing defines how the client request will be treated based on the URL sent.
In fact, when the controller receives the client request, it will go in the urls.py file and check whether the URL is a customer's request and use the corresponding view.
For example, in the following URL, Django will look for the search string in urls.py to know what action to take: http://localhost/search.
This is what the urls.py file looks like, as it is created by Django when creating the project:
from django.conf.urls import patterns, include, url
from django.contrib import admin
admin.autodiscover()
urlpatterns = patterns('',
    # Examples:
    # url(r'^$', 'Work_msanager.views.home', name='home'),
    # url(r'^blog/', include('blog.urls')),
    url(r'^admin/', include(admin.site.urls)),
)
We will detail the components of this file:
- The first line imports the functions commonly used in the management of URLs.
- The next two lines are useful to the administration module. We will comment by adding
#at the beginning of the line. These lines will be explained in a later chapter. - The remaining lines define the URLs in the
urlpatternsvariable. We will also review the URL starting withurl (r '^ admin.
After having received a request from a web client, the controller goes through the list of URLs linearly and checks whether the URL is correct with regular expressions. If it is not in conformity, the controller keeps checking the rest of the list. If it is in conformity, the controller will call the method of the corresponding view by sending the parameters in the URL. If you want to write URLs, you must first know the basics of regular expressions.
Regular expressions are like a small language in itself. Despite their complex and inaccessible air, they can manipulate the strings with great flexibility. They comprise a sequence of characters to define a pattern.
We will not explore all the concepts of regular expressions in this book, because it would require several chapters and divert us from the main goal of this book. Practice your regular expressions before you write your first URLs; many sites help you train on regular expressions. Search for Online regex matcher, and you will find pages to check your regular expressions through JavaScript. You can further explore regular expressions through the book, Mastering Regular Expressions Python, Packt Publishing, written by Félix López. There is a practical tool to visualize regular expressions. This tool is called Regexper and was created by Jeff Avallone. We will use this to represent regular expressions as a diagram.
The following sections explore the patterns used, functions, and an example to help you understand regular expressions better.
Uninterpreted characters, such as letters and digits, in a regular expression mean that they are present in the string and must be placed in exactly the same order.
For example, the regular expression test01 will validate the test01, dktest01, and test0145g strings but won't validate test10 or tste01.
The regular expression test-reg will validate a test-regex but not test-aregex or testregex:
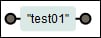
A visual representation of the test01 regular expression
To check whether a string must be present at the beginning or the end of the line, you must use the ^ and $ characters. If ^ is present at the beginning of the string, the validation will be done at the beginning of the chain. It works in the same way for $ at the end.
The following are some examples:


In a regular expression, the dot (.) means "any character". So, when you validate characters that cannot be inferred, the dot is used. If you try to validate a dot in your speech, use the escape character, \.
The following are examples:


To validate the characters, you can use character classes. A character class is enclosed in square brackets and contains all the allowed characters. To validate all the numbers and letters in a location, you must use [0123456789a]. For example, ^tes[t0e]$ will only validate the three chains: test, tes0, and tese.
You can also use the following predefined classes:
[0-9]is equivalent to[0123456789][a-z]matches all the letters,[abcdefghijklmnopqrstuvwxyz][A-Z]matches all uppercase letters[a-zA-Z]matches all the letters
The following are the shortcuts:
\dis equivalent to[0-9]\wis equivalent to[a-zA-Z0-9_][0-9]is equivalent to[0123456789]
Everything that we have studied until now is the elements that define one and only one character. To validate a character one or more times, you must use braces {x, y}, where x defines the minimum number of occurrences and y is the maximum number of occurrences. If one of them is not specified, you will have an undefined value. For example, if you forget to include an element in {2,}, it means that the character must be present at least twice.
The following are some examples:
^test{2, 3}$only validatestesttandtesttt:
^tests{0,1}$only validatestestandtests
. ^ {1} $validates all the channels except one: the empty string
The following are the shortcuts:
*is equivalent to{0}?is equivalent to{0, 1}+is equivalent to{1}
Regular expressions are very powerful and will be very useful even outside of programming with Django.
The uninterpreted characters
Uninterpreted characters, such as letters and digits, in a regular expression mean that they are present in the string and must be placed in exactly the same order.
For example, the regular expression test01 will validate the test01, dktest01, and test0145g strings but won't validate test10 or tste01.
The regular expression test-reg will validate a test-regex but not test-aregex or testregex:
A visual representation of the test01 regular expression
To check whether a string must be present at the beginning or the end of the line, you must use the ^ and $ characters. If ^ is present at the beginning of the string, the validation will be done at the beginning of the chain. It works in the same way for $ at the end.
The following are some examples:
In a regular expression, the dot (.) means "any character". So, when you validate characters that cannot be inferred, the dot is used. If you try to validate a dot in your speech, use the escape character, \.
The following are examples:
To validate the characters, you can use character classes. A character class is enclosed in square brackets and contains all the allowed characters. To validate all the numbers and letters in a location, you must use [0123456789a]. For example, ^tes[t0e]$ will only validate the three chains: test, tes0, and tese.
You can also use the following predefined classes:
[0-9]is equivalent to[0123456789][a-z]matches all the letters,[abcdefghijklmnopqrstuvwxyz][A-Z]matches all uppercase letters[a-zA-Z]matches all the letters
The following are the shortcuts:
\dis equivalent to[0-9]\wis equivalent to[a-zA-Z0-9_][0-9]is equivalent to[0123456789]
Everything that we have studied until now is the elements that define one and only one character. To validate a character one or more times, you must use braces {x, y}, where x defines the minimum number of occurrences and y is the maximum number of occurrences. If one of them is not specified, you will have an undefined value. For example, if you forget to include an element in {2,}, it means that the character must be present at least twice.
The following are some examples:
^test{2, 3}$only validatestesttandtesttt:^tests{0,1}$only validatestestandtests. ^ {1} $validates all the channels except one: the empty string
The following are the shortcuts:
*is equivalent to{0}?is equivalent to{0, 1}+is equivalent to{1}
Regular expressions are very powerful and will be very useful even outside of programming with Django.
The beginning and the end of the line
To check whether a string must be present at the beginning or the end of the line, you must use the ^ and $ characters. If ^ is present at the beginning of the string, the validation will be done at the beginning of the chain. It works in the same way for $ at the end.
The following are some examples:
In a regular expression, the dot (.) means "any character". So, when you validate characters that cannot be inferred, the dot is used. If you try to validate a dot in your speech, use the escape character, \.
The following are examples:
To validate the characters, you can use character classes. A character class is enclosed in square brackets and contains all the allowed characters. To validate all the numbers and letters in a location, you must use [0123456789a]. For example, ^tes[t0e]$ will only validate the three chains: test, tes0, and tese.
You can also use the following predefined classes:
[0-9]is equivalent to[0123456789][a-z]matches all the letters,[abcdefghijklmnopqrstuvwxyz][A-Z]matches all uppercase letters[a-zA-Z]matches all the letters
The following are the shortcuts:
\dis equivalent to[0-9]\wis equivalent to[a-zA-Z0-9_][0-9]is equivalent to[0123456789]
Everything that we have studied until now is the elements that define one and only one character. To validate a character one or more times, you must use braces {x, y}, where x defines the minimum number of occurrences and y is the maximum number of occurrences. If one of them is not specified, you will have an undefined value. For example, if you forget to include an element in {2,}, it means that the character must be present at least twice.
The following are some examples:
^test{2, 3}$only validatestesttandtesttt:^tests{0,1}$only validatestestandtests. ^ {1} $validates all the channels except one: the empty string
The following are the shortcuts:
*is equivalent to{0}?is equivalent to{0, 1}+is equivalent to{1}
Regular expressions are very powerful and will be very useful even outside of programming with Django.
The any character regular expression
In a regular expression, the dot (.) means "any character". So, when you validate characters that cannot be inferred, the dot is used. If you try to validate a dot in your speech, use the escape character, \.
The following are examples:
To validate the characters, you can use character classes. A character class is enclosed in square brackets and contains all the allowed characters. To validate all the numbers and letters in a location, you must use [0123456789a]. For example, ^tes[t0e]$ will only validate the three chains: test, tes0, and tese.
You can also use the following predefined classes:
[0-9]is equivalent to[0123456789][a-z]matches all the letters,[abcdefghijklmnopqrstuvwxyz][A-Z]matches all uppercase letters[a-zA-Z]matches all the letters
The following are the shortcuts:
\dis equivalent to[0-9]\wis equivalent to[a-zA-Z0-9_][0-9]is equivalent to[0123456789]
Everything that we have studied until now is the elements that define one and only one character. To validate a character one or more times, you must use braces {x, y}, where x defines the minimum number of occurrences and y is the maximum number of occurrences. If one of them is not specified, you will have an undefined value. For example, if you forget to include an element in {2,}, it means that the character must be present at least twice.
The following are some examples:
^test{2, 3}$only validatestesttandtesttt:^tests{0,1}$only validatestestandtests. ^ {1} $validates all the channels except one: the empty string
The following are the shortcuts:
*is equivalent to{0}?is equivalent to{0, 1}+is equivalent to{1}
Regular expressions are very powerful and will be very useful even outside of programming with Django.
Character classes
To validate the characters, you can use character classes. A character class is enclosed in square brackets and contains all the allowed characters. To validate all the numbers and letters in a location, you must use [0123456789a]. For example, ^tes[t0e]$ will only validate the three chains: test, tes0, and tese.
You can also use the following predefined classes:
[0-9]is equivalent to[0123456789][a-z]matches all the letters,[abcdefghijklmnopqrstuvwxyz][A-Z]matches all uppercase letters[a-zA-Z]matches all the letters
The following are the shortcuts:
\dis equivalent to[0-9]\wis equivalent to[a-zA-Z0-9_][0-9]is equivalent to[0123456789]
Everything that we have studied until now is the elements that define one and only one character. To validate a character one or more times, you must use braces {x, y}, where x defines the minimum number of occurrences and y is the maximum number of occurrences. If one of them is not specified, you will have an undefined value. For example, if you forget to include an element in {2,}, it means that the character must be present at least twice.
The following are some examples:
^test{2, 3}$only validatestesttandtesttt:^tests{0,1}$only validatestestandtests. ^ {1} $validates all the channels except one: the empty string
The following are the shortcuts:
*is equivalent to{0}?is equivalent to{0, 1}+is equivalent to{1}
Regular expressions are very powerful and will be very useful even outside of programming with Django.
Validating the number of characters
Everything that we have studied until now is the elements that define one and only one character. To validate a character one or more times, you must use braces {x, y}, where x defines the minimum number of occurrences and y is the maximum number of occurrences. If one of them is not specified, you will have an undefined value. For example, if you forget to include an element in {2,}, it means that the character must be present at least twice.
The following are some examples:
^test{2, 3}$only validatestesttandtesttt:^tests{0,1}$only validatestestandtests. ^ {1} $validates all the channels except one: the empty string
The following are the shortcuts:
*is equivalent to{0}?is equivalent to{0, 1}+is equivalent to{1}
Regular expressions are very powerful and will be very useful even outside of programming with Django.
One of the interesting features of Django is to contain a development server. Indeed, during the development phase of the site, the developer does not need to set up a web server. However, when you put the site into production, you will need to install a real web server because it is not for use in production.
Indeed, the Django server is not secure and can hardly bear a heavy load. This does not mean that your site will be slow and full of flaws; it just means that you have to go through a real web server into production.
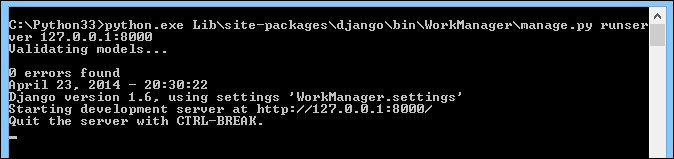
To use the development server, we need to use the manage.py runserver command file. We must launch the command prompt and put ourselves in the project root (use the cd command to browse folders) to execute the command:
manage.py runserver 127.0.0.1:8000
This command starts the Django development server. Let's explain the control step by step:
- The
runserverparameter starts the development server. 127.0.0.1is our internal IP address to the network adapter. This means that our server will listen and respond only to the computer on which it is launched. If we were in a local network and wanted to make our website available on computers other than ours, we would enter our local IP address instead of127.0.0.1. The value127.0.0.1is the default value of the parameter.8000defines the listening port of the server. This setting is useful to run multiple web servers on a single computer.
If the command is executed correctly, the window should show us the message, 0 errors found, as shown in the following screenshot:
To see the result, we must open our browser and enter the following URL: http://localhost:8000.
Django confirms that our development environment is functional by displaying the following message:

This message also means that we have no specified URL. We will add two URLs to our file:
url (r'^$', 'TasksManager.views.index.page),
url (r'^index$', 'TasksManager.views.index.page')
Tip
You should consistently get to know about bugs in Django, especially on the GitHub page for Django: https://github.com/django.
In the URLs that we enter, we define the first parameter (regular expression) that will validate the URL. We will discuss the second argument in the following chapter.
Let's go back to our browser and refresh the page with the F5 key. Django will display a ViewDoesNotExist at /
error.
This means that our module does not exist. You must study your errors; in this example, we had an error. With this error, we will directly fix the part that does not work.
Another problem that we regularly encounter is the 404 Page not found error. We can generate it by typing the http://localhost:8000/test404 URL in our browser. This error means that no URL has been validating the test404 string.
We must pay attention to errors because seeing and resolving them can save us a lot of time.
Now that we have created our URL and interpreted by the routing system, we must ensure that a view (which is a controller in the MVC pattern) meets the customer's demand.
This is the function of the second parameter of the URLs present in urls.py. This parameter will define the method that will play the role of a view. Take, for example, our first URL:
url (r'^$', 'TasksManager.views.index.page'),
Firstly, as we have seen when studying regular expressions, this URL will be valid only if we browse the http://localhost:8000 URL. The second parameter in the URL means that in the index.py file, there is a method called page that will process the request. The index.py file is located in the views package at the root of the TasksManager application.
When we want a folder to be recognized as a package by Python, we need to create a folder that contains the __init__.py file that we can leave blank.
You can choose another structure to store your views. You must choose the structure that best fits your project. Have a long-term vision of your project in order to define quality architecture from the first line of code.
In our index.py file, we will create a method called page(). This method will return an HTML page to the client. The page is being returned by the HTTP protocol, so we will use the HttpResponse() function and its importation. The argument of this HttpResponse() function returns the HTML content that we will return to the browser. To simplify reading this example, we do not use a proper HTML structure, because we just return Hello world! to the client, as shown in the following code:
# - * - Coding: utf -8 - * -
from django.http import HttpResponse
# View for index page.
def page (request) :
 return HttpResponse ("Hello world!" )
As we can see in the previous example, we added a comment before our page() method. Comments are very important. They help you understand your code very quickly.
We also set the encoding of the UTF-8 characters. This will improve our application's compatibility with other languages. We do not necessarily indicate it later in the book, but it is advisable to use it.
To test our first page, we will have to use the runserver command, which we saw earlier in this chapter. To do this, you must run the command and refresh your page, http://localhost:8000, in your browser.
If you see Hello World! appear in your browser without an error, it means that you have followed the previous steps. If you have forgotten something, do not hesitate to find your error on the Internet; others have probably been through the same.
However, we must improve our view because at the moment, we do not respect the MVC model. We will create a template to separate the HTML of Python code and have more flexibility.
In this chapter, we studied the basics of regular expressions. It is a powerful tool to use to manipulate strings. We learned how to manipulate the system routing URL. We also created our first view that returns a string to the client. In the next chapter, we will learn how to create maintainable templates with Django.
As we saw in the first chapter, where we explained the MVC and MVT models, templates are files that will allow us to generate the HTML code returned to the client. In our views, the HTML code is not mixed with the Python code.
Django comes with its own template system. However, as Django is modular, it is possible to use a different template system. This system is composed of a language that will be used to make our dynamic templates.
In this chapter, we will learn how to do the following:
- Send data to a template
- Display data in a template
- Display object lists in a template
- Handle chains with filters in Django
- Use URLs effectively
- Create base templates in order to extend other templates
- Insert static files in our templates
We will create the first template of our application. To do so, we must first edit the settings.py file to define the folder that will contain our templates. We will first define the project folder as PROJECT_ROOT to simplify the migration to another system:
PROJECT_ROOT = os.path.abspath(os.path.dirname(__file__))
TEMPLATE_DIRS = (os.path.join(PROJECT_ROOT, '../TasksManager/templates'),
  # Put strings here, like "/home/html/django_templates" or "C:/www/django/templates".
  # Always use forward slashes, even on Windows.
  # Don't forget to use absolute paths, not relative paths.
)
Now that Django knows where to look for the templates, we will create the first template of the application. To do this, use a file browser and add the index.html file in the TasksManager/templates/en/public/ folder. We do not need to create the __init__.py file, because these files do not contain any Python files.
The following is the content of the index.html file:
<html>
  <head>
    <title>
      Hello World Title
    </title>
  </head>
  <body>
    <h1>
      Hello World Django
    </h1>
    <article>
      Hello world !
    </article>
  </body>
</html>
Although the template is correct, we need to change the view to indicate its use. We will modify the index.py file with the following content:
from django.shortcuts import render
# View for index page.
def page(request):
  return render(request, 'en/public/index.html')
If we test this page, we will notice that the template has been taken into account by the view.
Before improving our template, we must send variables to the templates. The injection of the data is based on these variables, as the template will perform certain actions. Indeed, as we have seen in the explanation of the MVC pattern, the controller must send variables to the template in order to display them.
There are several functions to send variables to the template. The two main functions are render() and render_to_response(). The render() function is very similar to render_to_response (). The main difference is that if we use render, we do not need to specify context_instance = RequestContext(request) in order to send the current context. This is the context that will allow us to use the CSRF middleware later in the book.
We will change our view to inject variables in our template. These variables will be useful to work with the template language. The following is our modified view:
from django.shortcuts import render
"""
View for index page.
"""

def page(request):
  my_variable = "Hello World !"
  years_old = 15
  array_city_capitale = [ "Paris", "London", "Washington" ]
return render(request, 'en/public/index.html', { "my_var":my_variable, "years":years_old, "array_city":array_city_capitale })Django comes with a full-template language. This means that we will use template tags that will allow us to have more flexibility in our templates and display variables, perform loops, and set up filters.
The HTML and template languages are mixed in the templates; however, the template language is very simplistic, and there is a minority when compared to the HTML code. A web designer will easily modify the template files.
In our controller, we send a variable named my_var. We can display it in a <span> tag in the following way. Add the following lines in the <article> tag of our template tag:
<span> {{my_var}} </ span> In this way, because our variable contains string = "Hello World!", the HTML code that will be generated is as follows:
<span> Hello World! </span>
We will learn how to create conditions for variables or functions in order to filter the data in the variables in the following examples.
Language templates also allow conditional structures. Note that for a display variable, double brackets {{}} are used, but once we have an action to be made as a condition or loop, we will use {%%}.
Our controller sends a years variable that can define age. An example of a conditional structure is when you can change the value of the variable in the controller to observe the changes. Add the following code in our <article> tag:
<span>
  {% if years < 10 %}
    You are a child
  {% elif years < 18 %}
    You are a teenager
  {% else %}
    You are an adult!
  {% endif %}
</span>
In our case, when we send the value 15 to the generated template, the code that is used is as follows:
<span> You are a teenager </span>
Looping allows you to read through the elements of a table or data dictionary. In our controller, we sent a data table called array_city in which we have the names of cities. To see all these names of cities in the form of a list, we can write the following in our template:
<ul>
  {% for city in array_city %}
    <li>
      {{ city }}
    </li>
  {% endfor %}
</ul>
This looping will go through the array_city table, and place each element in the city variable that we display in the <li> tag. With our sample data, this code will produce the following HTML code:
<ul>
  <li>Paris</li>
  <li>London</li>
  <li>Washington</li>
</ul>
Conditional statements
Language templates also allow conditional structures. Note that for a display variable, double brackets {{}} are used, but once we have an action to be made as a condition or loop, we will use {%%}.
Our controller sends a years variable that can define age. An example of a conditional structure is when you can change the value of the variable in the controller to observe the changes. Add the following code in our <article> tag:
<span>
  {% if years < 10 %}
    You are a child
  {% elif years < 18 %}
    You are a teenager
  {% else %}
    You are an adult!
  {% endif %}
</span>
In our case, when we send the value 15 to the generated template, the code that is used is as follows:
<span> You are a teenager </span>
Looping allows you to read through the elements of a table or data dictionary. In our controller, we sent a data table called array_city in which we have the names of cities. To see all these names of cities in the form of a list, we can write the following in our template:
<ul>
  {% for city in array_city %}
    <li>
      {{ city }}
    </li>
  {% endfor %}
</ul>
This looping will go through the array_city table, and place each element in the city variable that we display in the <li> tag. With our sample data, this code will produce the following HTML code:
<ul>
  <li>Paris</li>
  <li>London</li>
  <li>Washington</li>
</ul>
Looping in a template
Looping allows you to read through the elements of a table or data dictionary. In our controller, we sent a data table called array_city in which we have the names of cities. To see all these names of cities in the form of a list, we can write the following in our template:
<ul>
  {% for city in array_city %}
    <li>
      {{ city }}
    </li>
  {% endfor %}
</ul>
This looping will go through the array_city table, and place each element in the city variable that we display in the <li> tag. With our sample data, this code will produce the following HTML code:
<ul>
  <li>Paris</li>
  <li>London</li>
  <li>Washington</li>
</ul>
Filters are an effective way to modify the data before sending it to the template. We will look at some examples of filters in the following sections to understand them better.
The lower filter converts into lowercase letters, and the upper filter converts into uppercase letters. The example given in the subsequent sections contains the my_hello variable, which equals Hello World!
The capfirst filter transforms the first letter to uppercase. The example with the myvar = "hello" variable is as follows:
<span>{{ my_hello | capfirst }}</span>This code generates the following HTML code:
<span> Hello World! </span>
The pluralize filter can easily handle plurals. Often, developers choose a simple solution for lack of time. The solution is to display channels: You have 2 products in your cart.
Django simplifies this kind of string. The pluralize filter will add a suffix to the end of a word if the variable represents a plural value, shown as follows:
You have {{ product }} nb_products {{ nb_products | pluralize }} in our cart.This channel will show the following three channels if nb_products is 1 and 2:
You have 1 product in our cart.
You have 2 products in our cart.
I received {{ nb_diaries }} {{ nb_diaries|pluralize : "y , ies "}}.
The previous code will show the following two chains if nb_diaries is 1 and 2:
I received one diary.
I received two diaries.
In the previous example, we used a filter that takes arguments for the first time. To set parameters to a filter, you must use the following syntax:
{{ variable | filter:"parameters" }}This filter helps to increase the quality of your site. A website looks much more professional when it displays correct sentences.
The XSS filter is used to escape HTML characters. This filter helps prevent from XSS attacks. These attacks are based on injecting client-side scripting by a hacker. The following is a step-by-step description of an XSS attack:
- The attacker finds a form so that the content will be displayed on another page, for example, a comment field of a commercial site.
- The hacker writes JavaScript code to hack using the tag in this form. Once the form is submitted, the JavaScript code is stored in the database.
- The victim views the page comments and JavaScript runs.
The risk is more important than a simple alert() method to display a message. With this type of vulnerability, the hacker can steal session IDs, redirect the user to a spoofed site, edit the page, and so on.
More concretely, the filter changes the following characters:
<is converted to<>is converted to>'is converted to'"is converted to"&is converted to&
We can automatically escape the contents of a block with the {% autoescape %} tag, which takes the on or off parameter. By default, autoescape is enabled, but note that with older versions of Django, autoescape is not enabled.
When autoescape is enabled, if we want to define a variable as a variable of trust, we can filter it with the safe filter. The following example shows the different possible scenarios:
<div>
  {% autoescape on %}
  <div>
    <p>{{ variable1 }}</p>
    <p>
      <span>
        {{ variable2|safe }}
      </span>
      {% endautoescape %}
      {% autoescape off %}
    </p>
  </div>
    <span>{{ variable3 }}</span>
    <span>{{ variable4|escape }}</span>
  {% endautoescape %}
  <span>{{ variable5 }}</span>
</div>
In this example:
variable1is escaped byautoescapevariable2is not escaped as it was filtered with safevariable3is not escaped becauseautoescapeis defined asoffvariable4is escaped because it has been filtered with the escape filtervariable5is escaped becauseautoescapeisoff
The linebreaks filter allows you to convert line breaks into an HTML tag. A single new line is transformed into the <br /> tag. A new line followed by a blank will become a paragraph break ,</p>:
<span>{{ text|linebreaks }}</span>The truncatechars filter allows you to truncate a string from a certain length. If this number is exceeded, the string is truncated and Django adds the string " ...".
The example of the variable that contains "Welcome in Django " is as follows:
{{ text|truncatechars:14 }}This code outputs the following:
"Welcome in ..."
The upper and lower filters
The lower filter converts into lowercase letters, and the upper filter converts into uppercase letters. The example given in the subsequent sections contains the my_hello variable, which equals Hello World!
The capfirst filter transforms the first letter to uppercase. The example with the myvar = "hello" variable is as follows:
<span>{{ my_hello | capfirst }}</span>This code generates the following HTML code:
<span> Hello World! </span>
The pluralize filter can easily handle plurals. Often, developers choose a simple solution for lack of time. The solution is to display channels: You have 2 products in your cart.
Django simplifies this kind of string. The pluralize filter will add a suffix to the end of a word if the variable represents a plural value, shown as follows:
You have {{ product }} nb_products {{ nb_products | pluralize }} in our cart.This channel will show the following three channels if nb_products is 1 and 2:
You have 1 product in our cart.
You have 2 products in our cart.
I received {{ nb_diaries }} {{ nb_diaries|pluralize : "y , ies "}}.
The previous code will show the following two chains if nb_diaries is 1 and 2:
I received one diary.
I received two diaries.
In the previous example, we used a filter that takes arguments for the first time. To set parameters to a filter, you must use the following syntax:
{{ variable | filter:"parameters" }}This filter helps to increase the quality of your site. A website looks much more professional when it displays correct sentences.
The XSS filter is used to escape HTML characters. This filter helps prevent from XSS attacks. These attacks are based on injecting client-side scripting by a hacker. The following is a step-by-step description of an XSS attack:
- The attacker finds a form so that the content will be displayed on another page, for example, a comment field of a commercial site.
- The hacker writes JavaScript code to hack using the tag in this form. Once the form is submitted, the JavaScript code is stored in the database.
- The victim views the page comments and JavaScript runs.
The risk is more important than a simple alert() method to display a message. With this type of vulnerability, the hacker can steal session IDs, redirect the user to a spoofed site, edit the page, and so on.
More concretely, the filter changes the following characters:
<is converted to<>is converted to>'is converted to'"is converted to"&is converted to&
We can automatically escape the contents of a block with the {% autoescape %} tag, which takes the on or off parameter. By default, autoescape is enabled, but note that with older versions of Django, autoescape is not enabled.
When autoescape is enabled, if we want to define a variable as a variable of trust, we can filter it with the safe filter. The following example shows the different possible scenarios:
<div>
  {% autoescape on %}
  <div>
    <p>{{ variable1 }}</p>
    <p>
      <span>
        {{ variable2|safe }}
      </span>
      {% endautoescape %}
      {% autoescape off %}
    </p>
  </div>
    <span>{{ variable3 }}</span>
    <span>{{ variable4|escape }}</span>
  {% endautoescape %}
  <span>{{ variable5 }}</span>
</div>
In this example:
variable1is escaped byautoescapevariable2is not escaped as it was filtered with safevariable3is not escaped becauseautoescapeis defined asoffvariable4is escaped because it has been filtered with the escape filtervariable5is escaped becauseautoescapeisoff
The linebreaks filter allows you to convert line breaks into an HTML tag. A single new line is transformed into the <br /> tag. A new line followed by a blank will become a paragraph break ,</p>:
<span>{{ text|linebreaks }}</span>The truncatechars filter allows you to truncate a string from a certain length. If this number is exceeded, the string is truncated and Django adds the string " ...".
The example of the variable that contains "Welcome in Django " is as follows:
{{ text|truncatechars:14 }}This code outputs the following:
"Welcome in ..."
The capfirst filter
The capfirst filter transforms the first letter to uppercase. The example with the myvar = "hello" variable is as follows:
<span>{{ my_hello | capfirst }}</span>This code generates the following HTML code:
<span> Hello World! </span>
The pluralize filter can easily handle plurals. Often, developers choose a simple solution for lack of time. The solution is to display channels: You have 2 products in your cart.
Django simplifies this kind of string. The pluralize filter will add a suffix to the end of a word if the variable represents a plural value, shown as follows:
You have {{ product }} nb_products {{ nb_products | pluralize }} in our cart.This channel will show the following three channels if nb_products is 1 and 2:
You have 1 product in our cart.
You have 2 products in our cart.
I received {{ nb_diaries }} {{ nb_diaries|pluralize : "y , ies "}}.
The previous code will show the following two chains if nb_diaries is 1 and 2:
I received one diary.
I received two diaries.
In the previous example, we used a filter that takes arguments for the first time. To set parameters to a filter, you must use the following syntax:
{{ variable | filter:"parameters" }}This filter helps to increase the quality of your site. A website looks much more professional when it displays correct sentences.
The XSS filter is used to escape HTML characters. This filter helps prevent from XSS attacks. These attacks are based on injecting client-side scripting by a hacker. The following is a step-by-step description of an XSS attack:
- The attacker finds a form so that the content will be displayed on another page, for example, a comment field of a commercial site.
- The hacker writes JavaScript code to hack using the tag in this form. Once the form is submitted, the JavaScript code is stored in the database.
- The victim views the page comments and JavaScript runs.
The risk is more important than a simple alert() method to display a message. With this type of vulnerability, the hacker can steal session IDs, redirect the user to a spoofed site, edit the page, and so on.
More concretely, the filter changes the following characters:
<is converted to<>is converted to>'is converted to'"is converted to"&is converted to&
We can automatically escape the contents of a block with the {% autoescape %} tag, which takes the on or off parameter. By default, autoescape is enabled, but note that with older versions of Django, autoescape is not enabled.
When autoescape is enabled, if we want to define a variable as a variable of trust, we can filter it with the safe filter. The following example shows the different possible scenarios:
<div>
  {% autoescape on %}
  <div>
    <p>{{ variable1 }}</p>
    <p>
      <span>
        {{ variable2|safe }}
      </span>
      {% endautoescape %}
      {% autoescape off %}
    </p>
  </div>
    <span>{{ variable3 }}</span>
    <span>{{ variable4|escape }}</span>
  {% endautoescape %}
  <span>{{ variable5 }}</span>
</div>
In this example:
variable1is escaped byautoescapevariable2is not escaped as it was filtered with safevariable3is not escaped becauseautoescapeis defined asoffvariable4is escaped because it has been filtered with the escape filtervariable5is escaped becauseautoescapeisoff
The linebreaks filter allows you to convert line breaks into an HTML tag. A single new line is transformed into the <br /> tag. A new line followed by a blank will become a paragraph break ,</p>:
<span>{{ text|linebreaks }}</span>The truncatechars filter allows you to truncate a string from a certain length. If this number is exceeded, the string is truncated and Django adds the string " ...".
The example of the variable that contains "Welcome in Django " is as follows:
{{ text|truncatechars:14 }}This code outputs the following:
"Welcome in ..."
The pluralize filter
The pluralize filter can easily handle plurals. Often, developers choose a simple solution for lack of time. The solution is to display channels: You have 2 products in your cart.
Django simplifies this kind of string. The pluralize filter will add a suffix to the end of a word if the variable represents a plural value, shown as follows:
You have {{ product }} nb_products {{ nb_products | pluralize }} in our cart.This channel will show the following three channels if nb_products is 1 and 2:
You have 1 product in our cart.
You have 2 products in our cart.
I received {{ nb_diaries }} {{ nb_diaries|pluralize : "y , ies "}}.
The previous code will show the following two chains if nb_diaries is 1 and 2:
I received one diary.
I received two diaries.
In the previous example, we used a filter that takes arguments for the first time. To set parameters to a filter, you must use the following syntax:
{{ variable | filter:"parameters" }}This filter helps to increase the quality of your site. A website looks much more professional when it displays correct sentences.
The XSS filter is used to escape HTML characters. This filter helps prevent from XSS attacks. These attacks are based on injecting client-side scripting by a hacker. The following is a step-by-step description of an XSS attack:
- The attacker finds a form so that the content will be displayed on another page, for example, a comment field of a commercial site.
- The hacker writes JavaScript code to hack using the tag in this form. Once the form is submitted, the JavaScript code is stored in the database.
- The victim views the page comments and JavaScript runs.
The risk is more important than a simple alert() method to display a message. With this type of vulnerability, the hacker can steal session IDs, redirect the user to a spoofed site, edit the page, and so on.
More concretely, the filter changes the following characters:
<is converted to<>is converted to>'is converted to'"is converted to"&is converted to&
We can automatically escape the contents of a block with the {% autoescape %} tag, which takes the on or off parameter. By default, autoescape is enabled, but note that with older versions of Django, autoescape is not enabled.
When autoescape is enabled, if we want to define a variable as a variable of trust, we can filter it with the safe filter. The following example shows the different possible scenarios:
<div>
  {% autoescape on %}
  <div>
    <p>{{ variable1 }}</p>
    <p>
      <span>
        {{ variable2|safe }}
      </span>
      {% endautoescape %}
      {% autoescape off %}
    </p>
  </div>
    <span>{{ variable3 }}</span>
    <span>{{ variable4|escape }}</span>
  {% endautoescape %}
  <span>{{ variable5 }}</span>
</div>
In this example:
variable1is escaped byautoescapevariable2is not escaped as it was filtered with safevariable3is not escaped becauseautoescapeis defined asoffvariable4is escaped because it has been filtered with the escape filtervariable5is escaped becauseautoescapeisoff
The linebreaks filter allows you to convert line breaks into an HTML tag. A single new line is transformed into the <br /> tag. A new line followed by a blank will become a paragraph break ,</p>:
<span>{{ text|linebreaks }}</span>The truncatechars filter allows you to truncate a string from a certain length. If this number is exceeded, the string is truncated and Django adds the string " ...".
The example of the variable that contains "Welcome in Django " is as follows:
{{ text|truncatechars:14 }}This code outputs the following:
"Welcome in ..."
The escape and safe to avoid XSS filters
The XSS filter is used to escape HTML characters. This filter helps prevent from XSS attacks. These attacks are based on injecting client-side scripting by a hacker. The following is a step-by-step description of an XSS attack:
- The attacker finds a form so that the content will be displayed on another page, for example, a comment field of a commercial site.
- The hacker writes JavaScript code to hack using the tag in this form. Once the form is submitted, the JavaScript code is stored in the database.
- The victim views the page comments and JavaScript runs.
The risk is more important than a simple alert() method to display a message. With this type of vulnerability, the hacker can steal session IDs, redirect the user to a spoofed site, edit the page, and so on.
More concretely, the filter changes the following characters:
<is converted to<>is converted to>'is converted to'"is converted to"&is converted to&
We can automatically escape the contents of a block with the {% autoescape %} tag, which takes the on or off parameter. By default, autoescape is enabled, but note that with older versions of Django, autoescape is not enabled.
When autoescape is enabled, if we want to define a variable as a variable of trust, we can filter it with the safe filter. The following example shows the different possible scenarios:
<div>
  {% autoescape on %}
  <div>
    <p>{{ variable1 }}</p>
    <p>
      <span>
        {{ variable2|safe }}
      </span>
      {% endautoescape %}
      {% autoescape off %}
    </p>
  </div>
    <span>{{ variable3 }}</span>
    <span>{{ variable4|escape }}</span>
  {% endautoescape %}
  <span>{{ variable5 }}</span>
</div>
In this example:
variable1is escaped byautoescapevariable2is not escaped as it was filtered with safevariable3is not escaped becauseautoescapeis defined asoffvariable4is escaped because it has been filtered with the escape filtervariable5is escaped becauseautoescapeisoff
The linebreaks filter allows you to convert line breaks into an HTML tag. A single new line is transformed into the <br /> tag. A new line followed by a blank will become a paragraph break ,</p>:
<span>{{ text|linebreaks }}</span>The truncatechars filter allows you to truncate a string from a certain length. If this number is exceeded, the string is truncated and Django adds the string " ...".
The example of the variable that contains "Welcome in Django " is as follows:
{{ text|truncatechars:14 }}This code outputs the following:
"Welcome in ..."
The linebreaks filter
The linebreaks filter allows you to convert line breaks into an HTML tag. A single new line is transformed into the <br /> tag. A new line followed by a blank will become a paragraph break ,</p>:
<span>{{ text|linebreaks }}</span>The truncatechars filter allows you to truncate a string from a certain length. If this number is exceeded, the string is truncated and Django adds the string " ...".
The example of the variable that contains "Welcome in Django " is as follows:
{{ text|truncatechars:14 }}This code outputs the following:
"Welcome in ..."
The truncatechars filter
The truncatechars filter allows you to truncate a string from a certain length. If this number is exceeded, the string is truncated and Django adds the string " ...".
The example of the variable that contains "Welcome in Django " is as follows:
{{ text|truncatechars:14 }}This code outputs the following:
"Welcome in ..."
Before learning what a DRY link is, we will first remind you of what an HTML link is. Every day, when we go on the Internet, we change a page or website by clicking on links. These links are redirected to URLs. The following is an example link to google.com:
<a href="http://www.google.com">Google link !</a>
We will create a second page in our application to create the first valid link. Add the following line to the urls.py file:
url(r'^connection$', 'TasksManager.views.connection.page'),
Then, create a view corresponding to the preceding URL:
from django.shortcuts import render
# View for connection page.
def page(request):
  return render(request, 'en/public/connection.html')
We will create a second template for the new view. Let's duplicate the first template and call the copy, connection.html, as well as modify Hello world in Connection. We can note that this template does not respect the DRY philosophy. This is normal; we will learn how to share code between different templates in the next section.
We will create an HTML link in our first index.html template. This link will direct the user to our second view. Our <article> tag becomes:
<article>
  Hello world !
  <br />
  <a href="connection">Connection</a>
</article>
Now, let's test our site with the development server, and open our browser to the URL of our site. By testing the site, we can check whether the link works properly. This is a good thing, because now you are able to make a static website with Django, and this framework includes a handy tool to manage URLs.
Django can never write a link in the href property. Indeed, by properly filing our urls.py file, we can refer to the name of a URL and name address.
To do this, we need to change our urls.py file that contains the following URLs:
url(r'^$', 'TasksManager.views.index.page', name="public_index"),
url(r'^connection/$', 'TasksManager.views.connection.page', name="public_connection"),
Adding the name property to each of our URLs allows us to use the name of the URL to create links. Change your index.html template to create a DRY link:
<a href="{% url 'public_connection' %}">Connection</a>Test the new site again; note that the link still works. But for now, this feature is useless to us. If Google decides to improve the indexing of the URLs whose addresses end with the name of the website, you will have to change all the URLs. To do this with Django, all you will need to do is change the second URL as follows:
url(r'^connection-TasksManager$', 'TasksManager.views.connection.page', name="public_connection"),
If we test our site again, we can see that the change has been done properly and that the change in the urls.py file is effective on all the pages of the site. When you need to use parameterized URLs, you must use the following syntax to integrate the parameters to the URL:
{% url "url_name" param %}
{% url "url_name" param1, param2 %}The legacy of templates allows you to define a super template and a subtemplate that inherits from the super template. In the super template, it is possible to define blocks that subtemplates can fill. This method allows us to respect the DRY philosophy by applying the common code to several templates in a super template. We will use an example where the index.html template will extend the base.html template.
The following is the base.html template code, which we must create in the template folder:
<html>
  <head>
    <title>
      { block title_html %}{% endblock %}
    </title>
  </head>
  <body>
    <h1>
      Tasks Manager - {% block h1 %}{% endblock %}
    </h1>
    <article>
      {% block article_content %}{% endblock %}
    </article>
  </body>
</html>
In the previous code, we defined three areas that the child templates can override: title_html, h1, and article_content. The following is the index.html template code:
{% extends "base.html" %}
{% block title_html %}
  Hello World Title
{% endblock %}
{% block h1 %}
  {{ bloc.super }}Hello World Django
{% endblock %}
{% block article_content %}
  Hello world !
{% endblock %}
In this template, we first use the extends tag, which extends the base.html template. Then, the block and endblock tags allow us to redefine what is present in the base.html template. We may change our connection.html template in the same way so that a change in base.html can be made on both templates.
It is possible to define as many blocks as necessary. We can also create super templates that extend themselves to create more complex architectures.
Static files such as JavaScript files, CSS, or images are essential to obtain an ergonomic website. These files are often stored in a folder, but they can be useful to modify this folder under development or in production.
According to the URLs, Django allows us to define a folder containing the static files and to easily modify its location when required.
To set the path where Django will look for static files, we have to change our settings.py file by adding or changing the following line:
STATIC_URL = '/static/'
STATICFILES_DIRS = (
    os.path.join(PROJECT_ROOT, '../TasksManager/static/'),
)
We will define a proper architecture for our future static files. It is important to choose an early consistent architecture, as it makes the application support as well as include another developer easier. Our statics files' architecture is as follows:
static/
  images/
  javascript/
    lib/
  css/
  pdf/
We create a folder for each type of static file and define a lib folder for JavaScript libraries as jQuery, which we will use later in the book. For example, we change our base.html file. We will add a CSS file to manage the styles of our pages. To do this, we must add the following line between </ title> and < / head>:
<link href="{% static "css/style.css" %}" rel="stylesheet" type="text/css" />To use the tag in our static template, we must also load the system by putting the following line before using the static tag:
{% load staticfiles %}We will create the style.css file in the /static/css folder. This way, the browser won't generate an error later in the development.
In this chapter, we learned how to create a template and send data to the templates, and how to use the conditions, loops, and filters in the templates. We also discussed how to create DRY URLs for a flexible URL structure, expand the templates to meet the DRY philosophy, and how to use the static files.
In the next chapter, we will learn how to structure our data to save it in a database.
The website we just created contains only static data; however, what we want to do is store data so as to automate all the tasks. That's why there are models; they will put a link between our views and the database.
Django, like many frameworks, proposes database access with an abstraction layer. This abstraction layer is called object-relational mapping (ORM). This allows you to use the Python implementation object in order to access the data without worrying about using a database. With this ORM, we do not need to use the SQL query for simple and slightly complex actions. This ORM belongs to Django, but there are others such as SQLAlchemy, which is a quality ORM used especially in the Python TurboGears framework.
A model is an object that inherits from the Model class. The Model class is a Django class that is specifically designed for data persistence.
We define fields in models. These properties allow us to organize data within a model. To make a connection between databases and SQL, we can say that a model is represented by a table in the database, and a model property is represented by a field in the table.
In this chapter, we will explain:
- How to set up access to the database
- How to install South for the database migrations
- How to create simple models
- How to create a relationship between models
- How to extend our models
- How to use the administration module
Django can interface with many databases. However, during the development of our application, we use SQLite libraries that are included in Django.
We will modify settings.py to set our connection to the database:
DATABASES = {
  'default': {
    'ENGINE': 'django.db.backends.sqlite3',
    'NAME': os.path.join(PROJECT_ROOT, 'database.db'),
    'USER': '',
    'PASSWORD': '',
    'HOST': '',
    'PORT': '',
  }
}
The following is the description of the properties mentioned in the preceding code:
- The
ENGINEproperty specifies the type of database to be used. - The
NAMEproperty defines the path and final name of the SQLite database. We use a syntax usingos.path.jointo our code, and it is compatible with all operating systems. The file's database will be contained in the project directory. - The other properties are useful when we use a database server, but as we will use SQLite, we do not need to define them.
South is a very useful extension of Django. It facilitates the migration of the database when changing fields. It also keeps a history of the changes in the structure of the database.
We talk about it now because it must be installed before the creation of the database to work correctly.
Django 1.7 incorporates a migration system. You will not need to use South anymore to make the migration of a Django application. You can find more information about the migration systems integrated into Django 1.7 at https://docs.djangoproject.com/en/dev/topics/migrations/.
To install South, we use the pip command. We have already used it to install Django. To do this, run the following command:
pip install South
Before actually using South, we must change the settings.py file for South to be well integrated in Django. To do this, you must go to INSTALLED_APPS and add the following lines (depending on the version, it is possible that the installation of South added the line):
'south',
'TasksManager',
Before we make our first migrations and generate our database, we also have to create the schema migration. To do this, we must run the following command:
manage.py schemamigration TasksManager --initial
Then, we must perform an initial migration:
manage.py syncdb --migrate
Django asks us to first create an account. This account will be a superuser. Remember the login and password that you enter; you will need this information later.
South is now fully operational. Each time we need to modify the models, we will make a migration. However, for the migration to be made correctly, you must keep the following things in mind:
- Never perform the Django
syncdbcommand. After runningsyncdb --migratefor the first time, never run it again. Usemigrateafterwards. - Always put a default value in the new fields; otherwise, we will be asked to assign a value.
- Each time we finish editing our models, we must execute the following two commands in the correct order:
manage.py schemamigration TasksManager –auto
manage.py migrate TasksManager
Installing South
To install South, we use the pip command. We have already used it to install Django. To do this, run the following command:
pip install South
Before actually using South, we must change the settings.py file for South to be well integrated in Django. To do this, you must go to INSTALLED_APPS and add the following lines (depending on the version, it is possible that the installation of South added the line):
'south',
'TasksManager',
Before we make our first migrations and generate our database, we also have to create the schema migration. To do this, we must run the following command:
manage.py schemamigration TasksManager --initial
Then, we must perform an initial migration:
manage.py syncdb --migrate
Django asks us to first create an account. This account will be a superuser. Remember the login and password that you enter; you will need this information later.
South is now fully operational. Each time we need to modify the models, we will make a migration. However, for the migration to be made correctly, you must keep the following things in mind:
- Never perform the Django
syncdbcommand. After runningsyncdb --migratefor the first time, never run it again. Usemigrateafterwards. - Always put a default value in the new fields; otherwise, we will be asked to assign a value.
- Each time we finish editing our models, we must execute the following two commands in the correct order:
manage.py schemamigration TasksManager –auto
manage.py migrate TasksManager
Using the South extension
Before we make our first migrations and generate our database, we also have to create the schema migration. To do this, we must run the following command:
manage.py schemamigration TasksManager --initial
Then, we must perform an initial migration:
manage.py syncdb --migrate
Django asks us to first create an account. This account will be a superuser. Remember the login and password that you enter; you will need this information later.
South is now fully operational. Each time we need to modify the models, we will make a migration. However, for the migration to be made correctly, you must keep the following things in mind:
- Never perform the Django
syncdbcommand. After runningsyncdb --migratefor the first time, never run it again. Usemigrateafterwards. - Always put a default value in the new fields; otherwise, we will be asked to assign a value.
- Each time we finish editing our models, we must execute the following two commands in the correct order:
manage.py schemamigration TasksManager –auto
manage.py migrate TasksManager
To create models, we must have already studied the application in depth. Models are the basis of any application because they will store all the data. Therefore, we must prepare them carefully.
Concerning our Tasksmanager application, we need a user who saves tasks performed on a project. We'll create two models: User_django and Project.
We need to store our models in the models.py file. We will edit the models.py file in the TasksManager folder. We do not need to modify the configuration file, because when you need the model, we will have to import it.
The file already exists and has a line. The following line allows you to import the base model of Django:
from django.db import models
To create the UserProfile model, we ask ourselves the question, "what data about the user do we need to keep?". We will need the following data:
- The user's real name
- A nickname that will identify each user
- A password that will be useful for user authentication
- Phone number
- Date of birth (this is not essential, but we must study the dates!)
- The date and time of the last connection
- E-mail address
- Age (in years)
- The creation date of the user account
- A specialization, if it is supervisor
- The type of user
- A supervisor, if you are a developer
The model that is needed is as follows:
class UserProfile(models.Model):
  name = models.CharField(max_length=50, verbose_name="Name")
  login = models.CharField(max_length=25, verbose_name="Login")
  password = models.CharField(max_length=100, verbose_name="Password")
  phone = models.CharField(max_length=20, verbose_name="Phone number" , null=True, default=None, blank=True)
  born_date = models.DateField(verbose_name="Born date" , null=True, default=None, blank=True)
  last_connection = models.DateTimeField(verbose_name="Date of last connection" , null=True, default=None, blank=True)
  email = models.EmailField(verbose_name="Email")
  years_seniority = models.IntegerField(verbose_name="Seniority", default=0)
  date_created = models.DateField(verbose_name="Date of Birthday", auto_now_add=True)
We have not defined the specialization, type of user, and supervisor, because these points will be seen in the next part.
In the preceding code, we can see that Django_user inherits from the Model class. This Model class has all the methods that we will need to manipulate the models. We can also override these methods to customize the use of models.
Within this class, we added our fields by adding an attribute in which we specified the values. For example, the first name field is a character string type with a maximum length of 50 characters. The verbose_name property will be the label that defines our field in forms. The following is a list of the commonly used field types:
CharField: This is a character string with a limited number of charactersTextField: This is a character string with unlimited charactersIntegerField: This is an integer fieldDateField: This is a date fieldDateTimeField: This field consists of the date as well as the time in hours, minutes, and secondsDecimalField: This is a decimal number that can be defined precisely
To save our projects, we will need the following data:
- Title
- Description
- Client name
These factors allow us to define the following model:
class Project(models.Model):
  title = models.CharField(max_length=50, verbose_name="Title")
  description = models.CharField(max_length=1000, verbose_name="Description")
  client_name = models.CharField(max_length=1000, verbose_name="Client name")
To comply with good practices, we would not have had to define a text field for the customer, but define a relationship to a client table. To simplify our first model, we define a text field for the client name.
The UserProfile model
To create the UserProfile model, we ask ourselves the question, "what data about the user do we need to keep?". We will need the following data:
- The user's real name
- A nickname that will identify each user
- A password that will be useful for user authentication
- Phone number
- Date of birth (this is not essential, but we must study the dates!)
- The date and time of the last connection
- E-mail address
- Age (in years)
- The creation date of the user account
- A specialization, if it is supervisor
- The type of user
- A supervisor, if you are a developer
The model that is needed is as follows:
class UserProfile(models.Model):
  name = models.CharField(max_length=50, verbose_name="Name")
  login = models.CharField(max_length=25, verbose_name="Login")
  password = models.CharField(max_length=100, verbose_name="Password")
  phone = models.CharField(max_length=20, verbose_name="Phone number" , null=True, default=None, blank=True)
  born_date = models.DateField(verbose_name="Born date" , null=True, default=None, blank=True)
  last_connection = models.DateTimeField(verbose_name="Date of last connection" , null=True, default=None, blank=True)
  email = models.EmailField(verbose_name="Email")
  years_seniority = models.IntegerField(verbose_name="Seniority", default=0)
  date_created = models.DateField(verbose_name="Date of Birthday", auto_now_add=True)
We have not defined the specialization, type of user, and supervisor, because these points will be seen in the next part.
In the preceding code, we can see that Django_user inherits from the Model class. This Model class has all the methods that we will need to manipulate the models. We can also override these methods to customize the use of models.
Within this class, we added our fields by adding an attribute in which we specified the values. For example, the first name field is a character string type with a maximum length of 50 characters. The verbose_name property will be the label that defines our field in forms. The following is a list of the commonly used field types:
CharField: This is a character string with a limited number of charactersTextField: This is a character string with unlimited charactersIntegerField: This is an integer fieldDateField: This is a date fieldDateTimeField: This field consists of the date as well as the time in hours, minutes, and secondsDecimalField: This is a decimal number that can be defined precisely
To save our projects, we will need the following data:
- Title
- Description
- Client name
These factors allow us to define the following model:
class Project(models.Model):
  title = models.CharField(max_length=50, verbose_name="Title")
  description = models.CharField(max_length=1000, verbose_name="Description")
  client_name = models.CharField(max_length=1000, verbose_name="Client name")
To comply with good practices, we would not have had to define a text field for the customer, but define a relationship to a client table. To simplify our first model, we define a text field for the client name.
The Project model
To save our projects, we will need the following data:
- Title
- Description
- Client name
These factors allow us to define the following model:
class Project(models.Model):
  title = models.CharField(max_length=50, verbose_name="Title")
  description = models.CharField(max_length=1000, verbose_name="Description")
  client_name = models.CharField(max_length=1000, verbose_name="Client name")
To comply with good practices, we would not have had to define a text field for the customer, but define a relationship to a client table. To simplify our first model, we define a text field for the client name.
Relationships are elements that join our models. For example, in the case of this application, a task is linked to a project. Indeed, the developer performs a task for a particular project unless it is a more general task, but it's out of the scope of our project. We define the one-to-many type of relationship in order to denote that a task always concerns a single project but a project can be connected to many tasks.
There are two other kinds of relationships:
- The one-to-one relationship sets apart a model in two parts. The resulting database will create two tables linked by a relationship. We will see an example in the chapter on the authentication module.
- The many-to-many relationship defines relationships with many records in one model can be connected to many records of the several other models of the same type. For example, an author can publish several books and a book may have several authors.
For the task model, we need the following elements:
- A way to define the task in a few words
- A description for more details about the task
- A past life
- Its importance
- The project to which it is attached
- The developer who has created it
This allows us to write the following model:
class Task(models.Model):
  title = models.CharField(max_length=50, verbose_name="Title")
  description = models.CharField(max_length=1000, verbose_name="Description")
  time_elapsed = models.IntegerField(verbose_name="Elapsed time" , null=True, default=None, blank=True)
  importance = models.IntegerField(verbose_name="Importance")
  project = models.ForeignKey(Project, verbose_name="Project" , null=True, default=None, blank=True)
  app_user = models.ForeignKey(UserProfile, verbose_name="User")
In this model, we have defined two foreign key field types: project and app_user. In the database, these fields contain the login details of the record to which they are attached in the other table.
The project field that defines the relationship with the Project model has two additional attributes:
Null: This decides whether the element can be defined as null. The fact that this attribute is in theprojectfield means that a task is not necessarily related to a project.Default: This sets the default value that the field will have. That is, if we do not specify the value of the project before saving the model, the task will not be connected to a domain.
Creating the task model with relationships
For the task model, we need the following elements:
- A way to define the task in a few words
- A description for more details about the task
- A past life
- Its importance
- The project to which it is attached
- The developer who has created it
This allows us to write the following model:
class Task(models.Model):
  title = models.CharField(max_length=50, verbose_name="Title")
  description = models.CharField(max_length=1000, verbose_name="Description")
  time_elapsed = models.IntegerField(verbose_name="Elapsed time" , null=True, default=None, blank=True)
  importance = models.IntegerField(verbose_name="Importance")
  project = models.ForeignKey(Project, verbose_name="Project" , null=True, default=None, blank=True)
  app_user = models.ForeignKey(UserProfile, verbose_name="User")
In this model, we have defined two foreign key field types: project and app_user. In the database, these fields contain the login details of the record to which they are attached in the other table.
The project field that defines the relationship with the Project model has two additional attributes:
Null: This decides whether the element can be defined as null. The fact that this attribute is in theprojectfield means that a task is not necessarily related to a project.Default: This sets the default value that the field will have. That is, if we do not specify the value of the project before saving the model, the task will not be connected to a domain.
The inheritance model allows the use of common fields for two different models. For example, in our App_user model, we cannot determine whether a random recording will be a developer or supervisor.
One solution would be to create two different models, but we would have to duplicate all the common fields such as name, username, and password, as follows:
class Supervisor(models.Model):
  # Duplicated common fields
  specialisation = models.CharField(max_length=50, verbose_name="Specialisation")

class Developer(models.Model):
  # Duplicated common fields
  supervisor = models.ForeignKey(Supervisor, verbose_name="Supervisor")
It would be a shame to duplicate the code, but it is the principle that Django and DRY have to follow. That is why there is an inheritance model.
Indeed, the legacy model is used to define a master model (or supermodel), which contains the common fields to several models. Children models automatically inherit the fields of the supermodel.
Nothing is more explicit than an example; we will modify our classes, Developer and Supervisor, to make them inherit App_user:
class Supervisor(UserProfile):
  specialisation = models.CharField(max_length=50, verbose_name="Specialisation")

class Developer(UserProfile):
  supervisor = models.ForeignKey(Supervisor, verbose_name="Supervisor")
The result of the legacy database allows us to create three tables:
- A table for the
App_usermodel that contains the fields for the properties of the model - A table for the
Supervisormodel, with a text field for specialization and a field that has a foreign key relationship with theApp_usertable - A
Developertable with two fields: a field in liaison with theSupervisortable and a field that links to theApp_usertable
Now that we have separated our two types of users, we will modify the relationship with App_user because only the developer will record his or her tasks. In the Tasks model, we have the following line:
app_user = models.ForeignKey(App_user, verbose_name="User")
This code is transformed as follows:
developer = models.ForeignKey(Developer, verbose_name="User")
For the generation of the database order to work, we must put models in the correct order. Indeed, if we define a relationship with a model that is not yet defined, Python will raise an exception. For the moment, the models will need to be defined in the order described. Later, we shall see how to work around this limitation.
In the next chapter, we will perform queries on the model. This requires the database to be synchronized with the models. We must first migrate South before starting the next chapter.
To perform the migration, we must use the commands we've seen at the beginning of the chapter. To simplify the migration, we can also create a batch file in the Python folder, where we will put the following lines:
manage.py schemamigration TasksManager --auto
manage.py migrate
pause
The following is a bash script you can create in the Work_manager folder that can perform the same thing on Debian Linux:
#!/bin/bash
manage.py runserver 127.0.0.1:8000
This way, when you migrate South, it will execute this file. The pause command allows you to look at the results or errors displayed without closing the window.
The administration module is very convenient and is included by default with Django. It is a module that will maintain the content of the database without difficulty. This is not a database manager because it cannot maintain the structure of the database.
One question that you may ask is, "what does it have other than a management tool database?". The answer is that the administration module is fully integrated with Django and uses these models.
The following are its advantages:
- It manages the relationships between models. This means that if we want to save a new developer, the module will propose a list of all the supervisors. In this way, it will not create a non-existent relationship.
- It manages Django permissions. You can set permissions for users according to models and CRUD operations.
- It is quickly established.
Being based on Django models and not on the database, this module allows the user to edit the recorded data.
To implement the administration module, edit the settings.py file. In the INSTALLED_APPS setting, you need to add or uncomment the following line:
'django.contrib.admin'
You also have to edit the urls.py file by adding or uncommenting the following lines:
from django.contrib import admin
admin.autodiscover()
url (r'^admin', include(admin.site.urls)),
The line that imports the administration module has to be at the beginning of the file with other imports. The line that runs the autodiscover() method must be found after the imports and before the urlpatterns definition. Finally, the last line is a URL that should be in urlpatterns.
We also have to create an admin.py file in the TasksManager folder in which we will define the styles we want to integrate into the management module:
from django.contrib import admin
from TasksManager.models import UserProfile, Project, Task , Supervisor , Developer
admin.site.register(UserProfile)
admin.site.register(Project)
admin.site.register(Task)
admin.site.register(Supervisor)
admin.site.register(Developer)
Now that we have configured the administration module, we can easily manage our data.
To use the administration module, we must connect to the URL that we have just defined: http://localhost:8000/admin/.
We must connect with the logins defined when creating the database:
- Once we are connected, the model list appears.
- If we click on the Supervisor model link, we arrive at a page where we can add a supervisor by using the button at the top-right corner of the window:
- By clicking on this button, we load a page consisting of a form. This form automatically provides practical tools to manage dates and times:
Let's add a new supervisor and then add a developer. When you want to choose the supervisor, you can see the one we have just created in a combobox. The green cross on the right-hand side allows you to quickly create a supervisor.
In the following chapter, we will define the str method for our models. This will improve the display lists of objects in this management module.
Installing the module
To implement the administration module, edit the settings.py file. In the INSTALLED_APPS setting, you need to add or uncomment the following line:
'django.contrib.admin'
You also have to edit the urls.py file by adding or uncommenting the following lines:
from django.contrib import admin
admin.autodiscover()
url (r'^admin', include(admin.site.urls)),
The line that imports the administration module has to be at the beginning of the file with other imports. The line that runs the autodiscover() method must be found after the imports and before the urlpatterns definition. Finally, the last line is a URL that should be in urlpatterns.
We also have to create an admin.py file in the TasksManager folder in which we will define the styles we want to integrate into the management module:
from django.contrib import admin
from TasksManager.models import UserProfile, Project, Task , Supervisor , Developer
admin.site.register(UserProfile)
admin.site.register(Project)
admin.site.register(Task)
admin.site.register(Supervisor)
admin.site.register(Developer)
Now that we have configured the administration module, we can easily manage our data.
To use the administration module, we must connect to the URL that we have just defined: http://localhost:8000/admin/.
We must connect with the logins defined when creating the database:
- Once we are connected, the model list appears.
- If we click on the Supervisor model link, we arrive at a page where we can add a supervisor by using the button at the top-right corner of the window:
- By clicking on this button, we load a page consisting of a form. This form automatically provides practical tools to manage dates and times:
Let's add a new supervisor and then add a developer. When you want to choose the supervisor, you can see the one we have just created in a combobox. The green cross on the right-hand side allows you to quickly create a supervisor.
In the following chapter, we will define the str method for our models. This will improve the display lists of objects in this management module.
Using the module
To use the administration module, we must connect to the URL that we have just defined: http://localhost:8000/admin/.
We must connect with the logins defined when creating the database:
- Once we are connected, the model list appears.
- If we click on the Supervisor model link, we arrive at a page where we can add a supervisor by using the button at the top-right corner of the window:
- By clicking on this button, we load a page consisting of a form. This form automatically provides practical tools to manage dates and times:
Let's add a new supervisor and then add a developer. When you want to choose the supervisor, you can see the one we have just created in a combobox. The green cross on the right-hand side allows you to quickly create a supervisor.
In the following chapter, we will define the str method for our models. This will improve the display lists of objects in this management module.
We studied the basics of the models that allow us to create simple applications. Sometimes, it is necessary to define more complex structures.
Sometimes, it is useful to store two foreign keys (or more) in a single model. For example, if we want two developers to work in parallel on the same task, we must use the related_name property in our models. For example, our Task model contains two relationships with the following lines:
developer1 = models.ForeignKey (Developer , verbose_name = "User" , related_name = "dev1" )
developer2 = models.ForeignKey (Developer , verbose_name = "User" , related_name = "dev2" )
Further in this book, we will not use these two relationships. To effectively follow this book, we must return to our previously defined Task model.
Note
Here, we define two developers on the same task. Best practices advise us to create a many-to-many relationship in the Task model. The thorough argument allows you to specify an intermediate table to store additional data. This is an optional step. An example of this type of relationship is as follows:
#Relationship to add to the Task model
developers = models.ManyToManyField(Developer , through="DeveloperWorkTask")
class DeveloperWorkTask(models.Model):
  developer = models.ForeignKey(Developer)
  task = models.ForeignKey(Task)
  time_elapsed_dev = models.IntegerField(verbose_name="Time elapsed", null=True, default=None, blank=True)
As already mentioned in the section on the use of the admin module, the __str__() method will allow a better view of our models. This method will set the string that will be used to display our model instance. When Django was not compatible with Python 3, this method was replaced by the __unicode__() method.
For example, when we added a developer, the drop-down list that defines a supervisor showed us the "Supervisor object" lines. It would be more helpful to display the name of the supervisor. In order to do this, change our App_user class and add the str() method:
class UserProfile ( models.Model ) :
# Fields...
def __str__ (self):
  return self.name
This method will return the name of the supervisor for the display and allows you to manage the administration easily:
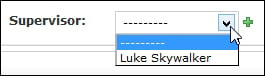
Using two relationships for the same model
Sometimes, it is useful to store two foreign keys (or more) in a single model. For example, if we want two developers to work in parallel on the same task, we must use the related_name property in our models. For example, our Task model contains two relationships with the following lines:
developer1 = models.ForeignKey (Developer , verbose_name = "User" , related_name = "dev1" )
developer2 = models.ForeignKey (Developer , verbose_name = "User" , related_name = "dev2" )
Further in this book, we will not use these two relationships. To effectively follow this book, we must return to our previously defined Task model.
Note
Here, we define two developers on the same task. Best practices advise us to create a many-to-many relationship in the Task model. The thorough argument allows you to specify an intermediate table to store additional data. This is an optional step. An example of this type of relationship is as follows:
#Relationship to add to the Task model
developers = models.ManyToManyField(Developer , through="DeveloperWorkTask")
class DeveloperWorkTask(models.Model):
  developer = models.ForeignKey(Developer)
  task = models.ForeignKey(Task)
  time_elapsed_dev = models.IntegerField(verbose_name="Time elapsed", null=True, default=None, blank=True)
As already mentioned in the section on the use of the admin module, the __str__() method will allow a better view of our models. This method will set the string that will be used to display our model instance. When Django was not compatible with Python 3, this method was replaced by the __unicode__() method.
For example, when we added a developer, the drop-down list that defines a supervisor showed us the "Supervisor object" lines. It would be more helpful to display the name of the supervisor. In order to do this, change our App_user class and add the str() method:
class UserProfile ( models.Model ) :
# Fields...
def __str__ (self):
  return self.name
This method will return the name of the supervisor for the display and allows you to manage the administration easily:
Defining the str method
As already mentioned in the section on the use of the admin module, the __str__() method will allow a better view of our models. This method will set the string that will be used to display our model instance. When Django was not compatible with Python 3, this method was replaced by the __unicode__() method.
For example, when we added a developer, the drop-down list that defines a supervisor showed us the "Supervisor object" lines. It would be more helpful to display the name of the supervisor. In order to do this, change our App_user class and add the str() method:
class UserProfile ( models.Model ) :
# Fields...
def __str__ (self):
  return self.name
This method will return the name of the supervisor for the display and allows you to manage the administration easily:
In this chapter, we learned migration with South. We also learned how to create simple models and relationships between the models. Furthermore, we learned how to install and use the admin module. In the next chapter, we will learn how to manipulate our data. We will learn how to use four main operations on the data: adding, reading (and research), modification, and deletion.
Querysets are used for data retrieval rather than for constructing SQL queries directly. They are part of the ORM used by Django. An ORM is used to link the view and controller by a layer of abstraction. In this way, the developer uses object model types without the need to write a SQL query. We will use querysets to retrieve the data we have stored in the database through models. These four operations are often summarized by CRUD (Create, Read, Update, and Delete).
The discussed examples in this chapter are intended to show you how the querysets work. The next chapter will show you how to use forms, and thus, how to save data sent from a client in the models.
By the end of this chapter, we will know how to:
- Save data in the database
- Retrieve data from the database
- Update data from the database
Data storage is simple with Django. We just need to fill the data in the models, and use methods to store them in a database. Django handles all the SQL queries; the developer does not need to write any.
Before you can save data from a model instance to the database, we need to define all the values of the model's required fields. We can show the examples in our view index.
The following example shows how to save a model:
from TasksManager.models import Project # line 1
from django.shortcuts import render
def page(request):
  new_project = Project(title="Tasks Manager with Django", description="Django project to getting start with Django easily.", client_name="Me") # line 2
  new_project.save() # line 3
  return render(request, 'en/public/index.html', {'action':'Save datas of model'})
We will explain the new lines of our view:
- We import our
models.pyfile; it's the model that we will use in the view - We then create an instance of our
Projectmodel and fill it with data - Finally, we execute the
save()method that saves the present data in the instance
We will test this code by starting the development server (or runserver) and then go to our URL. In the render() method, the value that we defined in the action variable is displayed. To check if the query is executed, we can use the administration module. There is also the software for managing databases.
We need to add more records by changing the values randomly in line 2. To find out how to do this, we'll need to read this chapter.
Before using Django to retrieve data from a database, we were using SQL queries to retrieve an object containing the result. With Django, there are two ways to retrieve records from the database depending on whether we want to get back one or several records.
To retrieve records from a model, we must first import the model into the view as we have done before to save the data in a model.
We can retrieve and display all the records in the Project model as follows:
from TasksManager.models import Project
from django.shortcuts import render
def page(request):
  all_projects = Project.objects.all()
  return render(request, 'en/public/index.html', {'action': "Display all project", 'all_projects': all_projects})
The code template that displays the projects becomes:
{% extends "base.html" %}
{% block title_html %}
  Projects list
{% endblock %}
{% block h1 %}
  Projects list
{% endblock %}
{% block article_content %}
  <h3>{{ action }}</h3>
  {% if all_projects|length > 0 %}
  <table>
    <thead>
      <tr>
        <td>ID</td>
        <td>Title</td>
      </tr>
    </thead>
    <tbody>
    {% for project in all_projects %}
      <tr>
        <td>{{ project.id }}</td>
        <td>{{ project.title }}</td>
      </tr>
    {% endfor %}
    </tbody>
  </table>
  {% else %}
  <span>No project.</span>
  {% endif %}
{% endblock %}
The all() method can be linked to a SQL SELECT * FROM query. Now, we will use the filter() method to filter our results and make the equivalent of a SELECT * FROM Project WHERE field = value query.
The following is the code to filter model records:
from TasksManager.models import Project
from django.shortcuts import render
def page(request):
  action='Display project with client name = "Me"'
  projects_to_me = Project.objects.filter(client_name="Me")
  return render(request, 'en/public/index.html', locals())
We used a new syntax to send the variables to the template. The locals() function sends all the local variables to the template, which simplifies the render line.
Each argument from the filter() method defines a filter for the query. Indeed, if we wanted to make two filters, we would have written the following line of code:
projects_to_me = Project.objects.filter(client_name="Me", title="Project test")
This line is equivalent to the following:
projects_to_me = Project.objects.filter(client_name="Me")
projects_to_me = projects_to_me.filter(title="Project test")
The first line can be broken into two, because the querysets are chainable. Chainable methods are methods that return a queryset such that other queryset methods can be used.
The response obtained with the all() and filter() methods is of the queryset type. A queryset is a collection of model instances that can be iterated over.
The methods that we will see in this chapter return objects of the Model type, which will be used to record relationships or to modify the instance of the model recovered.
To retrieve a single record with a queryset, we should use the get() method as in the following line:
first_project = Project.objects.get(id="1")
The get() method when used as the filter() method accepts filter arguments. However, you should be careful with setting the filters that retrieve a single record.
If the argument to get() is client_name = "Me", it would generate an error if we had more than two records corresponding to client_name.
We said that only the get() method makes it possible to retrieve an instance of a model. This is true, but sometimes it can be useful to retrieve an instance of a model from a queryset.
For example, if we want to get the first record of the customer Me, we will write:
queryset_project = Project.objects.filter(client_name="Me").order_by("id")
# This line returns a queryset in which there are as many elements as there are projects for the Me customer

first_item_queryset = queryset_project[:1]
# This line sends us only the first element of this queryset, but this element is not an instance of a model

project = first_item_queryset.get()
# This line retrieves the instance of the model that corresponds to the first element of queryset
These methods are chainable, so we can write the following line instead of the previous three lines:
project = Project.objects.filter(client_name="Me").order_by("id")[:1].get()Getting multiple records
To retrieve records from a model, we must first import the model into the view as we have done before to save the data in a model.
We can retrieve and display all the records in the Project model as follows:
from TasksManager.models import Project
from django.shortcuts import render
def page(request):
  all_projects = Project.objects.all()
  return render(request, 'en/public/index.html', {'action': "Display all project", 'all_projects': all_projects})
The code template that displays the projects becomes:
{% extends "base.html" %}
{% block title_html %}
  Projects list
{% endblock %}
{% block h1 %}
  Projects list
{% endblock %}
{% block article_content %}
  <h3>{{ action }}</h3>
  {% if all_projects|length > 0 %}
  <table>
    <thead>
      <tr>
        <td>ID</td>
        <td>Title</td>
      </tr>
    </thead>
    <tbody>
    {% for project in all_projects %}
      <tr>
        <td>{{ project.id }}</td>
        <td>{{ project.title }}</td>
      </tr>
    {% endfor %}
    </tbody>
  </table>
  {% else %}
  <span>No project.</span>
  {% endif %}
{% endblock %}
The all() method can be linked to a SQL SELECT * FROM query. Now, we will use the filter() method to filter our results and make the equivalent of a SELECT * FROM Project WHERE field = value query.
The following is the code to filter model records:
from TasksManager.models import Project
from django.shortcuts import render
def page(request):
  action='Display project with client name = "Me"'
  projects_to_me = Project.objects.filter(client_name="Me")
  return render(request, 'en/public/index.html', locals())
We used a new syntax to send the variables to the template. The locals() function sends all the local variables to the template, which simplifies the render line.
Each argument from the filter() method defines a filter for the query. Indeed, if we wanted to make two filters, we would have written the following line of code:
projects_to_me = Project.objects.filter(client_name="Me", title="Project test")
This line is equivalent to the following:
projects_to_me = Project.objects.filter(client_name="Me")
projects_to_me = projects_to_me.filter(title="Project test")
The first line can be broken into two, because the querysets are chainable. Chainable methods are methods that return a queryset such that other queryset methods can be used.
The response obtained with the all() and filter() methods is of the queryset type. A queryset is a collection of model instances that can be iterated over.
The methods that we will see in this chapter return objects of the Model type, which will be used to record relationships or to modify the instance of the model recovered.
To retrieve a single record with a queryset, we should use the get() method as in the following line:
first_project = Project.objects.get(id="1")
The get() method when used as the filter() method accepts filter arguments. However, you should be careful with setting the filters that retrieve a single record.
If the argument to get() is client_name = "Me", it would generate an error if we had more than two records corresponding to client_name.
We said that only the get() method makes it possible to retrieve an instance of a model. This is true, but sometimes it can be useful to retrieve an instance of a model from a queryset.
For example, if we want to get the first record of the customer Me, we will write:
queryset_project = Project.objects.filter(client_name="Me").order_by("id")
# This line returns a queryset in which there are as many elements as there are projects for the Me customer

first_item_queryset = queryset_project[:1]
# This line sends us only the first element of this queryset, but this element is not an instance of a model

project = first_item_queryset.get()
# This line retrieves the instance of the model that corresponds to the first element of queryset
These methods are chainable, so we can write the following line instead of the previous three lines:
project = Project.objects.filter(client_name="Me").order_by("id")[:1].get()Getting only one record
The methods that we will see in this chapter return objects of the Model type, which will be used to record relationships or to modify the instance of the model recovered.
To retrieve a single record with a queryset, we should use the get() method as in the following line:
first_project = Project.objects.get(id="1")
The get() method when used as the filter() method accepts filter arguments. However, you should be careful with setting the filters that retrieve a single record.
If the argument to get() is client_name = "Me", it would generate an error if we had more than two records corresponding to client_name.
We said that only the get() method makes it possible to retrieve an instance of a model. This is true, but sometimes it can be useful to retrieve an instance of a model from a queryset.
For example, if we want to get the first record of the customer Me, we will write:
queryset_project = Project.objects.filter(client_name="Me").order_by("id")
# This line returns a queryset in which there are as many elements as there are projects for the Me customer

first_item_queryset = queryset_project[:1]
# This line sends us only the first element of this queryset, but this element is not an instance of a model

project = first_item_queryset.get()
# This line retrieves the instance of the model that corresponds to the first element of queryset
These methods are chainable, so we can write the following line instead of the previous three lines:
project = Project.objects.filter(client_name="Me").order_by("id")[:1].get()Getting a model instance from the queryset instance
We said that only the get() method makes it possible to retrieve an instance of a model. This is true, but sometimes it can be useful to retrieve an instance of a model from a queryset.
For example, if we want to get the first record of the customer Me, we will write:
queryset_project = Project.objects.filter(client_name="Me").order_by("id")
# This line returns a queryset in which there are as many elements as there are projects for the Me customer

first_item_queryset = queryset_project[:1]
# This line sends us only the first element of this queryset, but this element is not an instance of a model

project = first_item_queryset.get()
# This line retrieves the instance of the model that corresponds to the first element of queryset
These methods are chainable, so we can write the following line instead of the previous three lines:
project = Project.objects.filter(client_name="Me").order_by("id")[:1].get()Now that we have learned how to retrieve a record and we know how to use a URL, we will create a page that will allow us to display the record of a project. To do this, we will see a new URL syntax:
url(r'^project-detail-(?P<pk>\d+)$', 'TasksManager.views.project_detail.page', name="project_detail"),
This URL contains a new string, (?P<pk>\d+). It allows the URL with a decimal parameter to be valid because it ends with \d. The + character at the end means that the parameter is not optional. The <pk> string means that the parameter's name is pk.
The system routing Django will directly send this parameter to our view. To use it, simply add it to the parameters of our page() function. Our view changes to the following:
from TasksManager.models import Project
from django.shortcuts import render
def page(request, pk):
  project = Project.objects.get(id=pk)
  return render(request, 'en/public/project_detail.html', {'project' : project})
We will then create our en/public/project_detail.html template extended from base.html with the following code in the article_content block:
<h3>{{ project.title }}</h3>
<h4>Client : {{ project.client_name }}</h4>
<p>
  {{ project.description }}
</p>
We have just written our first URL containing a parameter. We will use this later, especially in the chapter about the class-based views.
We have already recorded data from a model, but so far, we have never recorded it in the relationship database. The following is an example of recording a relationship that we will explain later in the chapter:
from TasksManager.models import Project, Task, Supervisor, Developer
from django.shortcuts import render
from django.utils import timezone
def page(request):
  # Saving a new supervisor
  new_supervisor = Supervisor(name="Guido van Rossum", login="python", password="password", last_connection=timezone.now(), email="python@python.com", specialisation="Python") # line 1
  new_supervisor.save()
  # Saving a new developer
  new_developer = Developer(name="Me", login="me", password="pass", last_connection=timezone.now(), email="me@python.com", supervisor=new_supervisor)
  new_developer.save()
  # Saving a new task
  project_to_link = Project.objects.get(id = 1) # line 2
  new_task = Task(title="Adding relation", description="Example of adding relation and save it", time_elapsed=2, importance=0, project=project_to_link, developer=new_developer) # line 3
  new_task.save()
  return render(request, 'en/public/index.html', {'action' : 'Save relationship'})
In this example, we have loaded four models. These four models are used to create our first task. Indeed, a spot is related to a project and developer. A developer is attached to a supervisor.
Following this architecture, we must first create a supervisor to add a developer. The following list explains this:
- We create a new supervisor. Note that the extending model requires no additional step for recording. In the
Supervisormodel, we define the fields of theApp_usermodel without any difficulties. Here, we usetimezoneto record the current day's date. - We look for the first recorded project. The result of this line will record a legacy of the
Modelclass instance in theproject_to_linkvariable. Only theget()method gives the instance of a model. Therefore, we must not use thefilter()method. - We create a new task, and attribute the project created in the beginning of the code and the developer that we just recorded.
This example is very comprehensive, and it combines many elements that we have studied from the beginning. We must understand it in order to continue programming in Django.
There are two mechanisms to update data in Django. Indeed, there is a mechanism to update one record and another mechanism to update multiple records.
Updating the existing data is very simple. We have already seen what it takes to be able to do so. The following is an example where it modifies the first task:
from TasksManager.models import Project, Task
from django.shortcuts import render
def page(request):
  new_project = Project(title = "Other project", description="Try to update models.", client_name="People")
  new_project.save()
  task = Task.objects.get(id = 1)
  task.description = "New description"
  task.project = new_project
  task.save()
  return render(request, 'en/public/index.html', {'action' : 'Update model'})
In this example, we created a new project and saved it. We searched our task for id = 1. We changed the description and project to the task it is attached to. Finally, we saved this task.
To edit multiple records in one shot, you must use the update() method with a queryset object type. For example, our People customer is bought by a company named Nobody, so we need to change all the projects where the client_name property is equal to People:
from TasksManager.models import Project
from django.shortcuts import render
def page(request):
  task = Project.objects.filter(client_name = "people").update(client_name="Nobody")
  return render(request, 'en/public/index.html', {'action' : 'Update for many model'})
The update() method of a queryset can change all the records related to this queryset. This method cannot be used on an instance of a model.
Updating a model instance
Updating the existing data is very simple. We have already seen what it takes to be able to do so. The following is an example where it modifies the first task:
from TasksManager.models import Project, Task
from django.shortcuts import render
def page(request):
  new_project = Project(title = "Other project", description="Try to update models.", client_name="People")
  new_project.save()
  task = Task.objects.get(id = 1)
  task.description = "New description"
  task.project = new_project
  task.save()
  return render(request, 'en/public/index.html', {'action' : 'Update model'})
In this example, we created a new project and saved it. We searched our task for id = 1. We changed the description and project to the task it is attached to. Finally, we saved this task.
To edit multiple records in one shot, you must use the update() method with a queryset object type. For example, our People customer is bought by a company named Nobody, so we need to change all the projects where the client_name property is equal to People:
from TasksManager.models import Project
from django.shortcuts import render
def page(request):
  task = Project.objects.filter(client_name = "people").update(client_name="Nobody")
  return render(request, 'en/public/index.html', {'action' : 'Update for many model'})
The update() method of a queryset can change all the records related to this queryset. This method cannot be used on an instance of a model.
Updating multiple records
To edit multiple records in one shot, you must use the update() method with a queryset object type. For example, our People customer is bought by a company named Nobody, so we need to change all the projects where the client_name property is equal to People:
from TasksManager.models import Project
from django.shortcuts import render
def page(request):
  task = Project.objects.filter(client_name = "people").update(client_name="Nobody")
  return render(request, 'en/public/index.html', {'action' : 'Update for many model'})
The update() method of a queryset can change all the records related to this queryset. This method cannot be used on an instance of a model.
To delete a record in the database, we must use the delete() method. Removing items is easier than changing items, because the method is the same for a queryset as for the instances of models. An example of this is as follows:
from TasksManager.models import Task
from django.shortcuts import render
def page(request):
  one_task = Task.objects.get(id = 1)
  one_task.delete() # line 1
  all_tasks = Task.objects.all()
  all_tasks.delete() # line 2
  return render(request, 'en/public/index.html', {'action' : 'Delete tasks'})
In this example, line 1 removes the stain with id = 1. Then, line 2 removes all the present tasks in the database.
Be careful because even if we use a web framework, we keep hold of the data. No confirmation will be required in this example, and no backup has been made. By default, the rule for model deletion with ForeignKey is the CASCADE value. This rule means that if we remove a template instance, the records with a foreign key to this model will also be deleted.
We now know how to create, read, update, and delete the present records in the database, but we haven't recovered the related objects. In our TasksManager application, it would be interesting to retrieve all the tasks in a project. For example, as we have just deleted all the present tasks in the database, we need to create others. We especially have to create tasks in the project database for the rest of this chapter.
With Python and its comprehensive implementation of the object-oriented model, accessing the related models is intuitive. For example, we will retrieve all the project tasks when login = 1:
from TasksManager.models import Task, Project
from django.shortcuts import render
def page(request):
  project = Project.objects.get(id = 1)
  tasks = Task.objects.filter(project = project)
  return render(request, 'en/public/index.html', {'action' : 'Tasks for project', 'tasks':tasks})
We will now look for the project task when id = 1:
from TasksManager.models import Task, Project
from django.shortcuts import render
def page(request):
  task = Task.objects.get(id = 1)
  project = task.project
  return render(request, 'en/public/index.html', {'action' : 'Project for task', 'project':project})
We will now use the relationship to access the project task.
We studied the basics of querysets that allow you to interact with the data. In specific cases, it is necessary to perform more complex actions on the data.
In queryset filters, we use a comma to separate filters. This point implicitly means a logical operator AND. When applying an OR operator, we are forced to use the Q object.
This Q object allows you to set complex queries on models. For example, to select the projects of the customers Me and Nobody, we must add the following lines in our view:
from TasksManager.models import Task, Project
from django.shortcuts import render
from django.db.models import Q
def page(request):
  projects_list = Project.objects.filter(Q(client_name="Me") | Q(client_name="Nobody"))
return render(request, 'en/public/index.html', {'action' : 'Project with OR operator', 'projects_list':projects_list})With the Django queryset, we cannot use the < and > operators to check whether a parameter is greater than or less than another.
You must use the following field lookups:
For example, we will write the queryset that can return all the tasks with a duration of greater than or equal to four hours:
tasks_list = Task.objects.filter(time_elapsed__gte=4)
The exclude queries can be useful in the context of a website. For example, we want to get the list of projects that do not last for more than four hours:
from TasksManager.models import Task, Project
from django.shortcuts import renderdef page(request):
  tasks_list = Task.objects.filter(time_elapsed__gt=4)
  array_projects = tasks_list.values_list('project', flat=True).distinct()
  projects_list = Project.objects.all()
  projects_list_lt4 = projects_list.exclude(id__in=array_projects)
  return render(request, 'en/public/index.html', {'action' : 'NOT IN SQL equivalent', 'projects_list_lt4':projects_list_lt4})
The following is an explanation of the code snippet:
- In the first queryset, we first retrieve the list of all the tasks for which
time_elapsedis greater than4 - In the second queryset, we got the list of all the related projects in these tasks
- In the third queryset, we got all the projects
- In the fourth queryset, we excluded all the projects with tasks that last for more than
4hours
Sometimes, developers may need to perform raw SQL queries. For this, we can use the raw() method, defining the SQL query as an argument. The following is an example that retrieves the first task:
first_task = Project.objects.raw("SELECT * FROM TasksManager_project")[0]To access the name of the first task, just use the following syntax:
first_task.title
Using an OR operator in a queryset
In queryset filters, we use a comma to separate filters. This point implicitly means a logical operator AND. When applying an OR operator, we are forced to use the Q object.
This Q object allows you to set complex queries on models. For example, to select the projects of the customers Me and Nobody, we must add the following lines in our view:
from TasksManager.models import Task, Project
from django.shortcuts import render
from django.db.models import Q
def page(request):
  projects_list = Project.objects.filter(Q(client_name="Me") | Q(client_name="Nobody"))
return render(request, 'en/public/index.html', {'action' : 'Project with OR operator', 'projects_list':projects_list})With the Django queryset, we cannot use the < and > operators to check whether a parameter is greater than or less than another.
You must use the following field lookups:
For example, we will write the queryset that can return all the tasks with a duration of greater than or equal to four hours:
tasks_list = Task.objects.filter(time_elapsed__gte=4)
The exclude queries can be useful in the context of a website. For example, we want to get the list of projects that do not last for more than four hours:
from TasksManager.models import Task, Project
from django.shortcuts import renderdef page(request):
  tasks_list = Task.objects.filter(time_elapsed__gt=4)
  array_projects = tasks_list.values_list('project', flat=True).distinct()
  projects_list = Project.objects.all()
  projects_list_lt4 = projects_list.exclude(id__in=array_projects)
  return render(request, 'en/public/index.html', {'action' : 'NOT IN SQL equivalent', 'projects_list_lt4':projects_list_lt4})
The following is an explanation of the code snippet:
- In the first queryset, we first retrieve the list of all the tasks for which
time_elapsedis greater than4 - In the second queryset, we got the list of all the related projects in these tasks
- In the third queryset, we got all the projects
- In the fourth queryset, we excluded all the projects with tasks that last for more than
4hours
Sometimes, developers may need to perform raw SQL queries. For this, we can use the raw() method, defining the SQL query as an argument. The following is an example that retrieves the first task:
first_task = Project.objects.raw("SELECT * FROM TasksManager_project")[0]To access the name of the first task, just use the following syntax:
first_task.title
Using the lower and greater than lookups
With the Django queryset, we cannot use the < and > operators to check whether a parameter is greater than or less than another.
You must use the following field lookups:
For example, we will write the queryset that can return all the tasks with a duration of greater than or equal to four hours:
tasks_list = Task.objects.filter(time_elapsed__gte=4)
The exclude queries can be useful in the context of a website. For example, we want to get the list of projects that do not last for more than four hours:
from TasksManager.models import Task, Project
from django.shortcuts import renderdef page(request):
  tasks_list = Task.objects.filter(time_elapsed__gt=4)
  array_projects = tasks_list.values_list('project', flat=True).distinct()
  projects_list = Project.objects.all()
  projects_list_lt4 = projects_list.exclude(id__in=array_projects)
  return render(request, 'en/public/index.html', {'action' : 'NOT IN SQL equivalent', 'projects_list_lt4':projects_list_lt4})
The following is an explanation of the code snippet:
- In the first queryset, we first retrieve the list of all the tasks for which
time_elapsedis greater than4 - In the second queryset, we got the list of all the related projects in these tasks
- In the third queryset, we got all the projects
- In the fourth queryset, we excluded all the projects with tasks that last for more than
4hours
Sometimes, developers may need to perform raw SQL queries. For this, we can use the raw() method, defining the SQL query as an argument. The following is an example that retrieves the first task:
first_task = Project.objects.raw("SELECT * FROM TasksManager_project")[0]To access the name of the first task, just use the following syntax:
first_task.title
Performing an exclude query
The exclude queries can be useful in the context of a website. For example, we want to get the list of projects that do not last for more than four hours:
from TasksManager.models import Task, Project
from django.shortcuts import renderdef page(request):
  tasks_list = Task.objects.filter(time_elapsed__gt=4)
  array_projects = tasks_list.values_list('project', flat=True).distinct()
  projects_list = Project.objects.all()
  projects_list_lt4 = projects_list.exclude(id__in=array_projects)
  return render(request, 'en/public/index.html', {'action' : 'NOT IN SQL equivalent', 'projects_list_lt4':projects_list_lt4})
The following is an explanation of the code snippet:
- In the first queryset, we first retrieve the list of all the tasks for which
time_elapsedis greater than4 - In the second queryset, we got the list of all the related projects in these tasks
- In the third queryset, we got all the projects
- In the fourth queryset, we excluded all the projects with tasks that last for more than
4hours
Sometimes, developers may need to perform raw SQL queries. For this, we can use the raw() method, defining the SQL query as an argument. The following is an example that retrieves the first task:
first_task = Project.objects.raw("SELECT * FROM TasksManager_project")[0]To access the name of the first task, just use the following syntax:
first_task.title
Making a raw SQL query
Sometimes, developers may need to perform raw SQL queries. For this, we can use the raw() method, defining the SQL query as an argument. The following is an example that retrieves the first task:
first_task = Project.objects.raw("SELECT * FROM TasksManager_project")[0]To access the name of the first task, just use the following syntax:
first_task.title
We all know about HTML forms. This is a <form> tag that contains the <input> and <select> tags. The user can fill in or edit these items and return them to the server. This is the preferred way to store data provided by the client. Frameworks such as Django seized the HTML form to make it better.
A Django form is inherited from the Form class object. It is an object in which we will set properties. These properties will be the fields in the form, and we will define their type.
In this chapter, we will learn how to do the following:
- Create an HTML form
- Handle the data sent by a form
- Create a Django form
- Validate and manipulate data sent from a Django form
- Create forms based on models
- Customize error messages and use widgets
The advantages of Django forms are as follows:
- Protection against CSRF vulnerabilities can be easily implemented. We'll talk about CSRF vulnerabilities thereafter.
- Data validation is automatic.
- Forms are easily customizable.
But the best way to compare a standard HTML form and a Django form is to practice it with an example: the form to add a developer.
In this section, we will show you how to add a developer without using Django forms. This example will show the time that can be saved by using Django.
Add the following URL to your urls.py file:
url(r'^create-developer$', 'TasksManager.views.create_developer.page', name="create_developer"),
We will create a template before the view. Indeed, we are going to fill the view with the template that contains the form. We do not put all the fields in the model because the code is too long. It is better to learn using shorter code. The following is our template in template/en/public/create_developer.html:
{% extends "base.html" %}
{% block title_html %}
  Create Developer
{% endblock %}
{% block h1 %}
  Create Developer
{% endblock %}
{% block article_content %}
  <form method="post" action="{% url "create_developer" %}" >
    <table>
      <tr>
        <td>Name</td>
        <td>
          <input type="text" name="name" />
        </td>
      </tr>
      <tr>
        <td>Login</td>
        <td>
          <input type="text" name="login" />
        </td>
      </tr>
      <tr>
        <td>Password</td>
        <td>
          <input type="text" name="password" />
        </td>
      </tr>
      <tr>
        <td>Supervisor</td>
        <td>
          <select name="supervisor">
            {% for supervisor in supervisors_list %}
              <option value="{{ supervisor.id }}">{{ supervisor.name }}</option>
            {% endfor %}
          </select>
        </td>
      </tr>
      <tr>
        <td></td>
        <td>
          <input type="submit" value="Valid" />
          </td>
      </tr>
    </table>
  </form>
{% endblock %}
Note that the template is impressive and yet it is a minimalist form.
The following screenshot shows the web page that we will create:
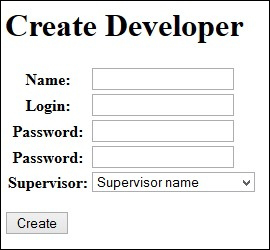
The view that will process this form will be as follows. Save the view in the file views/create_developer.py:
from django.shortcuts import render
from django.http import HttpResponse
from TasksManager.models import Supervisor, Developer
# View for create_developer
def page(request):
  error = False
  # If form has posted
  if request.POST:
  # This line checks if the data was sent in POST. If so, this means that the form has been submitted and we should treat it.
    if 'name' in request.POST:
    # This line checks whether a given data named name exists in the POST variables.
      name = request.POST.get('name', '')
      # This line is used to retrieve the value in the POST dictionary. Normally, we perform filters to recover the data to avoid false data, but it would have required many lines of code.
    else:
      error=True
    if 'login' in request.POST:
      login = request.POST.get('login', '')
    else:
      error=True
    if 'password' in request.POST:
      password = request.POST.get('password', '')
    else:
      error=True
    if 'supervisor' in request.POST:
      supervisor_id = request.POST.get('supervisor', '')
    else:
      error=True
    if not error:
      # We must get the supervisor
      supervisor = Supervisor.objects.get(id = supervisor_id)
      new_dev = Developer(name=name, login=login, password=password, supervisor=supervisor)
      new_dev.save()
      return HttpResponse("Developer added")
    else:
      return HttpResponse("An error has occured")
  else:
      supervisors_list = Supervisor.objects.all()
      return render(request, 'en/public/create_developer.html',
      'supervisors_list':supervisors_list})
In this view, we haven't even checked whether the supervisor exists. Even if the code is functional, note that it requires a lot of lines and we haven't verified the contents of the transmitted data.
We used the HttpResponse() method so that we do not have to create additional templates. We also have no details about client errors when a field is entered incorrectly.
If you want to verify whether your code works properly, do not forget to check the data in the administration module.
To try this form, you can add the following line in the block article_content of the index.html file:
<a href="{% url "create_developer" %}">Create developer</a>Django forms work with an object that inherits from the Form class. This object will handle much of the work we have done manually in the previous example.
When displaying the form, it will generate the contents of the form template. We may change the type of field that the object sends to the template if needed.
While receiving the data, the object will check the contents of each form element. If there is an error, the object will send a clear error to the client. If there is no error, we are certain that the form data is correct.
Cross-Site Request Forgery (CSRF) is an attack that targets a user who is loading a page that contains a malicious request. The malicious script uses the authentication of the victim to perform unwanted actions, such as changing data or access to sensitive data.
The following steps are executed during a CSRF attack:
- Script injection by the attacker.
- An HTTP query is performed to get a web page.
- Downloading the web page that contains the malicious script.
- Malicious script execution.
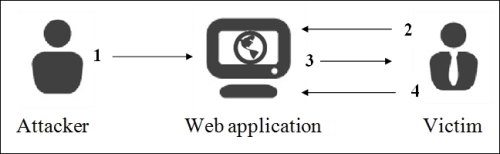
In this kind of attack, the hacker can also modify information that may be critical for the users of the website. Therefore, it is important for a web developer to know how to protect their site from this kind of attack, and Django will help with this.
To re-enable CSRF protection, we must edit the settings.py file and uncomment the following line:
'django.middleware.csrf.CsrfViewMiddleware',
This protection ensures that the data that has been sent is really sent from a specific property page. You can check this in two easy steps:
- When creating an HTML or Django form, we insert a CSRF token that will store the server. When the form is sent, the CSRF token will be sent too.
- When the server receives the request from the client, it will check the CSRF token. If it is valid, it validates the request.
Do not forget to add the CSRF token in all the forms of the site where protection is enabled. HTML forms are also involved, and the one we have just made does not include the token. For the previous form to work with CSRF protection, we need to add the following line in the form of tags and <form> </form>:
{% csrf_token %}We will first write the view that contains the form because the template will display the form defined in the view. Django forms can be stored in other files as forms.py at the root of the project file. We include them directly in our view because the form will only be used on this page. Depending on the project, you must choose which architecture suits you best. We will create our view in the views/create_developer.py file with the following lines:
from django.shortcuts import render
from django.http import HttpResponse
from TasksManager.models import Supervisor, Developer
from django import forms
# This line imports the Django forms package
class Form_inscription(forms.Form):
# This line creates the form with four fields. It is an object that inherits from forms.Form. It contains attributes that define the form fields.
  name = forms.CharField(label="Name", max_length=30)
  login      = forms.CharField(label="Login", max_length=30)
  password   = forms.CharField(label="Password", widget=forms.PasswordInput)
  supervisor = forms.ModelChoiceField(label="Supervisor", queryset=Supervisor.objects.all())
# View for create_developer
def page(request):
  if request.POST:
    form = Form_inscription(request.POST)
    # If the form has been posted, we create the variable that will contain our form filled with data sent by POST form.
    if form.is_valid():
    # This line checks that the data sent by the user is consistent with the field that has been defined in the form.
      name          = form.cleaned_data['name']
    # This line is used to retrieve the value sent by the client. The collected data is filtered by the clean() method that we will see later. This way to recover data provides secure data.
      login         = form.cleaned_data['login']
      password      = form.cleaned_data['password']
      supervisor    = form.cleaned_data['supervisor']
      # In this line, the supervisor variable is of the Supervisor type, that is to say that the returned data by the cleaned_data dictionary will directly be a model.
      new_developer = Developer(name=name, login=login, password=password, email="", supervisor=supervisor)
      new_developer.save()
      return HttpResponse("Developer added")
    else:
      return render(request, 'en/public/create_developer.html', {'form' : form})
      # To send forms to the template, just send it like any other variable. We send it in case the form is not valid in order to display user errors:
    else:
    form = Form_inscription()
    # In this case, the user does not yet display the form, it instantiates with no data inside.
    return render(request, 'en/public/create_developer.html', {'form' : form})
This screenshot shows the display of the form with the display of an error message:
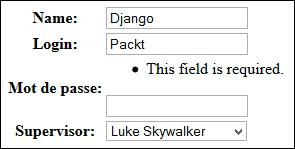
We set the template for this view. The template will be much shorter:
{% extends "base.html" %}
{% block title_html %}
  Create Developer
{% endblock %}
{% block h1 %}
  Create Developer
{% endblock %}
{% block article_content %}
  <form method="post" action="{% url "create_developer" %}" >
    {% csrf_token %}
    <!-- This line inserts a CSRF token. -->
    <table>
      {{ form.as_table }}
    <!-- This line displays lines of the form.-->
    </table>
    <p><input type="submit" value="Create" /></p>
  </form>
{% endblock %}
As the complete form operation is in the view, the template simply executes the as_table() method to generate the HTML form.
The previous code displays data in tabular form. The three methods to generate an HTML form structure are as follows:
So, we quickly wrote a secure form with error handling and CSRF protection through Django forms. In the Appendix, Cheatsheet, you can find the different possible fields in a form.
CSRF protection
Cross-Site Request Forgery (CSRF) is an attack that targets a user who is loading a page that contains a malicious request. The malicious script uses the authentication of the victim to perform unwanted actions, such as changing data or access to sensitive data.
The following steps are executed during a CSRF attack:
- Script injection by the attacker.
- An HTTP query is performed to get a web page.
- Downloading the web page that contains the malicious script.
- Malicious script execution.
In this kind of attack, the hacker can also modify information that may be critical for the users of the website. Therefore, it is important for a web developer to know how to protect their site from this kind of attack, and Django will help with this.
To re-enable CSRF protection, we must edit the settings.py file and uncomment the following line:
'django.middleware.csrf.CsrfViewMiddleware',
This protection ensures that the data that has been sent is really sent from a specific property page. You can check this in two easy steps:
- When creating an HTML or Django form, we insert a CSRF token that will store the server. When the form is sent, the CSRF token will be sent too.
- When the server receives the request from the client, it will check the CSRF token. If it is valid, it validates the request.
Do not forget to add the CSRF token in all the forms of the site where protection is enabled. HTML forms are also involved, and the one we have just made does not include the token. For the previous form to work with CSRF protection, we need to add the following line in the form of tags and <form> </form>:
{% csrf_token %}We will first write the view that contains the form because the template will display the form defined in the view. Django forms can be stored in other files as forms.py at the root of the project file. We include them directly in our view because the form will only be used on this page. Depending on the project, you must choose which architecture suits you best. We will create our view in the views/create_developer.py file with the following lines:
from django.shortcuts import render
from django.http import HttpResponse
from TasksManager.models import Supervisor, Developer
from django import forms
# This line imports the Django forms package
class Form_inscription(forms.Form):
# This line creates the form with four fields. It is an object that inherits from forms.Form. It contains attributes that define the form fields.
  name = forms.CharField(label="Name", max_length=30)
  login      = forms.CharField(label="Login", max_length=30)
  password   = forms.CharField(label="Password", widget=forms.PasswordInput)
  supervisor = forms.ModelChoiceField(label="Supervisor", queryset=Supervisor.objects.all())
# View for create_developer
def page(request):
  if request.POST:
    form = Form_inscription(request.POST)
    # If the form has been posted, we create the variable that will contain our form filled with data sent by POST form.
    if form.is_valid():
    # This line checks that the data sent by the user is consistent with the field that has been defined in the form.
      name          = form.cleaned_data['name']
    # This line is used to retrieve the value sent by the client. The collected data is filtered by the clean() method that we will see later. This way to recover data provides secure data.
      login         = form.cleaned_data['login']
      password      = form.cleaned_data['password']
      supervisor    = form.cleaned_data['supervisor']
      # In this line, the supervisor variable is of the Supervisor type, that is to say that the returned data by the cleaned_data dictionary will directly be a model.
      new_developer = Developer(name=name, login=login, password=password, email="", supervisor=supervisor)
      new_developer.save()
      return HttpResponse("Developer added")
    else:
      return render(request, 'en/public/create_developer.html', {'form' : form})
      # To send forms to the template, just send it like any other variable. We send it in case the form is not valid in order to display user errors:
    else:
    form = Form_inscription()
    # In this case, the user does not yet display the form, it instantiates with no data inside.
    return render(request, 'en/public/create_developer.html', {'form' : form})
This screenshot shows the display of the form with the display of an error message:
We set the template for this view. The template will be much shorter:
{% extends "base.html" %}
{% block title_html %}
  Create Developer
{% endblock %}
{% block h1 %}
  Create Developer
{% endblock %}
{% block article_content %}
  <form method="post" action="{% url "create_developer" %}" >
    {% csrf_token %}
    <!-- This line inserts a CSRF token. -->
    <table>
      {{ form.as_table }}
    <!-- This line displays lines of the form.-->
    </table>
    <p><input type="submit" value="Create" /></p>
  </form>
{% endblock %}
As the complete form operation is in the view, the template simply executes the as_table() method to generate the HTML form.
The previous code displays data in tabular form. The three methods to generate an HTML form structure are as follows:
So, we quickly wrote a secure form with error handling and CSRF protection through Django forms. In the Appendix, Cheatsheet, you can find the different possible fields in a form.
The view with a Django form
We will first write the view that contains the form because the template will display the form defined in the view. Django forms can be stored in other files as forms.py at the root of the project file. We include them directly in our view because the form will only be used on this page. Depending on the project, you must choose which architecture suits you best. We will create our view in the views/create_developer.py file with the following lines:
from django.shortcuts import render
from django.http import HttpResponse
from TasksManager.models import Supervisor, Developer
from django import forms
# This line imports the Django forms package
class Form_inscription(forms.Form):
# This line creates the form with four fields. It is an object that inherits from forms.Form. It contains attributes that define the form fields.
  name = forms.CharField(label="Name", max_length=30)
  login      = forms.CharField(label="Login", max_length=30)
  password   = forms.CharField(label="Password", widget=forms.PasswordInput)
  supervisor = forms.ModelChoiceField(label="Supervisor", queryset=Supervisor.objects.all())
# View for create_developer
def page(request):
  if request.POST:
    form = Form_inscription(request.POST)
    # If the form has been posted, we create the variable that will contain our form filled with data sent by POST form.
    if form.is_valid():
    # This line checks that the data sent by the user is consistent with the field that has been defined in the form.
      name          = form.cleaned_data['name']
    # This line is used to retrieve the value sent by the client. The collected data is filtered by the clean() method that we will see later. This way to recover data provides secure data.
      login         = form.cleaned_data['login']
      password      = form.cleaned_data['password']
      supervisor    = form.cleaned_data['supervisor']
      # In this line, the supervisor variable is of the Supervisor type, that is to say that the returned data by the cleaned_data dictionary will directly be a model.
      new_developer = Developer(name=name, login=login, password=password, email="", supervisor=supervisor)
      new_developer.save()
      return HttpResponse("Developer added")
    else:
      return render(request, 'en/public/create_developer.html', {'form' : form})
      # To send forms to the template, just send it like any other variable. We send it in case the form is not valid in order to display user errors:
    else:
    form = Form_inscription()
    # In this case, the user does not yet display the form, it instantiates with no data inside.
    return render(request, 'en/public/create_developer.html', {'form' : form})
This screenshot shows the display of the form with the display of an error message:
We set the template for this view. The template will be much shorter:
{% extends "base.html" %}
{% block title_html %}
  Create Developer
{% endblock %}
{% block h1 %}
  Create Developer
{% endblock %}
{% block article_content %}
  <form method="post" action="{% url "create_developer" %}" >
    {% csrf_token %}
    <!-- This line inserts a CSRF token. -->
    <table>
      {{ form.as_table }}
    <!-- This line displays lines of the form.-->
    </table>
    <p><input type="submit" value="Create" /></p>
  </form>
{% endblock %}
As the complete form operation is in the view, the template simply executes the as_table() method to generate the HTML form.
The previous code displays data in tabular form. The three methods to generate an HTML form structure are as follows:
So, we quickly wrote a secure form with error handling and CSRF protection through Django forms. In the Appendix, Cheatsheet, you can find the different possible fields in a form.
Template of a Django form
We set the template for this view. The template will be much shorter:
{% extends "base.html" %}
{% block title_html %}
  Create Developer
{% endblock %}
{% block h1 %}
  Create Developer
{% endblock %}
{% block article_content %}
  <form method="post" action="{% url "create_developer" %}" >
    {% csrf_token %}
    <!-- This line inserts a CSRF token. -->
    <table>
      {{ form.as_table }}
    <!-- This line displays lines of the form.-->
    </table>
    <p><input type="submit" value="Create" /></p>
  </form>
{% endblock %}
As the complete form operation is in the view, the template simply executes the as_table() method to generate the HTML form.
The previous code displays data in tabular form. The three methods to generate an HTML form structure are as follows:
So, we quickly wrote a secure form with error handling and CSRF protection through Django forms. In the Appendix, Cheatsheet, you can find the different possible fields in a form.
ModelForms are Django forms based on models. The fields of these forms are automatically generated from the model that we have defined. Indeed, developers are often required to create forms with fields that correspond to those in the database to a non-MVC website.
These particular forms have a save() method that will save the form data in a new record.
To broach, we will take, for example, the addition of a supervisor. For this, we will create a new page. For this, we will create the following URL:
url(r'^create-supervisor$', 'TasksManager.views.create_supervisor.page', name="create_supervisor"),
Our view will contain the following code:
from django.shortcuts import render
from TasksManager.models import Supervisor
from django import forms
from django.http import HttpResponseRedirect
from django.core.urlresolvers import reverse
def page(request):
  if len(request.POST) > 0:
    form = Form_supervisor(request.POST)
    if form.is_valid():
      form.save(commit=True)
      # If the form is valid, we store the data in a model record in the form.
      return HttpResponseRedirect(reverse('public_index'))
      # This line is used to redirect to the specified URL. We use the reverse() function to get the URL from its name defines urls.py.
    else:
      return render(request, 'en/public/create_supervisor.html', {'form': form})
  else:
    form = Form_supervisor()
    return render(request, 'en/public/create_supervisor.html', {'form': form})
class Form_supervisor(forms.ModelForm):
# Here we create a class that inherits from ModelForm.
  class Meta:
  # We extend the Meta class of the ModelForm. It is this class that will allow us to define the properties of ModelForm.
    model = Supervisor
    # We define the model that should be based on the form.
    exclude = ('date_created', 'last_connexion', )
    # We exclude certain fields of this form. It would also have been possible to do the opposite. That is to say with the fields property, we have defined the desired fields in the form.
As seen in the line exclude = ('date_created', 'last_connexion', ), it is possible to restrict the form fields. Both the exclude and fields properties must be used correctly. Indeed, these properties receive a tuple of the fields to exclude or include as arguments. They can be described as follows:
For example, we have a website selling royalty-free images with a registration form based on ModelForm. The administrator adds a credit field in the extended model of the user. If the developer has used an exclude property in some of the fields and did not add credits, the user will be able to take as many credits as he/she wants.
We will resume our previous template, where we will change the URL present in the attribute action of the <form> tag:
{% url "create_supervisor" %}This example shows us that ModelForms can save you a lot of time in development by having a form that can be customized (by modifying the validation, for example).
In the next chapter, we will see how to be faster with the class-based views.
The supervisor creation form
To broach, we will take, for example, the addition of a supervisor. For this, we will create a new page. For this, we will create the following URL:
url(r'^create-supervisor$', 'TasksManager.views.create_supervisor.page', name="create_supervisor"),
Our view will contain the following code:
from django.shortcuts import render
from TasksManager.models import Supervisor
from django import forms
from django.http import HttpResponseRedirect
from django.core.urlresolvers import reverse
def page(request):
  if len(request.POST) > 0:
    form = Form_supervisor(request.POST)
    if form.is_valid():
      form.save(commit=True)
      # If the form is valid, we store the data in a model record in the form.
      return HttpResponseRedirect(reverse('public_index'))
      # This line is used to redirect to the specified URL. We use the reverse() function to get the URL from its name defines urls.py.
    else:
      return render(request, 'en/public/create_supervisor.html', {'form': form})
  else:
    form = Form_supervisor()
    return render(request, 'en/public/create_supervisor.html', {'form': form})
class Form_supervisor(forms.ModelForm):
# Here we create a class that inherits from ModelForm.
  class Meta:
  # We extend the Meta class of the ModelForm. It is this class that will allow us to define the properties of ModelForm.
    model = Supervisor
    # We define the model that should be based on the form.
    exclude = ('date_created', 'last_connexion', )
    # We exclude certain fields of this form. It would also have been possible to do the opposite. That is to say with the fields property, we have defined the desired fields in the form.
As seen in the line exclude = ('date_created', 'last_connexion', ), it is possible to restrict the form fields. Both the exclude and fields properties must be used correctly. Indeed, these properties receive a tuple of the fields to exclude or include as arguments. They can be described as follows:
For example, we have a website selling royalty-free images with a registration form based on ModelForm. The administrator adds a credit field in the extended model of the user. If the developer has used an exclude property in some of the fields and did not add credits, the user will be able to take as many credits as he/she wants.
We will resume our previous template, where we will change the URL present in the attribute action of the <form> tag:
{% url "create_supervisor" %}This example shows us that ModelForms can save you a lot of time in development by having a form that can be customized (by modifying the validation, for example).
In the next chapter, we will see how to be faster with the class-based views.
We have studied the basics of the forms that allow you to create simple forms with little customization. Sometimes, it is useful to customize aspects such as data validation and error display, or use special graphics.
It is useful to perform specific validation of the form fields. Django makes this easy while reminding you of the advantages of the forms. We will take the example of the addition of a developer form, where we will conduct an audit of the password.
For this, we will change the form in our view (in the create_developer.py file) in the following manner:
class Form_inscription(forms.Form):
  name       = forms.CharField(label="Name", max_length=30)
  login = forms.CharField(label = "Login")
  password = forms.CharField(label = "Password", widget = forms.PasswordInput)
  # We add another field for the password. This field will be used to avoid typos from the user. If both passwords do not match, the validation will display an error message
  password_bis = forms.CharField(label = "Password", widget = forms.PasswordInput)
  supervisor = forms.ModelChoiceField(label="Supervisor", queryset=Supervisor.objects.all())
  def clean(self):
  # This line allows us to extend the clean method that is responsible for validating data fields.
    cleaned_data = super (Form_inscription, self).clean()
    # This method is very useful because it performs the clean() method of the superclass. Without this line we would be rewriting the method instead of extending it.
    password = self.cleaned_data.get('password')
    # We get the value of the field password in the variable.
    password_bis = self.cleaned_data.get('password_bis')
    if password and password_bis and password != password_bis:
      raise forms.ValidationError("Passwords are not identical.")
      # This line makes us raise an exception. This way, when the view performs the is_valid() method, if the passwords are not identical, the form is not validated .
    return self.cleaned_data
With this example, we can see that Django is very flexible in the management of forms and audits. It also allows you to customize the display of errors.
Sometimes, it may be important to display user-specific error messages. For example, a company may request for a password that must contain certain types of characters; for example, the password must contain at least one number and many letters. In such cases, it would be preferable to also indicate this in the error message. Indeed, users read more carefully the error messages than help messages.
To do this, you must use the error_messages property in the form fields and set the error message as a text string.
It is also possible to define different messages depending on the type of error. We will create a dictionary of the two most common mistakes and give them a message. We can define this dictionary as follows:
error_name = {
  'required': 'You must type a name !',
  'invalid': 'Wrong format.'
}
We will modify the name field of the Form_inscription form of create_developer.py:
name = forms.CharField(label="Name", max_length=30, error_messages=error_name)
This way, if the user doesn't fill the name field, he/she will see the following message: You must type a name!.
To apply this message to ModelForm, we have to go to the models.py file and modify the line that contains the name field.
name = models.CharField(max_length=50, verbose_name="Name", error_messages=error_name)
When editing models.py, we should not forget to specify the error_name dictionary.
These error messages improve the quality of the website by informing the user of his/her mistakes. It is very important to use custom errors on fields when validation is complex. However, do not overdo it on the basic fields as this would be a waste of time for the developer.
Widgets are an effective way to customize the display of the form elements. Indeed, in some cases, it may be helpful to specify a text area field with particular dimensions in ModelForm.
To learn the practice of using widgets and continue the development of our application, we will create the page of the creation of projects. This page will contain a Django form, and we'll set the description field in the HTML <textarea> tag.
We need to add the following URL to the urls.py file:
url(r'^create_project$', ' TasksManager.views.create_project.page', name='create_project'),
Then, create our view in the create_project.py file with the following code:
from django.shortcuts import render
from TasksManager.models import Project
from django import forms
from django.http import HttpResponseRedirect
from django.core.urlresolvers import reverse
class Form_project_create(forms.Form):
  title = forms.CharField(label="Title", max_length=30)
  description = forms.CharField(widget= forms.Textarea(attrs={'rows': 5, 'cols': 100,}))
  client_name = forms.CharField(label="Client", max_length=50)
def page(request):
  if request.POST:
    form = Form_project_create(request.POST)
    if form.is_valid():
      title = form.cleaned_data['title']
      description = form.cleaned_data['description']
      client_name = form.cleaned_data['client_name']
      new_project = Project(title=title, description=description, client_name=client_name)
      new_project.save()
      return HttpResponseRedirect(reverse('public_index'))
    else:
      return render(request, 'en/public/create_project.html', {'form' : form})
  else:
    form = Form_project_create()
  return render(request, 'en/public/create_project.html', {'form' : form})
It is possible to take one of the templates that we have created and adapted. This form will work the same way as all the Django forms that we have created. After copying a template that we have already created, we only need to change the title and URL of the action property of the <form> tag. By visiting the page, we notice that the widget works well and displays a text area more suitable for long text.
There are many other widgets to customize forms. A great quality of Django is that it is generic and totally adaptable with time.
There are two ways to declare the initial value of form fields with Django. The following examples take place in the create_developer.py file.
The following code will display new in the name field and will select the first supervisor in the <select> field that defines the supervisor. These fields are editable by the user:
form = Form_inscription(initial={'name': 'new', 'supervisor': Supervisor.objects.all()[:1].get().id})This line must replace the following line in the create_developer.py view:
form = Form_inscription()
To get the same effect as in the previous section, display new in the name field and select the first supervisor in the corresponding field; you must change the declaration name and supervisor fields with the following code:
name = forms.CharField(label="Name", max_length=30, initial="new")
supervisor = forms.ModelChoiceField(label="Supervisor", queryset=Supervisor.objects.all(), initial=Supervisor.objects.all()[:1].get().id)
Extending the validation form
It is useful to perform specific validation of the form fields. Django makes this easy while reminding you of the advantages of the forms. We will take the example of the addition of a developer form, where we will conduct an audit of the password.
For this, we will change the form in our view (in the create_developer.py file) in the following manner:
class Form_inscription(forms.Form):
  name       = forms.CharField(label="Name", max_length=30)
  login = forms.CharField(label = "Login")
  password = forms.CharField(label = "Password", widget = forms.PasswordInput)
  # We add another field for the password. This field will be used to avoid typos from the user. If both passwords do not match, the validation will display an error message
  password_bis = forms.CharField(label = "Password", widget = forms.PasswordInput)
  supervisor = forms.ModelChoiceField(label="Supervisor", queryset=Supervisor.objects.all())
  def clean(self):
  # This line allows us to extend the clean method that is responsible for validating data fields.
    cleaned_data = super (Form_inscription, self).clean()
    # This method is very useful because it performs the clean() method of the superclass. Without this line we would be rewriting the method instead of extending it.
    password = self.cleaned_data.get('password')
    # We get the value of the field password in the variable.
    password_bis = self.cleaned_data.get('password_bis')
    if password and password_bis and password != password_bis:
      raise forms.ValidationError("Passwords are not identical.")
      # This line makes us raise an exception. This way, when the view performs the is_valid() method, if the passwords are not identical, the form is not validated .
    return self.cleaned_data
With this example, we can see that Django is very flexible in the management of forms and audits. It also allows you to customize the display of errors.
Sometimes, it may be important to display user-specific error messages. For example, a company may request for a password that must contain certain types of characters; for example, the password must contain at least one number and many letters. In such cases, it would be preferable to also indicate this in the error message. Indeed, users read more carefully the error messages than help messages.
To do this, you must use the error_messages property in the form fields and set the error message as a text string.
It is also possible to define different messages depending on the type of error. We will create a dictionary of the two most common mistakes and give them a message. We can define this dictionary as follows:
error_name = {
  'required': 'You must type a name !',
  'invalid': 'Wrong format.'
}
We will modify the name field of the Form_inscription form of create_developer.py:
name = forms.CharField(label="Name", max_length=30, error_messages=error_name)
This way, if the user doesn't fill the name field, he/she will see the following message: You must type a name!.
To apply this message to ModelForm, we have to go to the models.py file and modify the line that contains the name field.
name = models.CharField(max_length=50, verbose_name="Name", error_messages=error_name)
When editing models.py, we should not forget to specify the error_name dictionary.
These error messages improve the quality of the website by informing the user of his/her mistakes. It is very important to use custom errors on fields when validation is complex. However, do not overdo it on the basic fields as this would be a waste of time for the developer.
Widgets are an effective way to customize the display of the form elements. Indeed, in some cases, it may be helpful to specify a text area field with particular dimensions in ModelForm.
To learn the practice of using widgets and continue the development of our application, we will create the page of the creation of projects. This page will contain a Django form, and we'll set the description field in the HTML <textarea> tag.
We need to add the following URL to the urls.py file:
url(r'^create_project$', ' TasksManager.views.create_project.page', name='create_project'),
Then, create our view in the create_project.py file with the following code:
from django.shortcuts import render
from TasksManager.models import Project
from django import forms
from django.http import HttpResponseRedirect
from django.core.urlresolvers import reverse
class Form_project_create(forms.Form):
  title = forms.CharField(label="Title", max_length=30)
  description = forms.CharField(widget= forms.Textarea(attrs={'rows': 5, 'cols': 100,}))
  client_name = forms.CharField(label="Client", max_length=50)
def page(request):
  if request.POST:
    form = Form_project_create(request.POST)
    if form.is_valid():
      title = form.cleaned_data['title']
      description = form.cleaned_data['description']
      client_name = form.cleaned_data['client_name']
      new_project = Project(title=title, description=description, client_name=client_name)
      new_project.save()
      return HttpResponseRedirect(reverse('public_index'))
    else:
      return render(request, 'en/public/create_project.html', {'form' : form})
  else:
    form = Form_project_create()
  return render(request, 'en/public/create_project.html', {'form' : form})
It is possible to take one of the templates that we have created and adapted. This form will work the same way as all the Django forms that we have created. After copying a template that we have already created, we only need to change the title and URL of the action property of the <form> tag. By visiting the page, we notice that the widget works well and displays a text area more suitable for long text.
There are many other widgets to customize forms. A great quality of Django is that it is generic and totally adaptable with time.
There are two ways to declare the initial value of form fields with Django. The following examples take place in the create_developer.py file.
The following code will display new in the name field and will select the first supervisor in the <select> field that defines the supervisor. These fields are editable by the user:
form = Form_inscription(initial={'name': 'new', 'supervisor': Supervisor.objects.all()[:1].get().id})This line must replace the following line in the create_developer.py view:
form = Form_inscription()
To get the same effect as in the previous section, display new in the name field and select the first supervisor in the corresponding field; you must change the declaration name and supervisor fields with the following code:
name = forms.CharField(label="Name", max_length=30, initial="new")
supervisor = forms.ModelChoiceField(label="Supervisor", queryset=Supervisor.objects.all(), initial=Supervisor.objects.all()[:1].get().id)
Customizing the display of errors
Sometimes, it may be important to display user-specific error messages. For example, a company may request for a password that must contain certain types of characters; for example, the password must contain at least one number and many letters. In such cases, it would be preferable to also indicate this in the error message. Indeed, users read more carefully the error messages than help messages.
To do this, you must use the error_messages property in the form fields and set the error message as a text string.
It is also possible to define different messages depending on the type of error. We will create a dictionary of the two most common mistakes and give them a message. We can define this dictionary as follows:
error_name = {
  'required': 'You must type a name !',
  'invalid': 'Wrong format.'
}
We will modify the name field of the Form_inscription form of create_developer.py:
name = forms.CharField(label="Name", max_length=30, error_messages=error_name)
This way, if the user doesn't fill the name field, he/she will see the following message: You must type a name!.
To apply this message to ModelForm, we have to go to the models.py file and modify the line that contains the name field.
name = models.CharField(max_length=50, verbose_name="Name", error_messages=error_name)
When editing models.py, we should not forget to specify the error_name dictionary.
These error messages improve the quality of the website by informing the user of his/her mistakes. It is very important to use custom errors on fields when validation is complex. However, do not overdo it on the basic fields as this would be a waste of time for the developer.
Widgets are an effective way to customize the display of the form elements. Indeed, in some cases, it may be helpful to specify a text area field with particular dimensions in ModelForm.
To learn the practice of using widgets and continue the development of our application, we will create the page of the creation of projects. This page will contain a Django form, and we'll set the description field in the HTML <textarea> tag.
We need to add the following URL to the urls.py file:
url(r'^create_project$', ' TasksManager.views.create_project.page', name='create_project'),
Then, create our view in the create_project.py file with the following code:
from django.shortcuts import render
from TasksManager.models import Project
from django import forms
from django.http import HttpResponseRedirect
from django.core.urlresolvers import reverse
class Form_project_create(forms.Form):
  title = forms.CharField(label="Title", max_length=30)
  description = forms.CharField(widget= forms.Textarea(attrs={'rows': 5, 'cols': 100,}))
  client_name = forms.CharField(label="Client", max_length=50)
def page(request):
  if request.POST:
    form = Form_project_create(request.POST)
    if form.is_valid():
      title = form.cleaned_data['title']
      description = form.cleaned_data['description']
      client_name = form.cleaned_data['client_name']
      new_project = Project(title=title, description=description, client_name=client_name)
      new_project.save()
      return HttpResponseRedirect(reverse('public_index'))
    else:
      return render(request, 'en/public/create_project.html', {'form' : form})
  else:
    form = Form_project_create()
  return render(request, 'en/public/create_project.html', {'form' : form})
It is possible to take one of the templates that we have created and adapted. This form will work the same way as all the Django forms that we have created. After copying a template that we have already created, we only need to change the title and URL of the action property of the <form> tag. By visiting the page, we notice that the widget works well and displays a text area more suitable for long text.
There are many other widgets to customize forms. A great quality of Django is that it is generic and totally adaptable with time.
There are two ways to declare the initial value of form fields with Django. The following examples take place in the create_developer.py file.
The following code will display new in the name field and will select the first supervisor in the <select> field that defines the supervisor. These fields are editable by the user:
form = Form_inscription(initial={'name': 'new', 'supervisor': Supervisor.objects.all()[:1].get().id})This line must replace the following line in the create_developer.py view:
form = Form_inscription()
To get the same effect as in the previous section, display new in the name field and select the first supervisor in the corresponding field; you must change the declaration name and supervisor fields with the following code:
name = forms.CharField(label="Name", max_length=30, initial="new")
supervisor = forms.ModelChoiceField(label="Supervisor", queryset=Supervisor.objects.all(), initial=Supervisor.objects.all()[:1].get().id)
Using widgets
Widgets are an effective way to customize the display of the form elements. Indeed, in some cases, it may be helpful to specify a text area field with particular dimensions in ModelForm.
To learn the practice of using widgets and continue the development of our application, we will create the page of the creation of projects. This page will contain a Django form, and we'll set the description field in the HTML <textarea> tag.
We need to add the following URL to the urls.py file:
url(r'^create_project$', ' TasksManager.views.create_project.page', name='create_project'),
Then, create our view in the create_project.py file with the following code:
from django.shortcuts import render
from TasksManager.models import Project
from django import forms
from django.http import HttpResponseRedirect
from django.core.urlresolvers import reverse
class Form_project_create(forms.Form):
  title = forms.CharField(label="Title", max_length=30)
  description = forms.CharField(widget= forms.Textarea(attrs={'rows': 5, 'cols': 100,}))
  client_name = forms.CharField(label="Client", max_length=50)
def page(request):
  if request.POST:
    form = Form_project_create(request.POST)
    if form.is_valid():
      title = form.cleaned_data['title']
      description = form.cleaned_data['description']
      client_name = form.cleaned_data['client_name']
      new_project = Project(title=title, description=description, client_name=client_name)
      new_project.save()
      return HttpResponseRedirect(reverse('public_index'))
    else:
      return render(request, 'en/public/create_project.html', {'form' : form})
  else:
    form = Form_project_create()
  return render(request, 'en/public/create_project.html', {'form' : form})
It is possible to take one of the templates that we have created and adapted. This form will work the same way as all the Django forms that we have created. After copying a template that we have already created, we only need to change the title and URL of the action property of the <form> tag. By visiting the page, we notice that the widget works well and displays a text area more suitable for long text.
There are many other widgets to customize forms. A great quality of Django is that it is generic and totally adaptable with time.
There are two ways to declare the initial value of form fields with Django. The following examples take place in the create_developer.py file.
The following code will display new in the name field and will select the first supervisor in the <select> field that defines the supervisor. These fields are editable by the user:
form = Form_inscription(initial={'name': 'new', 'supervisor': Supervisor.objects.all()[:1].get().id})This line must replace the following line in the create_developer.py view:
form = Form_inscription()
To get the same effect as in the previous section, display new in the name field and select the first supervisor in the corresponding field; you must change the declaration name and supervisor fields with the following code:
name = forms.CharField(label="Name", max_length=30, initial="new")
supervisor = forms.ModelChoiceField(label="Supervisor", queryset=Supervisor.objects.all(), initial=Supervisor.objects.all()[:1].get().id)
Setting initial data in a form
There are two ways to declare the initial value of form fields with Django. The following examples take place in the create_developer.py file.
The following code will display new in the name field and will select the first supervisor in the <select> field that defines the supervisor. These fields are editable by the user:
form = Form_inscription(initial={'name': 'new', 'supervisor': Supervisor.objects.all()[:1].get().id})This line must replace the following line in the create_developer.py view:
form = Form_inscription()
To get the same effect as in the previous section, display new in the name field and select the first supervisor in the corresponding field; you must change the declaration name and supervisor fields with the following code:
name = forms.CharField(label="Name", max_length=30, initial="new")
supervisor = forms.ModelChoiceField(label="Supervisor", queryset=Supervisor.objects.all(), initial=Supervisor.objects.all()[:1].get().id)
When instantiating the form
The following code will display new in the name field and will select the first supervisor in the <select> field that defines the supervisor. These fields are editable by the user:
form = Form_inscription(initial={'name': 'new', 'supervisor': Supervisor.objects.all()[:1].get().id})This line must replace the following line in the create_developer.py view:
form = Form_inscription()
To get the same effect as in the previous section, display new in the name field and select the first supervisor in the corresponding field; you must change the declaration name and supervisor fields with the following code:
name = forms.CharField(label="Name", max_length=30, initial="new")
supervisor = forms.ModelChoiceField(label="Supervisor", queryset=Supervisor.objects.all(), initial=Supervisor.objects.all()[:1].get().id)
When defining fields
To get the same effect as in the previous section, display new in the name field and select the first supervisor in the corresponding field; you must change the declaration name and supervisor fields with the following code:
name = forms.CharField(label="Name", max_length=30, initial="new")
supervisor = forms.ModelChoiceField(label="Supervisor", queryset=Supervisor.objects.all(), initial=Supervisor.objects.all()[:1].get().id)
Class-based views (CBVs) are views generated from models. In simple terms, we can say that these are like ModelForms, in that they simplify the view and work for common cases.
CRUD is the short form we use when referring to the four major operations performed on a database: create, read, update, and delete. CBV is the best way to create pages that perform these actions very quickly.
Creating forms for creating and editing a model or database table data is a very repetitive part of the job of a developer. They may spend a lot of time in doing this properly (validation, prefilled fields, and so on). With CBV, Django allows a developer to perform CRUD operations for a model in less than 10 minutes. They also have an important advantage: if the model evolves and CBVs were well done, changing the model will automatically change the CRUD operations within the website. In this case, adding a line in our models allows us to save tens or hundreds of lines of code.
CBVs still have a drawback. They are not very easy to customize with advanced features or those that are not provided. In many cases, when you try to perform a CRUD operation that has some peculiarities, it is better to create a new view.
You might ask why we did not directly study them—we could have saved a lot of time, especially when adding a developer in the database. This is because these views are generic. They are suitable for simple operations that do not require a lot of changes. When we need a complex form, CBVs will not be useful and will even extend the duration of programming.
We should use CBVs because they allow us to save a lot of time that would normally be used in running CRUD operations on models.
In this chapter, we will make the most of our TasksManager application. Indeed, we will enjoy the time savings offered by the CBVs to move quickly with this project. If you do not understand the functioning of CBVs immediately, it doesn't matter. What we have seen so far in previous chapters already allows us to make websites.
In this chapter, we will try to improve our productivity by covering the following topics:
- We will use the
CreateViewCBV to quickly build the page to add projects - We will see later how to display a list of objects and use the paging system
- We will then use the
DetailViewCBV to display the project information - We will then learn how to change the data in a record with the
UpdateViewCBV - We will learn how to change the form generated by a CBV
- We will then create a page to delete a record
- Then, we will eventually create a child class of
UpdateViewto make using it more flexible in our application
The CreateView CBV allows you to create a view that will automatically generate a form based on a model and automatically save the data in this form. It can be compared to ModelForm, except that we do not need to create a view. Indeed, all the code for this will be placed in the urls.py file except in special cases.
We will create a CBV that will allow us to create a project. This example aims to show that you can save even more time than with Django forms. We will be able to use the template used for the creation of forms in the previous chapter's project. Now, we will change our create_project URL as follows:
url (r'^create_project$', CreateView.as_view(model=Project, template_name="en/public/create_project.html", success_url = 'index'), name="create_project"),
We will add the following lines at the beginning of the urls.py file:
from django.views.generic import CreateView
from TasksManager.models import Project
In our new URL, we used the following new features:
CreateView.as_view: We call the methodas_viewof the CBVCreateView. This method returns a complete view to the user. Moreover, we return multiple parameters in this method.model: This defines the model that will apply the CBV.template_name: This defines the template that will display the form. As the CBV usesModelForm, we do not need to change ourcreate_project.htmltemplate.success_url: This defines the URL to which we will be redirected once the change has been taken into account. This parameter is not very DRY because we cannot use thenameproperty of the URL. When we extend our CBV, we will see how to use the name of the URL to be redirected.
That's all! The three lines that we have added to the urls.py file will perform the following actions:
- Generate the form
- Generate the view that sends the form to the template with or without errors
- Data is sent by the user
We just used one of the most interesting features of Django. Indeed, with only three lines, we have been doing what would have taken more than a hundred lines without any framework. We will also write the CBV that will allow us to add a task. Have a look at the following code:
from TasksManager.models import Project, Task
url (r'^create_task$', CreateView.as_view(model=Task, template_name="en/public/create_task.html", success_url = 'index'), name="create_task"),
We then need to duplicate the create_project.html template and change the link in the base.html template. Our new view is functional, and we used the same template for project creation. This is a common method because it saves a lot of time for the developer, but there is a more rigorous way to proceed.
To test the code, we can add the following link to the end of the article_content block of the index.html template:
<a href="{% url "create_task" %}">Create task</a>
ListView is a CBV that displays a list of records for a given model. The view is generated to send a template object from which we view the list.
We will look at an example displaying the list of projects and create a link to the details of a project. To do this, we must add the following lines in the urls.py file:
from TasksManager.models import Project
from django.views.generic.list import ListView
Add the following URLs to the file:
url (r'^project_list$', ListView.as_view(model=Project, template_name="en/public/project_list.html"), name="project_list"),
We will create the template that will be used to display the results in a tabular form by adding the following lines in the article_content block after extending the base.html template:
<table>
<tr>
  <th>Title</th>
  <th>Description</th>
  <th>Client name</th>
</tr>
{% for project in object_list %}
  <tr>
    <td>{{ project.title }}</td>
    <td>{{ project.description }}</td>
    <td>{{ project.client_name }}</td>
  </tr>
{% endfor %}
</table>
We created the same list as in Chapter 6, Getting a Model's Data with Querysets, about the queryset. The advantage is that we used a lot less lines and we did not use any view to create it. In the next part, we will implement paging by extending this CBV.
It is possible to extend the possibilities of the ListView CBV and customize them. This allows us to adapt the CBV to the needs of the websites. We can define the same elements as in the parameters in the as_view method, but it will be more readable and we can also override the methods. Depending on the type of CBV, spreading them allows you to:
- Change the model and template as we did in the URL
- Change the queryset to be executed
- Change the name of the object sent to the template
- Specify the URL that will redirect the user
We will expand our first CBV by modifying the list of projects that we have done. We will make two changes to this list by sorting by title and adding pagination. We will create the ListView.py file in the views/cbv module. This file will contain our customized listView. It is also possible to choose the architecture. For example, we could create a file named project.py to store all the CBVs concerning the projects. This file will contain the following code:
from django.views.generic.list import ListView
# In this line, we import the ListView class
from TasksManager.models import Project

class Project_list(ListView):
# In this line, we create a class that extends the ListView class.
  model=Project
  template_name = 'en/public/project_list.html'
# In this line, we define the template_name the same manner as in the urls.py file.
  paginate_by = 5
In this line, we define the number of visible projects on a single page.
  def get_queryset(self):
In this line, we override the get_queryset() method to return our queryset.
    queryset=Project.objects.all().order_by("title")
    return queryset
We could also have set the queryset in the following manner:
queryset=Project.objects.all().order_by("title")However, it may be useful to create a class that can be adapted to many cases. For the Project_list class to be interpreted in the URLs, we need to change our imports by adding the following line:
from TasksManager.views.cbv.ListView import Project_list
You must then change the URL. In this urls.py file, we will use the Project_list object without any parameters, as shown in the following code snippet; they are all defined in the ListView.py file:
url (r'^project_list$', Project_list.as_view(), name="project_list"),
From now on, the new page is functional. If we test it, we will realize that only the first five projects are displayed. Indeed, in the Project_list object, we defined a pagination of five items per page. To navigate through the list, we need to add the following code in the template before the end of the article_content block:
{% if is_paginated %}
  <div class="pagination">
    <span>
    {% if page_obj.has_previous %}
      <a href="{% url "project_list" %}?page={{ page_obj.previous_page_number }}">Previous</a>
    {% endif %}
    <span style="margin-left:15px;margin-right:15px;">
      Page {{ page_obj.number }} of {{ page_obj.paginator.num_pages }}.
    </span>
    {% if page_obj.has_next %}
      <a href="{% url "project_list" %}?page={{ page_obj.next_page_number }}">Next</a>
    {% endif %}
    </span>
  </div>
{% endif %}
This part of the template allows us to create links to the preceding and following pages at the bottom of the page. With this example, we created a sorted list of projects with pagination very quickly. The extending of CBVs can be very convenient and allows us to adapt to more complex uses. After this complete example, we will create a CBV to display a list of developers. This list will be useful later in the book. We must add the following URL after importing the ListView class:
url (r'^developer_list$', ListView.as_view(model=Developer, template_name="en/public/developer_list.html"), name="developer_list"),
We then use an inherited template of base.html and put the following code in the article_content block:
<table>
  <tr>
    <td>Name</td>
    <td>Login</td>
    <td>Supervisor</td>
  </tr>
  {% for dev in object_list %}
    <tr>
      <td><a href="">{{ dev.name }}</a></td>
      <td>{{ dev.login }}</td>
      <td>{{ dev.supervisor }}</td>
    </tr>
  {% endfor %}
</table>
We will notice that the name of the developer is an empty link. You should refill it when we create the page that displays the details of the developer. This is what we will do in the next section with DetailView.
An example of minimalist usage
We will look at an example displaying the list of projects and create a link to the details of a project. To do this, we must add the following lines in the urls.py file:
from TasksManager.models import Project
from django.views.generic.list import ListView
Add the following URLs to the file:
url (r'^project_list$', ListView.as_view(model=Project, template_name="en/public/project_list.html"), name="project_list"),
We will create the template that will be used to display the results in a tabular form by adding the following lines in the article_content block after extending the base.html template:
<table>
<tr>
  <th>Title</th>
  <th>Description</th>
  <th>Client name</th>
</tr>
{% for project in object_list %}
  <tr>
    <td>{{ project.title }}</td>
    <td>{{ project.description }}</td>
    <td>{{ project.client_name }}</td>
  </tr>
{% endfor %}
</table>
We created the same list as in Chapter 6, Getting a Model's Data with Querysets, about the queryset. The advantage is that we used a lot less lines and we did not use any view to create it. In the next part, we will implement paging by extending this CBV.
It is possible to extend the possibilities of the ListView CBV and customize them. This allows us to adapt the CBV to the needs of the websites. We can define the same elements as in the parameters in the as_view method, but it will be more readable and we can also override the methods. Depending on the type of CBV, spreading them allows you to:
- Change the model and template as we did in the URL
- Change the queryset to be executed
- Change the name of the object sent to the template
- Specify the URL that will redirect the user
We will expand our first CBV by modifying the list of projects that we have done. We will make two changes to this list by sorting by title and adding pagination. We will create the ListView.py file in the views/cbv module. This file will contain our customized listView. It is also possible to choose the architecture. For example, we could create a file named project.py to store all the CBVs concerning the projects. This file will contain the following code:
from django.views.generic.list import ListView
# In this line, we import the ListView class
from TasksManager.models import Project

class Project_list(ListView):
# In this line, we create a class that extends the ListView class.
  model=Project
  template_name = 'en/public/project_list.html'
# In this line, we define the template_name the same manner as in the urls.py file.
  paginate_by = 5
In this line, we define the number of visible projects on a single page.
  def get_queryset(self):
In this line, we override the get_queryset() method to return our queryset.
    queryset=Project.objects.all().order_by("title")
    return queryset
We could also have set the queryset in the following manner:
queryset=Project.objects.all().order_by("title")However, it may be useful to create a class that can be adapted to many cases. For the Project_list class to be interpreted in the URLs, we need to change our imports by adding the following line:
from TasksManager.views.cbv.ListView import Project_list
You must then change the URL. In this urls.py file, we will use the Project_list object without any parameters, as shown in the following code snippet; they are all defined in the ListView.py file:
url (r'^project_list$', Project_list.as_view(), name="project_list"),
From now on, the new page is functional. If we test it, we will realize that only the first five projects are displayed. Indeed, in the Project_list object, we defined a pagination of five items per page. To navigate through the list, we need to add the following code in the template before the end of the article_content block:
{% if is_paginated %}
  <div class="pagination">
    <span>
    {% if page_obj.has_previous %}
      <a href="{% url "project_list" %}?page={{ page_obj.previous_page_number }}">Previous</a>
    {% endif %}
    <span style="margin-left:15px;margin-right:15px;">
      Page {{ page_obj.number }} of {{ page_obj.paginator.num_pages }}.
    </span>
    {% if page_obj.has_next %}
      <a href="{% url "project_list" %}?page={{ page_obj.next_page_number }}">Next</a>
    {% endif %}
    </span>
  </div>
{% endif %}
This part of the template allows us to create links to the preceding and following pages at the bottom of the page. With this example, we created a sorted list of projects with pagination very quickly. The extending of CBVs can be very convenient and allows us to adapt to more complex uses. After this complete example, we will create a CBV to display a list of developers. This list will be useful later in the book. We must add the following URL after importing the ListView class:
url (r'^developer_list$', ListView.as_view(model=Developer, template_name="en/public/developer_list.html"), name="developer_list"),
We then use an inherited template of base.html and put the following code in the article_content block:
<table>
  <tr>
    <td>Name</td>
    <td>Login</td>
    <td>Supervisor</td>
  </tr>
  {% for dev in object_list %}
    <tr>
      <td><a href="">{{ dev.name }}</a></td>
      <td>{{ dev.login }}</td>
      <td>{{ dev.supervisor }}</td>
    </tr>
  {% endfor %}
</table>
We will notice that the name of the developer is an empty link. You should refill it when we create the page that displays the details of the developer. This is what we will do in the next section with DetailView.
Extending ListView
It is possible to extend the possibilities of the ListView CBV and customize them. This allows us to adapt the CBV to the needs of the websites. We can define the same elements as in the parameters in the as_view method, but it will be more readable and we can also override the methods. Depending on the type of CBV, spreading them allows you to:
- Change the model and template as we did in the URL
- Change the queryset to be executed
- Change the name of the object sent to the template
- Specify the URL that will redirect the user
We will expand our first CBV by modifying the list of projects that we have done. We will make two changes to this list by sorting by title and adding pagination. We will create the ListView.py file in the views/cbv module. This file will contain our customized listView. It is also possible to choose the architecture. For example, we could create a file named project.py to store all the CBVs concerning the projects. This file will contain the following code:
from django.views.generic.list import ListView
# In this line, we import the ListView class
from TasksManager.models import Project

class Project_list(ListView):
# In this line, we create a class that extends the ListView class.
  model=Project
  template_name = 'en/public/project_list.html'
# In this line, we define the template_name the same manner as in the urls.py file.
  paginate_by = 5
In this line, we define the number of visible projects on a single page.
  def get_queryset(self):
In this line, we override the get_queryset() method to return our queryset.
    queryset=Project.objects.all().order_by("title")
    return queryset
We could also have set the queryset in the following manner:
queryset=Project.objects.all().order_by("title")However, it may be useful to create a class that can be adapted to many cases. For the Project_list class to be interpreted in the URLs, we need to change our imports by adding the following line:
from TasksManager.views.cbv.ListView import Project_list
You must then change the URL. In this urls.py file, we will use the Project_list object without any parameters, as shown in the following code snippet; they are all defined in the ListView.py file:
url (r'^project_list$', Project_list.as_view(), name="project_list"),
From now on, the new page is functional. If we test it, we will realize that only the first five projects are displayed. Indeed, in the Project_list object, we defined a pagination of five items per page. To navigate through the list, we need to add the following code in the template before the end of the article_content block:
{% if is_paginated %}
  <div class="pagination">
    <span>
    {% if page_obj.has_previous %}
      <a href="{% url "project_list" %}?page={{ page_obj.previous_page_number }}">Previous</a>
    {% endif %}
    <span style="margin-left:15px;margin-right:15px;">
      Page {{ page_obj.number }} of {{ page_obj.paginator.num_pages }}.
    </span>
    {% if page_obj.has_next %}
      <a href="{% url "project_list" %}?page={{ page_obj.next_page_number }}">Next</a>
    {% endif %}
    </span>
  </div>
{% endif %}
This part of the template allows us to create links to the preceding and following pages at the bottom of the page. With this example, we created a sorted list of projects with pagination very quickly. The extending of CBVs can be very convenient and allows us to adapt to more complex uses. After this complete example, we will create a CBV to display a list of developers. This list will be useful later in the book. We must add the following URL after importing the ListView class:
url (r'^developer_list$', ListView.as_view(model=Developer, template_name="en/public/developer_list.html"), name="developer_list"),
We then use an inherited template of base.html and put the following code in the article_content block:
<table>
  <tr>
    <td>Name</td>
    <td>Login</td>
    <td>Supervisor</td>
  </tr>
  {% for dev in object_list %}
    <tr>
      <td><a href="">{{ dev.name }}</a></td>
      <td>{{ dev.login }}</td>
      <td>{{ dev.supervisor }}</td>
    </tr>
  {% endfor %}
</table>
We will notice that the name of the developer is an empty link. You should refill it when we create the page that displays the details of the developer. This is what we will do in the next section with DetailView.
The DetailView CBV allows us to display information from a registration model. This is the first CBV we will study that has URL parameters. In order to view the details of a record, it will send its ID to the CBV. We will study some examples.
First, we will create a page that will display the details of a task. For this, we will create the URL by adding these lines in the urls.py file:
from django.views.generic import DetailView
from TasksManager.models import Task
url (r'^task_detail_(?P<pk>\d+)$', DetailView.as_view(model=Task, template_name="en/public/task_detail.html"), name="task_detail"),
In this URL, we added the parameter-sending aspect. We have already discussed this type of URL in an earlier chapter when we covered querysets.
Regarding the template, we will create the en/public/task_detail.html template and place the following code in the article_content block:
<h4>
  {{ object.title }}
</h4>
<table>
  <tr>
    <td>Project : {{ object.project }}</td>
    <td>Developer : {{ object.app_user }}</td>
  </tr>
  <tr>
    <td>Importence : {{ object.importence }}</td>
    <td>Time elapsed : {{ object.time_elapsed }}</td>
  </tr>
</table>
<p>
  {{ object.description }}
</p>
In this code, we refer to the foreign keys Developer and Project. Using this syntax in the template, we call the __ unicode__() of the model in question. This enables the title of the project to be displayed. To test this piece of code, we need to create a link to a parameterized URL. Add this line to your index.html file:
<a href="{% url "task_detail" "1" %}">Detail first view</a><br />This line will allow us to see the details of the first task. You can try to create a list of tasks and a link to DetailView in each row of the table. This is what we will do.
We will now create the page that displays the details of a developer and his/her tasks. To get it done, we'll override the DetailView class by creating a DetailView.py file in the views/cbv module and add the following lines of code:
from django.views.generic import DetailView
from TasksManager.models import Developer, Task

class Developer_detail(DetailView):
  model=Developer
  template_name = 'en/public/developer_detail.html'
  def get_context_data(self, **kwargs):
    # This overrides the get_context_data() method.
    context = super(Developer_detail, self).get_context_data(**kwargs)
    # This allows calling the method of the super class. Without this line we would not have the basic context.
    tasks_dev = Task.objects.filter(developer = self.object)
    # This allows us to retrieve the list of developer tasks. We use self.object, which is a Developer type object already defined by the DetailView class.
    context['tasks_dev'] = tasks_dev
    # In this line, we add the task list to the context.
    return context
We need to add the following lines of code to the urls.py file:
from TasksManager.views.cbv.DetailView import Developer_detail
url (r'^developer_detail_(?P<pk>\d+)$', Developer_detail.as_view(), name="developer_detail"),
To see the main data and develop tasks, we create the developer_detail.html template. After extending from base.html, we must enter the following lines in the article_content block:
<h4>
  {{ object.name }}
</h4>
<span>Login : {{ object.login }}</span><br />
<span>Email : {{ object.email }}</span>
<h3>Tasks</h3>
<table>
  {% for task in tasks_dev %}
  <tr>
    <td>{{ task.title }}</td>
    <td>{{ task.importence }}</td>
    <td>{{ task.project }}</td>
  </tr>
  {% endfor %}
</table>
This example has allowed us to see how to send data to the template while using CBVs.
An example of minimalist usage
First, we will create a page that will display the details of a task. For this, we will create the URL by adding these lines in the urls.py file:
from django.views.generic import DetailView
from TasksManager.models import Task
url (r'^task_detail_(?P<pk>\d+)$', DetailView.as_view(model=Task, template_name="en/public/task_detail.html"), name="task_detail"),
In this URL, we added the parameter-sending aspect. We have already discussed this type of URL in an earlier chapter when we covered querysets.
Regarding the template, we will create the en/public/task_detail.html template and place the following code in the article_content block:
<h4>
  {{ object.title }}
</h4>
<table>
  <tr>
    <td>Project : {{ object.project }}</td>
    <td>Developer : {{ object.app_user }}</td>
  </tr>
  <tr>
    <td>Importence : {{ object.importence }}</td>
    <td>Time elapsed : {{ object.time_elapsed }}</td>
  </tr>
</table>
<p>
  {{ object.description }}
</p>
In this code, we refer to the foreign keys Developer and Project. Using this syntax in the template, we call the __ unicode__() of the model in question. This enables the title of the project to be displayed. To test this piece of code, we need to create a link to a parameterized URL. Add this line to your index.html file:
<a href="{% url "task_detail" "1" %}">Detail first view</a><br />This line will allow us to see the details of the first task. You can try to create a list of tasks and a link to DetailView in each row of the table. This is what we will do.
We will now create the page that displays the details of a developer and his/her tasks. To get it done, we'll override the DetailView class by creating a DetailView.py file in the views/cbv module and add the following lines of code:
from django.views.generic import DetailView
from TasksManager.models import Developer, Task

class Developer_detail(DetailView):
  model=Developer
  template_name = 'en/public/developer_detail.html'
  def get_context_data(self, **kwargs):
    # This overrides the get_context_data() method.
    context = super(Developer_detail, self).get_context_data(**kwargs)
    # This allows calling the method of the super class. Without this line we would not have the basic context.
    tasks_dev = Task.objects.filter(developer = self.object)
    # This allows us to retrieve the list of developer tasks. We use self.object, which is a Developer type object already defined by the DetailView class.
    context['tasks_dev'] = tasks_dev
    # In this line, we add the task list to the context.
    return context
We need to add the following lines of code to the urls.py file:
from TasksManager.views.cbv.DetailView import Developer_detail
url (r'^developer_detail_(?P<pk>\d+)$', Developer_detail.as_view(), name="developer_detail"),
To see the main data and develop tasks, we create the developer_detail.html template. After extending from base.html, we must enter the following lines in the article_content block:
<h4>
  {{ object.name }}
</h4>
<span>Login : {{ object.login }}</span><br />
<span>Email : {{ object.email }}</span>
<h3>Tasks</h3>
<table>
  {% for task in tasks_dev %}
  <tr>
    <td>{{ task.title }}</td>
    <td>{{ task.importence }}</td>
    <td>{{ task.project }}</td>
  </tr>
  {% endfor %}
</table>
This example has allowed us to see how to send data to the template while using CBVs.
Extending DetailView
We will now create the page that displays the details of a developer and his/her tasks. To get it done, we'll override the DetailView class by creating a DetailView.py file in the views/cbv module and add the following lines of code:
from django.views.generic import DetailView
from TasksManager.models import Developer, Task

class Developer_detail(DetailView):
  model=Developer
  template_name = 'en/public/developer_detail.html'
  def get_context_data(self, **kwargs):
    # This overrides the get_context_data() method.
    context = super(Developer_detail, self).get_context_data(**kwargs)
    # This allows calling the method of the super class. Without this line we would not have the basic context.
    tasks_dev = Task.objects.filter(developer = self.object)
    # This allows us to retrieve the list of developer tasks. We use self.object, which is a Developer type object already defined by the DetailView class.
    context['tasks_dev'] = tasks_dev
    # In this line, we add the task list to the context.
    return context
We need to add the following lines of code to the urls.py file:
from TasksManager.views.cbv.DetailView import Developer_detail
url (r'^developer_detail_(?P<pk>\d+)$', Developer_detail.as_view(), name="developer_detail"),
To see the main data and develop tasks, we create the developer_detail.html template. After extending from base.html, we must enter the following lines in the article_content block:
<h4>
  {{ object.name }}
</h4>
<span>Login : {{ object.login }}</span><br />
<span>Email : {{ object.email }}</span>
<h3>Tasks</h3>
<table>
  {% for task in tasks_dev %}
  <tr>
    <td>{{ task.title }}</td>
    <td>{{ task.importence }}</td>
    <td>{{ task.project }}</td>
  </tr>
  {% endfor %}
</table>
This example has allowed us to see how to send data to the template while using CBVs.
UpdateView is the CBV that will create and edit forms easily. This is the CBV that saves more time compared to developing without the MVC pattern. As with DetailView, we will have to send the logins of the record to the URL. To address UpdateView, we will discuss two examples:
- Changing a task for the supervisor to be able to edit a task
- Reducing the time spent to perform a task to develop
This example will show how to create the page that will allow the supervisor to modify a task. As with other CBVs, we will add the following lines in the urls.py file:
from django.views.generic import UpdateView
url (r'^update_task_(?P<pk>\d+)$', UpdateView.as_view(model=Task, template_name="en/public/update_task.html", success_url="index"), name="update_task"),
We will write a very similar template to the one we used for CreateView. The only difference (except the button text) will be the action field of the form, which we will define as empty. We will see how to fill the field at the end of this chapter. For now, we will make use of the fact that browsers submit the form to the current page when the field is empty. It remains visible so users can write the content to include in our article_content block. Have a look at the following code:
<form method="post" action="">
  {% csrf_token %}
  <table>
    {{ form.as_table }}
  </table>
  <p><input type="submit" value="Update" /></p>
</form>
This example is really simple. It could have been more DRY if we entered the name of the URL in the success_url property.
In our application, the life cycle of a task is the following:
- The supervisor creates the task without any duration
- When the developer has completed the task, they save their working time
We will work on the latter point, where the developer can only change the duration of the task. In this example, we will override the UpdateView class. To do this, we will create an UpdateView.py file in the views/cbv module. We need to add the following content:
from django.views.generic import UpdateView
from TasksManager.models import Task
from django.forms import ModelForm
from django.core.urlresolvers import reverse

class Form_task_time(ModelForm):
# In this line, we create a form that extends the ModelForm. The UpdateView and CreateView CBV are based on a ModelForm system.
  class Meta:
    model = Task
    fields = ['time_elapsed']
    # This is used to define the fields that appear in the form. Here there will be only one field.

class Task_update_time(UpdateView):
  model = Task
  template_name = 'en/public/update_task_developer.html'
form_class = Form_task_time
# In this line, we impose your CBV to use the ModelForm we created. When you do not define this line, Django automatically generates a ModelForm.
  success_url = 'public_empty'
  # This line sets the name of the URL that will be seen once the change has been completed.
  def get_success_url(self):
  # In this line, when you put the name of a URL in the success_url property, we have to override this method. The reverse() method returns the URL corresponding to a URL name.
    return reverse(self.success_url)
We may use this CBV with the following URL:
from TasksManager.views.cbv.UpdateView import Task_update_time
url (r'^update_task_time_(?P<pk>\d+)$', Task_update_time.as_view(), name = "update_task_time"),
For the update_task_developer.html template, we just need to duplicate the update_task.html template and modify its titles.
An example of minimalist usage
This example will show how to create the page that will allow the supervisor to modify a task. As with other CBVs, we will add the following lines in the urls.py file:
from django.views.generic import UpdateView
url (r'^update_task_(?P<pk>\d+)$', UpdateView.as_view(model=Task, template_name="en/public/update_task.html", success_url="index"), name="update_task"),
We will write a very similar template to the one we used for CreateView. The only difference (except the button text) will be the action field of the form, which we will define as empty. We will see how to fill the field at the end of this chapter. For now, we will make use of the fact that browsers submit the form to the current page when the field is empty. It remains visible so users can write the content to include in our article_content block. Have a look at the following code:
<form method="post" action="">
  {% csrf_token %}
  <table>
    {{ form.as_table }}
  </table>
  <p><input type="submit" value="Update" /></p>
</form>
This example is really simple. It could have been more DRY if we entered the name of the URL in the success_url property.
In our application, the life cycle of a task is the following:
- The supervisor creates the task without any duration
- When the developer has completed the task, they save their working time
We will work on the latter point, where the developer can only change the duration of the task. In this example, we will override the UpdateView class. To do this, we will create an UpdateView.py file in the views/cbv module. We need to add the following content:
from django.views.generic import UpdateView
from TasksManager.models import Task
from django.forms import ModelForm
from django.core.urlresolvers import reverse

class Form_task_time(ModelForm):
# In this line, we create a form that extends the ModelForm. The UpdateView and CreateView CBV are based on a ModelForm system.
  class Meta:
    model = Task
    fields = ['time_elapsed']
    # This is used to define the fields that appear in the form. Here there will be only one field.

class Task_update_time(UpdateView):
  model = Task
  template_name = 'en/public/update_task_developer.html'
form_class = Form_task_time
# In this line, we impose your CBV to use the ModelForm we created. When you do not define this line, Django automatically generates a ModelForm.
  success_url = 'public_empty'
  # This line sets the name of the URL that will be seen once the change has been completed.
  def get_success_url(self):
  # In this line, when you put the name of a URL in the success_url property, we have to override this method. The reverse() method returns the URL corresponding to a URL name.
    return reverse(self.success_url)
We may use this CBV with the following URL:
from TasksManager.views.cbv.UpdateView import Task_update_time
url (r'^update_task_time_(?P<pk>\d+)$', Task_update_time.as_view(), name = "update_task_time"),
For the update_task_developer.html template, we just need to duplicate the update_task.html template and modify its titles.
Extending the UpdateView CBV
In our application, the life cycle of a task is the following:
- The supervisor creates the task without any duration
- When the developer has completed the task, they save their working time
We will work on the latter point, where the developer can only change the duration of the task. In this example, we will override the UpdateView class. To do this, we will create an UpdateView.py file in the views/cbv module. We need to add the following content:
from django.views.generic import UpdateView
from TasksManager.models import Task
from django.forms import ModelForm
from django.core.urlresolvers import reverse

class Form_task_time(ModelForm):
# In this line, we create a form that extends the ModelForm. The UpdateView and CreateView CBV are based on a ModelForm system.
  class Meta:
    model = Task
    fields = ['time_elapsed']
    # This is used to define the fields that appear in the form. Here there will be only one field.

class Task_update_time(UpdateView):
  model = Task
  template_name = 'en/public/update_task_developer.html'
form_class = Form_task_time
# In this line, we impose your CBV to use the ModelForm we created. When you do not define this line, Django automatically generates a ModelForm.
  success_url = 'public_empty'
  # This line sets the name of the URL that will be seen once the change has been completed.
  def get_success_url(self):
  # In this line, when you put the name of a URL in the success_url property, we have to override this method. The reverse() method returns the URL corresponding to a URL name.
    return reverse(self.success_url)
We may use this CBV with the following URL:
from TasksManager.views.cbv.UpdateView import Task_update_time
url (r'^update_task_time_(?P<pk>\d+)$', Task_update_time.as_view(), name = "update_task_time"),
For the update_task_developer.html template, we just need to duplicate the update_task.html template and modify its titles.
The DeleteView CBV can easily delete a record. It does not save a lot of time compared to a normal view, but it cannot be burdened with unnecessary views. We will show an example of task deletion. For this, we need to create the DeleteView.py file in the views/cbv module. Indeed, we need to override it because we will enter the name of the URL that we want to redirect. We can only put the URL in success_url, but we want our URL to be as DRY as possible. We will add the following code in the DeleteView.py file:
from django.core.urlresolvers import reverse
from django.views.generic import DeleteView
from TasksManager.models import Task

class Task_delete(DeleteView):
  model = Task
  template_name = 'en/public/confirm_delete_task.html'
  success_url = 'public_empty'
  def get_success_url(self):
    return reverse(self.success_url)
In the preceding code, the template will be used to confirm the deletion. Indeed, the DeleteView CBV will ask for user confirmation before deleting. We will add the following lines in the urls.py file to add the URL of the deletion:
from TasksManager.views.cbv.DeleteView import Task_delete
url(r'task_delete_(?P<pk>\d+)$', Task_delete.as_view(), name="task_delete"),
To finish our task suppression page, we will create the confirm_delete_task.html template by extending base.html with the following content in the article_content block:
<h3>Do you want to delete this object?</h3>
<form method="post" action="">
  {% csrf_token %}
  <table>
    {{ form.as_table }}
  </table>
  <p><input type="submit" value="Delete" /></p>
</form>CBVs allow us to save a lot of time during page creation by performing CRUD actions with our models. By extending them, it is possible to adapt them to our use and save even more time.
To finish our suppression page, in this chapter, we have seen that CBVs allow us to not be burdened with unnecessary views. However, we have created many templates that are similar, and we override the CBV only to use the DRY URLs. We will fix these small imperfections. In this section, we will create a CBV and generic template that will allow us to:
Before writing our CBV, we will modify the models.py file, giving each model a verbose_name property and verbose_name_plural. For this, we will use the Meta class. For example, the Task model will become the following:
class Task(models.Model):
  # fields
  def __str__(self):
    return self.title
  class Meta:
    verbose_name = "task"
    verbose_name_plural = "tasks"
We will create an UpdateViewCustom.py file in the views/cbv folder and add the following code:
from django.views.generic import UpdateView
from django.core.urlresolvers import reverse

class UpdateViewCustom(UpdateView):
  template_name = 'en/cbv/UpdateViewCustom.html'
  # In this line, we define the template that will be used for all the CBVs that extend the UpdateViewCustom class. This template_name field can still be changed if we need it.
  url_name=""
  # This line is used to create the url_name property. This property will help us to define the name of the current URL. In this way, we can add the link in the action attribute of the form.
  def get_success_url(self):
  # In this line, we override the get_success_url() method by default, this method uses the name URLs.
    return reverse(self.success_url)
  def get_context_data(self, **kwargs):
  # This line is the method we use to send data to the template.
    context = super(UpdateViewCustom, self).get_context_data(**kwargs)
    # In this line, we perform the super class method to send normal data from the CBV UpdateView.
    model_name = self.model._meta.verbose_name.title()
    # In this line, we get the verbose_name property of the defined model.
    context['model_name'] = model_name
    # In this line, we send the verbose_name property to the template.
    context['url_name'] = self.url_name \
    # This line allows us to send the name of our URL to the template.
    return context
We then need to create the template that displays the form. For this, we need to create the UpdateViewCustom.html file and add the following content:
{% extends "base.html" %}
{% block title_html %}
  Update a {{ model_name }}
  <!-- In this line, we show the type of model we want to change here. -->
{% endblock %}
{% block h1 %}
  Update a {{ model_name }}
{% endblock %}
{% block article_content %}
  <form method="post" action="{% url url_name object.id %}"> <!-- line 2 -->
  <!-- In this line, we use our url_name property to redirect the form to the current page. -->
    {% csrf_token %}
    <table>
      {{ form.as_table }}
    </table>
    <p><input type="submit" value="Update" /></p>
  </form>
{% endblock %}
To test these new CBVs, we will change the update_task URL in the following manner:
url (r'^update_task_(?P<pk>\d+)$', UpdateViewCustom.as_view(model=Task, url_name="update_task", success_url="public_empty"), name="update_task"),
The following is a screenshot that shows what the CBV will display:
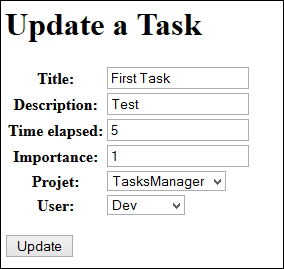
Using a custom class CBV update
To finish our suppression page, in this chapter, we have seen that CBVs allow us to not be burdened with unnecessary views. However, we have created many templates that are similar, and we override the CBV only to use the DRY URLs. We will fix these small imperfections. In this section, we will create a CBV and generic template that will allow us to:
Before writing our CBV, we will modify the models.py file, giving each model a verbose_name property and verbose_name_plural. For this, we will use the Meta class. For example, the Task model will become the following:
class Task(models.Model):
  # fields
  def __str__(self):
    return self.title
  class Meta:
    verbose_name = "task"
    verbose_name_plural = "tasks"
We will create an UpdateViewCustom.py file in the views/cbv folder and add the following code:
from django.views.generic import UpdateView
from django.core.urlresolvers import reverse

class UpdateViewCustom(UpdateView):
  template_name = 'en/cbv/UpdateViewCustom.html'
  # In this line, we define the template that will be used for all the CBVs that extend the UpdateViewCustom class. This template_name field can still be changed if we need it.
  url_name=""
  # This line is used to create the url_name property. This property will help us to define the name of the current URL. In this way, we can add the link in the action attribute of the form.
  def get_success_url(self):
  # In this line, we override the get_success_url() method by default, this method uses the name URLs.
    return reverse(self.success_url)
  def get_context_data(self, **kwargs):
  # This line is the method we use to send data to the template.
    context = super(UpdateViewCustom, self).get_context_data(**kwargs)
    # In this line, we perform the super class method to send normal data from the CBV UpdateView.
    model_name = self.model._meta.verbose_name.title()
    # In this line, we get the verbose_name property of the defined model.
    context['model_name'] = model_name
    # In this line, we send the verbose_name property to the template.
    context['url_name'] = self.url_name \
    # This line allows us to send the name of our URL to the template.
    return context
We then need to create the template that displays the form. For this, we need to create the UpdateViewCustom.html file and add the following content:
{% extends "base.html" %}
{% block title_html %}
  Update a {{ model_name }}
  <!-- In this line, we show the type of model we want to change here. -->
{% endblock %}
{% block h1 %}
  Update a {{ model_name }}
{% endblock %}
{% block article_content %}
  <form method="post" action="{% url url_name object.id %}"> <!-- line 2 -->
  <!-- In this line, we use our url_name property to redirect the form to the current page. -->
    {% csrf_token %}
    <table>
      {{ form.as_table }}
    </table>
    <p><input type="submit" value="Update" /></p>
  </form>
{% endblock %}
To test these new CBVs, we will change the update_task URL in the following manner:
url (r'^update_task_(?P<pk>\d+)$', UpdateViewCustom.as_view(model=Task, url_name="update_task", success_url="public_empty"), name="update_task"),
The following is a screenshot that shows what the CBV will display:
In this chapter, we have learned how to use one of the most powerful features of Django: CBVs. With them, developers can run efficient CRUD operations.
We also learned how to change CBVs to suit our use by adding pagination on a list of items or displaying the work of a developer on the page that displays the information for this user.
In the next chapter, we will learn how to use session variables. We will explore this with a practical example. In this example, we will modify the task list to show the last task accessed.
Sessions are variables stored by the server according to the user. On many websites, it is useful to keep user data as an identifier, a basket, or a configuration item. For this, Django stores this information in the database. It then randomly generates a string as a hash code that is transmitted to the client as a cookie. This way of working allows you to store a lot of information about the user while minimizing the exchange of data between the server and client, for example, the type of identifier that the server can generate.
In this chapter, we will do the following:
- Study how session variables work with the Django framework
- Learn how to create and retrieve a session variable
- Study session variables with a practical and useful example
- Make ourselves aware of the safety of using session variables
Firebug is a plugin for Firefox. This is a handy tool for a web developer; it allows you to do the following:
- Display the JavaScript console to read errors
- Read and edit the HTML code of the page from the browser
- View the cookies used by the website consulted
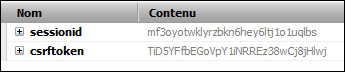
Cookies realized with Firebug
In this screenshot realized with Firebug, we notice that we have two cookies:
The following is a screenshot of the table where session data is stored:

Sessions are very useful, especially for authentication systems. Indeed, in many cases, when a user connects to a website, we record their identifier in the session variable. Thus, with each HTTP request, the user sends this identifier to inform the site about their status. This is also an essential system to make the administration module work, which we will see in a later chapter. However, sessions have a disadvantage if they are not regularly removed: they take more space in the database. To use sessions in Django, the django.contrib.sessions.middleware.SessionMiddleware middleware must be enabled and the browser must accept cookies.
The life cycle of a session is explained as follows:
- The user who does not have any session makes an HTTP request to the website.
- The server generates a session identifier and sends it to the browser along with the page requested by the user.
- Whenever the browser makes a request, it will automatically send the session identifier.
- Depending on the configuration of the system administrator, the server periodically checks if there are expired sessions. If this is the case, it may be deleted.
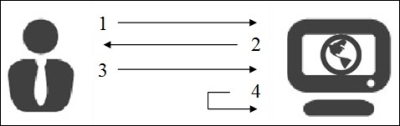
With Django, storage in a database, generation of the hash code, and exchanges with the client will be transparent. Sessions are stored in the context represented by the request variable. To save a value in a session variable, we must use the following syntax:
request.session['session_var_name'] = "Value"
Once the session variable is registered, you must use the following syntax to recover it:
request.session['session_var_name']
To use these lines, we have to be sure to interact with the request context. Indeed, in some cases, such as CBV, we do not have simple access to the request context.
In this example, we will show a practical example of using session variables. In general, a developer consults the tasks to be done. He/she selects one task, studies it, and then realizes and notes the time spent. We will store the identifier of the last task accessed in a session variable, and we will display it at the top of the tasks list to be carried out.
For this, we will no longer use the DetailView CBV to display the details of a task, but we will use a real view. First, we must define the URL that will allow us to see our view. For this, we will modify the task_detail URL with the following code:
url (r'^task_detail_(?P<pk>\d+)$', 'TasksManager.views.task_detail.page', name="task_detail"),
We will create our view in the views/task_detail.py file with the following code:
from django.shortcuts import render
from TasksManager.models import Task
from django.http import HttpResponseRedirect
from django.core.urlresolvers import reverse
def page(request, pk):
  check_task = Task.objects.filter(id = pk)
  # This line is used to retrieve a queryset of the elements whose ID property matches to the parameter pk sent to the URL. We will use this queryset in the following line : task = check_task.get().

  try:
  # This is used to define an error handling exception to the next line.
    task = check_task.get()
    # This line is used to retrieve the record in the queryset.
  except (Task.DoesNotExist, Task.MultipleObjectsReturned):
  # This allows to process the two kind of exceptions: DoesNotExist and MultipleObjectsReturned. The DoesNotExist exception type is raised if the queryset has no records. The MultipleObjectsReturned exception type is raised if queryset contains multiple records.
    return HttpResponseRedirect(reverse('public_empty'))
    # This line redirects the user if an exception is thrown. We could also redirect to an error page.
  else:
    request.session['last_task'] = task.id
    # This line records the ID property of the task in a session variable named last_task.
    #In this line, we use the same template that defines the form CBV DetailView. Without having to modify the template, we send our task in a variable named object.
  return render(request, 'en/public/task_detail.html', {'object' : task})
We will then create a list of the tasks with the ListView CBV. To do this, we must add the following URL to the urls.py file:
url (r'^task_list$', 'TasksManager.views.task_list.page', name="task_list"),
The corresponding view for this URL is as follows:
from django.shortcuts import render
from TasksManager.models import Task
from django.core.urlresolvers import reverse
def page(request):
  tasks_list = Task.objects.all()
  # This line is used to retrieve all existing tasks databases.
  last_task = 0
  # In this line, we define last_task variable with a null value without generating a bug when using the render() method.
  if 'last_task' in request.session:
  # This line is used to check whether there is a session variable named last_task.
    last_task = Task.objects.get(id = request.session['last_task'])
    # In this line, we get the recording of the last task in our last_task variable.
    tasks_list = tasks_list.exclude(id = request.session['last_task'])
    # In this line, we exclude the last task for the queryset to not have duplicates.
  return render(request, 'en/public/tasks_list.html', {'tasks_list': tasks_list, 'last_task' : last_task})
We will then create the template for our list. This example will be complete because this list will create, read, update, and delete tasks. The following code must be placed in the tasks_list.html file:
{% extends "base.html" %}
{% block title_html %}
  Tasks list
{% endblock %}
{% block article_content %}
  <table>
  <tr>
    <th>Title</th>
    <th>Description</th>
    <th colspan="2"><a href="{% url "create_task" %}">Create</a></th>
  </tr>
  {% if last_task %}
  <!-- This line checks to see if we have a record in the last_task variable. If this variable has kept the value 0, the condition will not be validated. In this way, the last accessed task will display at the beginning of the list.-->
    <tr class="important">
      <td><a href="{% url "task_detail" last_task.id %}">{{ last_task.title }}</a></td>
      <td>{{ last_task.description|truncatechars:25 }}</td>
      <td><a href="{% url "update_task" last_task.id %}">Edit</a></td>
      <td><a href="{% url "task_delete" last_task.id %}">Delete</a></td>
    </tr>
  {% endif %}
  {% for task in tasks_list %}
  <!-- This line runs through the rest of the tasks and displays. -->
    <tr>
      <td><a href="{% url "task_detail" task.id %}">{{ task.title }}</a></td>
      <td>{{ task.description|truncatechars:25 }}</td>
      <td><a href="{% url "update_task" task.id %}">Edit</a></td>
      <td><a href="{% url "task_delete" task.id %}">Delete</a></td>
    </tr>
  {% endfor %}
  </table>
{% endblock %}
For this example to be complete, we must add the following lines in the style.css file that we have created:
tr.important td {
  font-weight:bold;
}
These lines are used to highlight the row of the last task consulted.
Session variables are not modifiable by the user because they are stored by the server, unless if in your website you choose to store data sent by the client. However, there is a type of flaw that uses the system session. Indeed, if a user cannot change their session variables, they may try to usurp another user session.
We will imagine a realistic attack scenario. We are in a company that uses a website to centralize e-mails and the schedule of each employee. An employee we appoint, Bob, is very interested in one of his colleagues, Alicia. He wants to read her e-mails to learn more about her. One day, when she goes to take her coffee in the break room, Bob sits at Alicia's computer. Like all employees, he uses the same password to ease administration, and he can easily connect to Alicia's PC. Luckily, the browser has been left open. Besides, the browser periodically contacts the server to see if new messages have arrived so that the session does not have time to expire. He downloads a tool such as Firebug that allows him to read cookies. He retrieves the hash, erases the traces, and returns to his computer. He changes the ID session cookies in his browser; therefore, he has access to all the information about Alicia. Moreover, when there is no encryption, this kind of attack can be done remotely in a local network that sniffs network traffic. This is called session fixation. To protect ourselves from this kind of attack, it is possible to take a few measures:
- Encrypt communications between the server and client with SSL, for example.
- Ask the user to enter a password before they can access sensitive information, such as banking information.
- Conduct an audit of the IP address and session number. Disconnect the user if he/she changes his/her IP address. Notwithstanding this measure, the attacker can perform an IP spoofing to usurp the IP's victim.
In this chapter, we managed to save data related to a user. This data is stored for the whole duration of the session. It cannot be modified directly by the user.
We also studied the safety sessions. Keep in mind that a user session can be stolen by an attacker. Depending on the size of the project, it is necessary to take measures to secure the website.
In the next chapter, we will learn how to use the authentication module. It will allow us to create users and restrict access to certain pages to the logged-in users.
The authentication module saves a lot of time in creating space for users. The following are the main advantages of this module:
- The main actions related to users are simplified (connection, account activation, and so on)
- Using this system ensures a certain level of security
- Access restrictions to pages can be done very easily
It's such a useful module that we have already used it without noticing. Indeed, access to the administration module is performed by the authentication module. The user we created during the generation of our database was the first user of the site.
This chapter greatly alters the application we wrote earlier. At the end of this chapter, we will have:
- Modified our UserProfile model to make it compatible with the module
- Created a login page
- Modified the addition of developer and supervisor pages
- Added the restriction of access to connected users
In this section, we will learn how to use the authentication module by making our application compatible with the module.
There is normally nothing special to do for the administration module to work in our TasksManager application. Indeed, by default, the module is enabled and allows us to use the administration module. However, it is possible to work on a site where the web Django authentication module has been disabled. We will check whether the module is enabled.
In the INSTALLED_APPS section of the settings.py file, we have to check the following line:
'django.contrib.auth',
The authentication module has its own User model. This is also the reason why we have created a UserProfile model and not just User. It is a model that already contains some fields, such as nickname and password. To use the administration module, you have to use the User model on the Python33/Lib/site-package/django/contrib/auth/models.py file.
We will modify the UserProfile model in the models.py file that will become the following:
class UserProfile(models.Model):
  user_auth = models.OneToOneField(User, primary_key=True)
  phone = models.CharField(max_length=20, verbose_name="Phone number", null=True, default=None, blank=True)
  born_date = models.DateField(verbose_name="Born date", null=True, default=None, blank=True)
  last_connexion = models.DateTimeField(verbose_name="Date of last connexion", null=True, default=None, blank=True)
years_seniority = models.IntegerField(verbose_name="Seniority", default=0)
def __str__(self):
  return self.user_auth.username
We must also add the following line in models.py:
from django.contrib.auth.models import User
In this new model, we have:
The OneToOne relation means that for each recorded UserProfile model, there will be a record of the User model. In doing all this, we deeply modify the database. Given these changes and because the password is stored as a hash, we will not perform the migration with South.
It is possible to keep all the data and do a migration with South, but we should develop a specific code to save the information of the UserProfile model to the User model. The code should also generate a hash for the password, but it would be long and it is not the subject of the book. To reset South, we must do the following:
- Delete the
TasksManager/migrationsfolder and all the files contained in this folder - Delete the
database.dbfile
To use the migration system, we have to use the following commands already used in the chapter about models:
manage.py schemamigration TasksManager --initial
manage.py syncdb –migrate
After the deletion of the database, we must remove the initial data in create_developer.py. We must also delete the URL developer_detail and the following line in index.html:
<a href="{% url "developer_detail" "2" %}">Detail second developer (The second user must be a developer)</a><br />The pages that allow you to add a developer and supervisor no longer work because they are not compatible with our recent changes. We will change these pages to integrate our style changes. The view contained in the create_supervisor.py file will contain the following code:
from django.shortcuts import render
from TasksManager.models import Supervisor
from django import forms
from django.http import HttpResponseRedirect
from django.core.urlresolvers import reverse
from django.contrib.auth.models import User
def page(request):
  if request.POST:
    form = Form_supervisor(request.POST)
    if form.is_valid():
      name           = form.cleaned_data['name']
      login          = form.cleaned_data['login']
      password       = form.cleaned_data['password']
      specialisation = form.cleaned_data['specialisation']
      email          = form.cleaned_data['email']
      new_user = User.objects.create_user(username = login, email = email, password=password)
      # In this line, we create an instance of the User model with the create_user() method. It is important to use this method because it can store a hashcode of the password in database. In this way, the password cannot be retrieved from the database. Django uses the PBKDF2 algorithm to generate the hash code password of the user.
      new_user.is_active = True
      # In this line, the is_active attribute defines whether the user can connect or not. This attribute is false by default which allows you to create a system of account verification by email, or other system user validation.
      new_user.last_name=name
      # In this line, we define the name of the new user.
      new_user.save()
      # In this line, we register the new user in the database.
      new_supervisor = Supervisor(user_auth = new_user, specialisation=specialisation)
      # In this line, we create the new supervisor with the form data. We do not forget to create the relationship with the User model by setting the property user_auth with new_user instance.
      new_supervisor.save()
      return HttpResponseRedirect(reverse('public_empty'))
    else:
      return render(request, 'en/public/create_supervisor.html', {'form' : form})
  else:
    form = Form_supervisor()
  form = Form_supervisor()
  return render(request, 'en/public/create_supervisor.html', {'form' : form})
class Form_supervisor(forms.Form):
  name = forms.CharField(label="Name", max_length=30)
  login = forms.CharField(label = "Login")
  email = forms.EmailField(label = "Email")
  specialisation = forms.CharField(label = "Specialisation")
  password = forms.CharField(label = "Password", widget = forms.PasswordInput)
  password_bis = forms.CharField(label = "Password", widget = forms.PasswordInput)
  def clean(self):
    cleaned_data = super (Form_supervisor, self).clean()
    password = self.cleaned_data.get('password')
    password_bis = self.cleaned_data.get('password_bis')
    if password and password_bis and password != password_bis:
      raise forms.ValidationError("Passwords are not identical.")
    return self.cleaned_data
The create_supervisor.html template remains the same, as we are using a Django form.
You can change the page() method in the create_developer.py file to make it compatible with the authentication module (you can refer to downloadable Packt code files for further help):
def page(request):
  if request.POST:
    form = Form_inscription(request.POST)
    if form.is_valid():
      name          = form.cleaned_data['name']
      login         = form.cleaned_data['login']
      password      = form.cleaned_data['password']
      supervisor    = form.cleaned_data['supervisor']
      new_user = User.objects.create_user(username = login, password=password)
      new_user.is_active = True
      new_user.last_name=name
      new_user.save()
      new_developer = Developer(user_auth = new_user, supervisor=supervisor)
      new_developer.save()
      return HttpResponse("Developer added")
    else:
      return render(request, 'en/public/create_developer.html', {'form' : form})
  else:
    form = Form_inscription()
    return render(request, 'en/public/create_developer.html', {'form' : form})
We can also modify developer_list.html with the following content:
{% extends "base.html" %}
{% block title_html %}
    Developer list
{% endblock %}
{% block h1 %}
    Developer list
{% endblock %}
{% block article_content %}
    <table>
        <tr>
            <td>Name</td>
            <td>Login</td>
            <td>Supervisor</td>
        </tr>
        {% for dev in object_list %}
            <tr>
                <!-- The following line displays the __str__ method of the model. In this case it will display the username of the developer -->
                <td><a href="">{{ dev }}</a></td>
                <!-- The following line displays the last_name of the developer -->
                <td>{{ dev.user_auth.last_name }}</td>
                <!-- The following line displays the __str__ method of the Supervisor model. In this case it will display the username of the supervisor -->
                <td>{{ dev.supervisor }}</td>
            </tr>
        {% endfor %}
    </table>
{% endblock %}Now that you can create users, you must create a login page to allow the user to authenticate. We must add the following URL in the urls.py file:
url(r'^connection$', 'TasksManager.views.connection.page', name="public_connection"),
You must then create the connection.py view with the following code:
from django.shortcuts import render
from django import forms
from django.contrib.auth import authenticate, login
# This line allows you to import the necessary functions of the authentication module.
def page(request):
  if request.POST:
  # This line is used to check if the Form_connection form has been posted. If mailed, the form will be treated, otherwise it will be displayed to the user.
    form = Form_connection(request.POST)
    if form.is_valid():
      username = form.cleaned_data["username"]
      password = form.cleaned_data["password"]
      user = authenticate(username=username, password=password)
      # This line verifies that the username exists and the password is correct.
      if user:
      # In this line, the authenticate function returns None if authentication has failed, otherwise it returns an object that validates the condition.
        login(request, user)
        # In this line, the login() function allows the user to connect.
    else:
      return render(request, 'en/public/connection.html', {'form' : form})
  else:
    form = Form_connection()
  return render(request, 'en/public/connection.html', {'form' : form})
class Form_connection(forms.Form):
  username = forms.CharField(label="Login")
  password = forms.CharField(label="Password", widget=forms.PasswordInput)
  def clean(self):
    cleaned_data = super(Form_connection, self).clean()
    username = self.cleaned_data.get('username')
    password = self.cleaned_data.get('password')
    if not authenticate(username=username, password=password):
      raise forms.ValidationError("Wrong login or password")
    return self.cleaned_data
You must then create the connection.html template with the following code:
{% extends "base.html" %}
{% block article_content %}
  {% if user.is_authenticated %}
  <-- This line checks if the user is connected.-->
    <h1>You are connected.</h1>
    <p>
      Your email : {{ user.email }}
      <-- In this line, if the user is connected, this line will display his/her e-mail address.-->
    </p>
  {% else %}
  <!-- In this line, if the user is not connected, we display the login form.-->
    <h1>Connexion</h1>
    <form method="post" action="{{ public_connection }}">
      {% csrf_token %}
      <table>
        {{ form.as_table }}
      </table>
      <input type="submit" class="button" value="Connection" />
    </form>
  {% endif %}
{% endblock %}
When the user logs in, Django will save his/her data connection in session variables. This example has allowed us to verify that the audit login and password was transparent to the user. Indeed, the authenticate() and login() methods allow the developer to save a lot of time. Django also provides convenient shortcuts for the developer such as the user.is_authenticated attribute that checks if the user is logged in. Users prefer when a logout link is present on the website, especially when connecting from a public computer. We will now create the logout page.
First, we need to create the logout.py file with the following code:
from django.shortcuts import render
from django.contrib.auth import logout
def page(request):
    logout(request)
    return render(request, 'en/public/logout.html')
In the previous code, we imported the logout() function of the authentication module and used it with the request object. This function will remove the user identifier of the request object, and delete flushes their session data.
When the user logs out, he/she needs to know that the site was actually disconnected. Let's create the following template in the logout.html file:
{% extends "base.html" %}
{% block article_content %}
  <h1>You are not connected.</h1>
{% endblock %}When developers implement an authentication system, it's usually to limit access to anonymous users. In this section, we'll see two ways to control access to our web pages.
The authentication module provides simple ways to prevent anonymous users from accessing some pages. Indeed, there is a very convenient decorator to restrict access to a view. This decorator is called login_required.
In the example that follows, we will use the designer to limit access to the page() view from the create_developer module in the following manner:
- First, we must import the decorator with the following line:
from django.contrib.auth.decorators import login_required
- Then, we will add the decorator just before the declaration of the view:
@login_required
def page(request): # This line already exists. Do not copy it.
- With the addition of these two lines, the page that lets you add a developer is only available to the logged-in users. If you try to access the page without being connected, you will realize that it is not very practical because the obtained page is a 404 error. To improve this, simply tell Django what the connection URL is by adding the following line in the
settings.pyfile:LOGIN_URL = 'public_connection'
- With this line, if the user tries to access a protected page, he/she will be redirected to the login page. You may have noticed that if you're not logged in and you click the Create a developer link, the URL contains a parameter named next. The following is the screen capture of the URL:

- This parameter contains the URL that the user tried to consult. The authentication module redirects the user to the page when he/she connects. To do this, we will modify the
connection.pyfile we created. We add the line that imports therender()function to import theredirect()function:from django.shortcuts import render, redirect
- To redirect the user after they log in, we must add two lines after the line that contains the code login (request, user). There are two lines to be added:
if request.GET.get('next') is not None:
  return redirect(request.GET['next'])
This system is very useful when the user session has expired and he/she wants to see a specific page.
The system that we have seen does not simply limit access to pages generated by CBVs. For this, we will use the same decorator, but this time in the urls.py file.
We will add the following line to import the decorator:
from django.contrib.auth.decorators import login_required
We need to change the line that corresponds to the URL named create_project:
url (r'^create_project$', login_required(CreateView.as_view(model=Project, template_name="en/public/create_project.html", success_url = 'index')), name="create_project"),
The use of the login_required decorator is very simple and allows the developer to not waste too much time.
Restricting access to views
The authentication module provides simple ways to prevent anonymous users from accessing some pages. Indeed, there is a very convenient decorator to restrict access to a view. This decorator is called login_required.
In the example that follows, we will use the designer to limit access to the page() view from the create_developer module in the following manner:
- First, we must import the decorator with the following line:
from django.contrib.auth.decorators import login_required
- Then, we will add the decorator just before the declaration of the view:
@login_required
def page(request): # This line already exists. Do not copy it.
- With the addition of these two lines, the page that lets you add a developer is only available to the logged-in users. If you try to access the page without being connected, you will realize that it is not very practical because the obtained page is a 404 error. To improve this, simply tell Django what the connection URL is by adding the following line in the
settings.pyfile:LOGIN_URL = 'public_connection'
- With this line, if the user tries to access a protected page, he/she will be redirected to the login page. You may have noticed that if you're not logged in and you click the Create a developer link, the URL contains a parameter named next. The following is the screen capture of the URL:
- This parameter contains the URL that the user tried to consult. The authentication module redirects the user to the page when he/she connects. To do this, we will modify the
connection.pyfile we created. We add the line that imports therender()function to import theredirect()function:from django.shortcuts import render, redirect
- To redirect the user after they log in, we must add two lines after the line that contains the code login (request, user). There are two lines to be added:
if request.GET.get('next') is not None:
  return redirect(request.GET['next'])
This system is very useful when the user session has expired and he/she wants to see a specific page.
The system that we have seen does not simply limit access to pages generated by CBVs. For this, we will use the same decorator, but this time in the urls.py file.
We will add the following line to import the decorator:
from django.contrib.auth.decorators import login_required
We need to change the line that corresponds to the URL named create_project:
url (r'^create_project$', login_required(CreateView.as_view(model=Project, template_name="en/public/create_project.html", success_url = 'index')), name="create_project"),
The use of the login_required decorator is very simple and allows the developer to not waste too much time.
Restricting access to URLs
The system that we have seen does not simply limit access to pages generated by CBVs. For this, we will use the same decorator, but this time in the urls.py file.
We will add the following line to import the decorator:
from django.contrib.auth.decorators import login_required
We need to change the line that corresponds to the URL named create_project:
url (r'^create_project$', login_required(CreateView.as_view(model=Project, template_name="en/public/create_project.html", success_url = 'index')), name="create_project"),
The use of the login_required decorator is very simple and allows the developer to not waste too much time.
In this chapter, we modified our application to make it compatible with the authentication module. We created pages that allow the user to log in and log out. We then learned how to restrict access to some pages for the logged in users.
In the next chapter, we will improve the usability of the application with the addition of AJAX requests. We will learn the basics of jQuery and then learn how to use it to make an asynchronous request to the server. Also, we will learn how to handle the response from the server.
AJAX is an acronym for Asynchronous JavaScript and XML. This technology allows a browser to asynchronously communicate with the server using JavaScript. Refreshing the web page is not necessarily required to perform an action on the server.
Many web applications have been released that run on AJAX. A web application is often described as a website containing only one page and which performs all operations with an AJAX server.
If you are not using a library, using AJAX requires a lot of lines of code to be compatible with several browsers. When including jQuery, it is possible to make easy AJAX requests while at the same time being compatible with many browsers.
In this chapter, we will cover:
- Working with JQuery
- JQuery basics
- Working with AJAX in the task manager
In this chapter, we use jQuery to make AJAX requests. Before using jQuery, let's understand its basics.
CSS selectors used in style sheets can effectively retrieve an item with very little code. This is a feature that is so interesting that it is implemented in the HTML5 Selector API with the following syntax:
item = document.querySelector('tag#id_content');jQuery also allows us to use CSS selectors. To do the same thing with jQuery, you must use the following syntax:
item = $('tag#id_content');At the moment, it is better to use jQuery than the Selector API because jQuery 1.x.x guarantees great compatibility with older browsers.
It is possible to get back the HTML code between two tags with the html() method:
alert($('div#div_1').html());This line will display an alert with the HTML content of the <div id="div_1"> tag. Concerning the input and textarea tags, it is possible to recover their content in the same way as with the val() method.
Changing the content of a tag is very simple because we're using the same method as the one we used for recovery. The main difference between the two is that we will send a parameter to the method.
Thus, the following instruction will add a button in the div tag:
$('div#div_1').html($('div#div_1').html()+'<button>JQuery</button>');jQuery also allows us to loop all the elements that match a selector. To do this, you must use the each() method as shown in the following example:
var cases = $('nav ul li').each(function() {
  $(this).addClass("nav_item");
});To use jQuery, you must first import the library. There are two ways to add jQuery to a web page. Each method has its own advantages, as outlined here:
- Download jQuery and import it from our web server. Using this method, we keep control over the library and we are sure that the file will be reachable if we have our own website too.
- Use the hosted libraries of the Google-hosted bookstores reachable from any website. The advantage is that we avoid an HTTP request to our server, which saves a bit of power.
In this chapter, we will host jQuery on our web server to not be dependent on a host.
We will import jQuery in all the pages of our application because we might need multiple pages. In addition, the cache of the browser will keep jQuery for some time so as not to download it too often. For this, we will download jQuery 1.11.0 and save it on the TasksManager/static/javascript/lib/jquery-1.11.0.js file.
Then, you must add the following line in the head tag of the base.html file:
<script src="{% static 'javascript/lib/jquery-1.11.0.js' %}"></script>
{% block head %}{% endblock %}
With these changes, we can use jQuery in all the pages of our website, and we can add lines in the head block from the template which extends base.html.
CSS selectors in jQuery
CSS selectors used in style sheets can effectively retrieve an item with very little code. This is a feature that is so interesting that it is implemented in the HTML5 Selector API with the following syntax:
item = document.querySelector('tag#id_content');jQuery also allows us to use CSS selectors. To do the same thing with jQuery, you must use the following syntax:
item = $('tag#id_content');At the moment, it is better to use jQuery than the Selector API because jQuery 1.x.x guarantees great compatibility with older browsers.
It is possible to get back the HTML code between two tags with the html() method:
alert($('div#div_1').html());This line will display an alert with the HTML content of the <div id="div_1"> tag. Concerning the input and textarea tags, it is possible to recover their content in the same way as with the val() method.
Changing the content of a tag is very simple because we're using the same method as the one we used for recovery. The main difference between the two is that we will send a parameter to the method.
Thus, the following instruction will add a button in the div tag:
$('div#div_1').html($('div#div_1').html()+'<button>JQuery</button>');jQuery also allows us to loop all the elements that match a selector. To do this, you must use the each() method as shown in the following example:
var cases = $('nav ul li').each(function() {
  $(this).addClass("nav_item");
});To use jQuery, you must first import the library. There are two ways to add jQuery to a web page. Each method has its own advantages, as outlined here:
- Download jQuery and import it from our web server. Using this method, we keep control over the library and we are sure that the file will be reachable if we have our own website too.
- Use the hosted libraries of the Google-hosted bookstores reachable from any website. The advantage is that we avoid an HTTP request to our server, which saves a bit of power.
In this chapter, we will host jQuery on our web server to not be dependent on a host.
We will import jQuery in all the pages of our application because we might need multiple pages. In addition, the cache of the browser will keep jQuery for some time so as not to download it too often. For this, we will download jQuery 1.11.0 and save it on the TasksManager/static/javascript/lib/jquery-1.11.0.js file.
Then, you must add the following line in the head tag of the base.html file:
<script src="{% static 'javascript/lib/jquery-1.11.0.js' %}"></script>
{% block head %}{% endblock %}With these changes, we can use jQuery in all the pages of our website, and we can add lines in the head block from the template which extends base.html.
Getting back the HTML content
It is possible to get back the HTML code between two tags with the html() method:
alert($('div#div_1').html());This line will display an alert with the HTML content of the <div id="div_1"> tag. Concerning the input and textarea tags, it is possible to recover their content in the same way as with the val() method.
Changing the content of a tag is very simple because we're using the same method as the one we used for recovery. The main difference between the two is that we will send a parameter to the method.
Thus, the following instruction will add a button in the div tag:
$('div#div_1').html($('div#div_1').html()+'<button>JQuery</button>');jQuery also allows us to loop all the elements that match a selector. To do this, you must use the each() method as shown in the following example:
var cases = $('nav ul li').each(function() {
$(this).addClass("nav_item");
});To use jQuery, you must first import the library. There are two ways to add jQuery to a web page. Each method has its own advantages, as outlined here:
- Download jQuery and import it from our web server. Using this method, we keep control over the library and we are sure that the file will be reachable if we have our own website too.
- Use the hosted libraries of the Google-hosted bookstores reachable from any website. The advantage is that we avoid an HTTP request to our server, which saves a bit of power.
In this chapter, we will host jQuery on our web server to not be dependent on a host.
We will import jQuery in all the pages of our application because we might need multiple pages. In addition, the cache of the browser will keep jQuery for some time so as not to download it too often. For this, we will download jQuery 1.11.0 and save it on the TasksManager/static/javascript/lib/jquery-1.11.0.js file.
Then, you must add the following line in the head tag of the base.html file:
<script src="{% static 'javascript/lib/jquery-1.11.0.js' %}"></script>
{% block head %}{% endblock %}With these changes, we can use jQuery in all the pages of our website, and we can add lines in the head block from the template which extends base.html.
Setting HTML content in an element
Changing the content of a tag is very simple because we're using the same method as the one we used for recovery. The main difference between the two is that we will send a parameter to the method.
Thus, the following instruction will add a button in the div tag:
$('div#div_1').html($('div#div_1').html()+'<button>JQuery</button>');jQuery also allows us to loop all the elements that match a selector. To do this, you must use the each() method as shown in the following example:
var cases = $('nav ul li').each(function() {
$(this).addClass("nav_item");
});To use jQuery, you must first import the library. There are two ways to add jQuery to a web page. Each method has its own advantages, as outlined here:
- Download jQuery and import it from our web server. Using this method, we keep control over the library and we are sure that the file will be reachable if we have our own website too.
- Use the hosted libraries of the Google-hosted bookstores reachable from any website. The advantage is that we avoid an HTTP request to our server, which saves a bit of power.
In this chapter, we will host jQuery on our web server to not be dependent on a host.
We will import jQuery in all the pages of our application because we might need multiple pages. In addition, the cache of the browser will keep jQuery for some time so as not to download it too often. For this, we will download jQuery 1.11.0 and save it on the TasksManager/static/javascript/lib/jquery-1.11.0.js file.
Then, you must add the following line in the head tag of the base.html file:
<script src="{% static 'javascript/lib/jquery-1.11.0.js' %}"></script>
{% block head %}{% endblock %}With these changes, we can use jQuery in all the pages of our website, and we can add lines in the head block from the template which extends base.html.
Looping elements
jQuery also allows us to loop all the elements that match a selector. To do this, you must use the each() method as shown in the following example:
var cases = $('nav ul li').each(function() {
$(this).addClass("nav_item");
});To use jQuery, you must first import the library. There are two ways to add jQuery to a web page. Each method has its own advantages, as outlined here:
- Download jQuery and import it from our web server. Using this method, we keep control over the library and we are sure that the file will be reachable if we have our own website too.
- Use the hosted libraries of the Google-hosted bookstores reachable from any website. The advantage is that we avoid an HTTP request to our server, which saves a bit of power.
In this chapter, we will host jQuery on our web server to not be dependent on a host.
We will import jQuery in all the pages of our application because we might need multiple pages. In addition, the cache of the browser will keep jQuery for some time so as not to download it too often. For this, we will download jQuery 1.11.0 and save it on the TasksManager/static/javascript/lib/jquery-1.11.0.js file.
Then, you must add the following line in the head tag of the base.html file:
<script src="{% static 'javascript/lib/jquery-1.11.0.js' %}"></script>
{% block head %}{% endblock %}With these changes, we can use jQuery in all the pages of our website, and we can add lines in the head block from the template which extends base.html.
Importing the jQuery library
To use jQuery, you must first import the library. There are two ways to add jQuery to a web page. Each method has its own advantages, as outlined here:
- Download jQuery and import it from our web server. Using this method, we keep control over the library and we are sure that the file will be reachable if we have our own website too.
- Use the hosted libraries of the Google-hosted bookstores reachable from any website. The advantage is that we avoid an HTTP request to our server, which saves a bit of power.
In this chapter, we will host jQuery on our web server to not be dependent on a host.
We will import jQuery in all the pages of our application because we might need multiple pages. In addition, the cache of the browser will keep jQuery for some time so as not to download it too often. For this, we will download jQuery 1.11.0 and save it on the TasksManager/static/javascript/lib/jquery-1.11.0.js file.
Then, you must add the following line in the head tag of the base.html file:
<script src="{% static 'javascript/lib/jquery-1.11.0.js' %}"></script>
{% block head %}{% endblock %}With these changes, we can use jQuery in all the pages of our website, and we can add lines in the head block from the template which extends base.html.
In this section, we will modify the page that displays the list of tasks for deleting the tasks to be carried out in AJAX. To do this, we will perform the following steps:
- Add a
Deletebutton on thetask_listpage. - Create a JavaScript file that will contain the AJAX code and the function that will process the return value of the AJAX request.
- Create a Django view that will delete the task.
We will add the Delete button by modifying the tasks_list.html template. To do this, you must change the for task in task loop in tasks_list as follows:
{% for task in tasks_list %}
<tr id="task_{{ task.id }}">
<td><a href="{% url "task_detail" task.id %}">{{ task.title }}</a></td>
<td>{{ task.description|truncatechars:25 }}</td>
<td><a href="{% url "update_task" task.id %}">Edit</a></td>
<td><button onclick="javascript:task_delete({{ task.id }}, '{% url "task
_delete_ajax" %}');">Delete</button></td>
</tr>
{% endfor %}In the preceding code, we added an id property to the <tr> tag. This property will be useful in the JavaScript code to delete the task line when the page will receive the AJAX response. We also replaced the Delete link with a Delete button that executes the JavaScript task_delete() function. The new button will call the task_delete() function to execute the AJAX request. This function accepts two parameters:
- The identifier of the task
- The URL of the AJAX request
We will create this function in the static/javascript/task.js file by adding the following code:
function task_delete(id, url){
$.ajax({
type: 'POST',
// Here, we define the used method to send data to the Django views. Other values are possible as POST, GET, and other HTTP request methods.
url: url,
// This line is used to specify the URL that will process the request.
data: {task: id},
// The data property is used to define the data that will be sent with the AJAX request.
dataType:'json',
// This line defines the type of data that we are expecting back from the server. We do not necessarily need JSON in this example, but when the response is more complete, we use this kind of data type.
success: task_delete_confirm,
// The success property allows us to define a function that will be executed when the AJAX request works. This function receives as a parameter the AJAX response.
error: function () {alert('AJAX error.');}
// The error property can define a function when the AJAX request does not work. We defined in the previous code an anonymous function that displays an AJAX error to the user.
});
}
function task_delete_confirm(response) {
task_id = JSON.parse(response);
// This line is in the function that receives the AJAX response when the request was successful. This line allows deserializing the JSON response returned by Django views.
if (task_id>0) {
$('#task_'+task_id).remove();
// This line will delete the <tr> tag containing the task we have just removed
}
else {
alert('Error');
}
}We must add the following lines after the title_html block in the tasks_list.html template to import task.js in the template:
{% load static %}
{% block head %}
<script src="{% static 'javascript/task.js' %}"></script>
{% endblock %}We must add the following URL to the urls.py file:
url(r'^task-delete-ajax$', 'TasksManager.views.ajax.task_delete_ajax.page', name="task_delete_ajax"),
This URL will use the views contained in the view/ajax/task_delete_ajax.py file. We must create the AJAX module with the __init__.py file and our task_delete_ajax.py file with the following content:
from TasksManager.models import Task
from django.http import HttpResponse
from django import forms
from django.views.decorators.csrf import csrf_exempt
# We import the csrf_exempt decorator that we will use to line 4.
import json
# We import the json module we use to line 8.
class Form_task_delete(forms.Form):
# We create a form with a task field that contains the identifier of the task. When we create a form it allows us to use the Django validators to check the contents of the data sent by AJAX. Indeed, we are not immune that the user sends data to hack our server.
task = forms.IntegerField()
@csrf_exempt
# This line allows us to not verify the CSRF token for this view. Indeed, with AJAX we cannot reliably use the CSRF protection.
def page(request):
return_value="0"
# We create a variable named return_value that will contain a code returned to our JavaScript function. We initialize the value 0 to the variable.
if len(request.POST) > 0:
form = Form_task_delete(request.POST)
if form.is_valid():
# This line allows us to verify the validity of the value sent by the AJAX request.
id_task = form.cleaned_data['task']
task_record = Task.objects.get(id = id_task)
task_record.delete()
return_value=id_task
# If the task been found, the return_value variable will contain the value of the id property after removing the task. This value will be returned to the JavaScript function and will be useful to remove the corresponding row in the HTML table.
# The following line contains two significant items. The json.dumps() function will return a serialized JSON object. Serialization allows encoding an object sequence of characters. This technique allows different languages to share objects transparently. We also define a content_type to specify the type of data returned by the view.
return HttpResponse(json.dumps(return_value), content_type = "application/json")In this chapter, we learned how to use jQuery. We saw how to easily access the DOM with this library. We also created an AJAX request on our TasksManager application and we wrote the view to process this request.
In the next chapter, we will learn how to deploy a Django project based on the Nginx and PostgreSQL server. We will see and discuss the installation step by step.
When the development phase of a website is complete and you want to make it accessible to users, you must deploy it. The following are the steps to do this:
- Completing the development
- Selecting the physical server
- Selecting the server software
- Selecting the server database
- Installing PIP and Python 3
- Installing PostgreSQL
- Installing Nginx
- Installing virtualenv and creating a virtual environment
- Installing Django, South, Gunicorn, and psycopg2
- Configuring PostgreSQL
- Adaptation of Work_manager to the production
- Initial South migration
- Using Gunicorn
- Starting Nginx
A physical server is the machine that will host your website. It is possible to host your own website at home, but this is not suitable for professional websites. Indeed, as many web users use the site, it is necessary to use a web host. There are so many different types of accommodations, as follows:
- Simple hosting: This type of hosting is suitable for websites that need quality service without having a lot of power. With this accommodation, you do not have to deal with system administration, but it does not allow the same flexibility as dedicated servers. This type of hosting also has another disadvantage with Django websites: there are not many hosts offering a compatible accommodation with Django yet.
- A dedicated server: This is the most flexible type of accommodation. We rent (or buy) a server with a web host that provides us with an Internet connection and other services. The prices are different depending on the desired configuration, but powerful servers are very expensive. This type of accommodation requires you to deal with system administration, unless you subscribe to an outsourcing service. An outsourcing service allows you to use a system administrator who will take care of the server against remuneration.
- A virtual server: Virtual servers are very similar to dedicated servers. They are usually less expensive because some virtual servers can run on a single physical server. Hosts regularly offer additional services such as server hot backups or replication.
Choosing a type of accommodation should be based on your needs and financial resources.
The following is a nonexhaustive list of hosts that offer Django:
- alwaysdata
- WebFaction
- DjangoEurope
- DjangoFoo Hosting
During the development phase, we used the server that comes with Django. This server is very convenient during development, but it is not suitable for a production website. Indeed, the development server is neither efficient nor secure. You have to choose another type of server to install it. There are many web servers; we selected two of them:
- Apache HTTP Server: This has been the most-used web server since 1996, according to Netcraft. It is a modular server that allows you to install modules without the need to compile the server. In recent years, it's been used less and less. According to Netcraft, in April 2013, the market share was 51 percent.
- Nginx: Nginx is known for its performance and low memory consumption. It is also modular, but the modules need to be integrated in the compilation. In April 2013, Nginx was used by 14 percent of all the websites whose web server Netcraft knows about.
The choice of server database is important. Indeed, this server will store all the data of the website. The main characteristics that are sought after in a database are performance, safeness, and reliability.
The choice depends on the importance of these three criteria:
- Oracle: This database is a system database developed by Oracle Corporation. There is a free open source version of this database, but its features are limited. This is not a free-of-charge database.
- MySQL: This is a database system that belongs to Oracle (since the purchase of Sun Microsystems). It is a widely used database on the Web, including the LAMP (Linux Apache MySQL PHP) platform. It is distributed under a dual GPL and a proprietary license.
- PostgreSQL: This is a system of free databases distributed under the BSD license. This system is known to be stable and offers advanced features (such as the creation of data types).
- SQLite: This is the system that we used during the development of our website. It is not suitable for a website that gets a lot of visitors. Indeed, the entire database is in a SQLite file and does not allow a competitor to access the data. Furthermore, there is no user or system without a security mechanism. However, it is quite possible to use it to demonstrate to a client.
- MongoDB: This is a document-oriented database. This database system is classified as a NoSQL database because it uses a storage architecture that uses the BSON (binary JSON) format. This system is popular in environments where the database is distributed among several servers.
For the rest of the book, we will use the HTTP Nginx server and PostgreSQL database. The chapter's explanation will be made on a GNU / Linux Debian 7.3.0 32-bit system. We will start with a new Debian operating system without any installations.
For the following commands, you must log on with a user account that has the same privileges as a superuser account. For this purpose, run the following command:
su
After this command, you must type the root password.
First, we update the Debian repositories:
apt-get update
Then, we install Python 3 and PIP as done in Chapter 2, Creating a Django Project:
apt-get install python3 apt-get install python3-pip alias pip=pip-3.2
We will install four packages to be able to use PostgreSQL:
apt-get install libpq-dev python-dev postgresql postgresql-contrib
Then, we will install our web Nginx server:
apt-get install nginx
We have installed Python and PIP as done in Chapter 2, Creating a Django Project, but before installing Django, we will install virtualenv. This tool is used to create virtual environments for Python and to have different library versions on the same operating system. Indeed, on many Linux systems with Debian, a version of Python 2 is already installed. It is recommended that you do not uninstall it to keep the system stable. We will install virtualenv to set our own environments and facilitate our future Django migration:
pip install virtualenv
You must then create a folder that will host your virtual environments:
mkdir /home/env
The following command creates a virtual environment named django1.6 in the /home/env/ folder:
virtualenv /home/env/django1.6
We will then provide all the rights to all the users to access the folder of the environment by issuing the following command. From the point of view of safety, it would be better to restrict access by user or group, but this will take a lot of time:
cd /home/ chmod -R 777 env/ exit
Installing PIP and Python 3
For the following commands, you must log on with a user account that has the same privileges as a superuser account. For this purpose, run the following command:
su
After this command, you must type the root password.
First, we update the Debian repositories:
apt-get update
Then, we install Python 3 and PIP as done in Chapter 2, Creating a Django Project:
apt-get install python3 apt-get install python3-pip alias pip=pip-3.2
We will install four packages to be able to use PostgreSQL:
apt-get install libpq-dev python-dev postgresql postgresql-contrib
Then, we will install our web Nginx server:
apt-get install nginx
We have installed Python and PIP as done in Chapter 2, Creating a Django Project, but before installing Django, we will install virtualenv. This tool is used to create virtual environments for Python and to have different library versions on the same operating system. Indeed, on many Linux systems with Debian, a version of Python 2 is already installed. It is recommended that you do not uninstall it to keep the system stable. We will install virtualenv to set our own environments and facilitate our future Django migration:
pip install virtualenv
You must then create a folder that will host your virtual environments:
mkdir /home/env
The following command creates a virtual environment named django1.6 in the /home/env/ folder:
virtualenv /home/env/django1.6
We will then provide all the rights to all the users to access the folder of the environment by issuing the following command. From the point of view of safety, it would be better to restrict access by user or group, but this will take a lot of time:
cd /home/ chmod -R 777 env/ exit
Installing PostgreSQL
We will install four packages to be able to use PostgreSQL:
apt-get install libpq-dev python-dev postgresql postgresql-contrib
Then, we will install our web Nginx server:
apt-get install nginx
We have installed Python and PIP as done in Chapter 2, Creating a Django Project, but before installing Django, we will install virtualenv. This tool is used to create virtual environments for Python and to have different library versions on the same operating system. Indeed, on many Linux systems with Debian, a version of Python 2 is already installed. It is recommended that you do not uninstall it to keep the system stable. We will install virtualenv to set our own environments and facilitate our future Django migration:
pip install virtualenv
You must then create a folder that will host your virtual environments:
mkdir /home/env
The following command creates a virtual environment named django1.6 in the /home/env/ folder:
virtualenv /home/env/django1.6
We will then provide all the rights to all the users to access the folder of the environment by issuing the following command. From the point of view of safety, it would be better to restrict access by user or group, but this will take a lot of time:
cd /home/ chmod -R 777 env/ exit
Installing virtualenv and creating a virtual environment
We have installed Python and PIP as done in Chapter 2, Creating a Django Project, but before installing Django, we will install virtualenv. This tool is used to create virtual environments for Python and to have different library versions on the same operating system. Indeed, on many Linux systems with Debian, a version of Python 2 is already installed. It is recommended that you do not uninstall it to keep the system stable. We will install virtualenv to set our own environments and facilitate our future Django migration:
pip install virtualenv
You must then create a folder that will host your virtual environments:
mkdir /home/env
The following command creates a virtual environment named django1.6 in the /home/env/ folder:
virtualenv /home/env/django1.6
We will then provide all the rights to all the users to access the folder of the environment by issuing the following command. From the point of view of safety, it would be better to restrict access by user or group, but this will take a lot of time:
cd /home/ chmod -R 777 env/ exit
We will install Django and all the components that are needed for Nginx and Django to be able to communicate. We will first activate our virtual environment. The following command will connect us to the virtual environment. As a result, all Python commands made from this environment can only use packages installed in this environment. In our case, we will install four libraries that are only installed in our virtual environment. For the following commands, you must log in as a user who does not have the superuser privileges. We cannot perform the following commands from the root account because we need virtualenv. However, the root account sometimes overrides the virtual environment to use Python from the system, instead of the one present in the virtual environment.
source /home/env/django1.6/bin/activate pip install django=="1.6" pip install South
Gunicorn is a Python package that plays the role of a WSGI interface between Python and Nginx. To install it, issue the following command:
pip install gunicorn
psycopg2 is a library that allows Python and PostgreSQL to communicate with each other:
pip install psycopg2
To reconnect as a superuser, we have to disconnect from the virtual environment:
deactivate
For the following commands, you must log on with a user account that has the same privileges as a superuser. We will connect to the PostgreSQL server:
su su - postgres
The following command creates a database called workmanager:
createdb workmanager
We will then create a user for PostgreSQL. After entering the following command, more information is requested:
createuser -P
The following lines are the information requested by PostgreSQL for the new user and the responses (used for this chapter):
Role name : workmanager Password : workmanager Password confirmation : workmanager Super user : n Create DB : n Create new roles : n
Then, we must connect to the PostgreSQL interpreter:
psql
We give all the rights to our new user on the new database:
GRANT ALL PRIVILEGES ON DATABASE workmanager TO workmanager;
Then, we quit the SQL interpreter and the connection to PostgreSQL:
\q exit
For the following commands, you must log in as a user who does not have the superuser privileges.
At this stage of deployment, we have to copy the folder that contains our Django project. The folder to be copied is the
Work_manager folder (which contains the Work_manager and TasksManager folders and the manage.py file). We will copy it to the root of the virtual environment, that is, in /home/env/django1.6.
To copy it, you can use the means you have at your disposal: a USB key, SFTP, FTP, and so on. We then need to edit the settings.py file of the project to adapt it to the deployment.
The part that defines the database connection becomes the following:
DATABASES = {
'default': {
'ENGINE': 'django.db.backends.postgresql_psycopg2',
'NAME': 'workmanager',
'USER': 'workmanager',
'PASSWORD': 'workmanager',
'HOST': '127.0.0.1',
'PORT': '',
}
}We must modify the ALLOWED_HOSTS line with the following:
ALLOWED_HOSTS = ['*']
Also, it is important to not use the DEBUG mode. Indeed, the DEBUG mode can provide valuable data to hackers. For this, we must change the DEBUG and TEMPLATE_DEBUG variables in the following way:
DEBUG = False TEMPLATE_DEBUG = False
We activate our virtual environment to perform the migration and launch Gunicorn:
cd /home/env/django1.6/Work_manager/ source /home/env/django1.6/bin/activate python3.2 manage.py schemamigration TasksManager --initial python3.2 manage.py syncdb -–migrate
Sometimes, the creation of the database with PostgreSQL generates an error when everything goes well. To see if the creation of the database went well, we must run the following commands as the root user and verify that the tables have been created:
su su - postgres psql -d workmanager \dt \q exit
If they were properly created, you have to make a fake South migration to manually tell it that everything went well:
python3.2 manage.py migrate TasksManager --fake
Configuring PostgreSQL
For the following commands, you must log on with a user account that has the same privileges as a superuser. We will connect to the PostgreSQL server:
su su - postgres
The following command creates a database called workmanager:
createdb workmanager
We will then create a user for PostgreSQL. After entering the following command, more information is requested:
createuser -P
The following lines are the information requested by PostgreSQL for the new user and the responses (used for this chapter):
Role name : workmanager Password : workmanager Password confirmation : workmanager Super user : n Create DB : n Create new roles : n
Then, we must connect to the PostgreSQL interpreter:
psql
We give all the rights to our new user on the new database:
GRANT ALL PRIVILEGES ON DATABASE workmanager TO workmanager;
Then, we quit the SQL interpreter and the connection to PostgreSQL:
\q exit
For the following commands, you must log in as a user who does not have the superuser privileges.
At this stage of deployment, we have to copy the folder that contains our Django project. The folder to be copied is the
Work_manager folder (which contains the Work_manager and TasksManager folders and the manage.py file). We will copy it to the root of the virtual environment, that is, in /home/env/django1.6.
To copy it, you can use the means you have at your disposal: a USB key, SFTP, FTP, and so on. We then need to edit the settings.py file of the project to adapt it to the deployment.
The part that defines the database connection becomes the following:
DATABASES = {
'default': {
'ENGINE': 'django.db.backends.postgresql_psycopg2',
'NAME': 'workmanager',
'USER': 'workmanager',
'PASSWORD': 'workmanager',
'HOST': '127.0.0.1',
'PORT': '',
}
}We must modify the ALLOWED_HOSTS line with the following:
ALLOWED_HOSTS = ['*']
Also, it is important to not use the DEBUG mode. Indeed, the DEBUG mode can provide valuable data to hackers. For this, we must change the DEBUG and TEMPLATE_DEBUG variables in the following way:
DEBUG = False TEMPLATE_DEBUG = False
We activate our virtual environment to perform the migration and launch Gunicorn:
cd /home/env/django1.6/Work_manager/ source /home/env/django1.6/bin/activate python3.2 manage.py schemamigration TasksManager --initial python3.2 manage.py syncdb -–migrate
Sometimes, the creation of the database with PostgreSQL generates an error when everything goes well. To see if the creation of the database went well, we must run the following commands as the root user and verify that the tables have been created:
su su - postgres psql -d workmanager \dt \q exit
If they were properly created, you have to make a fake South migration to manually tell it that everything went well:
python3.2 manage.py migrate TasksManager --fake
Adaptation of Work_manager to production
For the following commands, you must log in as a user who does not have the superuser privileges.
At this stage of deployment, we have to copy the folder that contains our Django project. The folder to be copied is the
Work_manager folder (which contains the Work_manager and TasksManager folders and the manage.py file). We will copy it to the root of the virtual environment, that is, in /home/env/django1.6.
To copy it, you can use the means you have at your disposal: a USB key, SFTP, FTP, and so on. We then need to edit the settings.py file of the project to adapt it to the deployment.
The part that defines the database connection becomes the following:
DATABASES = {
'default': {
'ENGINE': 'django.db.backends.postgresql_psycopg2',
'NAME': 'workmanager',
'USER': 'workmanager',
'PASSWORD': 'workmanager',
'HOST': '127.0.0.1',
'PORT': '',
}
}We must modify the ALLOWED_HOSTS line with the following:
ALLOWED_HOSTS = ['*']
Also, it is important to not use the DEBUG mode. Indeed, the DEBUG mode can provide valuable data to hackers. For this, we must change the DEBUG and TEMPLATE_DEBUG variables in the following way:
DEBUG = False TEMPLATE_DEBUG = False
We activate our virtual environment to perform the migration and launch Gunicorn:
cd /home/env/django1.6/Work_manager/ source /home/env/django1.6/bin/activate python3.2 manage.py schemamigration TasksManager --initial python3.2 manage.py syncdb -–migrate
Sometimes, the creation of the database with PostgreSQL generates an error when everything goes well. To see if the creation of the database went well, we must run the following commands as the root user and verify that the tables have been created:
su su - postgres psql -d workmanager \dt \q exit
If they were properly created, you have to make a fake South migration to manually tell it that everything went well:
python3.2 manage.py migrate TasksManager --fake
Initial South migration
We activate our virtual environment to perform the migration and launch Gunicorn:
cd /home/env/django1.6/Work_manager/ source /home/env/django1.6/bin/activate python3.2 manage.py schemamigration TasksManager --initial python3.2 manage.py syncdb -–migrate
Sometimes, the creation of the database with PostgreSQL generates an error when everything goes well. To see if the creation of the database went well, we must run the following commands as the root user and verify that the tables have been created:
su su - postgres psql -d workmanager \dt \q exit
If they were properly created, you have to make a fake South migration to manually tell it that everything went well:
python3.2 manage.py migrate TasksManager --fake
In this chapter, we learned how to deploy a Django website with a modern architecture. In addition, we used virtualenv, which allows you to use several versions of Python libraries on the same system.
In this book, we learned what the MVC pattern is. We have installed Python and Django for our development environment. We learned how to create templates, views, and models. We also used the system for routing Django URLs. We also learned how to use some specific elements such as Django forms, CBV, or the authentication module. Then, we used session variables and AJAX requests. Finally, we learned how to deploy a Django website on a Linux server.
When a developer has learned how to use a technology, it is often necessary to search for new information or syntax. He/she can waste a lot of time doing this. The purpose of this appendix is to provide a quick reference for Django developers.
The following sections cover a nonexhaustive list of the field types in models.
The model fields are those that will be saved in the database. Depending on the database system selected, the type field may be different depending on the database used.
The types are specified with their options in the following manner:
Type (option1 = example_data, option2 = example_data) [information]
Fields presented in this section are numeric fields such as integers and decimals:
The descriptions of the options are as follows:
This section contains the types of fields that contain strings:
CharField (max_length = 250)TextField (max_length = 250): This field has the distinction of being presented as a<textarea>tag in the Django formsEmailField (max_length = 250): This field isCharFieldthat contains an e-mail validator for Django forms
The description of the option is as follows:
max_length: This sets the maximum number of characters that compose the string
This section contains the types of fields that contain temporal data:
DateField (auto_now = false,auto_now_add = true)DateTimeField (auto_now = false,auto_now_add = true)TimeField (auto_now = false,auto_now_add = true)
The descriptions of the options are as follows:
This section contains the types of fields that do not belong to the previous categories:
BooleanField()FileField: (upload_to = "path", max_length="250"): This field is used to store files on the serverImageField(upload_to = "path", max_length="250", height_field =height_img, width_field= width_img): This field corresponds toFileFieldbut imparts special treatment to images such as storing the image's height and width
The descriptions of the options are as follows:
Upload_to: This defines the folder that will store the files corresponding to this field.max_length: TheFileFieldandImageFieldfields are actually text fields that store the path and name of the uploaded file.height_fieldandwidth_field: These take an integer field of the model as an argument. This field is used to store the size of the image.
This section contains the types of fields that define the relationships between models:
ForeignKey (model, related_name = "foreign_key_for_dev", to_field="field_name", limit_choices_to=dict_or_Q, on_delete=)OneToOneField (model, related_name = "foreign_key_for_dev", to_field="field_name", limit_choices_to=dict_or_Q, on_delete=)ManyToManyField (model, related_name = "foreign_key_for_dev", to_field="field_name", limit_choices_to=dict_or_Q, on_delete=)
The descriptions of the options are as follows:
model: Here, you must specify the name of the model class you want to use.related_name: This allows you to name the relationship. It is essential when multiple relationships to the same model exist.to_field: This defines a relationship to a specific field of the model. By default, Django creates a relationship to the primary key.on_delete: The database action on the removal of a field can beCASCADE,PROTECT,SET_NULL,SET_DEFAULT, andDO_NOTHING.limit_choices_to: This defines the queryset that restricts records for the relationship.
The model meta attributes are to be defined in a meta class in the model in the following way:
class Product(models.Model):
name = models.CharField()
class Meta:
verbose_name = "product"The following attributes are used to define information about the model in which they are placed:
The following options are common to all the fields of a model:
default: This sets a default value for the field.null: This enables the null value for the field and makes an optional relationship if this option is defined on a relationship field.blank: This enables you to leave the field empty.error_messages: This specifies a series of error messages.help_text: This sets a help message.unique: This defines a field that does not contain duplicates.verbose_name: This defines a field name that is readable by a human. Do not put a capital letter first; Django will do it automatically.choices: This defines the number of possible choices for the field.db_column: This sets the name of the field created in the database.
It is possible to use all types of field models in the forms. Indeed, some types of model fields have been created for a particular use in forms. For example, the TextField model field has nothing different from CharField except the fact that by default, in the form, the TextField field displays a <textarea> tag and a <input type="text"> name. So, you can write a form field as follows:
field1 = forms.TextField()
The following options are common to all the form fields:
error_messages: This specifies a series of error messageshelp_text: This sets a help messagerequired: This defines a field that must be filledinitial: This sets the default value for the fieldvalidators: This defines a particular validator that validates the field valuewidget: This defines a specific widget for the field
Widgets allow you to define HTML code that renders form fields. We'll explain what widgets can generate as HTML code, as follows:
TextInput: This corresponds to<input type="text" />Textarea: This corresponds to<textarea></textarea>PasswordInput: This corresponds to<input type="password" />RadioSelect: This corresponds to<input type="radio" />Select: This corresponds to<select><option></option></select>CheckboxInput: This corresponds to<input type="checkbox" />FileInput: This corresponds to<input type="file" />HiddenInput: This corresponds to<input type="hidden" />
The following is a partial list of the error messages that can be set when form fields are entered incorrectly:
required: This message is displayed when the user does not fill data in the fieldmin_length: This message is displayed when the user has not supplied enough datamax_length: This message is displayed when the user has exceeded the size limit of a fieldmin_value: This message is displayed when the value entered by the user is too lowmax_value: This message is displayed when the value entered by the user is too high
Common options for the form fields
The following options are common to all the form fields:
error_messages: This specifies a series of error messageshelp_text: This sets a help messagerequired: This defines a field that must be filledinitial: This sets the default value for the fieldvalidators: This defines a particular validator that validates the field valuewidget: This defines a specific widget for the field
Widgets allow you to define HTML code that renders form fields. We'll explain what widgets can generate as HTML code, as follows:
TextInput: This corresponds to<input type="text" />Textarea: This corresponds to<textarea></textarea>PasswordInput: This corresponds to<input type="password" />RadioSelect: This corresponds to<input type="radio" />Select: This corresponds to<select><option></option></select>CheckboxInput: This corresponds to<input type="checkbox" />FileInput: This corresponds to<input type="file" />HiddenInput: This corresponds to<input type="hidden" />
The following is a partial list of the error messages that can be set when form fields are entered incorrectly:
required: This message is displayed when the user does not fill data in the fieldmin_length: This message is displayed when the user has not supplied enough datamax_length: This message is displayed when the user has exceeded the size limit of a fieldmin_value: This message is displayed when the value entered by the user is too lowmax_value: This message is displayed when the value entered by the user is too high
The widget form
Widgets allow you to define HTML code that renders form fields. We'll explain what widgets can generate as HTML code, as follows:
TextInput: This corresponds to<input type="text" />Textarea: This corresponds to<textarea></textarea>PasswordInput: This corresponds to<input type="password" />RadioSelect: This corresponds to<input type="radio" />Select: This corresponds to<select><option></option></select>CheckboxInput: This corresponds to<input type="checkbox" />FileInput: This corresponds to<input type="file" />HiddenInput: This corresponds to<input type="hidden" />
The following is a partial list of the error messages that can be set when form fields are entered incorrectly:
required: This message is displayed when the user does not fill data in the fieldmin_length: This message is displayed when the user has not supplied enough datamax_length: This message is displayed when the user has exceeded the size limit of a fieldmin_value: This message is displayed when the value entered by the user is too lowmax_value: This message is displayed when the value entered by the user is too high
Error messages (forms and models)
The following is a partial list of the error messages that can be set when form fields are entered incorrectly:
required: This message is displayed when the user does not fill data in the fieldmin_length: This message is displayed when the user has not supplied enough datamax_length: This message is displayed when the user has exceeded the size limit of a fieldmin_value: This message is displayed when the value entered by the user is too lowmax_value: This message is displayed when the value entered by the user is too high
When a developer develops templates, he/she regularly needs to use the template language and filters.
The following are the key elements of the template language:
{% autoescape on OR off %} {% endautoescape %}: This automatically starts the auto-escape feature that helps protect the browser of the displayed data (XSS).{% block block_name %} {% endblock %}: This sets the blocks that can be filled by templates that inherit from them.{% comment %} {% endcomment %}: This sets a comment that will not be sent to the user as HTML.{% extends template_name %}: This overrides a template.{% spaceless %}: This removes all the whitespaces between the HTML tags.{% include template_name %}: This includes a template namedtemplate_namein the current template. The blocks included templates that cannot be redefined.
This section shows you how to loop through a dictionary. The steps involved in looping are as follows:
{% for var in list_var %}: This allows looping in thelist_vardictionary{% empty %}: This displays the subsequent code if the dictionary is empty{% endfor %}: This indicates the end of a loop
This section shows how to execute a conditional statement:
{% if cond %}: This line checks the condition and discusses the following code when enabled.{% elif cond %}: This line checks another condition if the first has not been verified. If this condition is satisfied, the following code will be processed.{% else %}: This line will process the following code if none of the previous conditions have been validated.{% endif %}: This line ends the processing of conditions.
The following are the different template filters:
addslashes: This adds slashes before quotescapfirst: This capitalizes the first characterlower: This converts the text into lowercaseupper: This converts the text into uppercasetitle: This capitalizes all the first characters of each wordcut: This removes all the values of the argument from the given string, for example,{{ value|cut:"*" }}removes all the*characterslinebreaks: This replaces line breaks in text with the appropriate HTML tagsdate: This displays a formatted date, for example,{{ value|date:"D d M Y" }}will displayWed 09 Jan 2008pluralize: This allows you to display plurals, shown as follows:You have {{ nb_products }} product{{ nb_products|pluralize }} in our cart. I received {{ nb_diaries }} diar{{ nb_diaries|pluralize:"y,ies" }}.random: This returns a random element from the listlinenumbers: This displays text with line numbers at the left-hand sidefirst: This displays the first item in the listlast: This displays the last item in the listsafe: This sets a non-escape valueescape: This escapes an HTML stringescapejs: This escapes characters to use in JavaScript stringsdefault: This defines a default value if the original value equalsNoneorempty; for example, with{{ value|default:"nothing" }}, if the value is"", it will displaynothing.dictsort: This sorts the dictionary in the ascending order of the key; for example,{{ value|dictsort:"price"}}will sort the dictionary bypricedictsortreversed: This is used to sort the dictionary in the descending order of the keyfloatformat: This formats a float value, and the following are the examples:When 45.332is the value,{{ value|floatformat:2 }}displays45.33- When
45.00is the value,{{ value|floatformat:"-2" }}displays45
The following are the queryset methods:
all(): This method retrieves all the records of a model.filter(condition): This method allows you to filter a queryset.none(): This method can return an empty queryset. This method is useful when you want to empty a queryset.dinstinct(field_name): This method is used to retrieve the unique values of a field.values_list(field_name): This method is used to retrieve the data dictionary of a field.get(condition): This method is used to retrieve a record from a model. When using this method, you must be sure that it concerns only one record.exclude(condition): This method allows you to exclude some records.
The following elements are the aggregation methods:
Template tags
The following are the key elements of the template language:
{% autoescape on OR off %} {% endautoescape %}: This automatically starts the auto-escape feature that helps protect the browser of the displayed data (XSS).{% block block_name %} {% endblock %}: This sets the blocks that can be filled by templates that inherit from them.{% comment %} {% endcomment %}: This sets a comment that will not be sent to the user as HTML.{% extends template_name %}: This overrides a template.{% spaceless %}: This removes all the whitespaces between the HTML tags.{% include template_name %}: This includes a template namedtemplate_namein the current template. The blocks included templates that cannot be redefined.
This section shows you how to loop through a dictionary. The steps involved in looping are as follows:
{% for var in list_var %}: This allows looping in thelist_vardictionary{% empty %}: This displays the subsequent code if the dictionary is empty{% endfor %}: This indicates the end of a loop
This section shows how to execute a conditional statement:
{% if cond %}: This line checks the condition and discusses the following code when enabled.{% elif cond %}: This line checks another condition if the first has not been verified. If this condition is satisfied, the following code will be processed.{% else %}: This line will process the following code if none of the previous conditions have been validated.{% endif %}: This line ends the processing of conditions.
The following are the different template filters:
addslashes: This adds slashes before quotescapfirst: This capitalizes the first characterlower: This converts the text into lowercaseupper: This converts the text into uppercasetitle: This capitalizes all the first characters of each wordcut: This removes all the values of the argument from the given string, for example,{{ value|cut:"*" }}removes all the*characterslinebreaks: This replaces line breaks in text with the appropriate HTML tagsdate: This displays a formatted date, for example,{{ value|date:"D d M Y" }}will displayWed 09 Jan 2008pluralize: This allows you to display plurals, shown as follows:You have {{ nb_products }} product{{ nb_products|pluralize }} in our cart. I received {{ nb_diaries }} diar{{ nb_diaries|pluralize:"y,ies" }}.random: This returns a random element from the listlinenumbers: This displays text with line numbers at the left-hand sidefirst: This displays the first item in the listlast: This displays the last item in the listsafe: This sets a non-escape valueescape: This escapes an HTML stringescapejs: This escapes characters to use in JavaScript stringsdefault: This defines a default value if the original value equalsNoneorempty; for example, with{{ value|default:"nothing" }}, if the value is"", it will displaynothing.dictsort: This sorts the dictionary in the ascending order of the key; for example,{{ value|dictsort:"price"}}will sort the dictionary bypricedictsortreversed: This is used to sort the dictionary in the descending order of the keyfloatformat: This formats a float value, and the following are the examples:When 45.332is the value,{{ value|floatformat:2 }}displays45.33- When
45.00is the value,{{ value|floatformat:"-2" }}displays45
The following are the queryset methods:
all(): This method retrieves all the records of a model.filter(condition): This method allows you to filter a queryset.none(): This method can return an empty queryset. This method is useful when you want to empty a queryset.dinstinct(field_name): This method is used to retrieve the unique values of a field.values_list(field_name): This method is used to retrieve the data dictionary of a field.get(condition): This method is used to retrieve a record from a model. When using this method, you must be sure that it concerns only one record.exclude(condition): This method allows you to exclude some records.
The following elements are the aggregation methods:
Loops in dictionaries
This section shows you how to loop through a dictionary. The steps involved in looping are as follows:
{% for var in list_var %}: This allows looping in thelist_vardictionary{% empty %}: This displays the subsequent code if the dictionary is empty{% endfor %}: This indicates the end of a loop
This section shows how to execute a conditional statement:
{% if cond %}: This line checks the condition and discusses the following code when enabled.{% elif cond %}: This line checks another condition if the first has not been verified. If this condition is satisfied, the following code will be processed.{% else %}: This line will process the following code if none of the previous conditions have been validated.{% endif %}: This line ends the processing of conditions.
The following are the different template filters:
addslashes: This adds slashes before quotescapfirst: This capitalizes the first characterlower: This converts the text into lowercaseupper: This converts the text into uppercasetitle: This capitalizes all the first characters of each wordcut: This removes all the values of the argument from the given string, for example,{{ value|cut:"*" }}removes all the*characterslinebreaks: This replaces line breaks in text with the appropriate HTML tagsdate: This displays a formatted date, for example,{{ value|date:"D d M Y" }}will displayWed 09 Jan 2008pluralize: This allows you to display plurals, shown as follows:You have {{ nb_products }} product{{ nb_products|pluralize }} in our cart. I received {{ nb_diaries }} diar{{ nb_diaries|pluralize:"y,ies" }}.random: This returns a random element from the listlinenumbers: This displays text with line numbers at the left-hand sidefirst: This displays the first item in the listlast: This displays the last item in the listsafe: This sets a non-escape valueescape: This escapes an HTML stringescapejs: This escapes characters to use in JavaScript stringsdefault: This defines a default value if the original value equalsNoneorempty; for example, with{{ value|default:"nothing" }}, if the value is"", it will displaynothing.dictsort: This sorts the dictionary in the ascending order of the key; for example,{{ value|dictsort:"price"}}will sort the dictionary bypricedictsortreversed: This is used to sort the dictionary in the descending order of the keyfloatformat: This formats a float value, and the following are the examples:When 45.332is the value,{{ value|floatformat:2 }}displays45.33- When
45.00is the value,{{ value|floatformat:"-2" }}displays45
The following are the queryset methods:
all(): This method retrieves all the records of a model.filter(condition): This method allows you to filter a queryset.none(): This method can return an empty queryset. This method is useful when you want to empty a queryset.dinstinct(field_name): This method is used to retrieve the unique values of a field.values_list(field_name): This method is used to retrieve the data dictionary of a field.get(condition): This method is used to retrieve a record from a model. When using this method, you must be sure that it concerns only one record.exclude(condition): This method allows you to exclude some records.
The following elements are the aggregation methods:
Conditional statements
This section shows how to execute a conditional statement:
{% if cond %}: This line checks the condition and discusses the following code when enabled.{% elif cond %}: This line checks another condition if the first has not been verified. If this condition is satisfied, the following code will be processed.{% else %}: This line will process the following code if none of the previous conditions have been validated.{% endif %}: This line ends the processing of conditions.
The following are the different template filters:
addslashes: This adds slashes before quotescapfirst: This capitalizes the first characterlower: This converts the text into lowercaseupper: This converts the text into uppercasetitle: This capitalizes all the first characters of each wordcut: This removes all the values of the argument from the given string, for example,{{ value|cut:"*" }}removes all the*characterslinebreaks: This replaces line breaks in text with the appropriate HTML tagsdate: This displays a formatted date, for example,{{ value|date:"D d M Y" }}will displayWed 09 Jan 2008pluralize: This allows you to display plurals, shown as follows:You have {{ nb_products }} product{{ nb_products|pluralize }} in our cart. I received {{ nb_diaries }} diar{{ nb_diaries|pluralize:"y,ies" }}.random: This returns a random element from the listlinenumbers: This displays text with line numbers at the left-hand sidefirst: This displays the first item in the listlast: This displays the last item in the listsafe: This sets a non-escape valueescape: This escapes an HTML stringescapejs: This escapes characters to use in JavaScript stringsdefault: This defines a default value if the original value equalsNoneorempty; for example, with{{ value|default:"nothing" }}, if the value is"", it will displaynothing.dictsort: This sorts the dictionary in the ascending order of the key; for example,{{ value|dictsort:"price"}}will sort the dictionary bypricedictsortreversed: This is used to sort the dictionary in the descending order of the keyfloatformat: This formats a float value, and the following are the examples:When 45.332is the value,{{ value|floatformat:2 }}displays45.33- When
45.00is the value,{{ value|floatformat:"-2" }}displays45
The following are the queryset methods:
all(): This method retrieves all the records of a model.filter(condition): This method allows you to filter a queryset.none(): This method can return an empty queryset. This method is useful when you want to empty a queryset.dinstinct(field_name): This method is used to retrieve the unique values of a field.values_list(field_name): This method is used to retrieve the data dictionary of a field.get(condition): This method is used to retrieve a record from a model. When using this method, you must be sure that it concerns only one record.exclude(condition): This method allows you to exclude some records.
The following elements are the aggregation methods:
The template filters
The following are the different template filters:
addslashes: This adds slashes before quotescapfirst: This capitalizes the first characterlower: This converts the text into lowercaseupper: This converts the text into uppercasetitle: This capitalizes all the first characters of each wordcut: This removes all the values of the argument from the given string, for example,{{ value|cut:"*" }}removes all the*characterslinebreaks: This replaces line breaks in text with the appropriate HTML tagsdate: This displays a formatted date, for example,{{ value|date:"D d M Y" }}will displayWed 09 Jan 2008pluralize: This allows you to display plurals, shown as follows:You have {{ nb_products }} product{{ nb_products|pluralize }} in our cart. I received {{ nb_diaries }} diar{{ nb_diaries|pluralize:"y,ies" }}.random: This returns a random element from the listlinenumbers: This displays text with line numbers at the left-hand sidefirst: This displays the first item in the listlast: This displays the last item in the listsafe: This sets a non-escape valueescape: This escapes an HTML stringescapejs: This escapes characters to use in JavaScript stringsdefault: This defines a default value if the original value equalsNoneorempty; for example, with{{ value|default:"nothing" }}, if the value is"", it will displaynothing.dictsort: This sorts the dictionary in the ascending order of the key; for example,{{ value|dictsort:"price"}}will sort the dictionary bypricedictsortreversed: This is used to sort the dictionary in the descending order of the keyfloatformat: This formats a float value, and the following are the examples:When 45.332is the value,{{ value|floatformat:2 }}displays45.33- When
45.00is the value,{{ value|floatformat:"-2" }}displays45
The following are the queryset methods:
all(): This method retrieves all the records of a model.filter(condition): This method allows you to filter a queryset.none(): This method can return an empty queryset. This method is useful when you want to empty a queryset.dinstinct(field_name): This method is used to retrieve the unique values of a field.values_list(field_name): This method is used to retrieve the data dictionary of a field.get(condition): This method is used to retrieve a record from a model. When using this method, you must be sure that it concerns only one record.exclude(condition): This method allows you to exclude some records.
The following elements are the aggregation methods:
The queryset methods
The following are the queryset methods:
all(): This method retrieves all the records of a model.filter(condition): This method allows you to filter a queryset.none(): This method can return an empty queryset. This method is useful when you want to empty a queryset.dinstinct(field_name): This method is used to retrieve the unique values of a field.values_list(field_name): This method is used to retrieve the data dictionary of a field.get(condition): This method is used to retrieve a record from a model. When using this method, you must be sure that it concerns only one record.exclude(condition): This method allows you to exclude some records.
The following elements are the aggregation methods: