Now that you know what Microsoft Teams is and what it looks like, it is time to look at its core features and how they can be used to achieve more with the platform.
A hub for communication and collaboration, Microsoft Teams brings people together. It is Microsoft's carefully designed features that allow the platform to do this in such a unique way.
To get the best out of Microsoft Teams, you will need to understand not only the basic concepts explained in the first chapter but also how to manage all the assets that the platform brings together.
In this chapter, you will gain an overview of the following main topics:
Understanding chats and meetings
Managing your time using the Microsoft Teams calendar
Working faster on Microsoft Teams with search, filters, and commands
Customizing Microsoft Teams
Understanding where Microsoft Teams data is stored
Understanding chats and meetings
Microsoft Teams' main features can be divided into two major sections: chats and meetings.
The chat feature takes a principal role in Microsoft Teams, allowing you to communicate with your peers in a few different ways with text. You can have one-to-one or group chats, which can be public or private. One-to-one chats are always private, and you will be able to start a new conversation with anyone from your own organization internally, or someone external—if your organization allows such communications.
Group chats, which you can start manually by adding people to the chat, are private, while team chats that you start in the context of regular channels are public and accessible to all team members.
The chat feature is heavily used by Microsoft Teams users and has many functionalities that deserve to be explained in detail. Chapter 3,How to Use Microsoft Teams: Chats and Conversation, is exclusively dedicated to chats and all of their built-in features.
The meetings feature on Microsoft Teams provides a rich environment that allows for collaboration with peers who are not in the same location as you. It allows you to bring people from all over the world into the same virtual space in a matter of seconds. Meetings allow each member to share audio and high-definition video, including screen sharing – you can share your entire desktop or individual applications with other users.
Meetings on Microsoft Teams can also be recorded and shared with other members of the organization in a matter of minutes. If you have a conflict in your schedule and are not able to attend the meeting, you can always watch the recording later.
Chapter 4,How to Use Microsoft Teams: Meetings, Webinars, and Live Events, is exclusively dedicated to meetings, and you will find instructions there on how to use their built-in features.
Now that you understand what chats and meetings are, you need to learn how to manage your meetings and schedule. Let's see how to do this in the next section.
Managing your time using the Microsoft Teams calendar
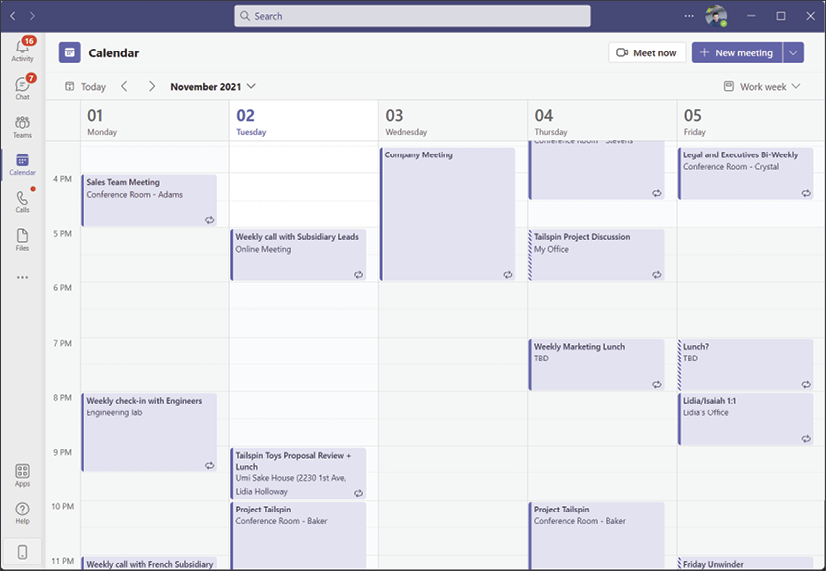
Microsoft Teams would not be a true collaboration solution if it were not equipped with a calendar. The calendar app is available by default on Teams and allows you to view and schedule team meetings.
The calendar with filled-in example slots is shown in Figure 2.2.1:
Figure 2.2.1: Scheduled appointments in the Teams' calendar
The Microsoft Teams calendar includes the following features:
Daily view
Weekly view, with the ability to display just workdays or the entire week
A visual identification of the work schedule, with the working hours displayed with a white background and the hours out of the schedule displayed in a light gray. This feature can be seen in Figure 2.2.1.
The ability to view the meeting scheduling details
The ability to schedule a meeting or live event
The ability to cancel a meeting
Synchronization with the Outlook and Exchange calendars
The ability to meet immediately, without previous scheduling
The detailed features related to meetings and events are explained in Chapter 4, How to Use Microsoft Teams: Meetings, Webinars, and Live Events.
In the next section, you will learn how to work faster with Microsoft Teams by making use of search, filters, and commands.
Working faster on Teams with search, filters, and commands
All the collaboration work that is done using chats and meetings on Microsoft Teams will generate a considerable amount of data, which can easily reach hundreds of megabytes across all the teams and channels in an organization.
Microsoft Teams comes with three features that can help you find content and carry out tasks without spending hours looking through the information manually:
Search
Filters
Commands
Let's look at each one of these in more detail.
Search
The search feature is available in all versions of Microsoft Teams. On the desktop version, you can find it in the title bar, as shown in Figure 2.3.1.
Figure 2.3.1: Searching through chat histories to find a specific message
The search feature looks for information in three different scopes:
Messages
People
Files
The search results are displayed in the left pane and you can alternate between the results using the tabs at the top of the pane. When you click on one of the results displayed in the Messages tab, it opens the message in the context of where it was posted, that is, in the team, channel, group chat, or one-to-one chat.
If you are looking for a team member and click on one of the results shown in the People tab, you will get access to a private chat window with that particular member.
The results shown in the Files tab are displayed in their Microsoft Teams context. For example, a Microsoft Word document will be opened in the web version of the application in the stage area. If the file is not compatible with the Microsoft Teams preview functionality, you will have the option to download the file locally or open it in a browser.
The mobile version of Microsoft Teams has the same search functionalities as in the desktop version, with the search bar also located at the top of the app. To use it, you will need to click on the magnifier icon and type in your search query. The results are then displayed in a separate window divided into the same three categories: Messages, People, and Files.
Pro tip: Search in your current location using keyboard shortcuts
When in the context of a chat or team, you can use the keyboard shortcut Ctrl + F on Windows, or Command + F on macOS, to restrict the scope of the search bar to your current location. After executing the keyboard shortcut, the search bar will display the information where the search is being made, as seen in Figure 2.3.2.
Figure 2.3.2: Searching in the command bar is restricted to the current channel
While performing a search, you can take advantage of the typeahead feature included in the search box that displays suggested results based on the words you are typing, as seen in Figure 2.3.3. These results are divided up into seven categories: People, Group chats, Teams, Channels, Files, Apps, and Commands. To view all the results, you must press Enter.
Figure 2.3.3: Suggested search results
Pro tip: Advanced search queries
To get more precise search results, the Keyword Query Language (KQL) included in Microsoft Teams can be used. This allows you to prefilter the information using four types of selector:
From: User
In: Team or Channel
Subject: Keywords
Sent: Date
Note the syntax used with the KQL: there is no space between the colon and the search keywords.
Other than KQL, the Microsoft Teams search box also allows you to search for partial or exact keywords:
Partial keyword: Use an asterisk, *, to perform a search with a partial keyword; this must be used in combination with a prefix or suffix as shown in the following two examples:
Prefix, e.g., Mark*: This keyword search will find results for all the words that start with Mark
Suffix, e.g., *.docx: This keyword search will find results for all the words/files that end with .docx
For an exact keyword, in which you know exactly what the word or term is that you want to search for, you must use quotation marks around the keyword, for example, "monthly reports".
Filters
The filters function offers another way to find content inside Microsoft Teams. You can use it, along with the search function, to filter the results retrieved, or in the context of Activity, Chat, and Teams. In the context of a search, filters are located in a second bar below the Messages, People, and Files tabs, as shown in Figure 2.3.4.
Figure 2.3.4: Filters can be accessed to refine a search
Filters are dynamic and display different fields depending on the context of your search. They are only available for Messages and Files—it is not possible to filter when searching for People.
Outside of the search context, the filter option also has its own search box and predefined tags that can be selected to retrieve information faster.
To filter in the context of Activity, Chat, or Teams, click on the filter icon (the three stacked horizontal lines) and type what you are looking for in the textbox. To use the predefined tags, click on the three dots (…) and choose one of the available options.
The tag feature is only available in the Activity and Chat contexts; in Teams you will only be able to filter using the filter textbox.
Figure 2.3.5: Filtering by activity type
Once a tag is selected, an icon is added to the text box, immediately filtering the results; this can be combined with your own search query to refine the results even further.
Commands
Commands are designed to help you work faster; they are shortcuts for tasks such as opening a channel or changing your present status. There are two types of commands: the ones built into the Teams application and the ones added by third-party apps.
To use the built-in commands, you will need to type a forward slash, /, into the command box at the top of the screen, followed by the command you want to use.
Pro tip: Open the command box using keyboard shortcuts
To gain quick access to the command box from any location inside Microsoft Teams, you can use the keyboard shortcut Ctrl + E on Windows, or Command + E on macOS. Once executed, the command box will be in focus and you can start typing right away without the need for the mouse.
Commands will perform simple tasks. Some of them will trigger the command action, while others will require input data to trigger the action. Figures 2.3.6 and2.3.7 show two different examples of actions that can be carried out in Teams using commands. If you type /busy, your presence status will be modified to busy:
Figure 2.3.6: Modifying your online status using a command
If you type /chat, the search bar changes its layout so that you have access to your contacts list and a textbox to send a quick message. This is particularly handy if you are in a meeting and need to send a private message to someone:
To view all the available commands at any given time, you can type a forward slash, /, into the search bar, as shown in Figure 2.3.8.
Figure 2.3.8: A forward slash, /, can be used in the search bar to display all available commands
Some apps can install new commands, and these are also available from the search bar. To use them, you will need to type the "at" symbol, @, followed by the name of the command. Typically, these types of commands are used to bring information from outside the organization into Teams.
As an example, if the Microsoft weather app is installed in your Microsoft Teams tenant, you will be able to get the current weather for any city when you type @Weather, followed by the name of the city:
Figure 2.3.9: Using commands to see information from custom apps installed in Microsoft Teams
Both built-in and third-party commands are only available on the desktop version of Microsoft Teams.
In this section, you learned how to harness a variety of tools that allow for the quick execution of tasks using Microsoft Teams shortcuts. Knowing how to use the command bar effectively will improve your efficiency while working with Microsoft Teams.
Customizing Microsoft Teams
Even though Microsoft Teams is a working platform, it allows you to customize certain features and settings to make it fit better with your working preferences and routines.
To access the configuration settings of Microsoft Teams, do the following:
On the Microsoft Teams client, click on the … icon next to your profile picture and then on Settings:
Figure 2.4.1: Navigating to personal Teams Settings
A popup will open, and from there you will have access to eight different groups of settings:
General: In this group, you will be able to access the Microsoft Teams themes. The default is a light theme, but dark and high contrast themes are also available. From the General tab, you can also select the language for the app and keyboard, as well as general application settings, such as auto-starting the application and using Teams as the default chat app for Office. From the General area, you will also be able to schedule your out of office and automatic replies, informing users that you are currently not working.
Figure 2.4.2: General Teams settings
Accounts: In the Accounts section you will find all the organizations where you exist as a guest user, along with the ability to mute their notifications or switch to the organization tenant. In this area, you will also be able to add your personal Microsoft Teams account. You can learn more about the personal Microsoft Teams version in Chapter 8, Other Microsoft Teams Use Cases.
Figure 2.4.3: The user Accounts Teams settings
Privacy: In the privacy settings, you will find an important option that allows you to prioritize notifications and calls from certain people when your status is set to Do not disturb.
Figure 2.4.4: Privacy settings
Here, you can also decide whether other users can access your read receipts on the app. A read receipt is displayed next to a message, with an icon representing an eye that informs other users that you have read their messages.
Figure 2.4.5: An "eye" icon appears next to a message when it has been seen by the recipient
Notifications: On Microsoft Teams, these settings will help you prioritize what is most relevant to you. You will find the notifications divided into seven different groups, each one allowing personalization to better suit your needs:
Figure 2.4.6: Settings used to help the user prioritize notifications
Email: This allows you to set the frequency that the Microsoft Teams platform sends you an email with a résumé of your missed activities. You will be able to define it as such: As soon as possible, Once every 10 minutes, Once every hour, Once every 8 hours, Daily, or Off.
Appearance and sound: Allows you to turn on/off the sounds for incoming calls and notifications. It also provides the ability to control whether notifications are displayed with a message preview; this option is particularly useful when projecting your screen.
Teams and channels: You can define when to be notified, choosing from the following options: All Activity, Mentions & replies, and Custom. The Custom setting provides a way to fine-tune several notification settings and define whether the notification is shown in the banner and feed, only in the feed, or turned off completely. The available refiners are shown in Figure 2.4.7.
Chat: You can define where notifications are displayed for mentions, replies, likes, and reactions.
Meetings: Define where the meeting notifications are displayed, and control the meeting chat notifications.
Pro tip: Mute chat meeting notifications while in a meeting
Meeting chat notifications can be controlled individually by meeting. If during the meeting you have the need to mute the chat, you can do so by going to the Chat option in the app bar. From there, locate the meeting's chat by clicking on the three dots (…) to open the context menu and select the Mute option, as shown in Figure 2.4.8.
Figure 2.4.8: Muting a meeting chat
People: You can define a pool of users that will trigger a notification every time they appear online or go offline.
Figure 2.4.9: Define whether you receive a notification when a user comes online or goes offline
Other: Define where to get notified when someone you know joins Microsoft Teams.
Devices: Allows you to select which devices are used for audio and video on Microsoft Teams. Here, you also have the option to perform a test call to make sure everything is working as expected. When attending a meeting or a live event, you can always override the settings defined here and use any other hardware available on your device. Another important setting you will find in this section is the noise suppression feature, so if you work in noisy environments, make sure to turn this feature on. With it enabled, Microsoft Teams will remove background noise automatically, improving the call experience for other participants.
Pro tip: Use Microsoft Teams-certified headsets
Microsoft Teams has a wide range of hardware that was designed specifically to work with the platform, leveraging Teams features and making the global use of the application a lot easier. Instead of using the built-in microphone and speakers on your computer, it is recommended that you use a certified headset; these will be automatically detected and prioritized by Teams as the main device to use if multiple peripherals are present. Certified devices are designed to prevent echo and distortion, and include basic built-in controls to answer/hang-up, mute/unmute, and control volume. To learn more about the Teams headsets, visit https://www.microsoft.com/en-us/microsoft-teams/across-devices/devices/category/headsets/36.
Pro tip: Never miss a call with the secondary ringer
With the Secondary ringer option available in the Devices settings, you will be able to define a second instance for the incoming calls on your device. If you have the default settings defined for your Teams headset, you will also be able to define the computer speakers as a ringer so you can hear any incoming call, even when you are not using the headset.
Figure 2.4.10: Device settings configuration
App permissions: To get the most out of all of Microsoft Teams' features, the application has permission to use a range of information from your device, including the location, or the physical hardware for meetings and live events. If you want to revoke access to peripherals or settings such as Location, you can do so in this tab:
Figure 2.4.11: Configuring permissions used by Microsoft Teams
From the App permissions option, you will also be able to control the permissions assigned to any custom personal application installed in Microsoft Teams. From this area, you will be able to grant or revoke access to your media devices such as the camera, microphone, speakers, location, notifications, MIDI device, or external links:
Figure 2.4.12: Refining the permissions of personal apps
Captions and transcripts: This setting allows you to turn on/off the possibility of being identified in meeting captions and transcripts.
Figure 2.4.13: Meeting captions and transcription settings
Calls: In this tab, you will find everything related to the calling features on Microsoft Teams. You can configure the voicemail options and the ringtone when someone calls you. If you have Microsoft Phone System, in this area you will also be able to define the phone number where the call should also ring.
Figure 2.4.14: Configuring call options
Microsoft Teams has the option to manage settings individually; this section covered each one of the options available in the platform. Once you start using Teams, make sure you have a look at each one of these settings to ensure that the application is adjusted to your needs and preferences.
Using Microsoft Teams with multiple organizations
As mentioned in Chapter 1, Microsoft Teams Basics, Teams does not allow you to run multiple instances of the application at the same time. If you are collaborating in multiple organizations, you will be able to use the fast switch option to access the other instances of Teams in which you exist as a guest user by using the same email address that is used in your organization.
To quickly change between organizations, you must do the following:
On the Microsoft Teams client, click on your profile picture.
From the menu, select the organization you want to join and click on it. Microsoft Teams will carry out the switch immediately:
Figure 2.4.15: Select which organization to switch to
There are a few considerations about the Accounts & orgs menu above that should be kept in mind:
It only becomes visible when the user belongs to more than one organization.
If you have unread notifications in any of the guest tenants, you will see a counter that shows the number of notifications, as can be seen in Figure 2.4.15; however, this information does not trigger any pop-up notifications in the Microsoft Teams application.
From this menu you will also be able to add a personal Microsoft Teams account to the application; this option is explained in detail in Chapter 8, Other Microsoft Teams Use Cases.
You will be able to see exactly what organization you are connected to by looking at the organization name next to your profile picture:
Microsoft Teams has a presence indicator system that is extremely handy for informing teammates about your availability to be contacted at a given moment. The presence indicator reacts automatically to Teams activity, and changes to Away if you leave the application inactive for 5 minutes or lock your device; if you are in a meeting or presenting it also changes, informing other users you are busy.
While there is an automatic system to define the presence, you can also manually define it from the personal menu in the application. To control your status and availability, the following must be done:
On the Microsoft Teams client, click on your profile picture; under your email click on the presence bar dropdown.
Figure 2.4.17: Changing the Microsoft Teams status
To change your presence indicator, click on one of the following:
Available: Represented by a green icon
Busy: Represented by a red icon
Do not disturb: Represented by a red icon resembling a prohibited signal
Be right back: Represented by a yellow icon
Appear away: Represented by a yellow icon
Appear offline: Represented by a white icon with a cross
If you need to define your presence for a set amount of time, use the duration option, which allows you to select the period that you would like a presence indicator to be shown for:
30 minutes
1 hour
2 hours
Today
This week
Custom: You can define the date and hour after which point your status will be reset
Figure 2.4.18: Set the duration for which a presence indicator is shown
To let Microsoft Teams control your status automatically, again, click on the Reset status option.
In Microsoft Teams you will be able to see the presence indicator for each user and the presence state associated with them when you hover over the user presence indicator, as shown in Figure 2.4.19.
Figure 2.4.19: The status of a user can be shown by hovering over the presence indicator
Pro tip: Change Microsoft Teams status using commands
When using Microsoft Teams, use the keyboard shortcut Ctrl+E on Windows, or Command+E on macOS, to open the search bar and then type the status command you want to change to:
/available
/away
/brb
/busy
/dnd
/offline
When using Teams, you will notice that some users have presence indicators that cannot be defined manually; those are defined automatically by a combination of settings made in other Microsoft 365 applications. Table 2.2 displays a list of all the icons and states you can find in Microsoft Teams and other Microsoft 365 applications.
Icon
State
User-configured
App-configured
Available
Yes
Yes
Available, Out of Office
No
Yes*
Busy
Yes
Yes
In a call
No
Yes
In a meeting
No
Yes
On a call, Out of Office
No
Yes
Do not disturb
Yes
No
Presenting
No
Yes
Focusing
No
Yes†
Away
Yes
Yes
Away – Last Seen
No
Yes
Be right back
Yes
No
Offline
Yes
Yes
Unknown
No
Yes
Out of Office
No
Yes
Table 2.2: All the status symbols visible in Microsoft Teams defined by Teams or other Microsoft 365 applications
* Out of Office is configured when automatic replies are defined in Outlook; if the user is using Microsoft Teams and is out of office at the same time, the presence is represented by this state.
† The Focusing state appears when the user defines a focus time in the My Analytics or Viva Insights applications.
Custom status messages
To complement the presence indicator, you can define custom status messages that are displayed to users when they reach out to you. To define a custom status message, perform the following:
On the Microsoft Teams client, click on your profile picture, and then under your email click on Set status message.
Fill in the text box with your message, and, if needed, mention other users using @, followed by the name of the user.
Figure 2.4.20: Filling in the status message box and mentioning other users
Choose whether the message should be displayed to users when they message you.
Define the Clear status message after setting.
Click Done.
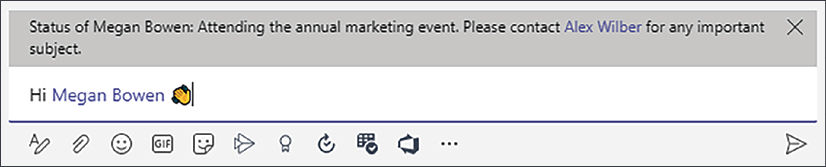
When a custom status is defined, users will see your message displayed in the way shown in Figure 2.4.21.
Figure 2.4.21: When messaging someone who has a status message set, it will appear as shown
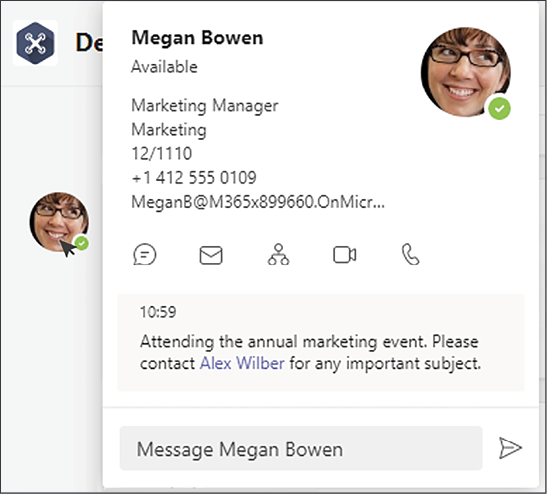
Custom status messages are also shown in the user profile card that is displayed when someone hovers over the user profile picture.
Figure 2.4.22: The status message, as seen when hovering over a user's profile icon
Defining focus time
Defining focus time is important for when you wish to focus on your own tasks without being disturbed by other users and notifications. You can set your focus time manually every day by changing your status to Do not disturb, or you can automate this process by using the My Analytics application included in the Microsoft 365 ecosystem.
To automatically define your focus time, do the following:
Define your focus plan by defining the number of focus hours:
Figure 2.4.23: Set your focus time for a set number of hours
Follow the wizard and choose whether you prefer your focus in the morning or afternoon, and whether or not you wish to receive notifications.
Once completed, you will get your calendar blocked with focus time. For those blocks your presence state is automatically defined as Focusing.
Figure 2.4.24: Focus time, as it appears in the calendar
Now that you have an overview of what Microsoft Teams' core features are and how to use them, you might be curious to know where all the data generated by these features is stored. Let us now look at this in more detail.
Where is Microsoft Teams data stored?
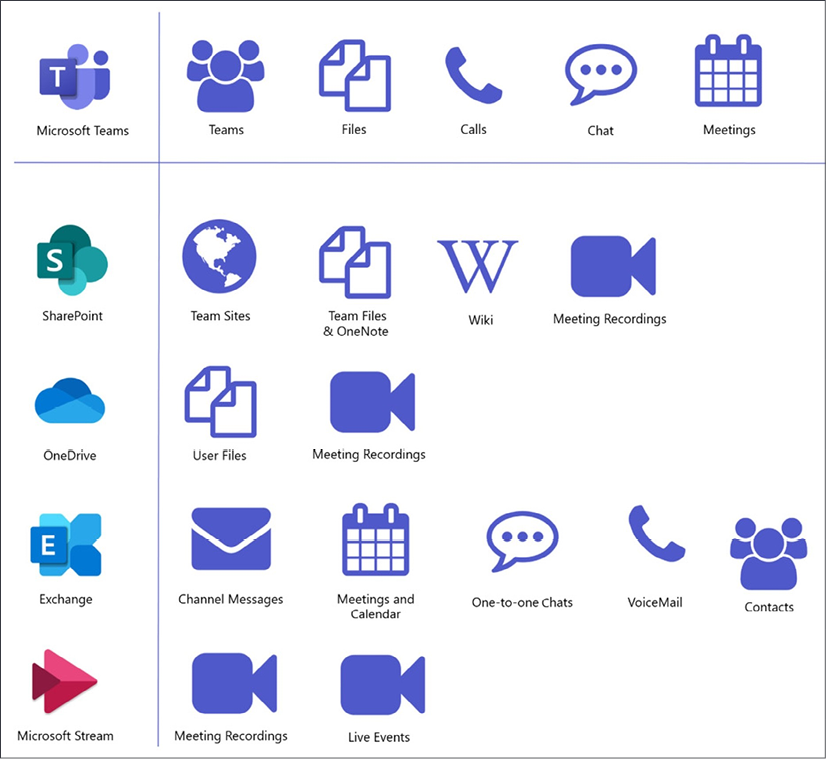
Microsoft Teams makes use of several Microsoft 365 services to deliver features in a central location. It is important to know that your data is not stored in a central location, as it may appear when using the Teams application, and, depending on the feature, your data might be stored in different locations.
Microsoft Teams data is stored in the apps described below. Some data is available to you through the app where it is stored, while other information is hidden and only displayed in the Microsoft Teams client:
Microsoft Exchange: One-to-one chats are stored in your mailbox in a hidden folder that is not available to other users. This data can only be viewed through Microsoft Teams. (The hidden folder is available through the information protection tools, if needed for legal reasons.) Voicemail is stored in the user mailbox and the data is available through Microsoft Teams.
Microsoft Stream: Meeting recordings are stored here. Users can access the recordings through the Stream portal or in the meeting résumé available in Microsoft Teams (more about this in Chapter 4,How to Use Microsoft Teams: Meetings, Webinars, and Live Events). Depending on the configuration made of your Microsoft Teams tenant, meeting recordings can also be stored in SharePoint or OneDrive.
SharePoint: Files shared in channels are stored in the team site collection. Each channel has a folder with the name of the channel in the documents library on SharePoint. Users can access the files from SharePoint or Microsoft Teams. Each private channel created in Microsoft Teams generates a new site collection that is used to store all the documents shared in that particular channel.
OneDrive for Business: Files shared in one-to-one chats remain on the OneDrive of the person who shared it, and permissions are given automatically. Microsoft Teams does not copy files to the user's OneDrive when shared in one-to-one chats. Users can access the files from OneDrive (files are located in the Microsoft Teams Chat Files folder) or from Microsoft Teams.
Figure 2.5.1 is a graphical representation of where Microsoft Teams stores files, and which apps are used to do so.
Figure 2.5.1: Locations in which particular data is stored across Microsoft applications
Summary
This chapter introduced the main features included in Microsoft Teams, giving you an overview of how they work and what they look like. In the upcoming chapters, you will see that these features are common across the Microsoft Teams apps.
Chats and meetings are key features of Microsoft Teams. They are complemented by other features, such as file sharing, search, and calendar, which allow you to be more efficient as you carry out daily tasks.
Despite being a global application, Microsoft Teams allows you to customize it to your own needs so you can adjust the notifications to your work rhythm, change the theme of the application from light to dark, and, most importantly, manually change your status, telling all the other Microsoft Teams users your availability.
In the next chapter, you will learn more about the chat feature and how to use it to communicate with other Teams members.
Updated with new chapters on Teams templates, the special editions of Teams, and Microsoft Viva
Customize Teams for increased efficiency, collaborate with best practices, and use advanced Teams functionalities to your advantage
Extend Teams through integration with Microsoft services such as PowerShell, SharePoint, Power Apps, and Power Automate
Description
Microsoft Teams is a permanent fixture in the modern workplace, but many of its productivity-boosting features go unnoticed or unused. Hands-On Microsoft Teams shows you how to use Teams to its full potential through easy-to-follow practical tutorials.
This guide to mastering Teams explores the platform in comprehensive detail and how it interacts with the rest of the Microsoft ecosystem to help you work efficiently and manage your resources. You'll get to grips with core functionality like setting up and managing teams, channels, chats, tabs, and meetings.
You'll also learn to get the best out of Teams by adding custom apps, integrating with Microsoft 365, using PowerShell automation, and exploring useful settings you didn't know existed. Along the way, you'll be shown various real-world scenarios and how to implement solutions for them in Teams that will increase your productivity.
Whether you're an administrator, manager, or team member, by the end of this book you'll be confident in using everything Microsoft Teams has to offer.
What you will learn
Perform scheduling and manage meetings, live events, and webinars
Create and manage Microsoft Teams templates to streamline company processes
Deal with permissions and security issues in managing private and public teams and channels
Extend Microsoft Teams using custom apps, Microsoft 365, and PowerShell automation
Build your own Teams app with the Developer Portal without writing any code
Deploy helpful chatbots using QnA Maker and Power Virtual Agents
Explore Teams use cases for education, frontline work, and personal life
Bring together knowledge, learning, resources, and insights with the new employee experience platform, Microsoft Viva
What do you get with Print?
Instant access to your digital eBook copy whilst your Print order is Shipped
Black & white paperback book shipped to your address
Download this book in EPUB and PDF formats
Access this title in our online reader with advanced features
DRM FREE - Read whenever, wherever and however you want
João Ferreira is an acclaimed Microsoft MVP, MCP, and MCSA. João has been working with SharePoint for the last 9 years and embraced Microsoft Teams right from day one. João is responsible for the development of several products and is also the owner of 4 blogs: HANDS-ON tek, HANDS-ON SharePoint, HANDS-ON Teams, and HANDS-ON Lists.
Economy: Delivery to most addresses in the US within 10-15 business days
Premium: Trackable Delivery to most addresses in the US within 3-8 business days
UK:
Economy: Delivery to most addresses in the U.K. within 7-9 business days. Shipments are not trackable
Premium: Trackable delivery to most addresses in the U.K. within 3-4 business days! Add one extra business day for deliveries to Northern Ireland and Scottish Highlands and islands
EU:
Premium: Trackable delivery to most EU destinations within 4-9 business days.
Australia:
Economy: Can deliver to P. O. Boxes and private residences. Trackable service with delivery to addresses in Australia only. Delivery time ranges from 7-9 business days for VIC and 8-10 business days for Interstate metro Delivery time is up to 15 business days for remote areas of WA, NT & QLD.
Premium: Delivery to addresses in Australia only Trackable delivery to most P. O. Boxes and private residences in Australia within 4-5 days based on the distance to a destination following dispatch.
India:
Premium: Delivery to most Indian addresses within 5-6 business days
Rest of the World:
Premium: Countries in the American continent: Trackable delivery to most countries within 4-7 business days
Asia:
Premium: Delivery to most Asian addresses within 5-9 business days
Disclaimer: All orders received before 5 PM U.K time would start printing from the next business day. So the estimated delivery times start from the next day as well. Orders received after 5 PM U.K time (in our internal systems) on a business day or anytime on the weekend will begin printing the second to next business day. For example, an order placed at 11 AM today will begin printing tomorrow, whereas an order placed at 9 PM tonight will begin printing the day after tomorrow.
Unfortunately, due to several restrictions, we are unable to ship to the following countries:
Afghanistan
American Samoa
Belarus
Brunei Darussalam
Central African Republic
The Democratic Republic of Congo
Eritrea
Guinea-bissau
Iran
Lebanon
Libiya Arab Jamahriya
Somalia
Sudan
Russian Federation
Syrian Arab Republic
Ukraine
Venezuela
What is custom duty/charge?
Customs duty are charges levied on goods when they cross international borders. It is a tax that is imposed on imported goods. These duties are charged by special authorities and bodies created by local governments and are meant to protect local industries, economies, and businesses.
Do I have to pay customs charges for the print book order?
The orders shipped to the countries that are listed under EU27 will not bear custom charges. They are paid by Packt as part of the order.
A custom duty or localized taxes may be applicable on the shipment and would be charged by the recipient country outside of the EU27 which should be paid by the customer and these duties are not included in the shipping charges been charged on the order.
How do I know my custom duty charges?
The amount of duty payable varies greatly depending on the imported goods, the country of origin and several other factors like the total invoice amount or dimensions like weight, and other such criteria applicable in your country.
For example:
If you live in Mexico, and the declared value of your ordered items is over $ 50, for you to receive a package, you will have to pay additional import tax of 19% which will be $ 9.50 to the courier service.
Whereas if you live in Turkey, and the declared value of your ordered items is over € 22, for you to receive a package, you will have to pay additional import tax of 18% which will be € 3.96 to the courier service.
How can I cancel my order?
Cancellation Policy for Published Printed Books:
You can cancel any order within 1 hour of placing the order. Simply contact customercare@packt.com with your order details or payment transaction id. If your order has already started the shipment process, we will do our best to stop it. However, if it is already on the way to you then when you receive it, you can contact us at customercare@packt.com using the returns and refund process.
Please understand that Packt Publishing cannot provide refunds or cancel any order except for the cases described in our Return Policy (i.e. Packt Publishing agrees to replace your printed book because it arrives damaged or material defect in book), Packt Publishing will not accept returns.
What is your returns and refunds policy?
Return Policy:
We want you to be happy with your purchase from Packtpub.com. We will not hassle you with returning print books to us. If the print book you receive from us is incorrect, damaged, doesn't work or is unacceptably late, please contact Customer Relations Team on customercare@packt.com with the order number and issue details as explained below:
If you ordered (eBook, Video or Print Book) incorrectly or accidentally, please contact Customer Relations Team on customercare@packt.com within one hour of placing the order and we will replace/refund you the item cost.
Sadly, if your eBook or Video file is faulty or a fault occurs during the eBook or Video being made available to you, i.e. during download then you should contact Customer Relations Team within 14 days of purchase on customercare@packt.com who will be able to resolve this issue for you.
You will have a choice of replacement or refund of the problem items.(damaged, defective or incorrect)
Once Customer Care Team confirms that you will be refunded, you should receive the refund within 10 to 12 working days.
If you are only requesting a refund of one book from a multiple order, then we will refund you the appropriate single item.
Where the items were shipped under a free shipping offer, there will be no shipping costs to refund.
On the off chance your printed book arrives damaged, with book material defect, contact our Customer Relation Team on customercare@packt.com within 14 days of receipt of the book with appropriate evidence of damage and we will work with you to secure a replacement copy, if necessary. Please note that each printed book you order from us is individually made by Packt's professional book-printing partner which is on a print-on-demand basis.
What tax is charged?
Currently, no tax is charged on the purchase of any print book (subject to change based on the laws and regulations). A localized VAT fee is charged only to our European and UK customers on eBooks, Video and subscriptions that they buy. GST is charged to Indian customers for eBooks and video purchases.
What payment methods can I use?
You can pay with the following card types:
Visa Debit
Visa Credit
MasterCard
PayPal
What is the delivery time and cost of print books?
Shipping Details
USA:
'
Economy: Delivery to most addresses in the US within 10-15 business days
Premium: Trackable Delivery to most addresses in the US within 3-8 business days
UK:
Economy: Delivery to most addresses in the U.K. within 7-9 business days. Shipments are not trackable
Premium: Trackable delivery to most addresses in the U.K. within 3-4 business days! Add one extra business day for deliveries to Northern Ireland and Scottish Highlands and islands
EU:
Premium: Trackable delivery to most EU destinations within 4-9 business days.
Australia:
Economy: Can deliver to P. O. Boxes and private residences. Trackable service with delivery to addresses in Australia only. Delivery time ranges from 7-9 business days for VIC and 8-10 business days for Interstate metro Delivery time is up to 15 business days for remote areas of WA, NT & QLD.
Premium: Delivery to addresses in Australia only Trackable delivery to most P. O. Boxes and private residences in Australia within 4-5 days based on the distance to a destination following dispatch.
India:
Premium: Delivery to most Indian addresses within 5-6 business days
Rest of the World:
Premium: Countries in the American continent: Trackable delivery to most countries within 4-7 business days
Asia:
Premium: Delivery to most Asian addresses within 5-9 business days
Disclaimer: All orders received before 5 PM U.K time would start printing from the next business day. So the estimated delivery times start from the next day as well. Orders received after 5 PM U.K time (in our internal systems) on a business day or anytime on the weekend will begin printing the second to next business day. For example, an order placed at 11 AM today will begin printing tomorrow, whereas an order placed at 9 PM tonight will begin printing the day after tomorrow.
Unfortunately, due to several restrictions, we are unable to ship to the following countries:
 Argentina
 Australia
 Austria
 Belgium
 Brazil
 Bulgaria
 Canada
 Chile
Chile
 Colombia
 Cyprus
 Czechia
 Denmark
 Ecuador
 Egypt
Egypt
 Estonia
 Finland
 France
 Germany
 Great Britain
 Greece
 Hungary
 India
India
 Indonesia
 Ireland
 Italy
Italy
 Japan
Japan
 Latvia
 Lithuania
 Luxembourg
 Malaysia
 Malta
Malta
 Mexico
 Netherlands
 New Zealand
 Norway
 Philippines
 Poland
 Portugal
 Romania
 Russia
 Singapore
 Slovakia
 Slovenia
 South Africa
 South Korea
 Spain
Spain
 Sweden
 Switzerland
 Taiwan
 Thailand
 Turkey
 Ukraine
 United States