Search icon
Arrow left icon
All Products
Best Sellers
New Releases
Books
Videos
Audiobooks
Learning Hub
Newsletters
Free Learning
Arrow right icon
Yocto for Raspberry Pi

You're reading from  Yocto for Raspberry Pi

Product type Book
Published in Jun 2016
Publisher Packt
ISBN-13 9781785281952
Pages 214 pages
Edition 1st Edition
Languages
Concepts
Authors (2):
TEXIER Pierre-Jean TEXIER Pierre-Jean
Profile icon TEXIER Pierre-Jean
Petter Mabäcker Petter Mabäcker
Profile icon Petter Mabäcker
View More author details

Table of Contents (18) Chapters

Yocto for Raspberry Pi
Credits
About the Authors
About the Reviewers
www.PacktPub.com
Preface
Meeting the Yocto Project Building our First Poky Image for the Raspberry Pi Mastering Baking with Hob and Toaster Understanding BitBake Creating, Developing, and Deploying on the Raspberry Pi Working with External Layers Deploying a Custom Layer on the Raspberry Pi Diving into the Raspberry Pi's Peripherals and Yocto Recipes Making a Media Hub on the Raspberry Pi Playing with an LCD Touchscreen and the Linux Kernel Contributing to the Raspberry Pi BSP Layer Home Automation Project - Booting a Custom Image

Chapter 9.  Making a Media Hub on the Raspberry Pi

In this chapter, we will learn how to deploy a custom application in order to make an embedded media hub (panel control for temperature, ADC, serial, and so on).

We will work on aspects of rpm packages, init scripts, recipes, and web development.

Project description – CPU temperature monitoring


The idea of this project is the creation of a web interface that allows, for example, monitoring of the CPU temperature.

To do this, we will use technologies such as HTML5 and nodejs. We will also have utilities available on the Raspberry Pi, such as vcgencmd.

In this project, we will use technical aspects, such as:

  • Websocket

  • Justgage

  • Nodejs

The idea here is not to explain these technologies, but to learn that they can be used in the Yocto Project.

Overview

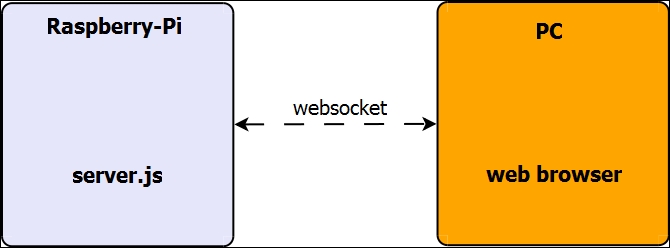
The following diagram represents the project's structure:

Hardware/software requirements

You'll need the following hardware and software for this project:

  • A Raspberry Pi

  • A host PC

  • An SD card

  • SSH/SCP

Creating the main application


The main project contains several files. To best present things, we'll only concentrate on two files:

  • server.js: This is the file that will create our web server and send data to the HTML web page

  • index.html: This is the page that will open the web browser to display the data received

server.js

The server.js file creates a server on the listening port 3344 and will be responsible for creating a socket (rpi_temperature) that contains the CPU temperature of Raspberry Pi. The socket function uses, among others, the vcgencmd command ( https://github.com/raspberrypi/firmware/blob/master/opt/vc/bin/vcgencmd ), permitting us to monitor the CPU temperature, as shown here:

setInterval(function() 
{ 
    child = exec("vcgencmd measure_temp | awk -F:", function      (error, stdout, stderr)  
    { 
        if (error !== null)  
        { 
            console.log('exec error: ' + error); 
        } 
        else 
        { 
            var date = new Date().getTime(); 
  ...

Creating the Yocto/OE environment


Now that we have developed the main application, what remains for us is to integrate it with our Yocto RPI environment.

Modifying the image

The first step consists of integrating the nodejs package (located at meta-openembedded/meta-oe/recipes-devtools/nodejs) with the Raspberry Pi environment. For this, we have to add the following line to raspberry-pack-image:

# Base this image on core-image-minimal 
include recipes-core/images/core-image-minimal.bb 
DESCRIPTION = "Image for raspberry-pi" 
IMAGE_FEATURES += "ssh-server-dropbear splash" 
# Include modules in rootfs 
IMAGE_INSTALL += " \ 
    kernel-modules \ 
    gpio-packt    \ 
    i2c-tools    \ 
    spitools    \ 
    nunchuck    \ 
    v4l-utils    \ 
    nodejs    \     
"

We have now integrated nodejs with our Poky distro.

Creating the recipe file

The second step consists of creating the recipe file; let's call this recipe webserver-packt_01.bb.

The idea is to have the following architecture inside the...

Deploying raspberry-packt-image


Now that we have a functional application (webserver-packt), we can add it to our custom image, raspberry-pack-image:

# Base this image on core-image-minimal 
include recipes-core/images/core-image-minimal.bb 
DESCRIPTION = "Image for raspberry-pi" 
IMAGE_FEATURES += "ssh-server-dropbear splash" 
# Include modules in rootfs 
IMAGE_INSTALL += " \ 
    kernel-modules \ 
    gpio-packt    \ 
    i2c-tools    \ 
    spitools    \ 
    nunchuck    \ 
    v4l-utils    \ 
    nodejs    \ 
    webserver-packt \ 
    " 

After doing this, we can start creating our image and then mount it on an SD card:

$ bitbake raspberry-packt-image

Testing the application


In order to test the application on the Raspberry Pi, you have just to go to the following address from your favorite browser:

http://raspberry-pi-ip-address:3344

If the whole environment has been properly configured, you should see the following page:

The future of this project


We looked at the basic idea of a server, and you should be able to improve it in order to make it as industrial as possible. One can easily imagine the following applications:

The final project might look something like this:

Summary


In this chapter, we learned how to create a web interface, how to integrate it within an existing environment, and how to deploy it on the Raspberry Pi.

In the next chapter we will learn some basics about the Linux kernel and how to configure the kernel to support various LCD touchscreens. Further on the chapter explains how to setup a Yocto project to run graphical applications or a window system, on a Raspberry Pi using a LCD touchscreen.

lock icon The rest of the chapter is locked
You have been reading a chapter from
Yocto for Raspberry Pi
Published in: Jun 2016 Publisher: Packt ISBN-13: 9781785281952
Register for a free Packt account to unlock a world of extra content!
A free Packt account unlocks extra newsletters, articles, discounted offers, and much more. Start advancing your knowledge today.
Unlock this book and the full library FREE for 7 days
Get unlimited access to 7000+ expert-authored eBooks and videos courses covering every tech area you can think of
Renews at $15.99/month. Cancel anytime}