Reader small image

You're reading from  Splunk 9.x Enterprise Certified Admin Guide

Product typeBook
Published inAug 2023
PublisherPackt
ISBN-139781803230238
Edition1st Edition
Right arrow
Author (1)
Srikanth Yarlagadda
Srikanth Yarlagadda
author image
Srikanth Yarlagadda

Srikanth is a highly accomplished IT professional with a diverse range of expertise in the technology industry. Having completed his Masters in Computer Applications in 2009, he has since honed his skills in Java, Oracle SOA, and API development, gaining valuable experience along the way. With over 13 years of experience in the field, Srikanth is now a Splunk Certified Architect and was recently selected to join the esteemed cohort of SplunkTrust in 2022. He has extensive knowledge of various Splunk products, including Splunk Enterprise Security and SOAR, and he is currently dedicated to Threat Detection and Security Automation using Splunk ES & SOAR. Srikanth's impressive work history includes significant roles at major telecom companies across Norway and Pan Europe. Beyond technology, Srikanth's greatest joy is his family. Along with his wife and two children, he calls Australia home and enjoys spending time together while staying active.
Read more about Srikanth Yarlagadda

Right arrow

Splunk Forwarder Management

The forwarder name should sound familiar at this stage as you will have already read about two types of forwarder: the universal forwarder (UF) and the heavy forwarder (HF). These are two different software binaries built for specific use cases. In this chapter, you will learn more about UFs, which are managed centrally through the deployment server (DS) in large and complex Splunk Enterprise environments.

We will begin by learning more about the purpose of UFs in the overall Splunk deployment architecture, followed by configuring the DS, and the installation and configuration of UF. Configuration includes connecting the UF to external indexers for data forwarding and using the deploymentclient.conf configuration to download apps from the DS. Finally, you will be introduced to monitoring forwarders through the monitoring console application.

This chapter holds significant importance not only for system administrators but also for data administrators...

Introducing the universal forwarder

A UF is another software package from Splunk Inc. that is different from the Splunk Enterprise binary. A UF is installed and configured on the source systems where data originated and can collect the data from a range of sources and forward it to Splunk indexers for indexing. For example, to forward web access logs generated by a web server stored in a file to Splunk indexers, the UF is installed on the web server host with read permissions to the log files. The UF actively monitors the logs, securely transmitting the data to the designated Splunk indexers for indexing.

In the context of UFs and Splunk indexers, the data receivers that the UF connects to are essentially the indexers themselves. Indexers are configured to listen on a designated port (typically 9997 by default). Once the UF has been installed, it is directed to the IP/DNS address of the Splunk indexers and the corresponding receiving port to establish a connection. This allows the...

Configuring the Deployment Server

The DS, as its name suggests, centrally manages the deployment to forwarders. It can deploy to both UFs and HFs and is optionally able to restart them after apps have been deployed. In this section, you will find out about the capabilities of DS and the configuration required to manage the forwarders.

Let’s go through the DS setup requirements:

  • The DS is an instance of Splunk Enterprise software that requires a Splunk Enterprise license.
  • Forwarders, whether they’re UFs or HFs, require a deploymentclient.conf file to be configured to establish a connection with the Splunk DS. This configuration file enables the forwarder to “phone home” and communicate with the DS. By either manually editing the deploymentclient.conf file or using the Splunk CLI, the forwarders can establish the required connection with the DS.
  • The serverclass.conf configuration file for managing server classes can be set up through the...

Installing the universal forwarder

The installation steps for the UF are different for various OSs, and the UF software package differs too, depending on the OS and computing architecture. In this section, you will find only Windows and Linux-compatible UF installation instructions.

To find the list of UF software packages available by OS, go to https://www.splunk.com/en_us/download/universal-forwarder.html.

Before we dive into the direct installation, Splunk suggests checking the hardware prerequisites. The following CPU, memory, and disk requirements apply to UF 8.2.x through 9.x on all OSs:

  • CPU: 1.5 GHz clock speed
  • Primary memory: 512 MB
  • Disk: 5 GB space

Let’s take a look at the Windows installation instructions.

Installation in Windows OS

To demonstrate, I have downloaded the Windows 11 64-bit architecture-compatible .msi forwarder package from the preceding download link. The package can be installed through the command line/PowerShell...

Configuring forwarding

Forwarding involves configuring the UF to establish connectivity to indexer peers for data transmission. This configuration can be achieved through the outputs.conf file, which contains the required indexer peer details. The Splunk CLI has commands to configure forwarding, which, in turn, writes to the same outputs.conf file.

Indexers can receive the data on the default TCP 9997 port, which must be enabled by system administrators before the connections from forwarders can be accepted. You need to make sure the network is open between the forwarder and indexers. In real-time Splunk deployments, the organization’s network administrator can help establish this. In our scenario, we've set up a standalone Splunk Enterprise instance and a UF to ensure seamless connectivity. This arrangement helps avoid connectivity problems unless port 9997, which needs to be available for listening, is somehow unavailable. Let’s take a look at both the Splunk...

Configuring deploymentclient

At this stage, we understand how to configure the DS and install the UF and have enabled data forwarding. To get the latest apps/add-ons from the DS, the UF requires a deploymentlclient.conf file, which can be created directly on the filesystem using a text editor. Alternatively, the same can be configured through the Splunk CLI command, which, in turn, writes to the deploymentclient.conf file. The CLI approach is the safest option as it avoids typos and other mistakes that might arise by directly editing the file.

Let’s look at the Splunk CLI and file approaches for configuring the deployment client:

  1. Log in to the UF host and change the directory to $SPLUNK_HOME/bin (the Linux default is /opt/splunkforwarder/bin).
  2. Execute the ./splunk set deploy-poll <DS-host:port> command to configure deploymentclient, as shown here:
    ./splunk set deploy-poll 10.9.8.7:8089
  3. After successfully executing the command, change the directory to ...

Forwarder monitoring

Monitoring our setup is quite important as the number of forwarders grows, and it can sometimes be very challenging. To aid with this, Splunk offers the out-of-the-box MC app, which contains a dashboard to monitor the forwarders.

By default, the forwarder monitoring feature is disabled in MC and must be enabled by following these steps:

  1. Log in to the MC-dedicated Splunk instance and navigate to Settings | Monitoring Console.
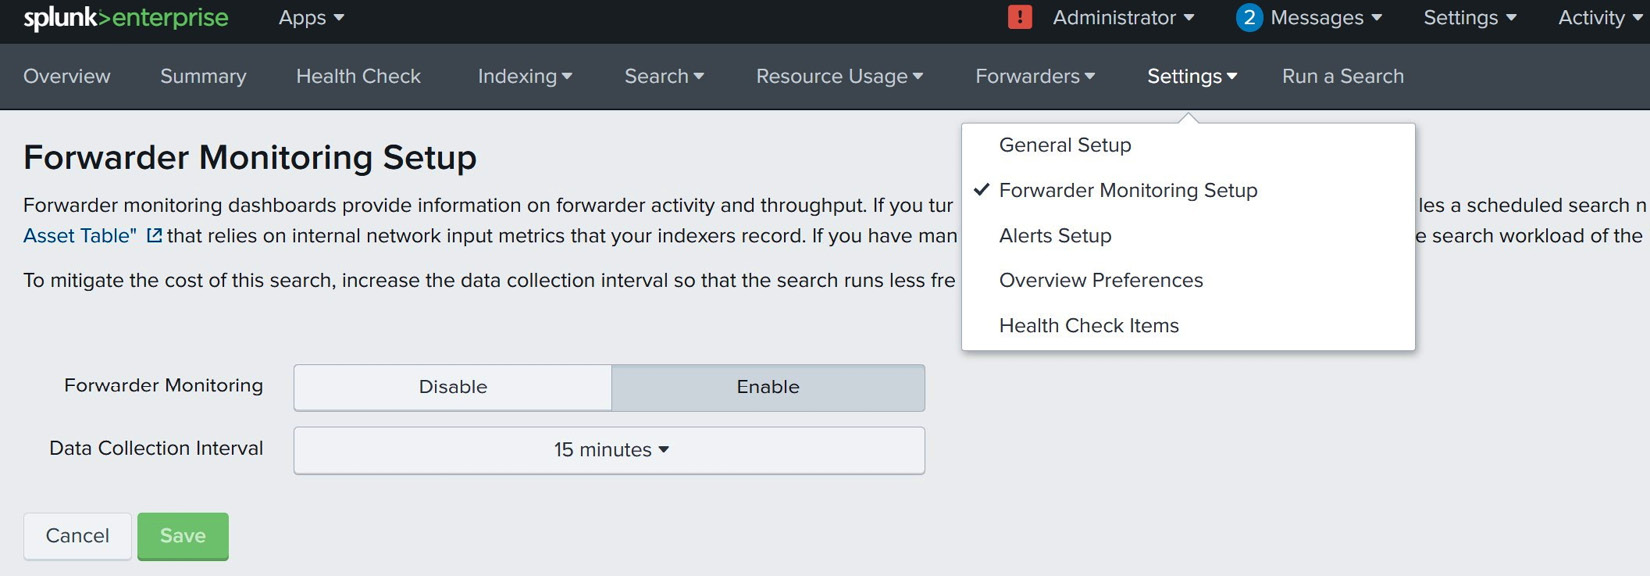
  2. Inside Monitoring Console, go to Settings | Forwarding Monitoring Setup; you will find that it is disabled. Click Enable. By default, Data Collection Interval is set to 15 minutes; leave it as-is and click Save, as shown in Figure 4.5:
Figure 4.5: Forwarder Monitoring Setup

Figure 4.5: Forwarder Monitoring Setup

You will find two menu items under the Forwarders tab: Forwarders Instance and Forwarders Deployment, as shown in Figure 4.6. The Forwarders: Instance and Forwarders: Deployment dashboards are built on the internal logs of...

Summary

In conclusion, the Splunk UF is a software binary that does not require any license and is typically installed on the source system. The UF is lightweight and consumes fewer resources. The UF monitors and forwards the data to indexers for indexing and reads the data in a file exactly once using the fishbucket concept. Structured data such as CSV, XML, JSON, and so on can be parsed using INDEXED_EXTRACTIONS. Forwarding on the UF is configured in the outputs.conf file, which contains the indexer host and management port details.

The UF can be installed on various supported OSs and hardware specifications; we have seen its installation for both Windows (through the interactive GUI) and Linux (through the CLI/silent mode). By default, the UF is installed in /opt/splunkforwarder/ in linux environment, which is referred to via the $SPLUNK_HOME environment variable.

After that, we explored the DS, which is a Splunk Enterprise instance for managing the many forwarders in large...

Self-assessment

This section will test you on what you have learned in this chapter. You will be given 10 questions with answers to choose from. The question pattern is the same as what we discussed in Chapter 1, in the Introducing the exams test pattern section. After the assessment, refer to the sections where you had difficulty answering questions; alternatively, you could refer to the official Splunk documentation. All the best!

  1. The UF can store indexed data. Is this statement true or false?
    1. True.
    2. False.
  2. Choose the statements that apply to UFs:
    1. The UF is a lightweight software binary that’s typically installed on the source machine.
    2. The UF requires a separate license from Splunk Inc.
    3. The UF can input data and optionally parse structured data (such as CSV, PSV, XML, or JSON).
    4. The UF resends the whole file from the beginning if it gets rebooted.
  3. Choose the statements that apply to DSs:
    1. The DS is a Splunk instance and by default, it is enabled.
    2. Apps for forwarders...
lock icon
The rest of the chapter is locked
You have been reading a chapter from
Splunk 9.x Enterprise Certified Admin Guide
Published in: Aug 2023Publisher: PacktISBN-13: 9781803230238
Register for a free Packt account to unlock a world of extra content!
A free Packt account unlocks extra newsletters, articles, discounted offers, and much more. Start advancing your knowledge today.
undefined
Unlock this book and the full library FREE for 7 days
Get unlimited access to 7000+ expert-authored eBooks and videos courses covering every tech area you can think of
Renews at $15.99/month. Cancel anytime

Author (1)

author image
Srikanth Yarlagadda

Srikanth is a highly accomplished IT professional with a diverse range of expertise in the technology industry. Having completed his Masters in Computer Applications in 2009, he has since honed his skills in Java, Oracle SOA, and API development, gaining valuable experience along the way. With over 13 years of experience in the field, Srikanth is now a Splunk Certified Architect and was recently selected to join the esteemed cohort of SplunkTrust in 2022. He has extensive knowledge of various Splunk products, including Splunk Enterprise Security and SOAR, and he is currently dedicated to Threat Detection and Security Automation using Splunk ES & SOAR. Srikanth's impressive work history includes significant roles at major telecom companies across Norway and Pan Europe. Beyond technology, Srikanth's greatest joy is his family. Along with his wife and two children, he calls Australia home and enjoys spending time together while staying active.
Read more about Srikanth Yarlagadda